Origami in Japanese means "folded paper". It is believed that in Japan more than a thousand years ago origami figures were not only toys for children. Their production was a sacred sacrament associated with the cult of the many-faced and thousand-armed goddess of mercy Kanon. The figures were used to decorate her statues to appease the goddess and ask her for help.
- Features of origami toys
- Some basic rules for working with paper
- Master class with step-by-step description of how to make a hare from origami paper
- Step-by-step production of a hare in drawings
- Instructions for making a modular origami hare
- Other diagrams for assembling origami bunnies
- Complex schemes for advanced
Features of origami toys
Nowadays origami has lost its religious meaning and has become a decoration of everyday life. Toys are used in everyday life - these are various packages, boxes, baskets, etc. Each package for packaging has its own meaning. You can immediately understand what event the Japanese is going to with a package - each case has its own form of packaging.
The main advantage of origami is that you can make anything you want from a simple square of paper. This hobby is for all ages, from preschool to old age. It is believed that origami is calming and physically healing, very useful for the development of a child: creative and spiritual.
Please note! The development of fine motor skills entails the development of certain parts of the brain responsible for speech and imaginative thinking.
The importance of origami for child development:
- Develops fine motor skills of hands and precise finger movements.
- Improves the eye.
- The child becomes more assiduous, focused on the result, and learns to pay attention to small details.
- Develops imagination.
- Improves memory, since when creating figures you need to remember the basic symbols and the sequence of actions.
- Children become familiar with basic geometric shapes.
- Forms a culture of work in the child
- Helps create game situations. By assembling paper animal figures, children get involved in the game process and become fairy-tale characters.
Origami requires paper, preferably colored and not very thick. Each piece should be of a certain shape - square, rectangle, circle, oval, trapezoid, triangle. Basically, a square or rectangle is used as a basis.
Some basic rules for working with paper
When working with paper, you should follow some rules:
- The fold lines should be made clear by ironing the paper well.
- It is better to tear the paper along the fibers, then the tear will be long and even. To understand how the fibers are arranged, you need to try to tear the sheet several times in different directions.
- If you need to glue something during the assembly process, it is better to apply glue to the part that needs to be attached to the base. Otherwise, the part will be glued unevenly and folds will appear on it.
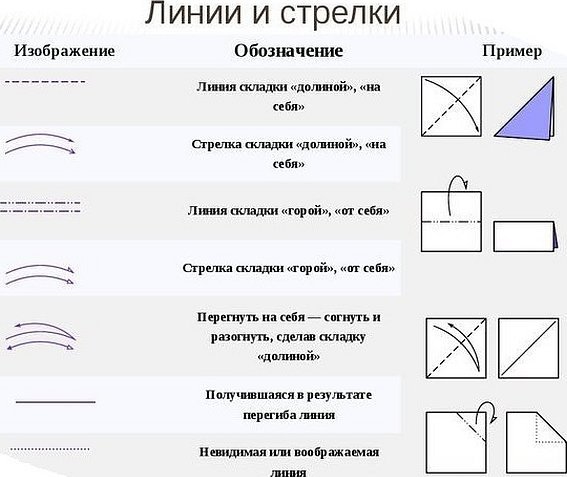
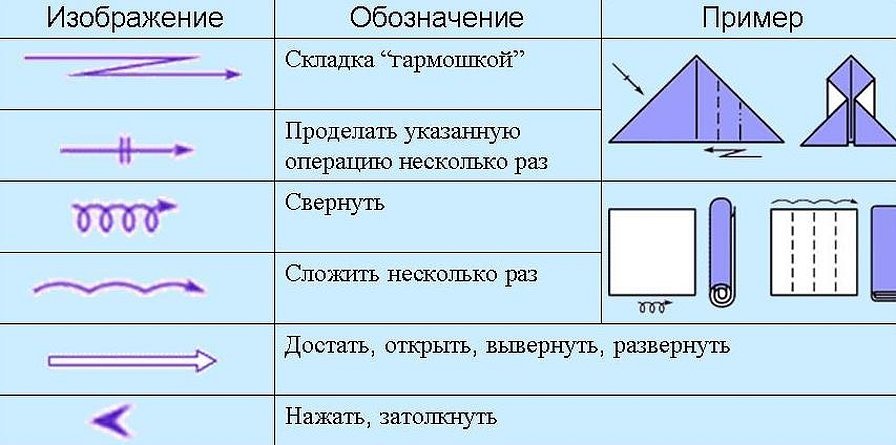
- Before you start working, you need to remember some symbols.
Important! To ensure that the fold is neat and not dirty, you need to iron it with scissors or an additional sheet of paper placed over the fold.
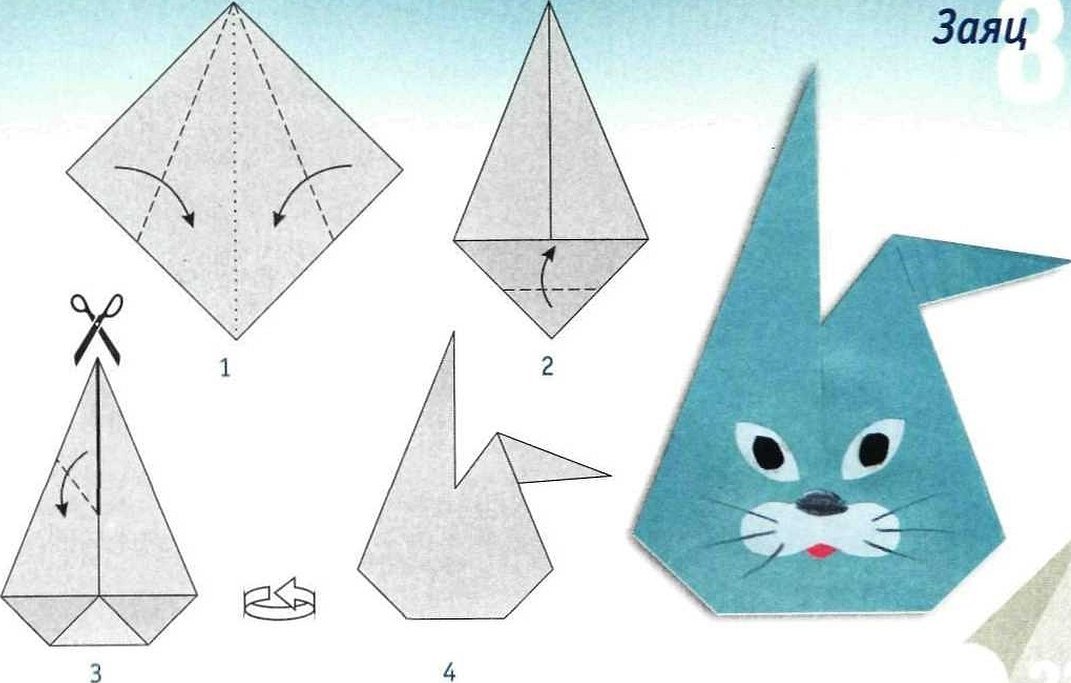
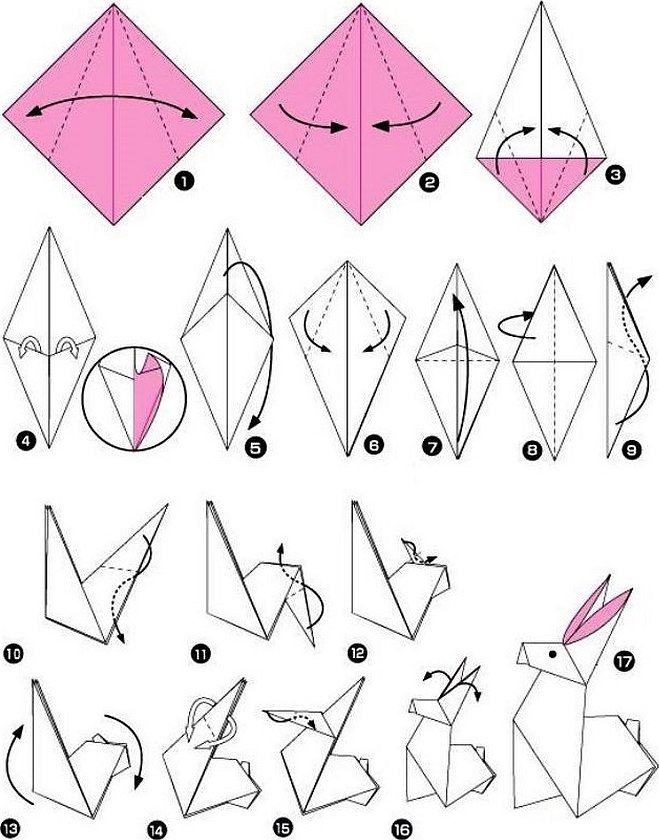
Master class with step-by-step description of how to make a hare from origami paper
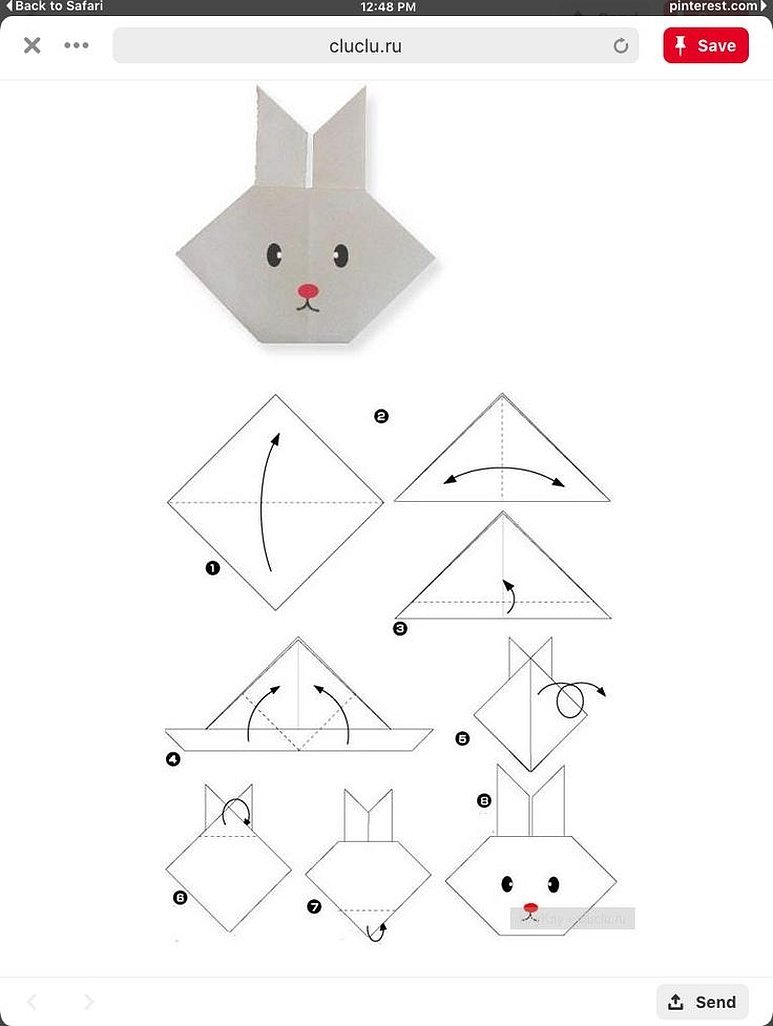
The easiest origami rabbit pattern is the animal's head, even a small child can handle it. For this craft you will need a square sheet of paper, a glue stick and a black marker.
Origami paper hare can be folded according to several schemes. The simplest of them is performed in the following sequence:
- Fold a square sheet of paper in half diagonally.
- Fold the resulting triangle in half again and return to its original position.
- Fold a small strip upward (literally a couple of centimeters).
- Fold the bottom corners up diagonally (as shown in the picture) so that they meet in the middle of the triangle.
- Turn the resulting figure over.
- Fold the top corner back (towards the resulting ears).
- Fold the bottom corner in the same way.
- The hare is ready, if you want you can decorate it beautifully, draw or glue on eyes and a nose cut out of paper.
There are several more similar schemes for making an origami hare for children, which will not be difficult to understand.
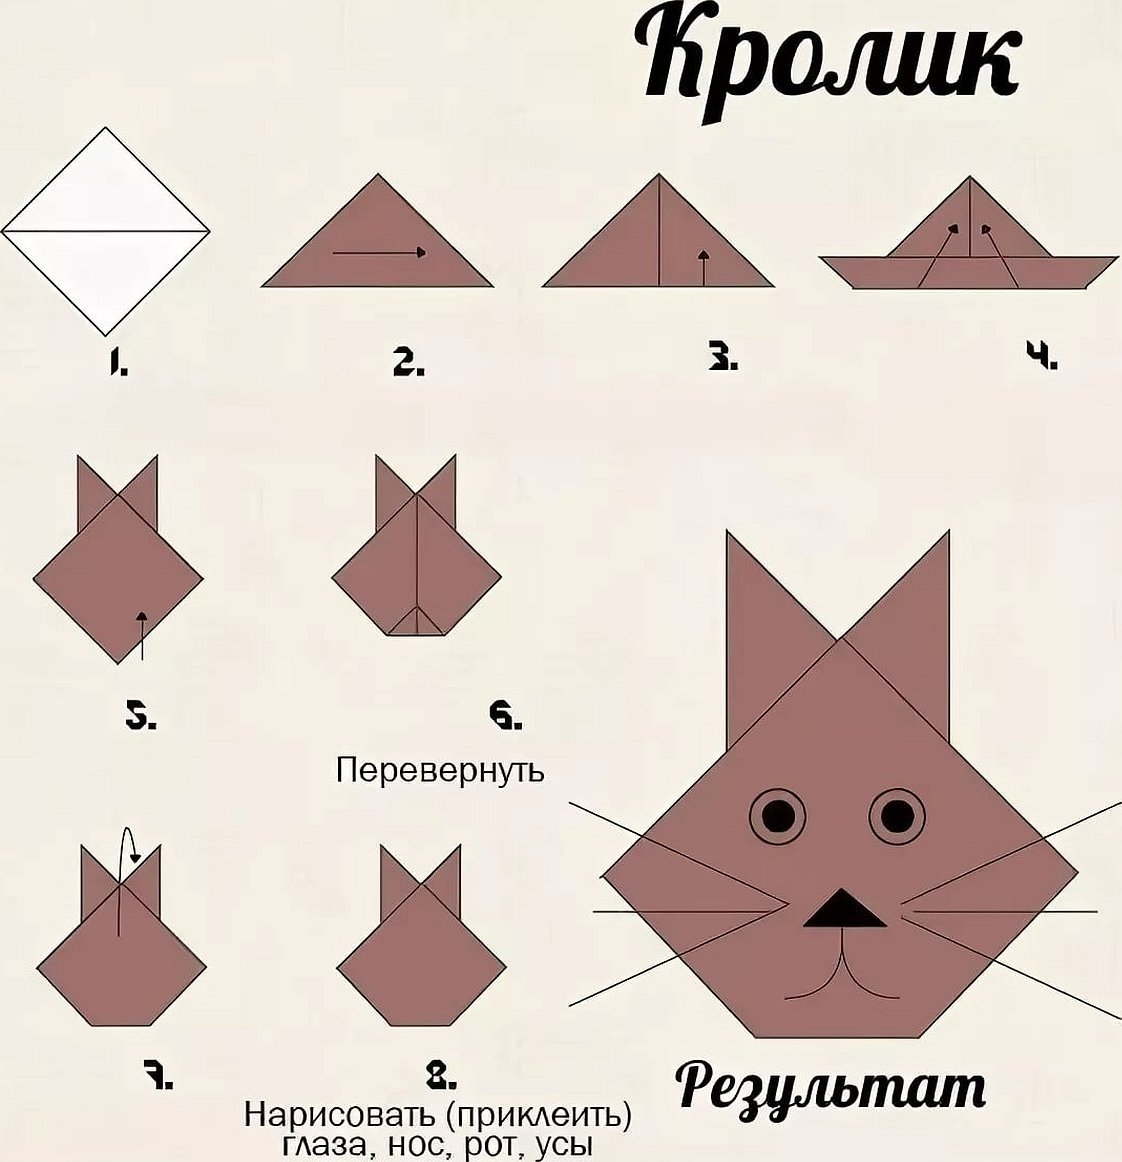
When the heads are mastered one hundred percent, you can start folding the origami bunny from paper entirely. Here the schemes are a little more complicated, but also accessible to children of primary school age.
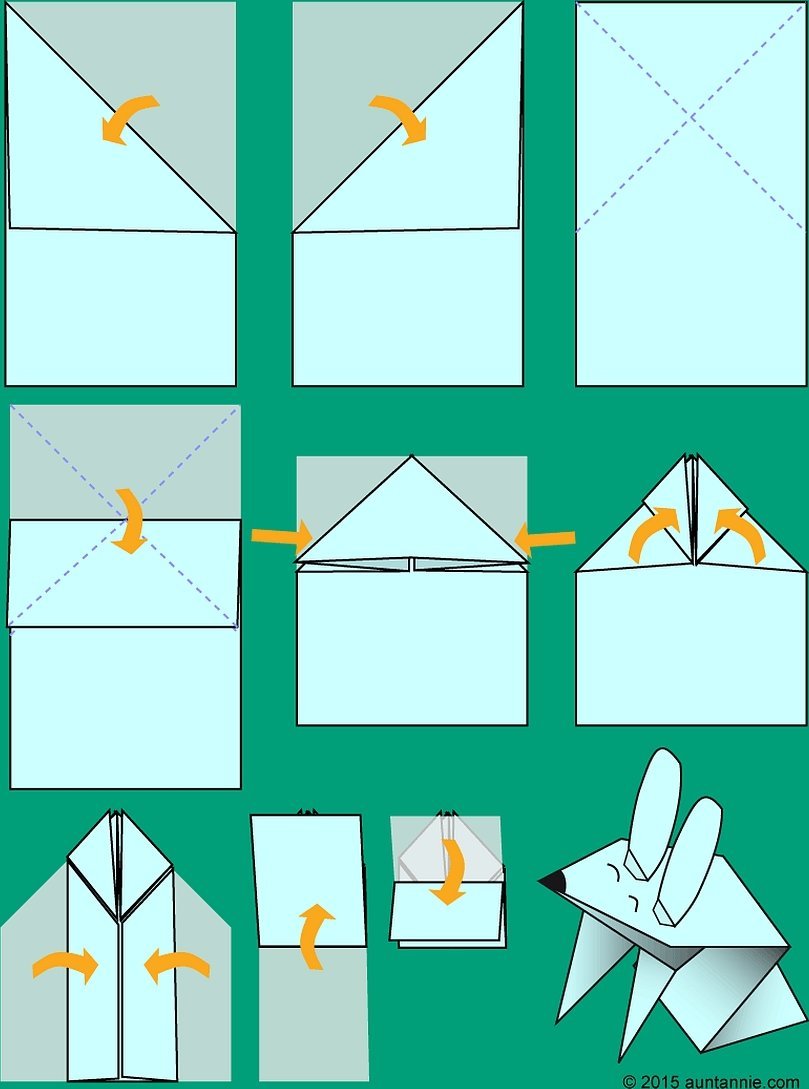
Step-by-step instructions on how to make an origami bunny using one of the diagrams as an example:
- Fold a square sheet of paper in half diagonally.
- Bend the corners towards the fold on both sides.
- Bend the protruding corner along the dotted line.
- Bend it back as shown in the picture.
- Bend the resulting corners diagonally towards the center.
- Turn the workpiece over.
- Fold the corner upward as shown in the picture.
- Fold the workpiece in half away from you.
- Move the resulting ears upward.
- Use scissors to make a cut in the middle.
- Fold the corners diagonally.
- Widen the ear.
- Straighten and bend the ear.
- Repeat steps 12-13 for the second ear.
- Give the hare some volume.
The hare is ready, you can draw a face if you wish.
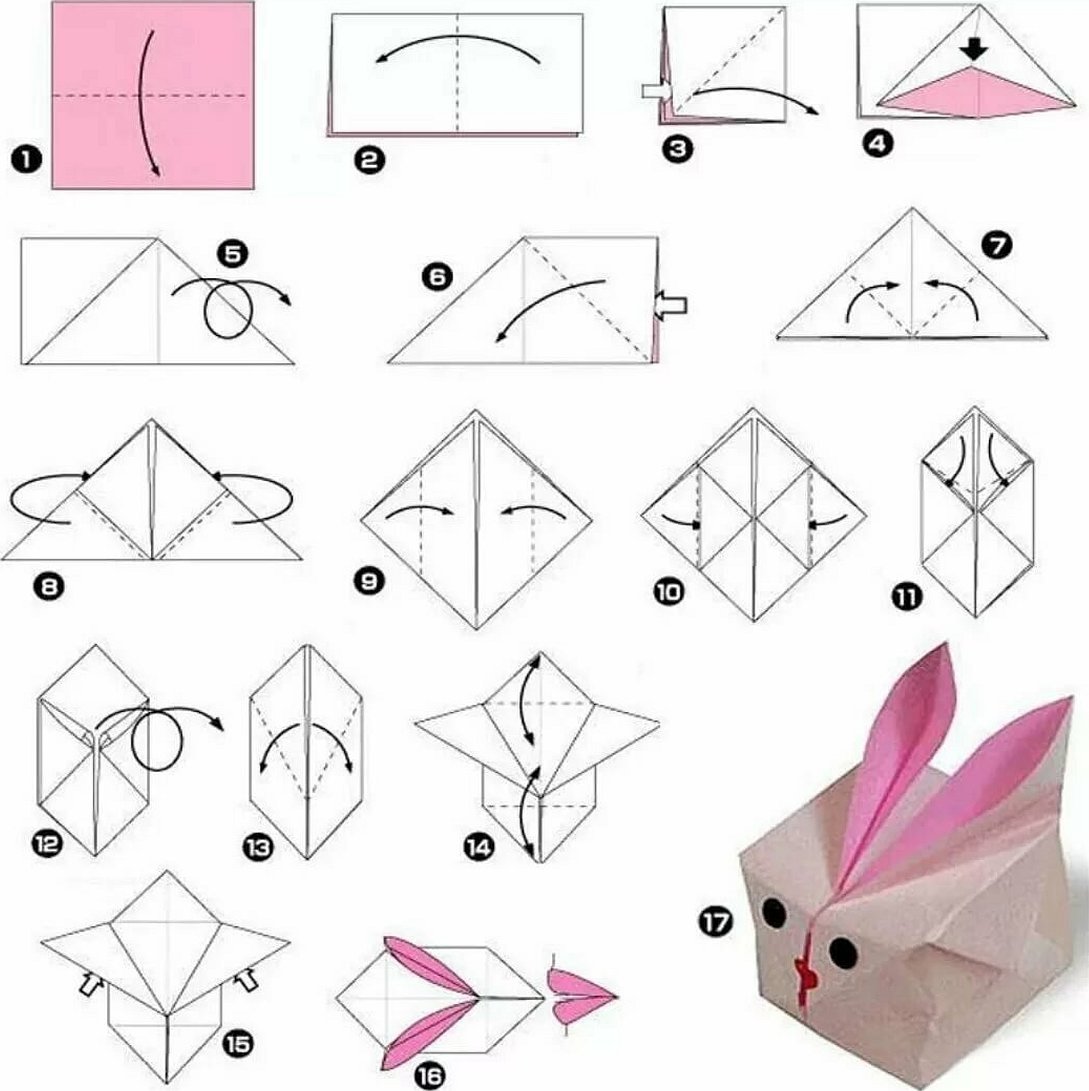
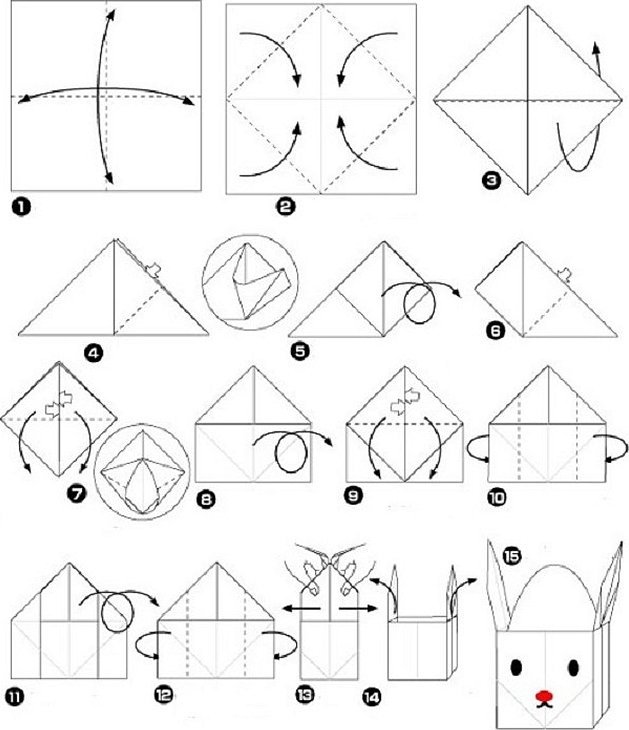
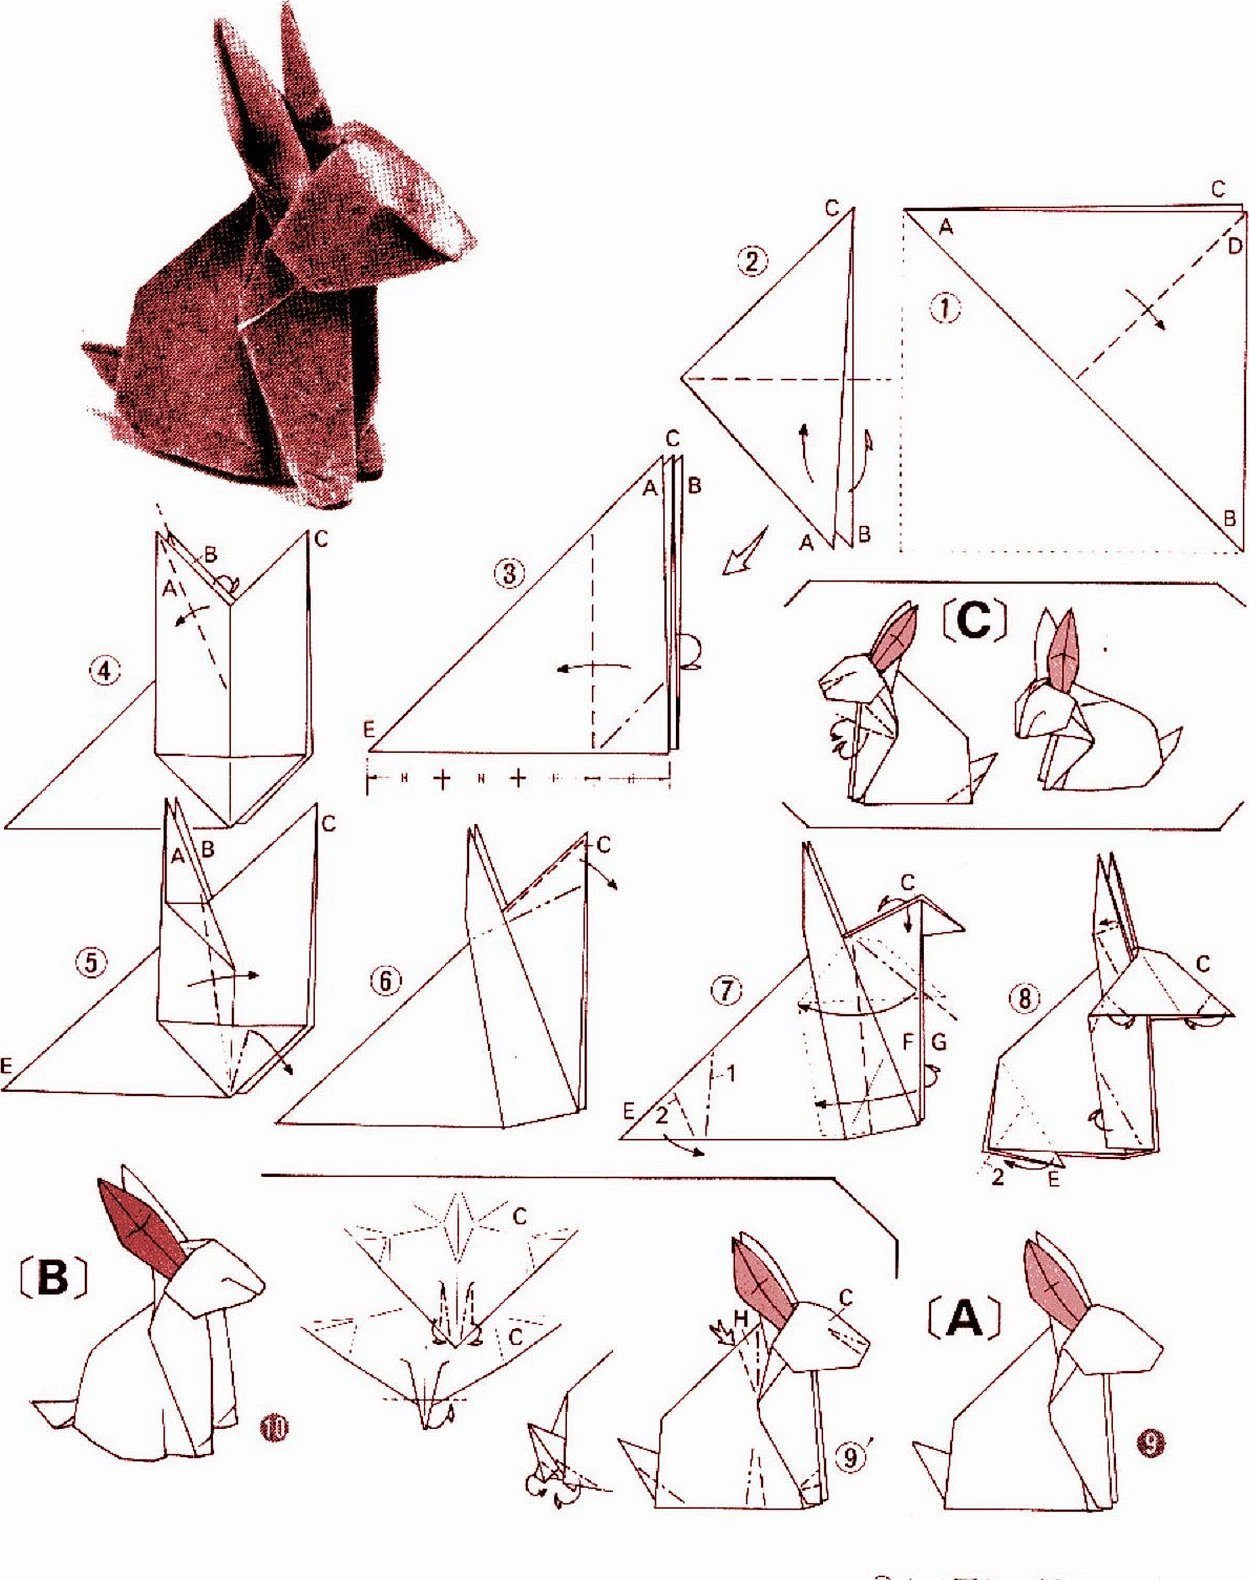
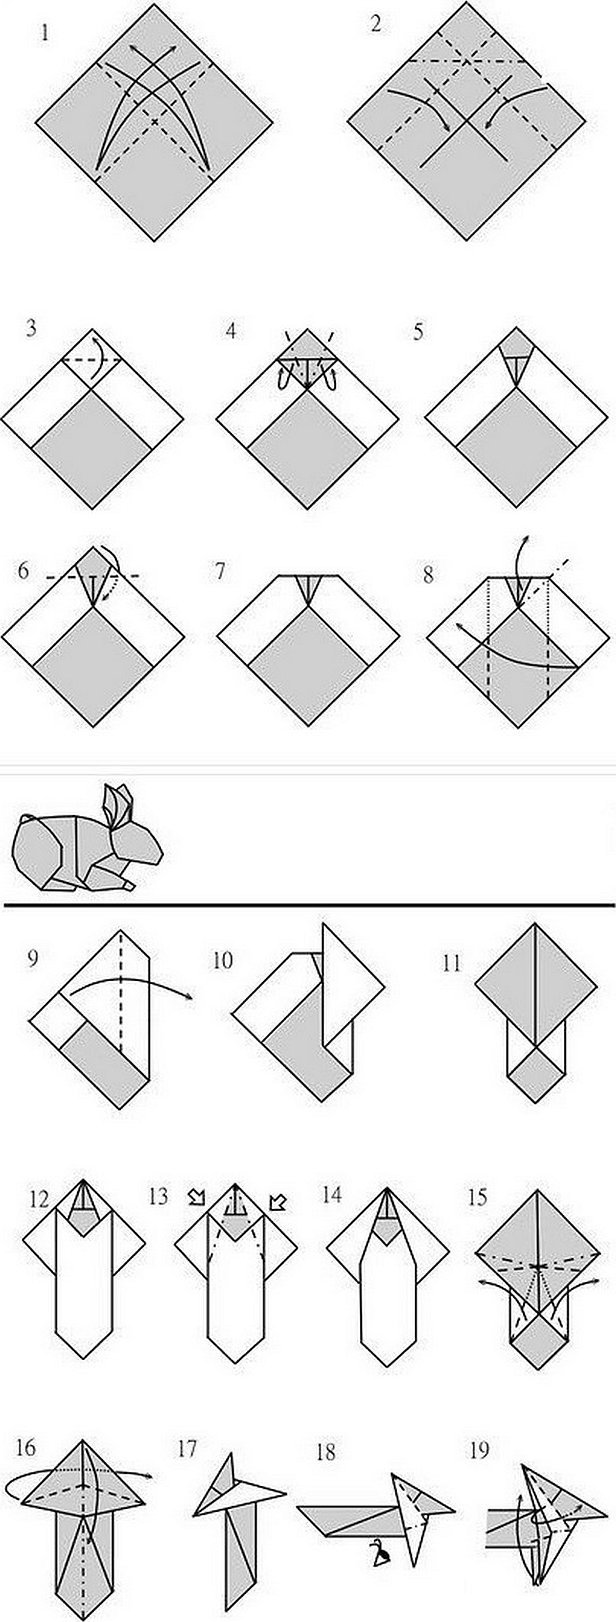
Step-by-step production of a hare in drawings
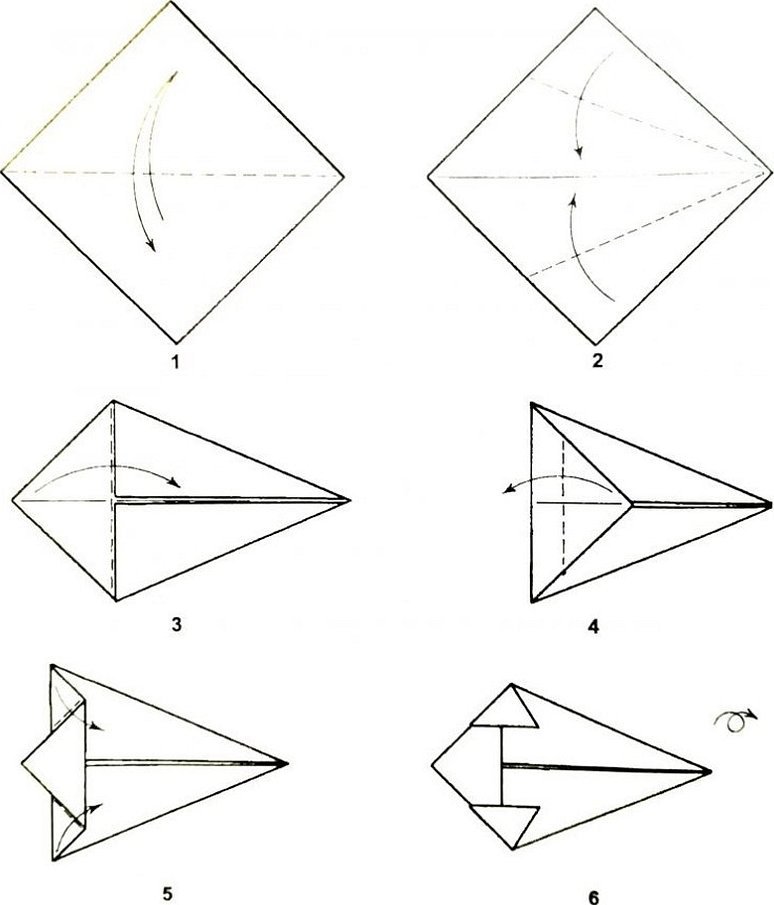
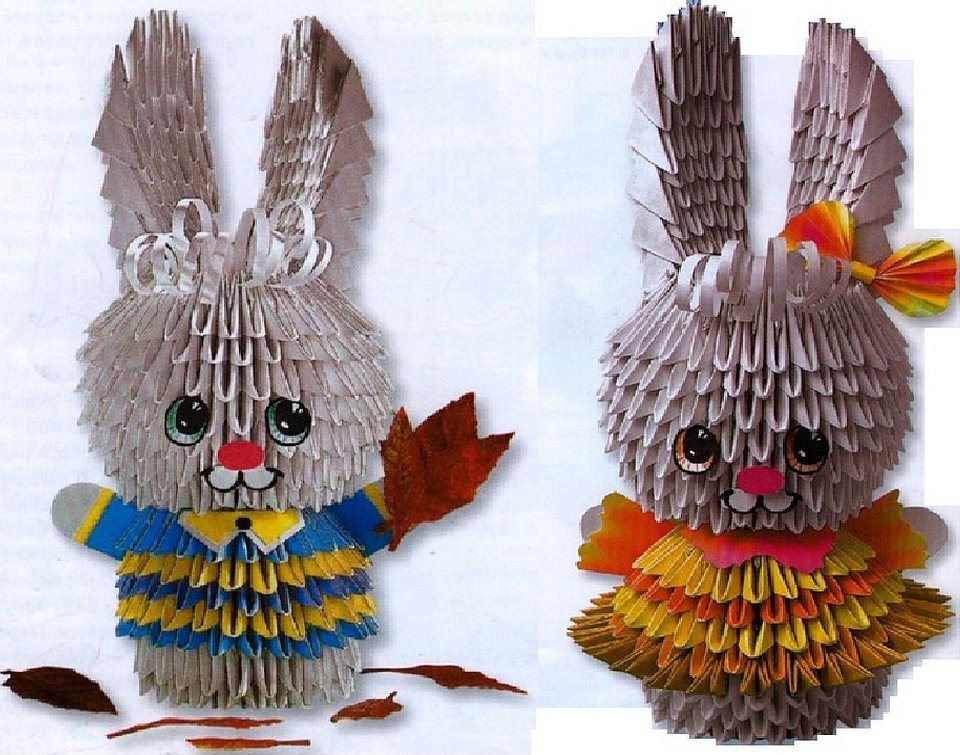
Instructions for making a modular origami hare
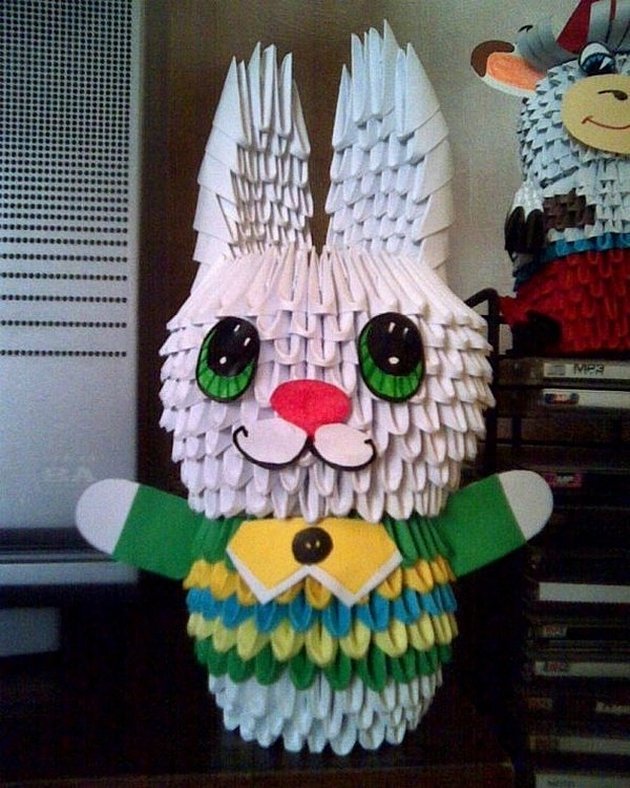
The modular origami hare looks impressive, the scheme of which is much more complex compared to the "regular" origami. Such a craft will take much more effort and time, but the result is worth it. First, you need to assemble the blank modules. For the hare, we will need 522 pieces. You can make all one-color, or 402 white and 120 colored.
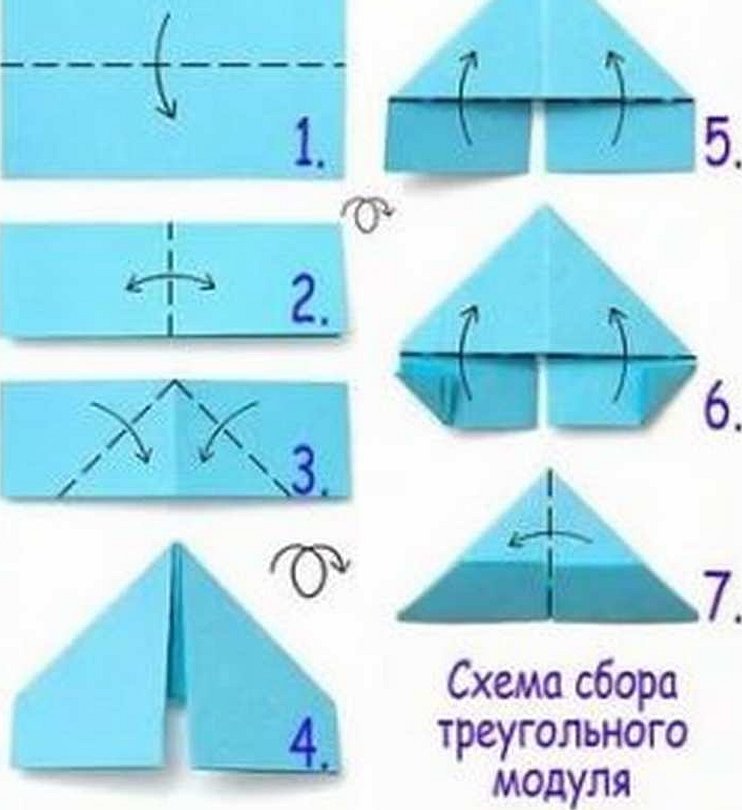
Please note! The triangular origami module is folded from a rectangular sheet of paper. The ratio of the sides of the rectangle is 1:1.5.
A standard A4 sheet can be divided into 16 such rectangles. To do this, divide the short and long sides into 4 parts and cut the sheet along the marked lines. Then follow this sequence:
- Fold the rectangular piece in half along the long side.
- Fold in half again (along the short side) and return to the original position.
- Fold the corners inward towards the fold.
- Turn the workpiece over.
- Fold the bottom edges up.
- Also bend the protruding outer ends away from you through the sides of the resulting triangle.
- Fold the triangle in half.
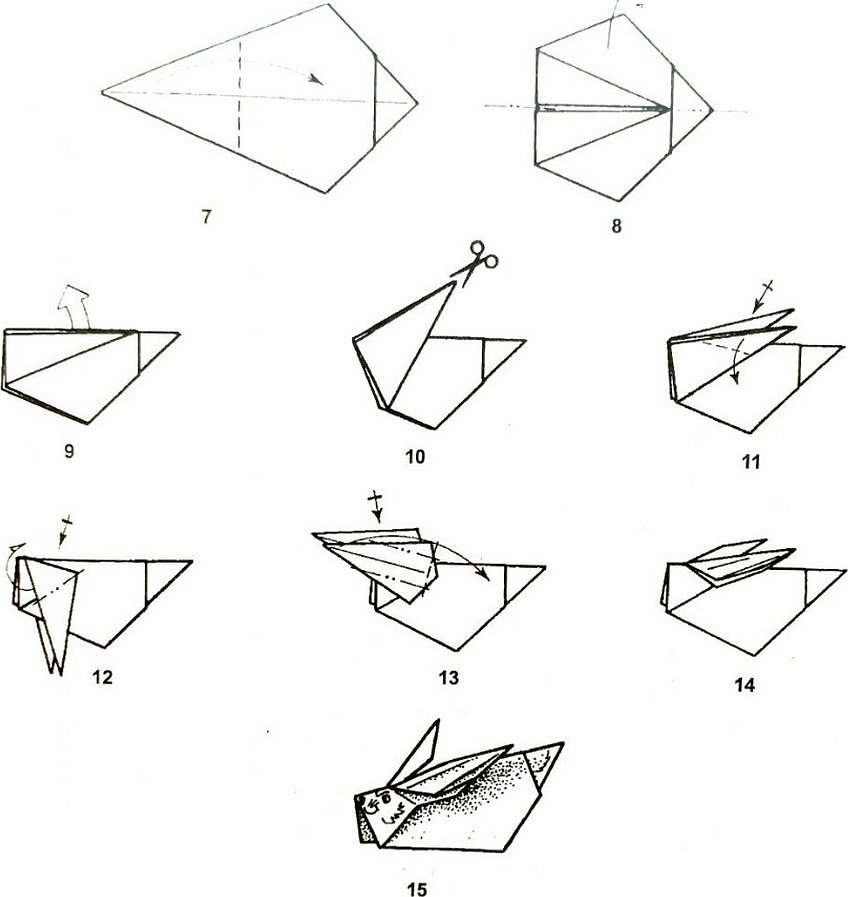
When all the triangles are ready, you can start assembling the modular hare:
- 2 modules should be placed on the base of the triangle, and one on its side edges. Then fasten three modules together so that the corners of two go into the pocket of the third. Attach two more triangles to the resulting blank. And so on until a closed ring is formed. There should be 8 blanks in the first ring.
- Using the same pattern, 3 circles with a larger diameter are made in a checkerboard pattern - 24 triangles each. This is the body of the bunny.
- The resulting workpiece must be turned inside out very carefully.
- Next, the colored modules are connected to create a sweater. The assembly scheme is the same, but the modules themselves are moved forward a little to create the illusion of volume. It is necessary to make 5 circles,
- The hare's head - white modules are needed. You should start laying out the head with the long side of the module inside. The first circle consists of 24 triangles, the next one - of 30, so after every three modules the triangles are doubled. This row is laid out with the long side of the modules outside. You need to make 7 such circles (the head will take a total of 8 circles).
- When all 8 rows are collected, the shape of the head is formed. To do this, the triangles are moved towards each other,
- Assembly of the ears: 7 rows are laid out, alternating 6 and 5 modules. The eighth row consists of five modules, and the ninth of four. In total, the ear consists of 9 rows.
- The second ear is made in a similar manner.
- Decorative elements (eyes, nose, paws) cut out of colored paper are attached.
As a result, you get a very cute origami rabbit made of paper with your own hands.
Other diagrams for assembling origami bunnies
Complex schemes for advanced
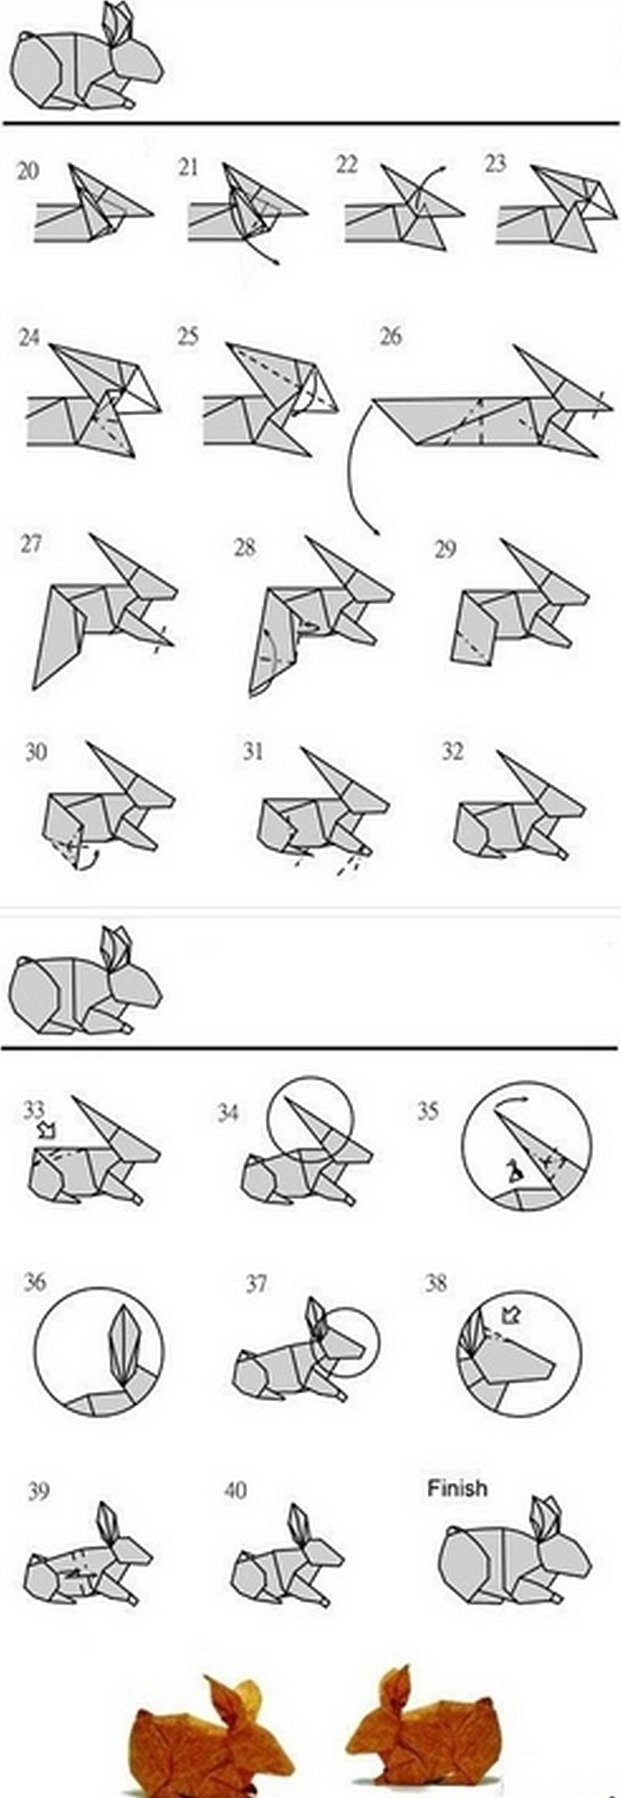
The first time you try to make rabbits using these patterns, some skill is required.
Origami crafts with a picture of a hare can be a symbolic gift for the New Year, a decoration for a Christmas tree or just a home decoration. To acquire skills, you should start with simple schemes, gradually moving on to more complex ones.


