In winter, the issue of warm and windproof clothing is especially acute: pants, raincoats, fur coats, shoes. Hands should not be ignored either. Gloves were invented for them, but it is much better to use mittens or mittens. Although they are not as practical and comfortable, they are very warm. This is achieved due to the fact that four fingers are located directly in one section and warm each other. This material will consider how to sew mittens or mittens with embroidery.
- How to sew
- How to choose a material
- How to construct a pattern
- Opening
- Assembling the product
- How to sew mittens from a sheepskin coat
- Fur mittens
- Baby mittens with elastic
- Fleece mittens for teenagers
- Sewing a potholder using patchwork technique
- Embroidery on mittens
- Crosswise
- With beads
- Volumetric embroidery on mittens
- Storage and care rules
How to sew
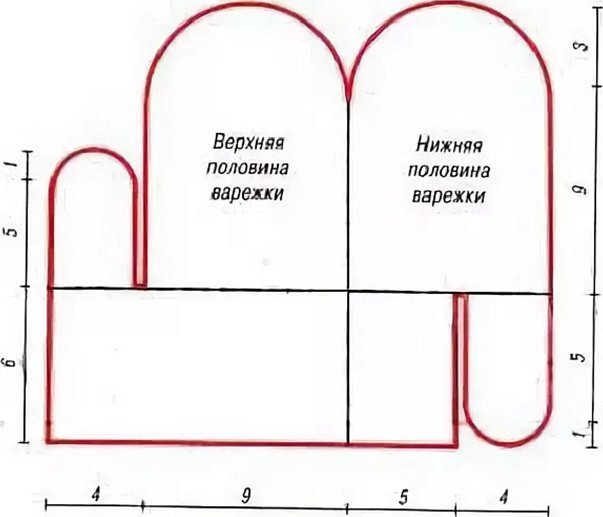
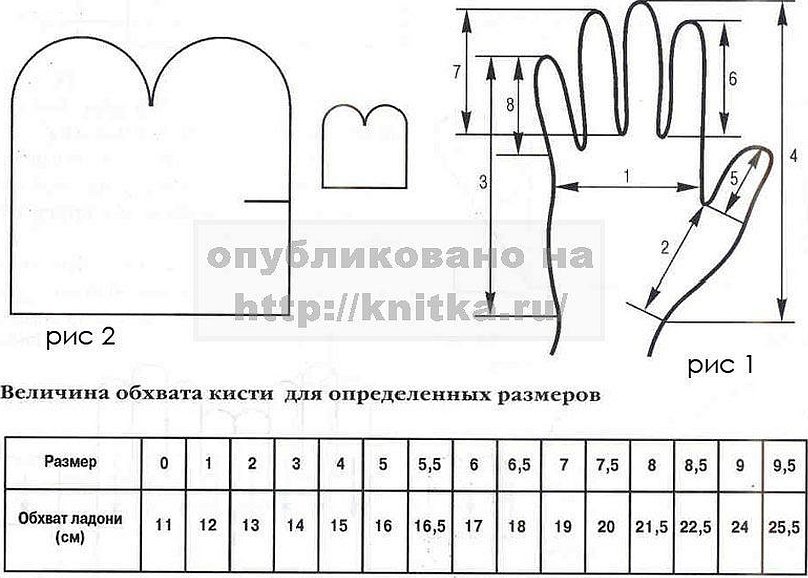
Experienced craftsmen know how to sew mittens, but for beginners we can explain. The pattern of this product consists of the front part and the back side adjacent to the palm. What is shown in the picture below is an image of the pattern on a notebook sheet. The picture can be enlarged several times and put your hand on it to make sure that the size is right. If the size is too small, then you need to further reduce and increase until you find the optimal and comfortable option. It is worth remembering that if the mittens are with fur or for workers, then you need to take an allowance for the thickness of the fur and other parameters.
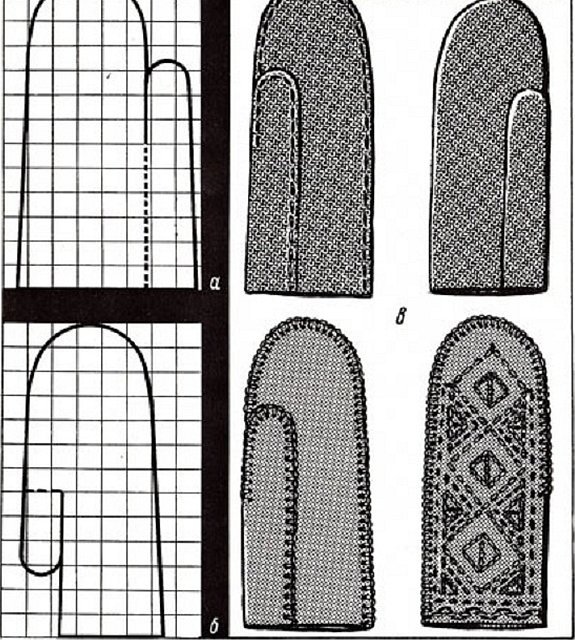
Important! The edges of the product (neck) after the pattern must be swept, putting all the parts face to face and sewing with a back-needle stitch, and then turning inside out.
There is another sewing method that involves processing the seams only on the outside. To do this, the parts are folded inside to outside and sewn with a loop stitch. It holds all the parts together and, unlike the previous one, also decorates them with a pattern. This option does not involve turning the product inside out and laying all the decorative seams on its “face”.
It is necessary to take into account the fact that when cutting out the parts and calculating the materials, there should be two pieces of each part. When marking on the fabric, you need to make sure that it does not turn out that all the parts are cut out for one hand. This is a very common mistake of beginners, indicating inattention.
How to choose a material
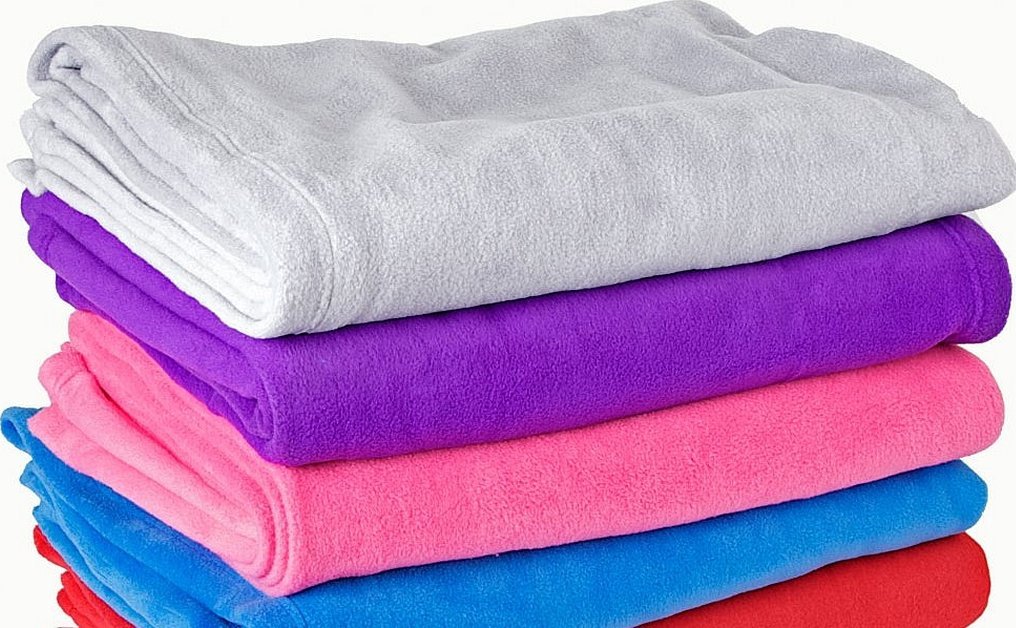
When choosing a material, some people get confused, because there is a lot of it and each type has its own qualities and characteristics. One of the most correct decisions will be to sew mittens from fleece. It perfectly warms hands in cold weather and frost. For children, the undeniable advantage of fleece will be the fact that it allows you to easily make snowballs.
Don't forget about such material as fur, whether it is artificial or natural. It all depends on taste. Those who advocate for the protection of animals will appreciate white mittens made of artificial fur with long pile. For people who are more loyal to this, products made of rabbit, goat or mink fur are ideal. Mouton is not suitable here, as it is too dense and thick.
The main "trick" in making mittens and gloves is that it is not necessary to spend money on expensive materials. It is enough to use old coats containing warm fur linings or cashmere or fleece leftovers from sewing large items.
How to construct a pattern
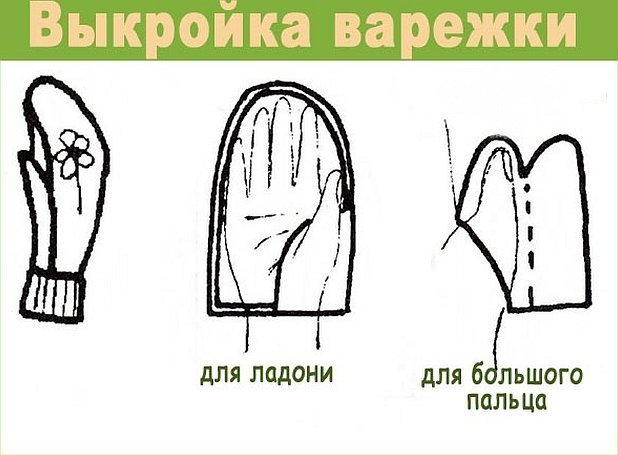
The most suitable material for mittens is fleece, the pattern of which is constructed individually. In general, it involves three stages:
- Placing the palm of the hand on a sheet of paper and then tracing it along the contour without highlighting the thumb in the form of a crane wedge. In this case, 5 mm are left additionally for the allowance and processing of the edges of the fabric or material, stitching;
- After this, the same hand is placed on another sheet and only the thumb is selected and the line of its articulation with the main part is determined;
- On the first outline, the same line is marked and its mirror image is drawn to the detail of the thumb without highlighting any lines.
The pattern of fur products is transferred to the fabric from the inside and cut out with special scissors. During this procedure, it is necessary to carefully separate the fur fibers, otherwise you can cut it off.
Important! In fur mittens, the thumb needs to be sewn on, otherwise the final product will not be very comfortable.
The fur lining piece can be made of fleece or a thinner knitted material. For the wrist of the glove, it is best to use an elastic band that is inserted 5 cm from the edge. The glove itself should be long enough to fit under the cuffs of the jacket and other outerwear.

Opening
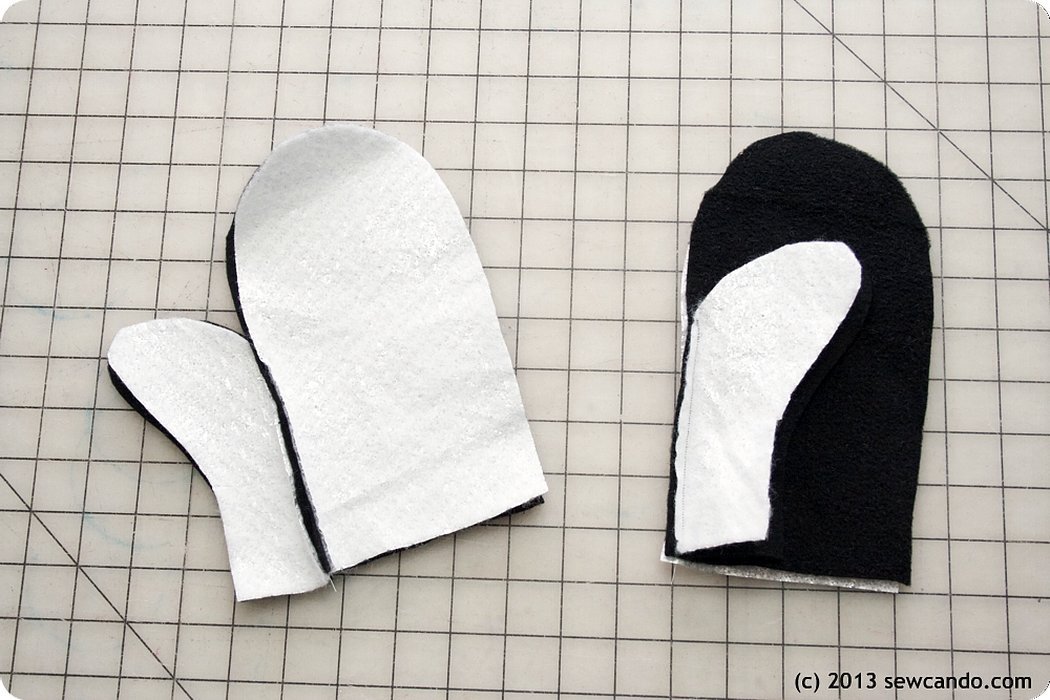
When calculating the amount of fabric needed, remember that the material is needed not only for the top of the product, but also for the inner lining, for which fleece should be used. Taking this into account, two mirrored parts should be cut out with a finger and palm, both from the main material and from the lining. Fleece mittens can be without a cuff, but with a sewn-in elastic band.
All parts of the product need to be laid out on the fabric, which is pre-folded in half with the right sides facing inward and pinned. After that, you need to cut out the details on the fabric, leaving half a centimeter for allowances and seams.
Assembling the product
After all the stages of selection and cutting, the product is assembled. First, the parts are sewn along the line of the thumb and the main part of the palm. After that, the back of the main part is connected to the other side of the finger, and all the remaining elements are sewn along the contour. The lining is assembled in the same way, but the seam near the fingers remains open.
The second step is to take the main material and lining, fold them and sew them along the wrist line and close. Now is the time to add elastic to the seam. The product is turned inside out through the open hole near the fingers, which is then sewn up with a blind stitch.
How to sew mittens from a sheepskin coat
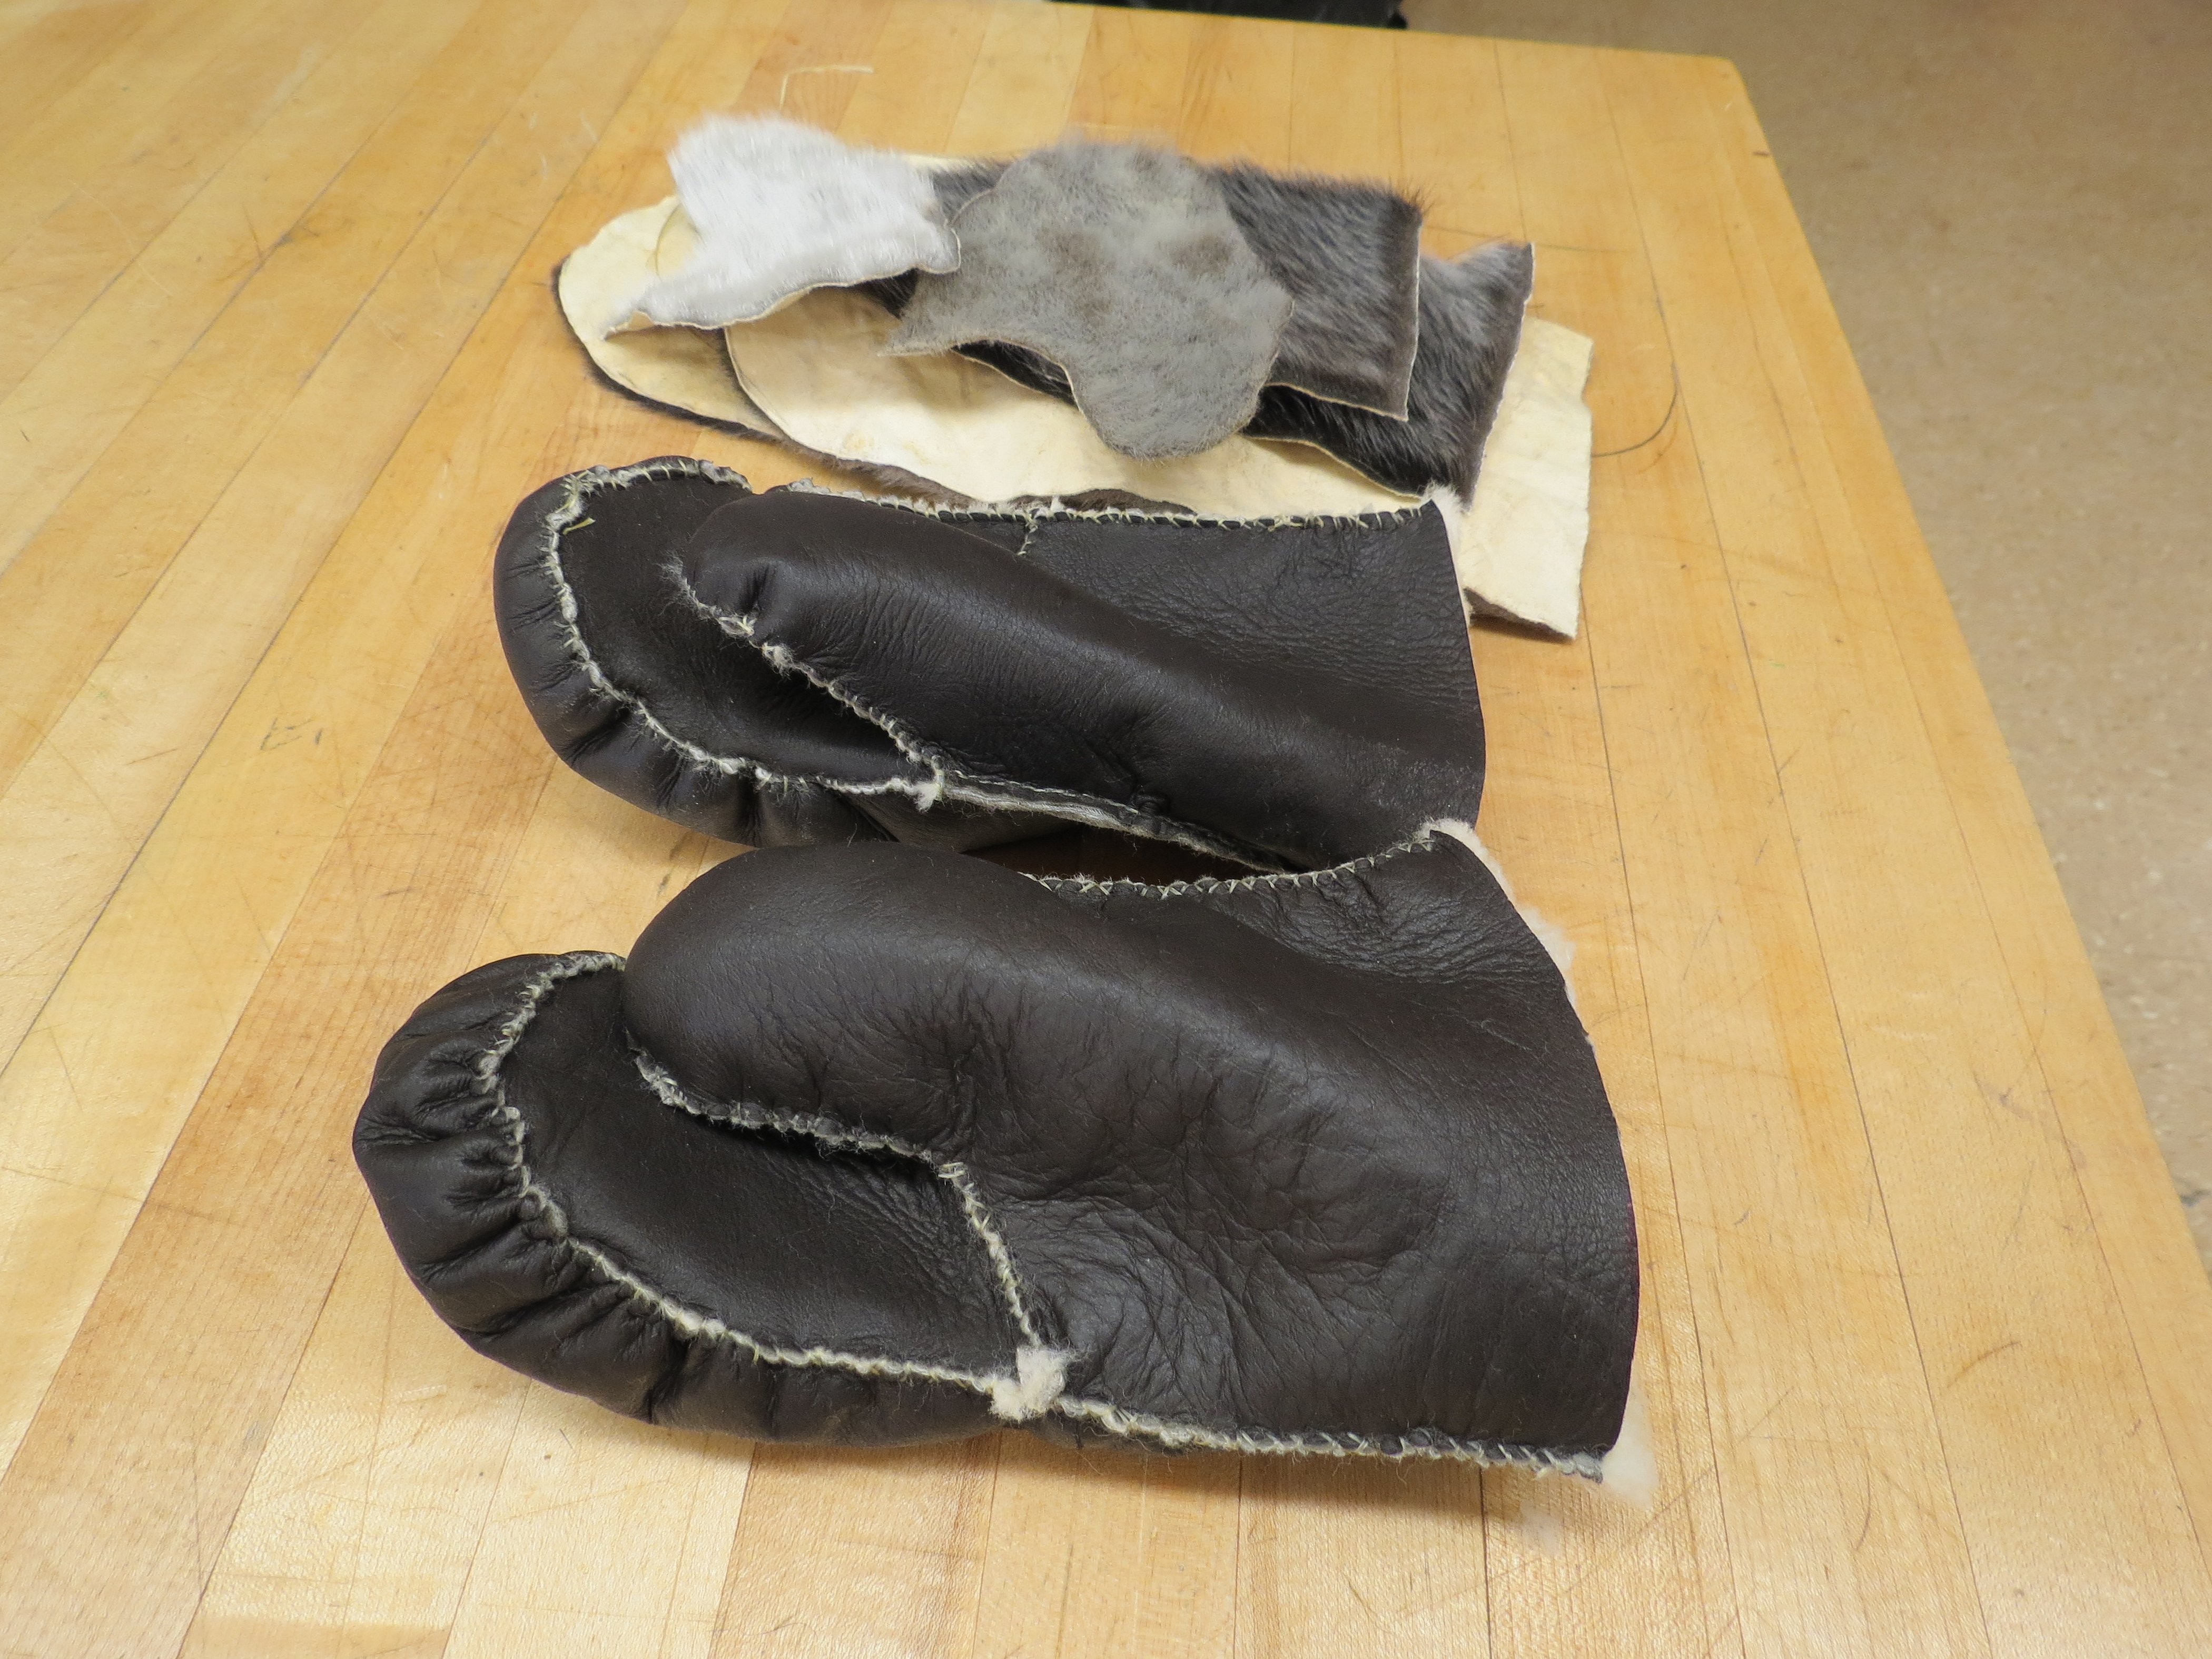
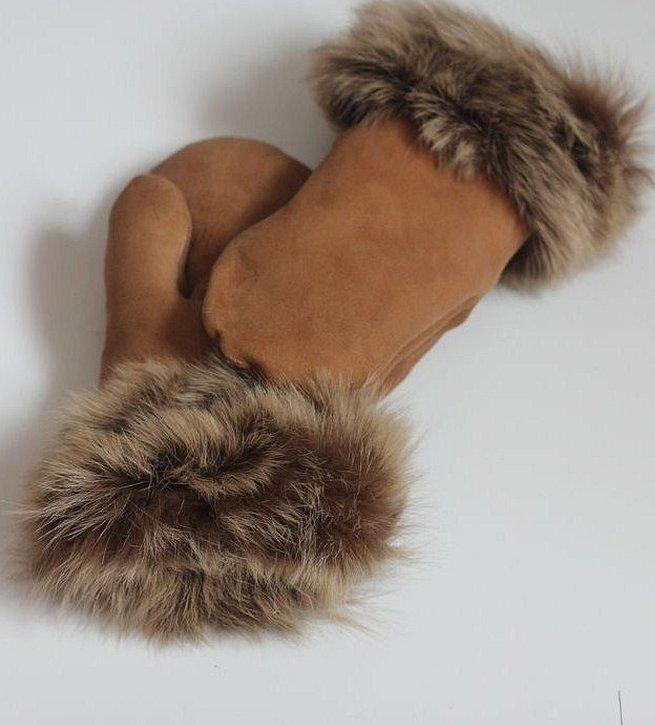
Sewing waterproof mittens from a sheepskin coat with embroidery is not difficult. A sheepskin mitten, the embroidery on which looks very stylish and fashionable, will be an excellent decoration for a winter wardrobe. Moreover, it will save money on buying store-bought products or fabrics, because an old sheepskin coat is ideal for cutting and sewing mittens, which will definitely become a novelty for their owner.
Before you start cutting a sheepskin coat out of leather, you need to practice on simpler and older fabrics. You also need to consider that allowances should be taken for the thickness of the inner fur.
Important! Items made from old coats and sheepskin coats can be safely trimmed with fur from the lining of these items around the wrist, and also decorated with all sorts of elements such as embroidery.
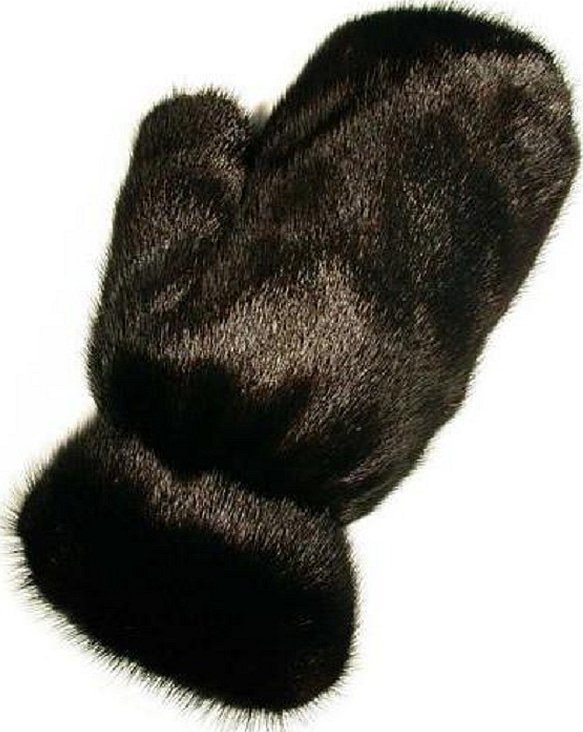
Fur mittens
Sewing mittens from fur is essentially no different from sewing from other materials. It is only important to carefully monitor the fur when cutting out the parts, so as not to leave "bald spots" on the finished product. For production you will need:
- fur: artificial or natural;
- lining material (fleece, knitwear);
- sharp tailor's scissors or knife;
- paper, thread, needle,
The further steps are no different from the method of sewing mittens and gloves based on fleece and other materials, which is described above.
Baby mittens with elastic
Children's mittens with elastic are sewn in a similar way, but with some reservations. When cutting out the pattern, if the mitten will contain elastic, the product is laid out on the table with the wrong side up. The elastic is placed a couple of centimeters from the edge of the mitten and, turning it inward, covers it.
Along this edge, a line is made, but you need to be careful and make sure that the elastic is not caught in it. After the line is finished on the first mitten, you need to take the second half and fold its lower end along the elastic in the same way as with the first part of the pattern.
Then all the parts are put together with the "face" inward, the fabric is gathered to the required degree of elastic tension. Machine stitching is done along the entire perimeter of the product. You can connect the products with another elastic band so that the newborn does not lose them or drop them from the stroller.
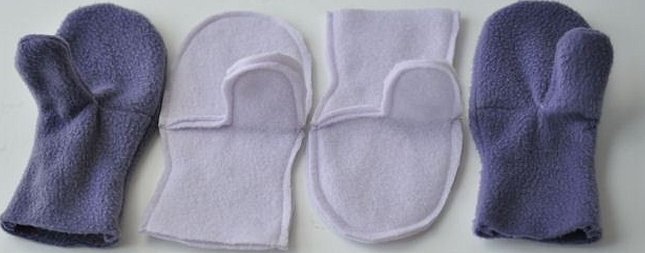
Fleece mittens for teenagers
Fleece is suitable for everyone: for babies, teenagers and adults. Before starting work, it is necessary to cut out the details of the product on a piece of unnecessary fleece fabric. Trying on and adjusting and making adjustments to the template are carried out. After correcting all the shortcomings, the template is transferred to a piece of fabric by tracing the contours. Patterns of the details are made.
The first stage of work involves sewing the two parts of the palm together and making a stitch around the thumb. Then the upper and lower parts are folded, the cuts are aligned, and a straight stitch is made. The details for the outer parts of the product are also connected, like all the mittens along the bottom line. A small hole should be left for turning the mitten inside out.
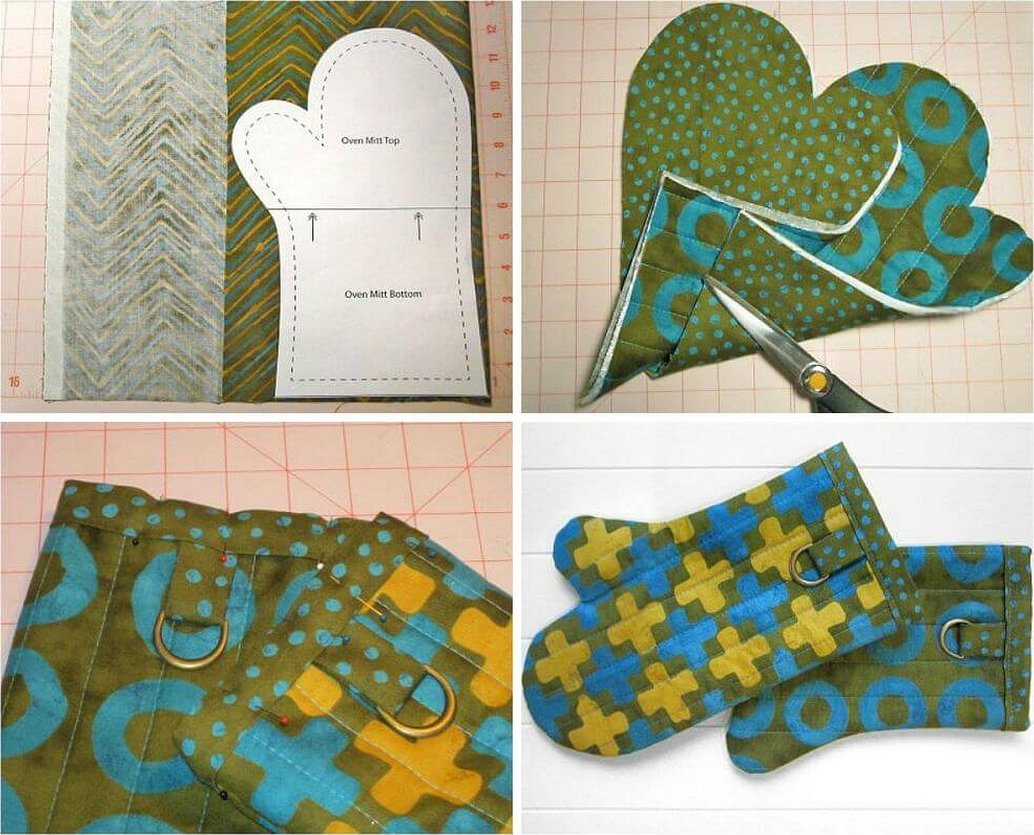
Sewing a potholder using patchwork technique
Often housewives sew potholders for the kitchen from everything they have at home. Patchwork work not only saves money from store options, but is also a very beautiful attribute of a housewife. In order to make such a product, you need:
- Prepare scraps of different fabrics and cut them into squares, connect them together on a sewing machine;
- Cut pieces of fabric into random shapes: birds, hearts, etc.;
- Prepare the potholder base and attach decorative elements to it;
Important! For potholders, it is better to use different classes of fabric with different shades and designs.

Embroidery on mittens
When the product is completely ready, it can be decorated with cross stitch, beads, rhinestones and other attractive elements. These methods will be discussed in more detail below.
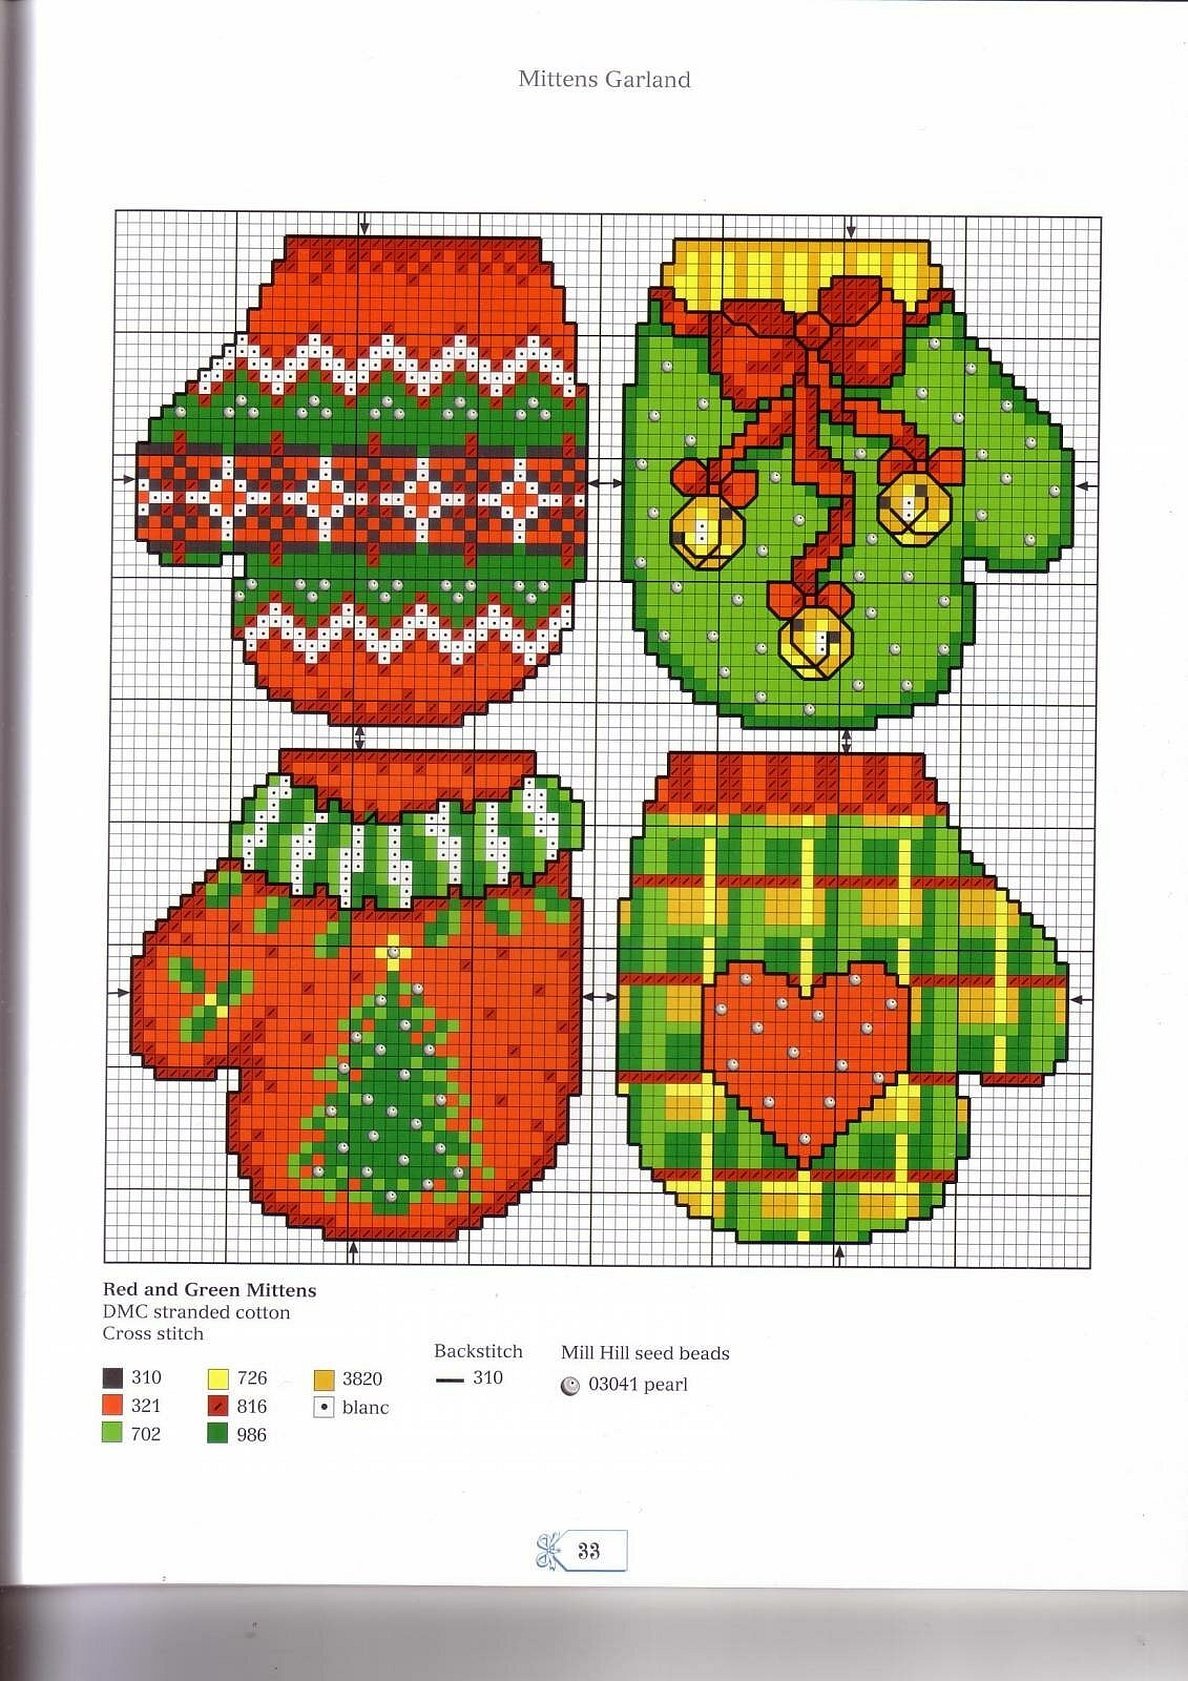
Crosswise
Cross stitch on mittens is usually done in a New Year or Christmas theme. The patterns can be the simplest patterns of snowflakes, snowmen, Christmas trees, etc. Before starting the embroidery, you need to make a pattern and determine the necessary colors of woolen threads. Cross stitch in the form of a mosaic looks good on knitted items with a "waterfall" type decor.
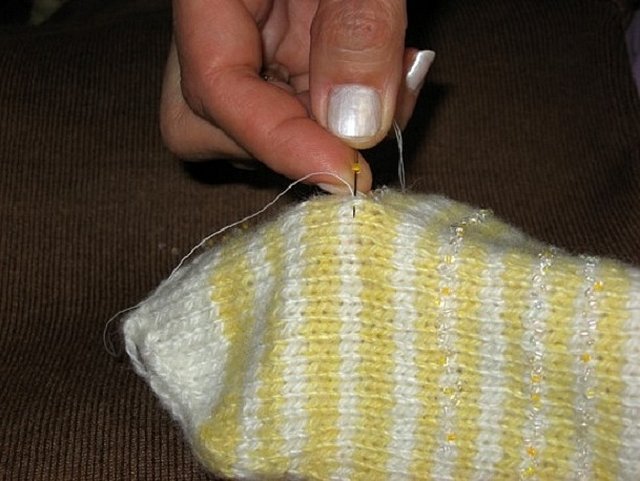
With beads
Beads are also one of the best means of decoration and are also ideal for knitted mittens. They should be of different colors and contrastingly emphasize the overall design of the products. In order to embroider them, the thinnest needles and strong threads are used that can withstand abrasion from beads and washing. The embroidered beads are attached to the material with a “needle forward” stitch, when the bead gets into the center of the loop. Dark tones of beads are well suited for this process: buckwheat, buckwheat honey, etc.
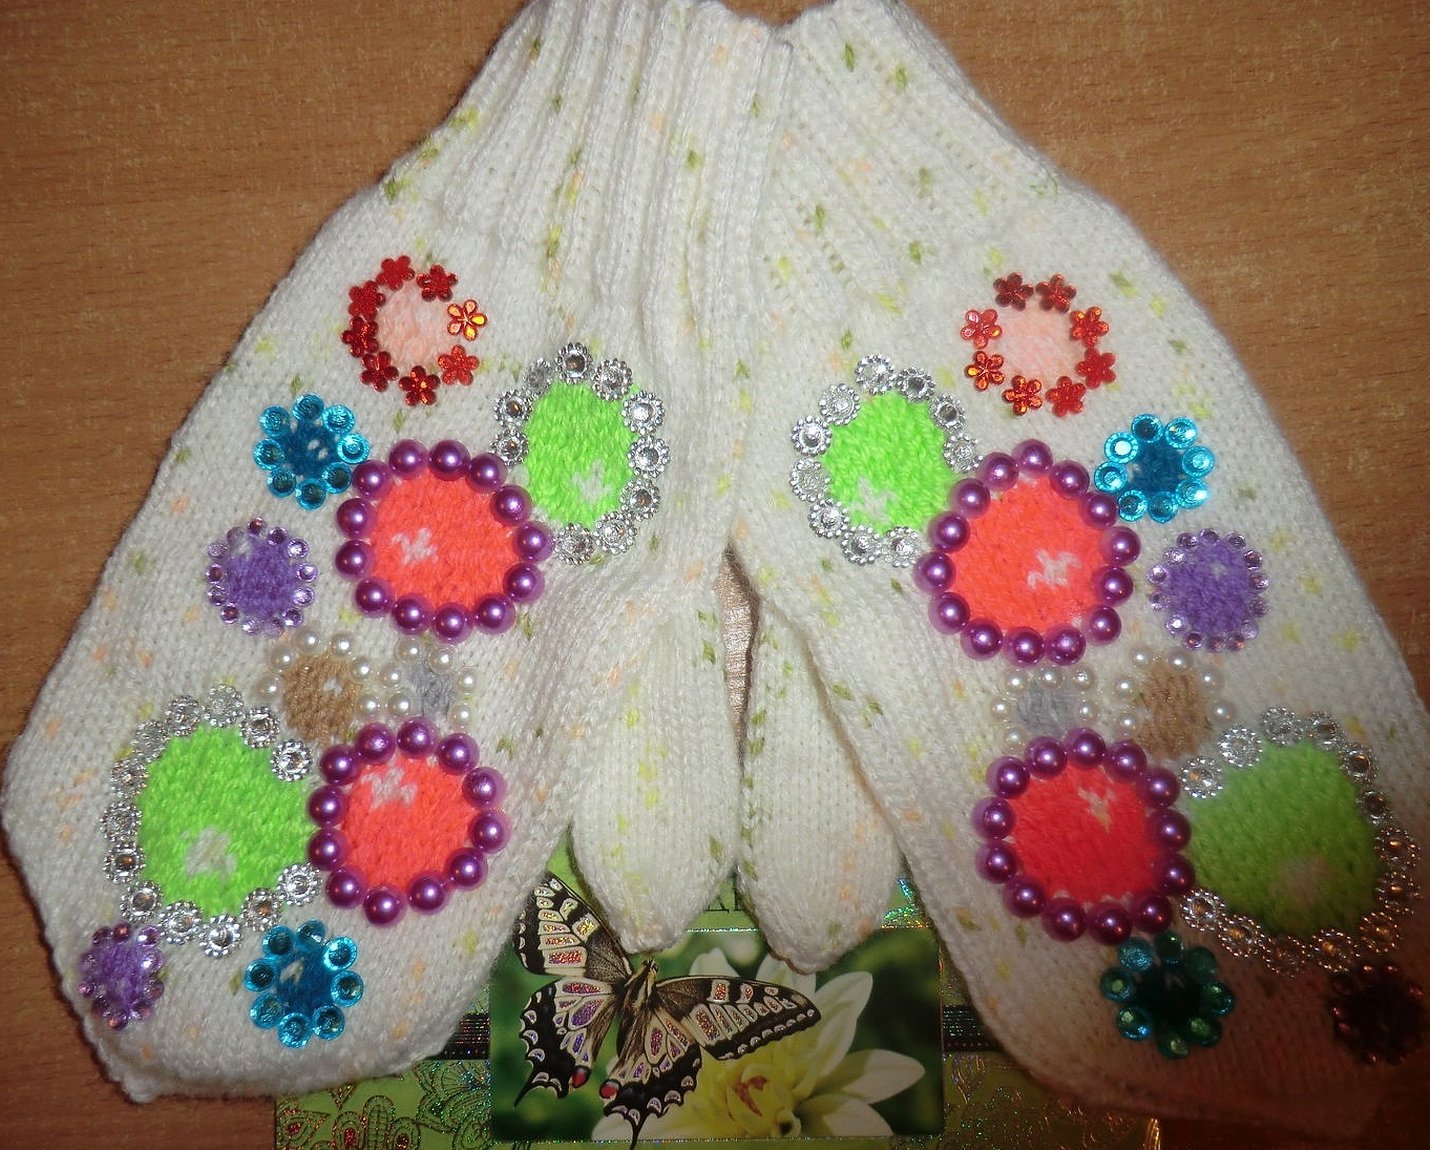
Volumetric embroidery on mittens
A mitten, the diamond embroidery on which fits harmoniously into the overall design, is an excellent decoration for winter clothing. It is decorated with multi-colored acrylic rhinestones, which are used in cross-stitch patterns instead of wool threads. Unlike the classic decoration, the diamond version requires less effort to embroider. With this technique, patterns, plots and entire landscapes from rhinestones are obtained.
Storage and care rules
The rules for caring for these winter attributes are the same as for all the others. When putting them away in a drawer or closet, you need to take care that they are not damaged by moths. Do not store mittens in damp places or under direct sunlight. Otherwise, the fabric may deteriorate and fade. Storage rules largely depend on the type of material and threads used. For each case, everything is individual and you need to read the descriptions of the materials from which the product is made. As for care, everything is also individual here, but general recommendations were given above.

Thus, there should be no questions about how to sew mittens. This is not a tricky business, but it requires attention and perseverance from novice craftswomen. The material read in which advice was given on the choice of materials, the basic rules for cutting and assembling mittens can help in this matter.


