A pattern calculation is something without which it is impossible to create a dress, sweater, trousers or any other clothing. This is the silhouette of the product, according to which pieces of fabric are made, sewn together to create the product. About why it is needed, what tools are needed to make a pattern, how to construct patterns, and what terms are required to know for this, below.
- Why do you need a basic pattern?
- Preparing a sketch of the future dress model
- Tools
- Terms used in construction
- Measurements for constructing a dress pattern
- Half-girths
- Lengths
- Heights
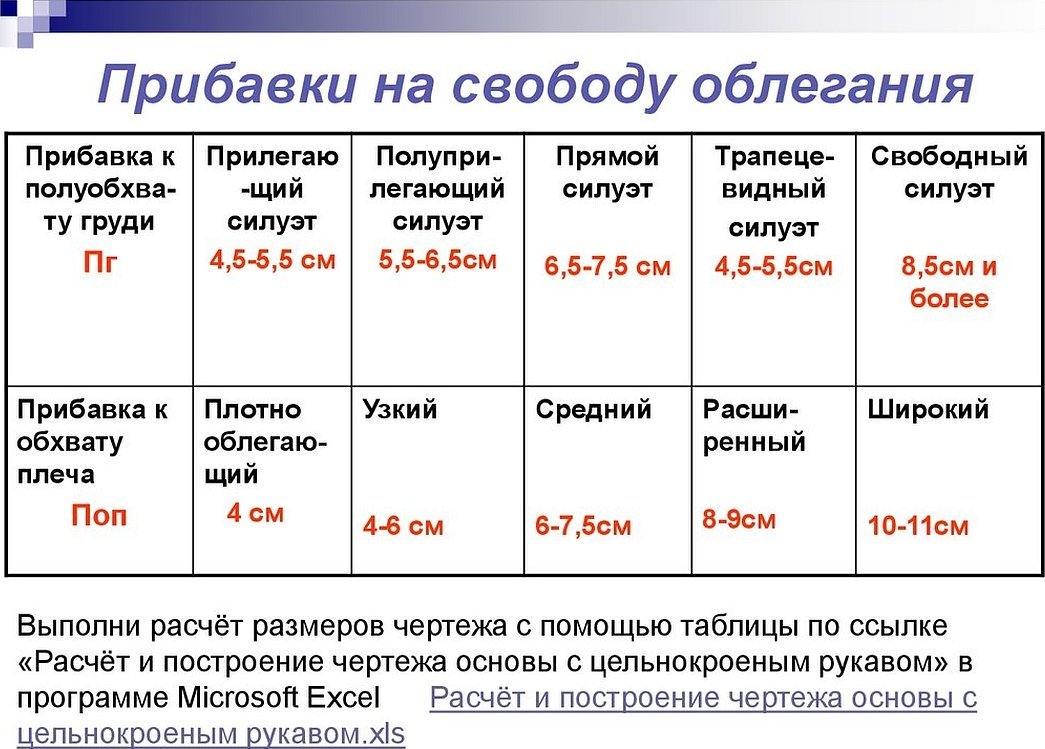
- Allowances for ease of fit
- Calculation
- Grid construction
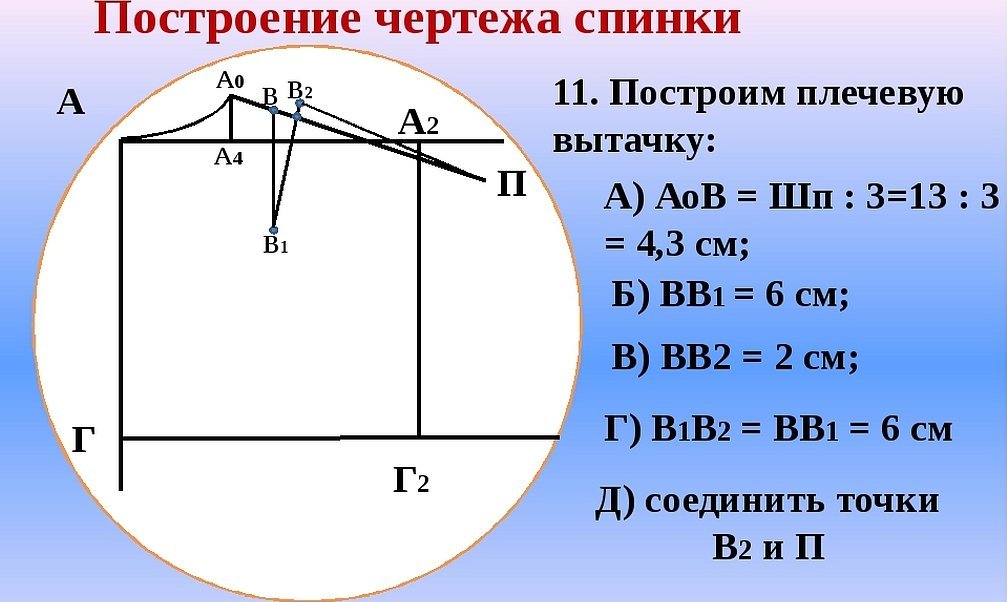
- Drawing the backrest
- Construction of the shelf drawing
- Construction of side lines
- Bodice
- Neck
- Shoulders
- Bottom of the armhole
- Reference point for constructing the armhole
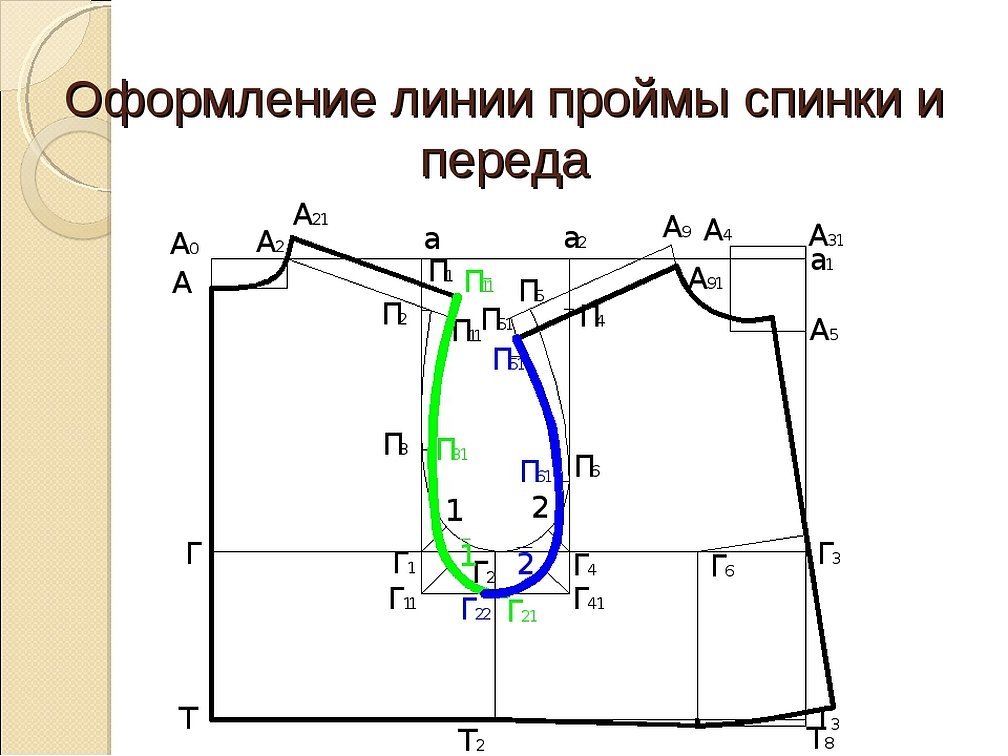
- Armhole
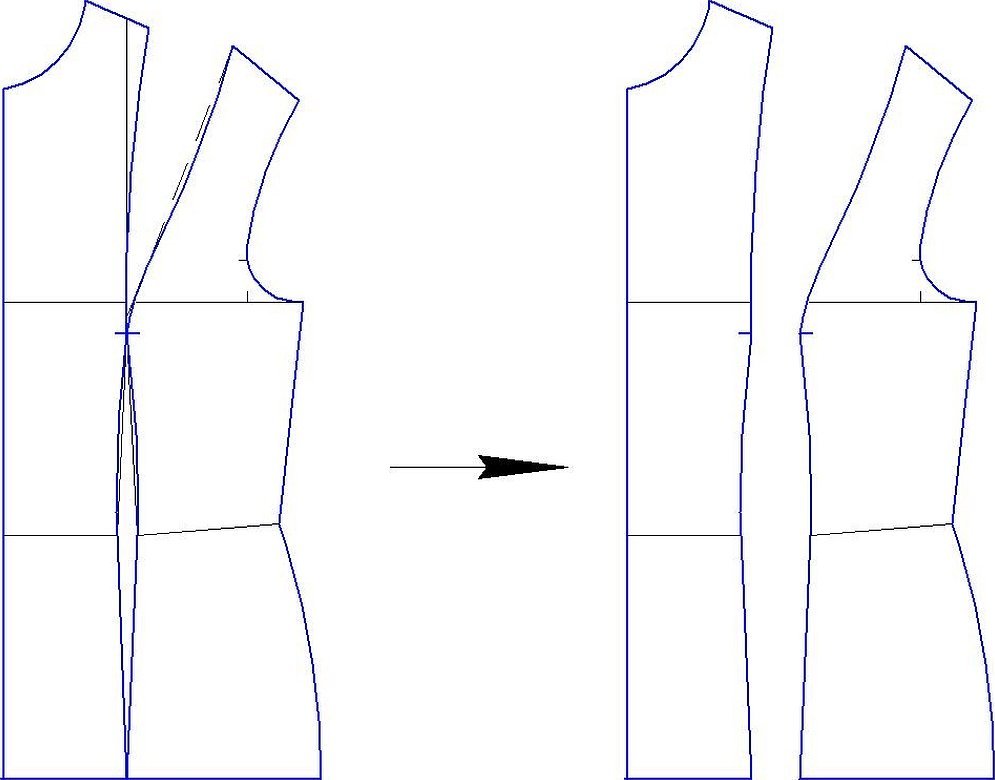
- Bust dart
- Dart on the back
- Waist darts
- Method of tattooing on a mannequin
Why do you need a basic pattern?
The finished pattern is a women's base, based on a typical figure. With standard figure sizes, you can create patterns yourself. Then you can take into account all the features of the figure, along with the chest size, posture, hip volume and abdominal convexity. All patterns are obtained by modeling the basic base. That is, having created a basic model once, you can form various products on it, sewing over hundreds of clothing models.
Of course, creating something new is easier than remaking the old. However, it will be easier to correct and adjust the finished base than to create a new one and look for information on how to make a pattern.
Please note! Even without using ready-made magazine patterns, you can always adjust the product to the required dimensions if you understand the principles of construction. When creating a basic pattern, there is practically no need to make changes after the first fitting. Even a novice craftsman can handle them.

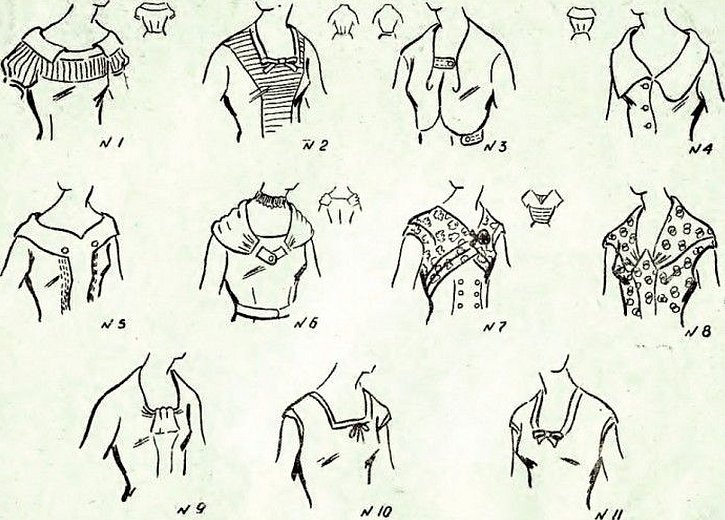
Preparing a sketch of the future dress model
Before making a dress, especially a women's dress, it is necessary to create a sketch to fully imagine the construction of the dress base pattern and determine the stages of sewing the product on a sewing machine. A sketch of the future product will help determine the finishing elements, color, quality of fabric, silhouette and details. It is worth noting that it is not necessary to be able to draw beautifully and understand the proportions of the human body. You can use ready-made design solutions and supplement them.
The biggest mistake beginner designers make in how to construct a pattern is the fact that they try to create complex dress models with a large number of darts, complex curves and cutouts. In addition, they plan to use expensive fabrics and materials that professional craftsmen cannot always handle. Without the necessary experience and knowledge, you should not try to try complex silhouettes right away. An experienced tailor, modeling a loose-fitting dress for a woman, can take a basic dress pattern and make changes to it with chalk on the fabric.
Tools
To create a pattern, you need to take specific tools for the cutter. As a rule, you always need paper with a ruler and a pencil according to the instructions. It is best to take a transparent and wide ruler in the form of a half-sun, which has markings in inches and centimeters. Inches are used when constructing a pattern taken from magazines or websites. You may also definitely need paper tape. It can help when gluing additional paper sections, laying folds on the pattern. But it is enough to buy regular roll masking tape, which has a width of 3 centimeters.
A toothed tracing wheel is a tool that will help you transfer your pattern onto paper.
A regular pencil marked soft. Designed for drawing on thick paper or Whatman paper. You will also need an eraser to remove extra lines.
You may also need a tape measure, elastic or full-length measuring tape along with a pair of tailor's scissors. The latter should be sharp and comfortable.
Please note! It is not recommended to cut paper with tailor's scissors. Otherwise, they will become dull and it will be impossible to work with them further.
The tools you will need to create the pattern are a rectangular ruler and graph paper to transfer the drawing onto a separate thick sheet.

Terms used in construction
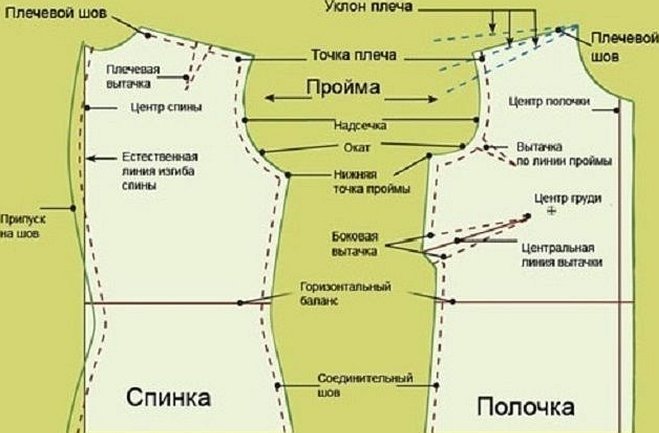
In order to correctly construct a pattern for your own dress, apron, skirt or sundress, you need to know the terms. It is essential to know the concepts of shoulder seam, shoulder dart, natural back curve line, seam allowance, back, center of the shelf, dart along the armhole line, center line of the dart. You also need to know the terms of the shelf system, shoulder slope, shoulder point, armhole, notch, lower armhole point, side dart, horizontal balance and connecting seam.
Other terms may be required depending on the specific sewing method. As a rule, a full list of them is given in any handicraft reference manual. What the parts listed above are can be found in the picture below.
Measurements for constructing a dress pattern
To construct a dress, regardless of its shape, three-quarter sleeves, length, material and other factors, you need to know the chest, waist and hip measurements. You will also definitely need the measurements of the back, front and additional measurements in the form of armhole depth, shoulder width, arm and wrist circumference.
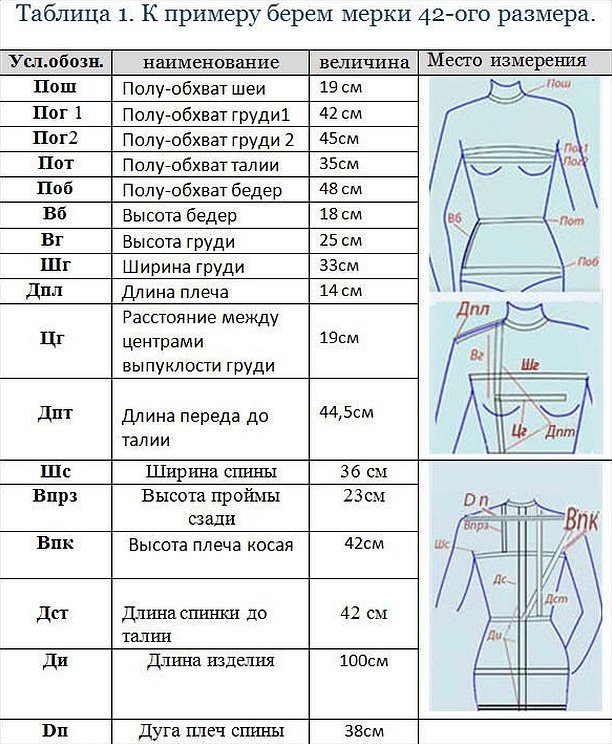
Half-girths
Half-girths are measurements of girths that are divided in half. To construct a dress or any other product by creating a basic pattern, you need to know the half-girth of the chest, waist and hips.
Lengths
Length measurements are the measurements of the distance from the back to the waist, the entire back, the length of the front to the waist. It is also necessary to measure the length of the entire product. When creating darts and yokes, you also need to know their heights and lengths.
Heights
To construct the most accurate basic pattern, you need to know the height of the chest, the back on the bias, the shoulder pads, the oblique chest height. In some models, you also need to know the seat height.
Allowances for ease of fit
When creating a basis for constructing a beautiful and especially tight-fitting dress, you need to take into account seam allowances. This is especially important if you plan to create darts and yokes on the model.
Calculation
To build a size chart, you need to know the neck half-girth with the chest, hip half-girth. You also need to know the value of half the waist girth. From the lengths, you should know the length of the product, shoulder, back to the waist and shelf to it. From the width - the width of the shoulder, chest and back. From the heights - those listed above.
Please note! When taking measurements, it is necessary that the centimeter is located on a strictly horizontal surface in a narrow and wide place. The tape cannot be stretched due to the narrowing of the product. You can study below what an example of calculation looks like.
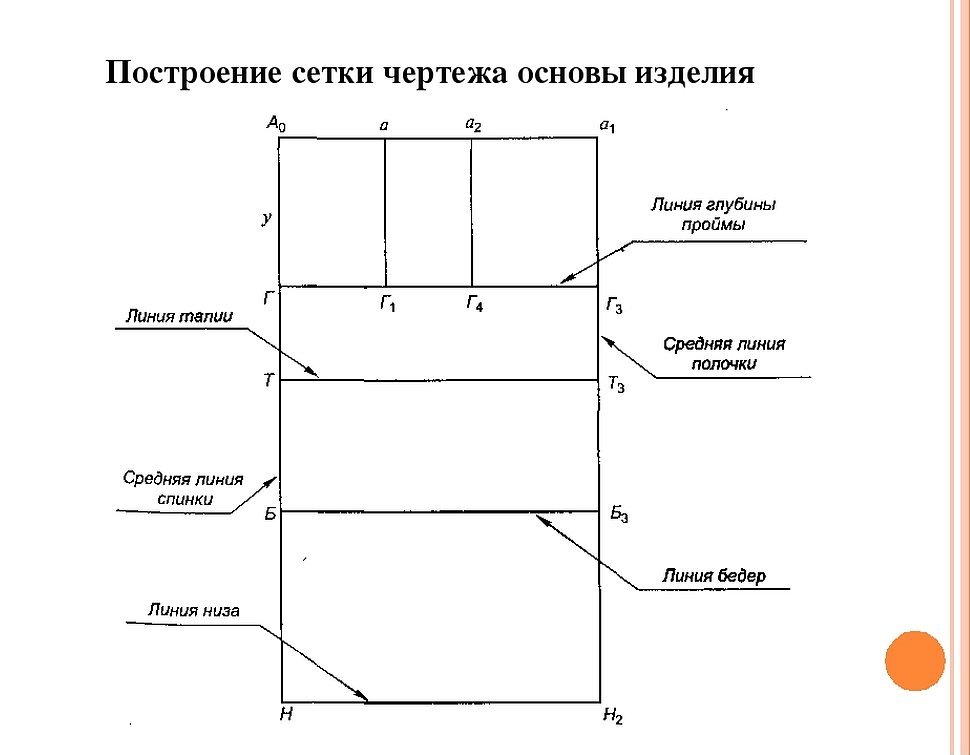
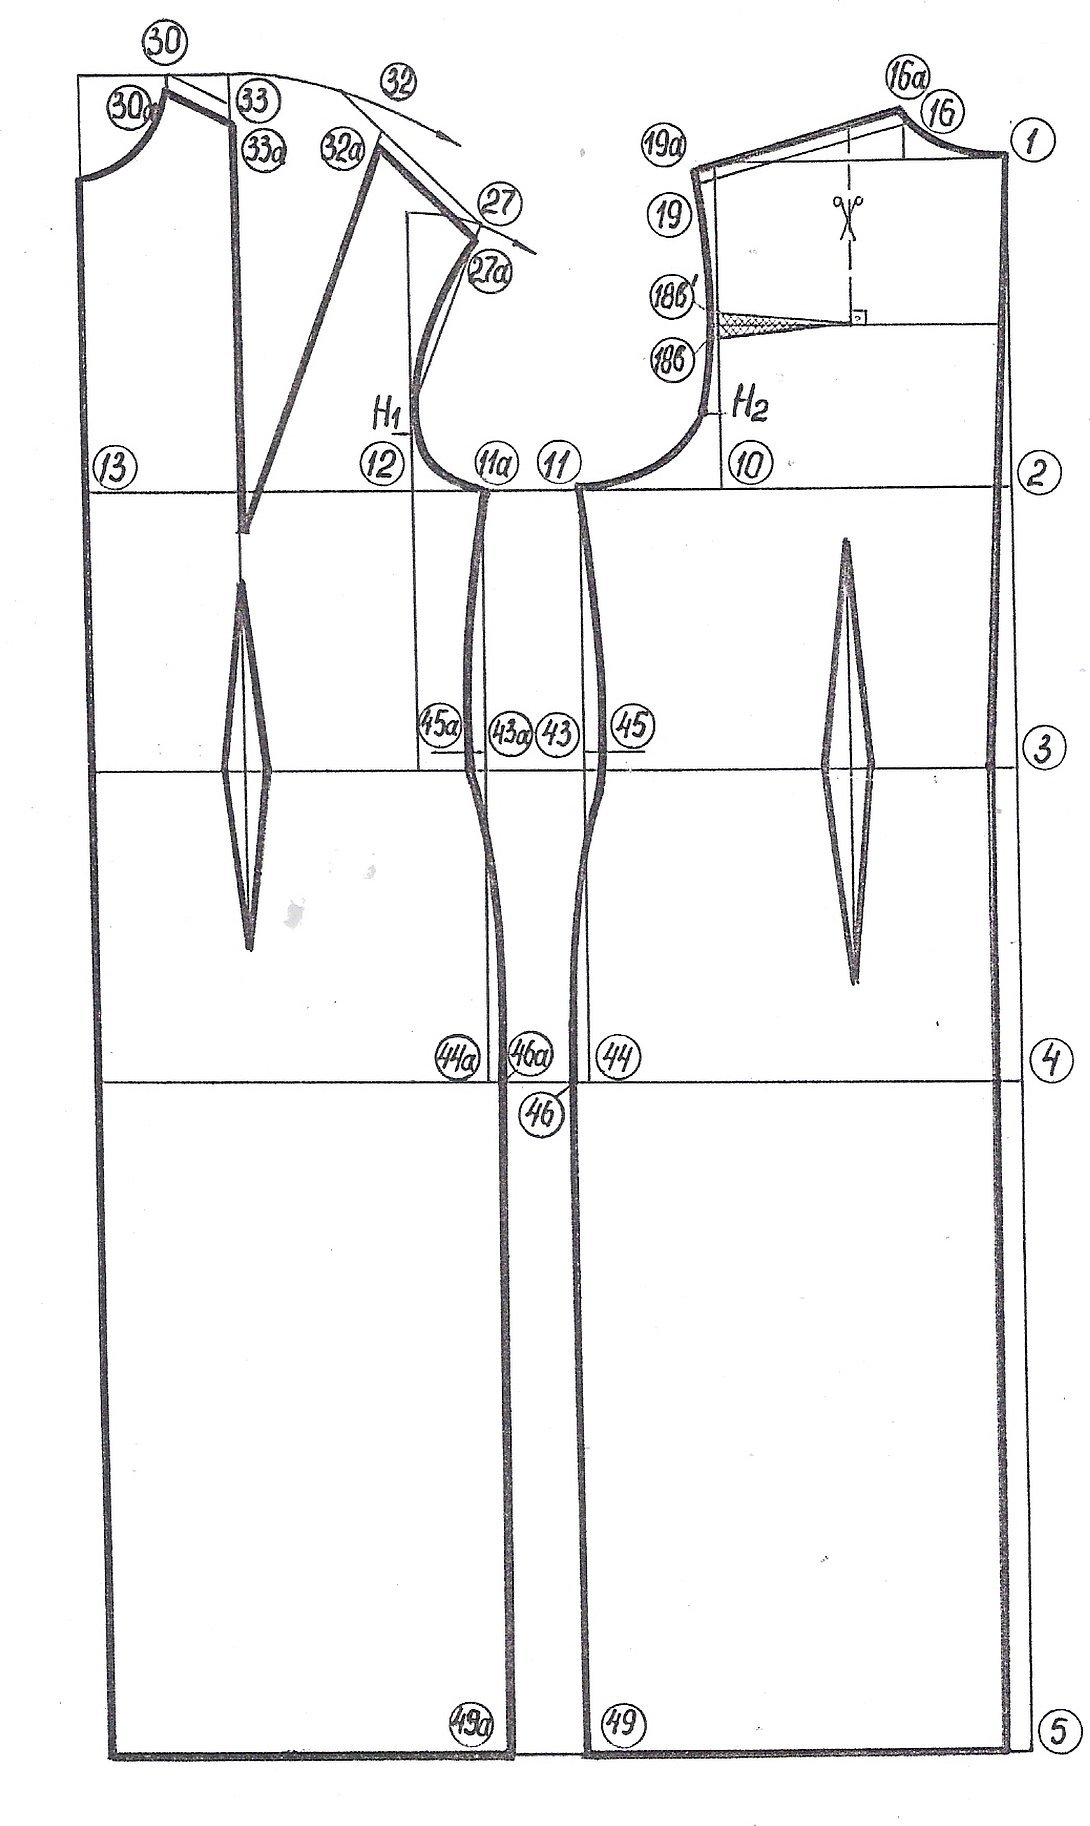
Grid construction
Mesh construction is a simple task if you have the appropriate knowledge in the field of construction. Below is how to construct a standard model of a sheath dress with the above parameters of the chest, waist and hips.
Drawing the backrest
The back is built taking into account the knowledge of the back center offset at the top, the deposition of the shoulder blade level and its connection with the point that has the purpose of a temporary line. Then it is built taking into account the knowledge of the width of the back of the neck.
Construction of the shelf drawing
The shelf is created by setting aside a tap along the waistline for semi-fitted garments. To construct the center seam of the back, you need to set aside a line from the obtained point. Next, from the back neckline along the center seam, set aside the length of the back down and get the correct length of the garment. Then you will need to construct the point of the center of the chest, the top and the width of the neckline of the shelf
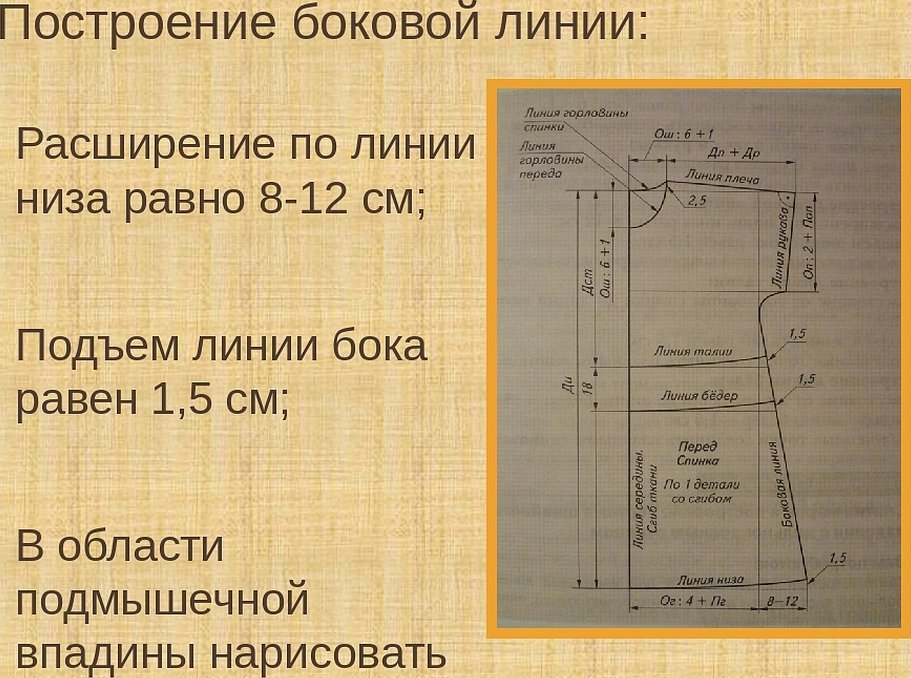
Construction of side lines
The side lines are built from the middle of the armhole and the center line of the side seam. They are obtained at the intersection of the waist, hips and bottom lines, after calculating the solution of the darts at the waist. To design the side seam, you need to divide the resulting number by the full solution of the darts. To calculate the expansion at the hips, divide the previous number by two.
Bodice
The sun bodice pattern is a basic drawing of a dress with a fitted sculptural style. To construct it, you need to understand that the base is obtained by adding centimeters of free fit. The amount of additions will depend on the silhouette and type of material.
Please note! All the distances on the diagram are laid out based on individual measurements so that the bodice is not pulled along the armhole. The sleeves of the dress are mounted to it last.
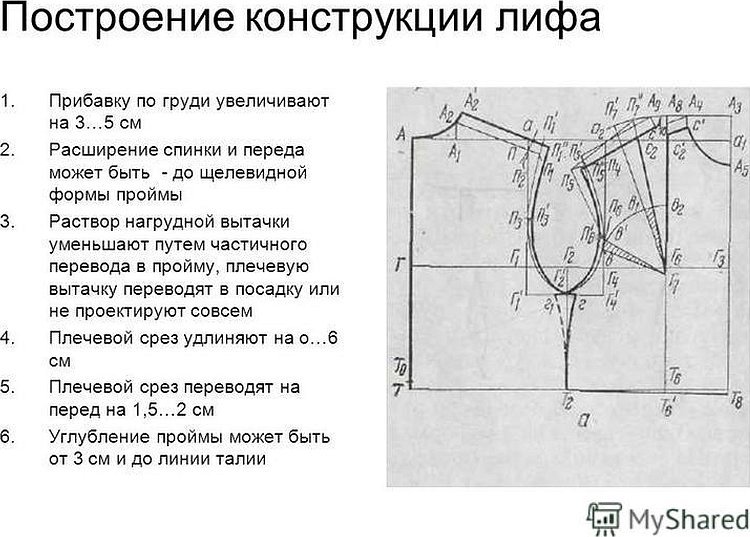
Neck
The neckline is the most labor-intensive part in constructing a pattern. For it, you need to know the back area and the shoulder line with the dart. It is equal to one third of the half-girth of the neck plus 0.5 centimeters.
Shoulders
The shoulder line is located at the edge of the neck. It shifts slightly towards the border of the back area. To construct it, you need to know the shoulder length measurement and add 1.6 centimeters for the dart. You also need to know the slope of the shoulder line.
Bottom of the armhole
The armhole is always equal to one-fourth of the chest half-girth. It always goes down to the chest line. The upper two-thirds of the height goes straight down.
Reference point for constructing the armhole
It is located in the middle between the bottom of the armhole and the front armhole. It is determined independently, without calculations.
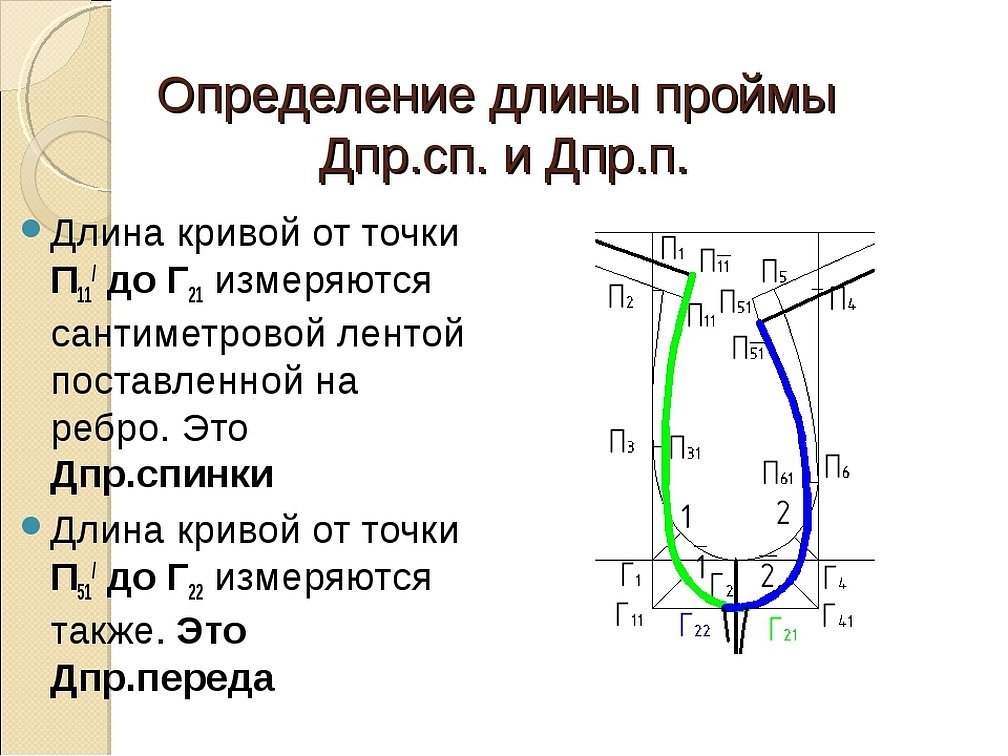
Armhole
The armhole height is equal to the half-girth of the chest divided by 4 + 5 centimeters. The armhole has two bends: upper and lower. One is deflected to the side, the other begins at one third of the chest height.
Bust dart
The bust dart always reaches the bust line in height. The point should coincide with the bust peak. The width is determined by half the bust measurement plus one centimeter.

Dart on the back
It is located four centimeters from the edge of the neckline, has a dart depth of 6 centimeters and a width of 1.6 centimeters.
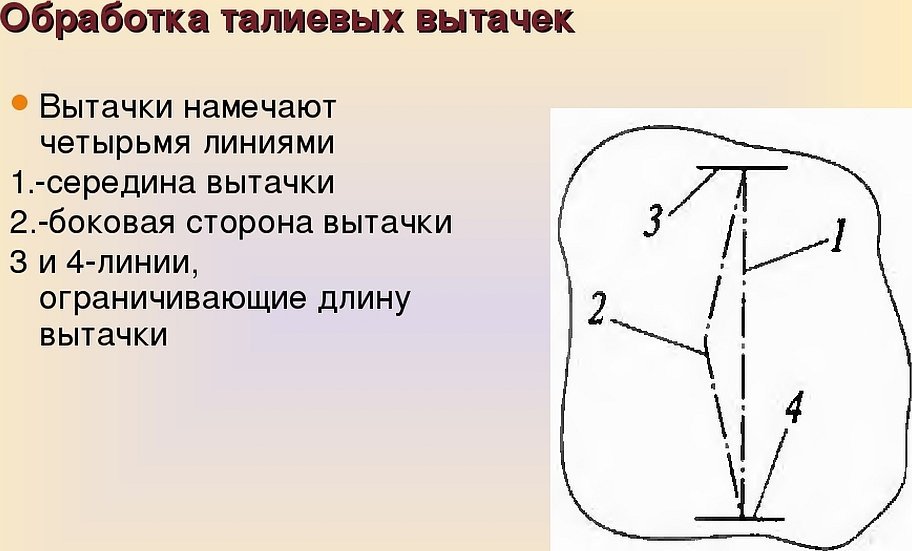
Waist darts
Usually found on the front or back pieces. Are uncut or solid darts. Always made in two pieces. Are located in the middle of the front or back.
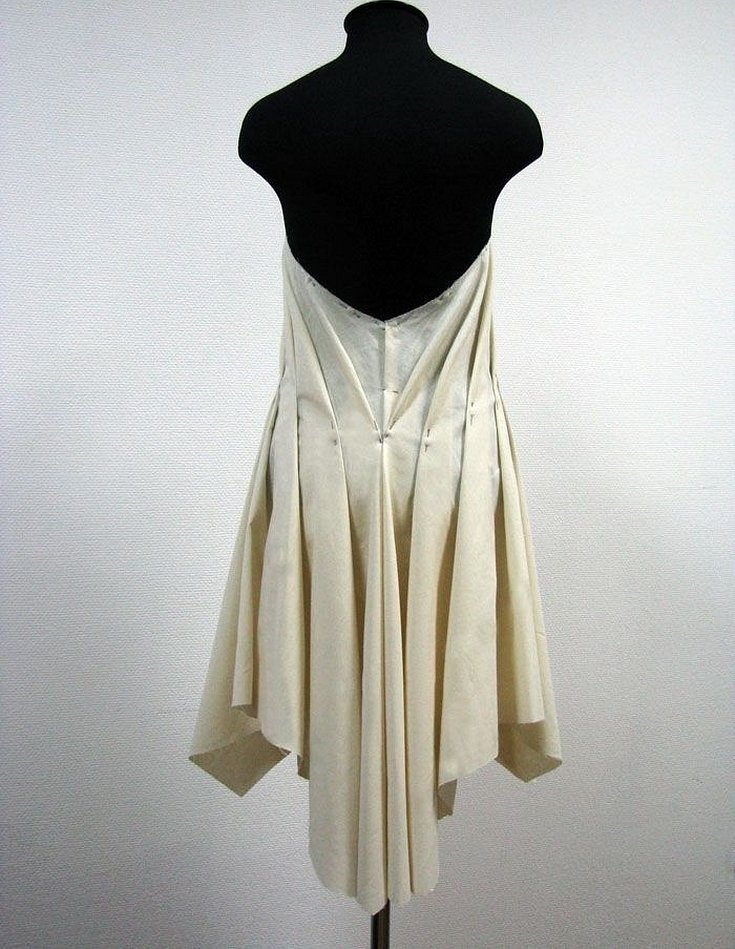
Method of tattooing on a mannequin
This is the creation of a shelf to obtain an accurate design. This replaces the process of creating a product drawing. It is implemented by pinning the model. It accurately repeats the volume of the future product.
In general, a basic pattern is a ready-made sketch of a future product, without which it is impossible to draw the details and build the silhouette of a dress or other product. It is possible to do it only with the help of measurements, which can be done with a measuring tape and other tools. When constructing a model of a women's or children's dress, it is important to take into account the measurements of the length, half-girth, height and allowances of the product, described in the constructed size chart. To adjust the product to the figure and make it more graceful and refined, it is enough to make a chest and waist dart, a dart on the back.


