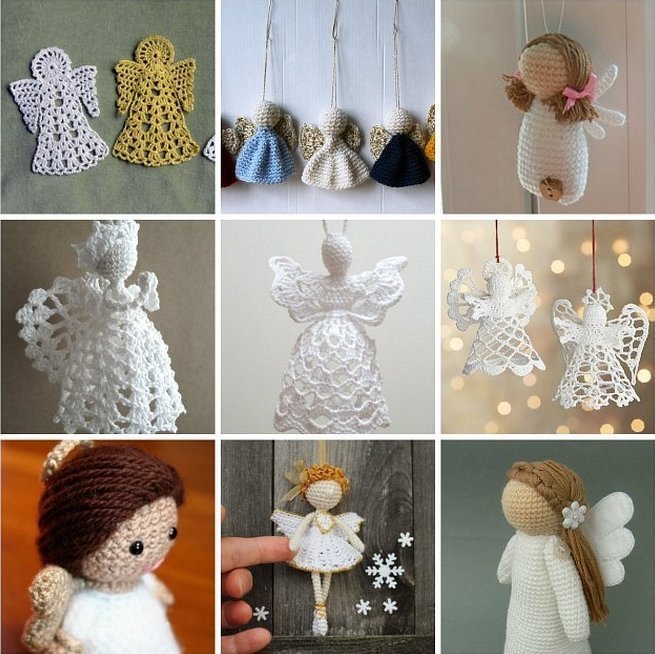
Using the simplest pattern and suitable yarn, you can knit a beautiful angel. Usually it is made with a crochet hook. Using this tool in your work, it is easy to recreate any type of pattern, knit the necessary shapes, details and parts. Beautiful angels will be a great decoration for the New Year holidays. From flat figures you can make a garland, which can be used as decoration for a birthday or angel's day.
General rules for crocheting toys: tips for beginners
When a needlewoman is just starting her journey of making soft toys by knitting, she needs to follow some recommendations that will help her avoid problems and mistakes in her work:
- At first, you should not use too textured or relief types of yarn. An uneven surface of the thread can worsen the appearance of each loop. Before you start working directly, you should try knitting a little to evaluate the result.
- When choosing a tool for work (hook) and material (yarn), it is worth following the following recommendation - the hook number should be one less than recommended in the instructions for the yarn. Then the knitting will be denser and more accurate.
- As a filler for stuffing the inside of a soft toy, it is worth using synthetic padding or holofiber. It is better to exclude cotton wool and finely chopped foam rubber, as they are unevenly distributed and get knocked down over time.
- When finishing work on each detail separately or on the entire toy, it is worth firmly fixing the thread and hiding the ends inside the craft, tightening the resulting element with a thin hook.
Please note! More skilled craftswomen use knitting needles when working on a soft toy. But even a beginner needlewoman can use this tool when making some elements of the craft.
To immediately get a complete picture of what the toy will turn out to be in the end, it is worth initially drawing a rough sketch, choosing the necessary fittings, yarn color and textile inserts.
Selection of yarn and manufacturing features
Crochet angels always look gentle. In order not to disturb such harmony, it is worth choosing the right yarn. There are several special recommendations for each individual case:
- The New Year's figurine usually represents a visual silhouette of an angel. A toy of this type is used to decorate a Christmas tree or interior, so cotton thread is recommended as the main material.
- To make a Christmas angel, use cotton thread with silver or gold lurex. You can choose different thread thicknesses.
- If the toy is to be knitted for children's games, it is advisable to use children's acrylic. It is better to take a thin thread to form a neat pattern. Thanks to the use of acrylic, you can get a voluminous toy of the desired shape.
- For an “airy” finish, you can use “grass” yarn and other types of decorative yarn and thread.
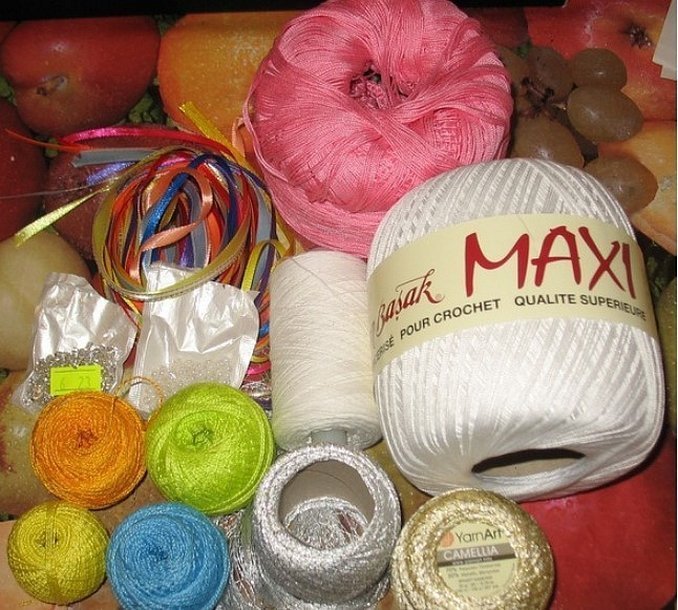
Much attention should be paid to the color of the yarn. It is better to choose yarn of pastel colors and shades to convey all the tenderness and grace of the symbolic toy.
Knitting rules
There are several options for how to crochet an angel. In any case, it is worth using a detailed master class, which will describe all the stages and include all the knitting patterns. The ideal option is a lesson that describes in detail the stages of creating a three-dimensional angel, which can become an excellent toy for a child or interior decoration. This will be an angel-baby doll.
Hands and wings
The shape of the hands in this model is the simplest - there is no need to knit each finger in detail. It is enough to make a visual separation between the main hand and the wrist. How to knit the hands correctly:
- The arm is knitted from the bottom up. Form an amigurumi ring and knit 6 single crochet stitches into it.
- In the next row, make an increase - 2 sc in each loop.
- Next, knit 4 tiers without changes 12 loops. This will help prepare the basis for forming the wrist.
- Then decrease 8 stitches through each sc. The result should be a wider lower arm.
- Knit another 11 rows without changes - 8 single crochets in each tier.
- Finish the work. Fasten the thread and cut it.
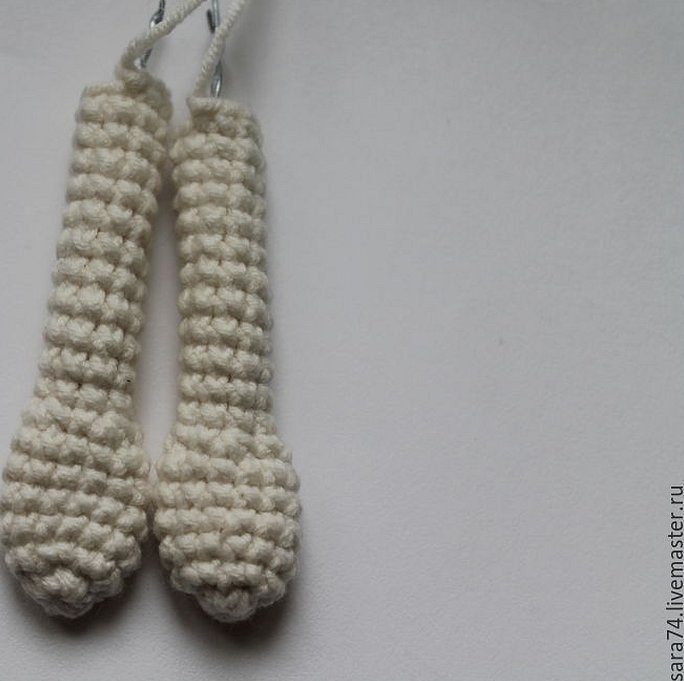
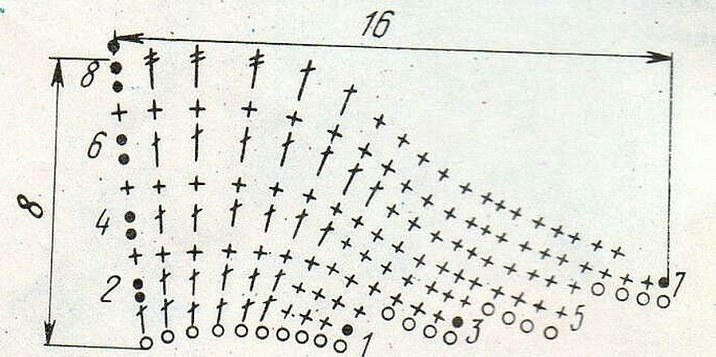
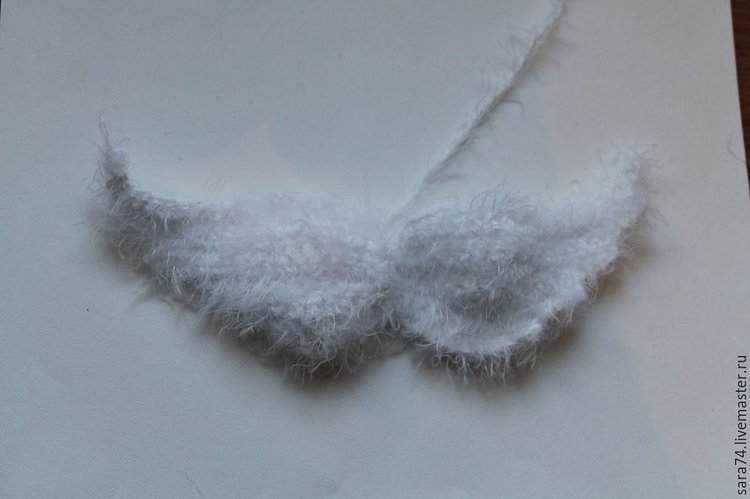
Once the arms are ready, you can start knitting the wings. You should not take too complex or openwork patterns, since the main material used is "grass" yarn. The texture of such a thread will still hide all the openwork. The wing can be knitted according to the pattern shown in picture 5.
Both arms and wings are made in 2. When these elements are ready, they should be put aside until assembly. The arms should be lightly filled with holofiber so that they can be bent later.
After sewing to the base of the body, the limbs are usually crossed and sewn together for complete fixation. But you can leave the arrangement unchanged.
Torso
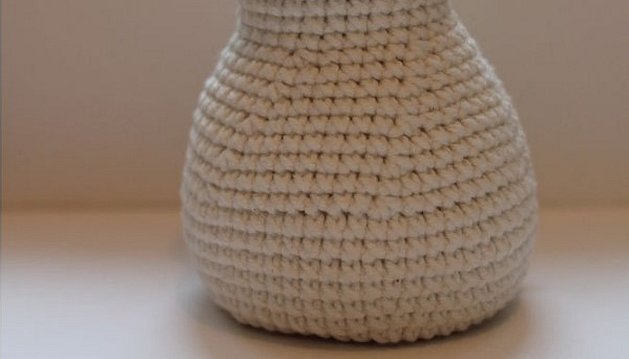
It is best to knit the body, as well as the head, using the amigurumi technique. Then you will get a beautiful pattern with a smooth transition to the main part of the product. Knitting is done from the bottom up:
- Form an amigurumi ring and crochet 6 single crochet stitches around it.
- In the 2nd row, increase the number of loops by 2 times - in each sc of the previous row, knit 2 sc. You will get 12 loops.
- In the next row, increase through 1 sc. As a result, you should get 18 sc. This is the basis for obtaining a stable base for the body.
- In each subsequent row, make the same increases (2 sc in 1 loop), but now through 2, 3, 4, 5, 6, 7 loops respectively. As a result, in the 9th row there will already be 54 columns.
- Knit tier 10 without changes - 54 single crochets. Secure the shape of the body base.
- In the 11th, make an increase of 6 more tables without a yarn over (through 8 cells).
- The next 4 tiers are knitted without changes - no additions or decreases are made. Thanks to this part, the length of the body will be formed. You can increase this number of rows, then the figure will be more elongated.
- Then, after 1 row, a decrease is made. In each tier, you need to decrease 6 sc after 8, 7, 6, 5, 4 loops, respectively.
Additional information! To make the toy stand firmly and evenly on a shelf or table, you can glue a cardboard circle to the base of the body and put a small stone on top for weight.
In this way the body is formed and the last rows prepare the transition from the body to the head - the neck. Having finished knitting at this stage, it is worth stuffing the body with holofiber.
Head
The principle of making such a figure is the simplest method - the body with the head are solid and do not require assembly in this place. As a result of this knitting method, the angel, of course, will not sit, but will stand like a statuette. Explanation of how the head is made:
- After decreasing when making the body, 30 loops remain. So you need to knit 5 rows.
- Then, after every 4 cells, make an increase – you will get 36 sc.
- Then in the next 3 tiers, add another 3 sc through 12 loops.
- Next, knit 3 tiers without changes – 45 columns.
- Then you need to decrease every 6, 5, 4, 3 loops, respectively, in each subsequent tier.
- Then decrease again until there are 6 loops left.
- Finish knitting.
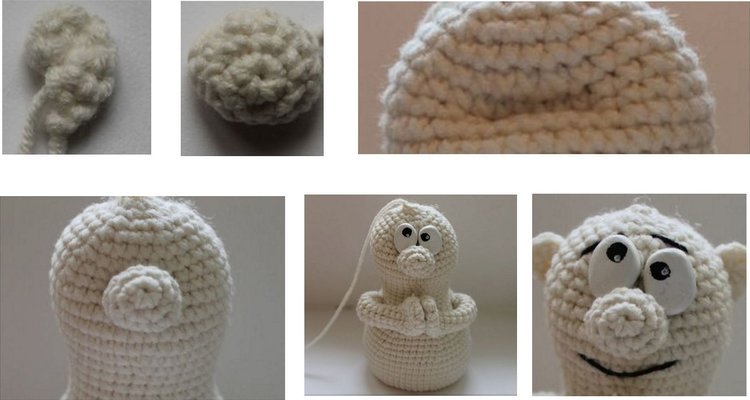
Next comes the decoration - sew on the eyes, nose, ears. This can be done according to the provided diagram. Then comes the assembly.
Interesting diagrams with description of the process
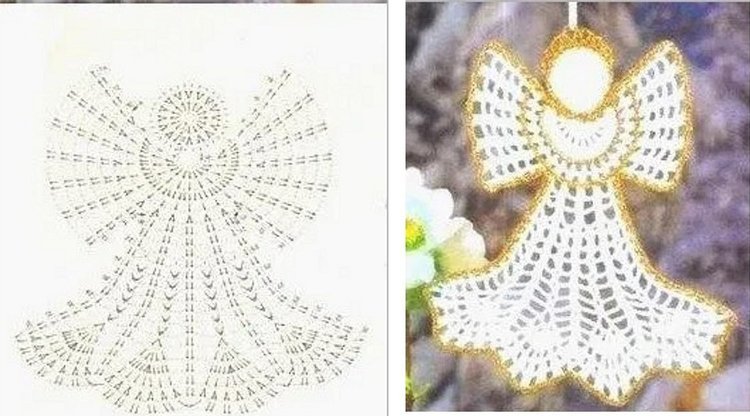
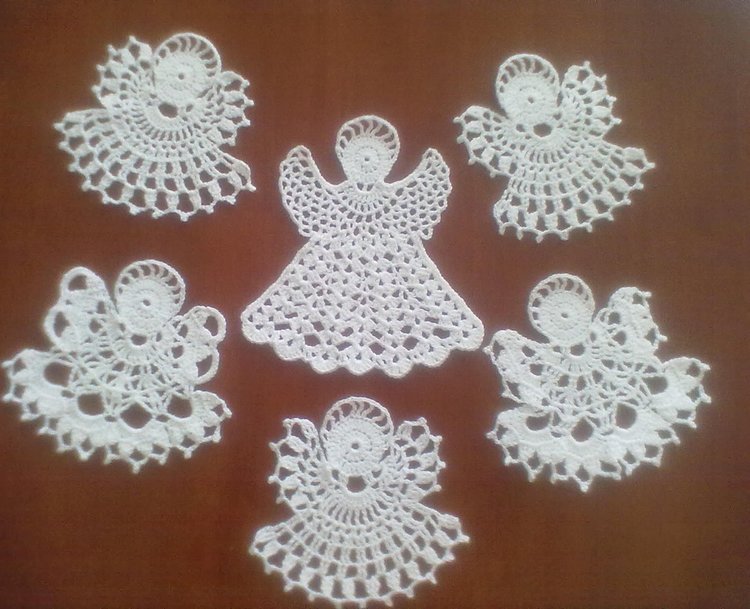
There are several more patterns on how to knit an angel. Such models can be flat. At the same time, a knitted angel can serve as a decoration for a Christmas tree. To make such a toy, you need to use a detailed MK. The step-by-step algorithm of work is presented in the crochet pattern in picture 9.
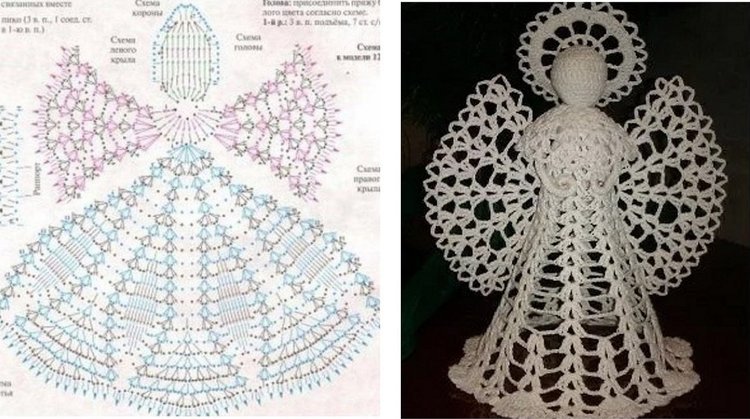
There is another option for making an angel using a crochet hook, the diagram and description of which are presented in picture 10.
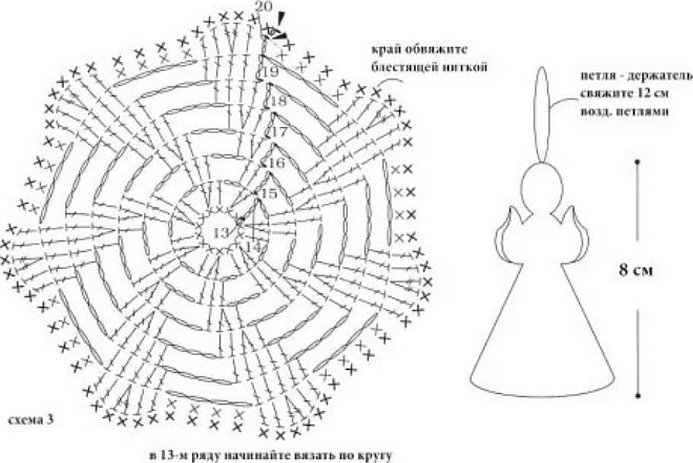
The diagram for making an angel figurine in picture 11 is suitable for both experienced and novice needlewomen.
Each pattern involves making an openwork base. You can get a beautiful pattern thanks to combinations of double crochets, single crochets, reductions and increases. Usually, in all the presented options (patterns), knitting begins with the head.
Please note! An additional advantage of knitting from the head is that it does not require complex assembly. It is enough to sew the assembled parts and parts of one ready base.
Nuances of angels
Any angel, connected by means of a hook and yarn, has its own nuances. One of the important features is that flat figures need to be starched. But sometimes other nuances are possible, which concern the decor of the finished product.
Is it necessary to starch a finished toy?
Angels crocheted from soft yarn must be starched. This will help to preserve the shape of the product. After one starching, the toy can stand for a long time without the need for a repeat procedure. If the crocheted figurine is to be used to decorate a tablecloth or curtain, then there is no point in starching such a product, since the plasticity of the knitted base must be preserved.
Often, it is necessary to starch only individual parts of the product - the skirt, wings, sleeves. Then the garment is rigid and does not require additional processing or finishing, that is, there is no need to make an additional rigid frame.
How to decorate an angel better
A crocheted flat angel can be decorated in different ways. The most popular option is to trim the edge of the skirt and sleeves with beads, beads or small glass stones. This is especially relevant when decorating an openwork base.
When making a doll in the form of an angel, the possible types of decoration become much more. For example, you can glue decorative feathers to the outline of the knitted wings. You can weave a special wreath or halo for the head from beads, or use satin ribbons to form a beautiful embroidery based on the dress of the finished doll.
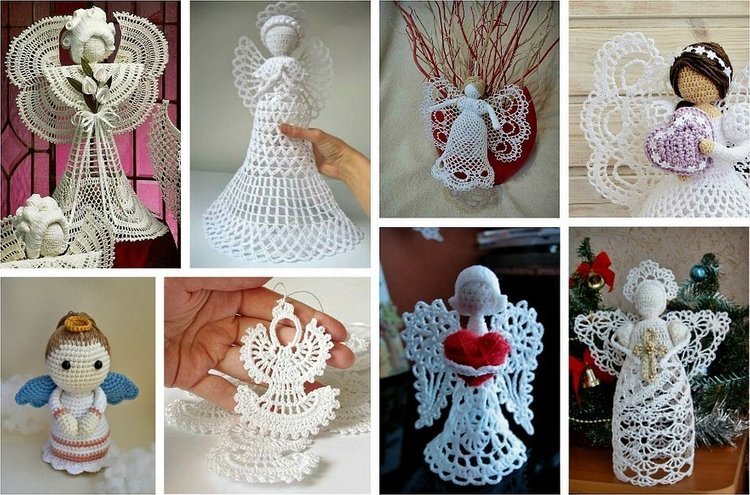
Each option is interesting in its own way and can be used within the framework of the desired decoration. The main thing is that the decoration is not flashy and does not stand out too much against the background of the overall composition.
Knitting angel figures has a lot of nuances, but the result is a unique product. You can use such a toy for decoration, games, decorating other products and objects. With imagination, it is quite possible to create full-fledged compositions on a certain theme.


