Many of those who do handicrafts like to make different birds and animals from scraps of materials. Hand-made toys are practical to use as original decor, decorating the interior of living spaces. The owl craft is the most common among such products. It is not surprising, because owls-wise heads made with your own hands from scrap materials always turn out cute and touching.
Paper owl craft: master class with description of work
Various materials are used for crafts – both familiar and unusual. Paper can be classified as the former. Thanks to the smooth surface and bright colors of the material, paper crafts are made quickly and easily. Working with paper helps develop creativity in children and adults.
Please note! The use of various techniques for working with this material, from simple applique to creating paper sculptures, allows you to realize any idea.
Just an owl
Today there are many incredibly easy master classes that help those who would like to make crafts together with their child. The proposed instructions describe the work on how to make an owl out of paper with your own hands.
To make this craft, you need to have on hand:
- two sheets of colored paper (pink and white);
- scissors;
- compass;
- glue stick;
- black felt-tip pen or marker.
Job Description:
- The basis of the craft is a circle. It should be cut out of a pink sheet. If you don't have pink paper at hand, you can choose any color you like. Using a compass, draw a circle with a diameter equal to the width of the sheet. However, you can outline any round object, the same plate.
- Bend the right and left sides of the circle to the middle line, stepping back from it by 1 cm. These parts of the circle will be the owl's wings.
- Bend the top part of the workpiece to the middle line. This element will be the owl's head.
- Next, you need to make the eyes. For them, on a white sheet of paper, using a compass, draw two circles with a diameter of 3 cm. Inside each of them, draw a circle with a diameter of 1 cm. The small circles should be colored with a black marker.
- Carefully cut out the finished eyes with scissors and glue them to the places where the head and wings are connected.
- Cut out an owl's beak from the remains of orange or yellow paper. Hers is in the shape of a triangle. The finished beak is glued in the center below the eyes.
- Next, cut out bird feet from the remains of pink paper. It is advisable to color them with a black marker. The feet are glued to the back of the craft.
- Use a black marker to draw the bird's plumage and eyelashes.
That's it, the owl is ready.
Volumetric owl
A three-dimensional owl craft made with your own hands using the origami technique. By repeating the steps of the proposed scheme, you can make a three-dimensional craft without glue. The scheme is quite simple, so even beginner needlewomen can handle it. To do this, you will need one sheet of colored paper, scissors, a pencil and a ruler for convenient work. Before you start folding the bird figure step by step, you need to cut a square out of a sheet of paper.
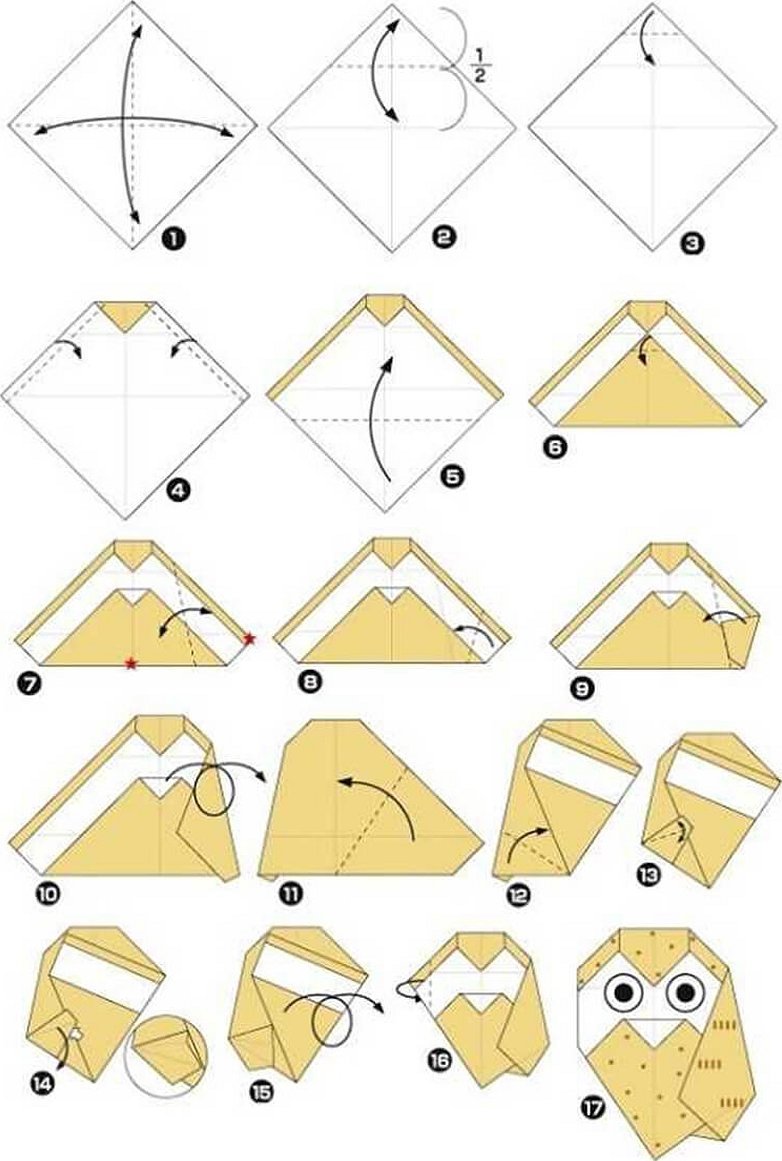
Then perform all actions according to the diagram:
- First, make cross folds diagonally in two directions.
- Pull the top corner towards the center of the square, secure the fold to mark the center line.
- Now pull this same corner towards the middle line and also make a fold.
- Bend back small edges from the last fold on both sides.
- Next, pull the bottom corner towards the top corner and make a fold.
- Bend back a small corner of the bottom triangle, which will serve as a beak.
- Connect the right corner to the center. Fix the fold line.
- Next, pull the right corner towards this line and fix the fold again.
- Bend the right side of the workpiece along the previously marked line. This will be the bird's wing.
- Turn the workpiece over.
- Connect the right side to the left.
- Fold the bottom corner up.
- Fix the fold line and bend it down.
- Form a pocket.
- Turn the workpiece over.
- Fold the left corner to the back side.
- Make the finishing touch - draw the eyes.
DIY Cardboard Owl: Step-by-Step Instructions
The base of the craft is a cardboard cylinder.
Please note! As a cylinder for the craft, you can use a roll of toilet paper or paper towels. There are many interesting ideas for decorating such rolls on the Internet.
Before making an owl out of cardboard with your own hands, you will need to stock up on:
- a small sleeve, preferably made of soft cardboard;
- colored paper;
- with scissors;
- glue stick;
- a piece of black felt;
- with watercolors or gouache;
- with a simple pencil and an eraser.
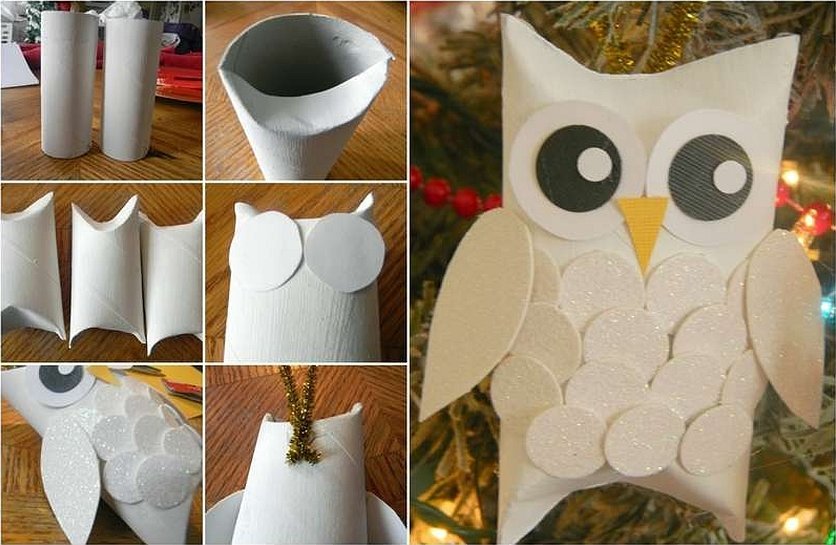
How to make a cardboard owl: step by step instructions:
- Preparing a cardboard tube. You need to cut the tube so that it is a couple of centimeters longer than the diameter. Then bend the edges inward on one side to create a smooth semicircular notch. Form owl ears from the higher edges. Glue narrow strips of paper to the folded edges.
- Painting the bushing. Such cardboard cylinders have an unpresentable appearance, so it is advisable to paint the bushing with brown paint and let it dry completely.
- Preparing the decoration. Cut out an owl beak, eyes and plumage for decorating the bird's chest from colored paper. For the beak, cut out a triangle from yellow paper. For the eyes, draw 2 circles 4 cm in diameter on a white sheet of paper with a simple pencil. Cut out 2 smaller circles from black paper - pupils. To make the plumage, fold a sheet of colored paper several times and cut out fragments in the form of a circle and a drop. Cut out wings from black felt using a template.
- Decorating the craft. Glue the pre-prepared decorative elements onto the sleeve.
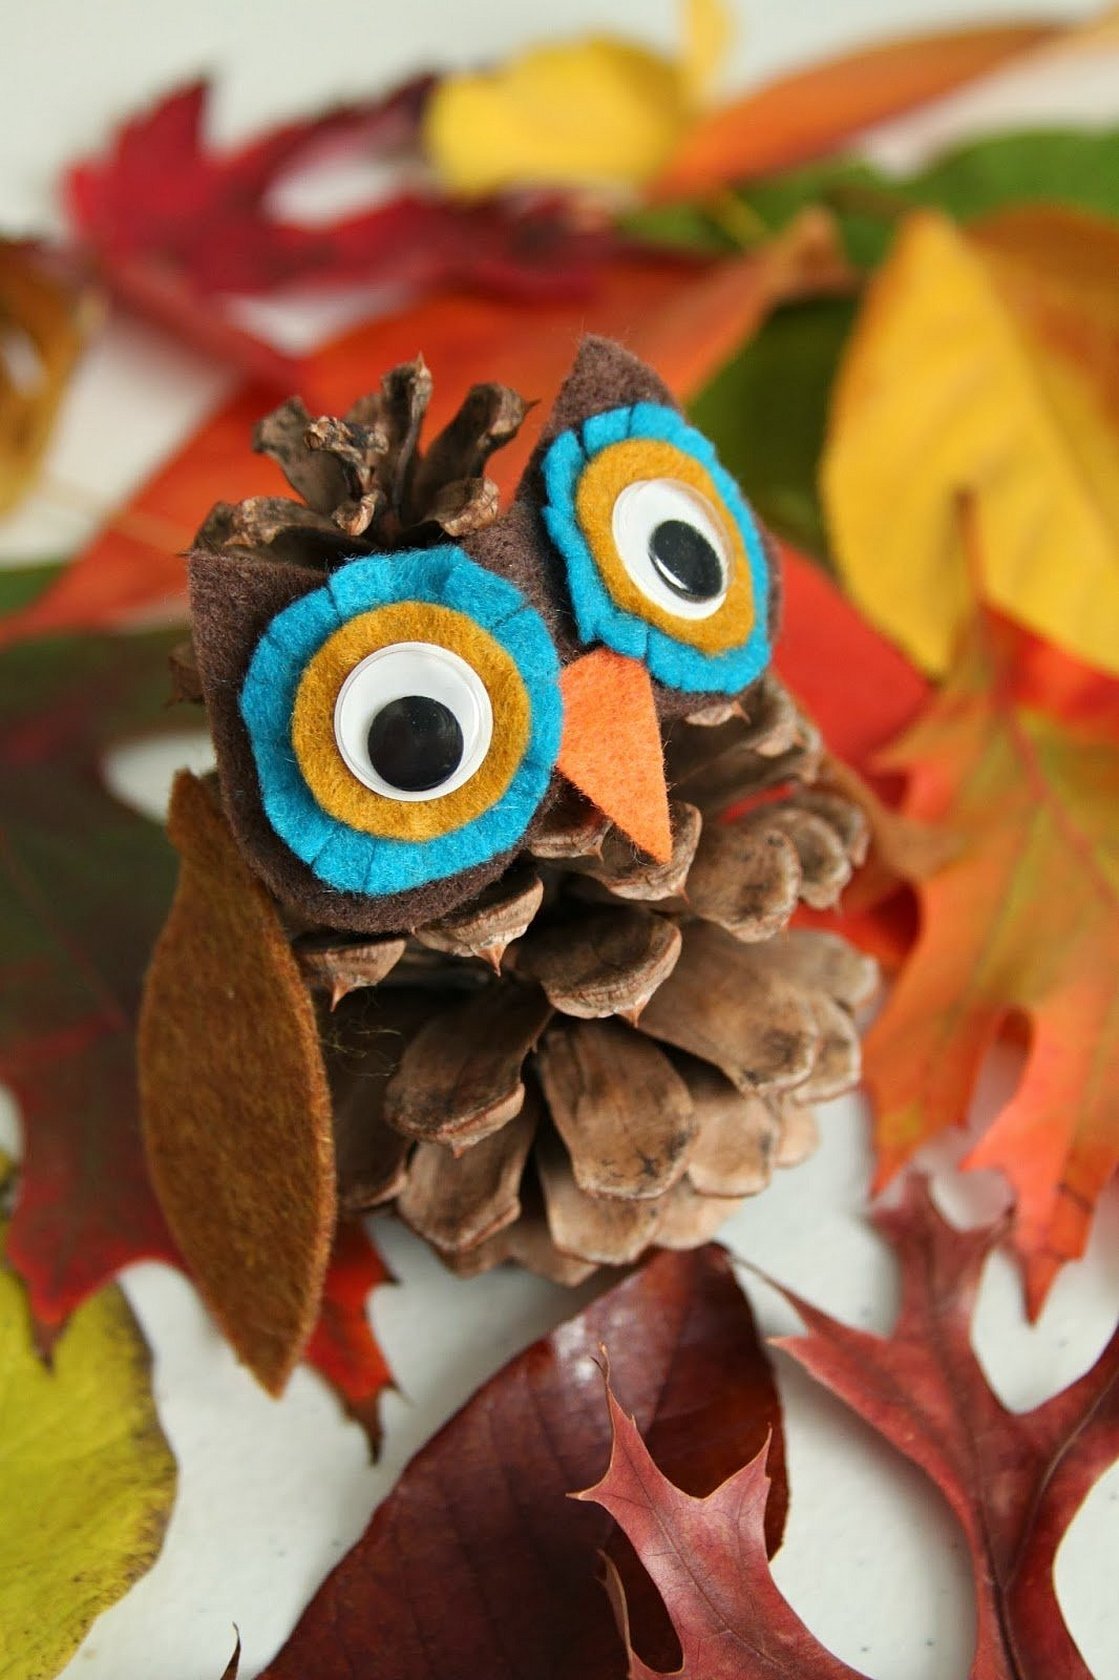
How to make an owl from natural material
Autumn is the best time to make crafts. Moreover, at this time they become quite popular in kindergartens and schools at golden autumn competitions. Most often, animals and birds are made from natural materials. Therefore, the question of how and from what to make an owl is relevant.
Please note! Many ideas for crafts from natural materials can be gleaned from the game "Pony Town".
Many funny and interesting owls can be made from improvised, and sometimes even unexpected, materials. What is not used to implement ideas:
- paper;
- cardboard;
- plasticine;
- scraps of fabric and felt;
- fur;
- files (packages);
- feathers;
- straw;
- reed;
- PET bottles;
- fallen leaves and twigs;
- pine cones and acorns;
- bark and tree cuts.
If you have a good imagination, this list can be continued endlessly.
Options for ready-made crafts
There are many options for making an owl craft yourself:
- made of clay and ceramics;
- made using quilling technique;
- from salt dough;
- cut from fruits and vegetables, such as zucchini;
- made from plastic bottles;
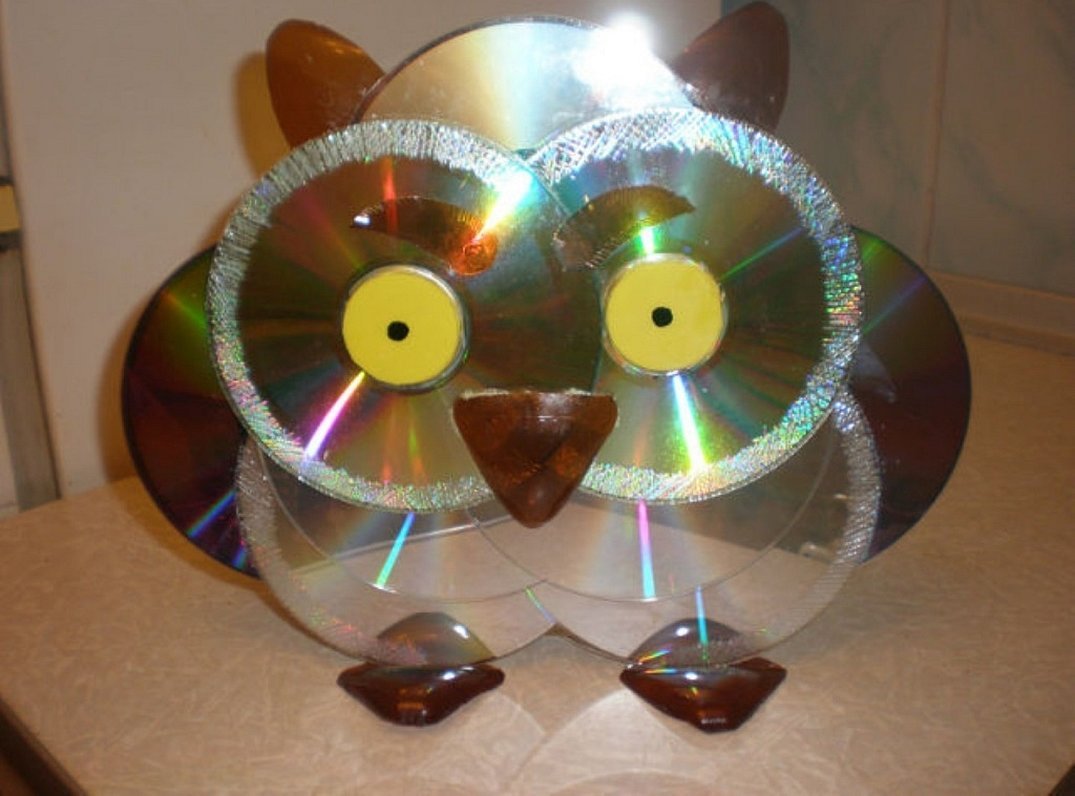
- from unnecessary CDs;
- files folders;
- various kinds of appliques made from colored paper, cardboard, felt, felt and fabric;
- voluminous crafts sewn from different fabrics, felt and stuffed with cotton wool or synthetic padding;
- sewn using patchwork technique;
- woven from beads and seed beads;
- crocheted and knitted bird figures;
- laid out from watermelon, pumpkin and other types of seeds.
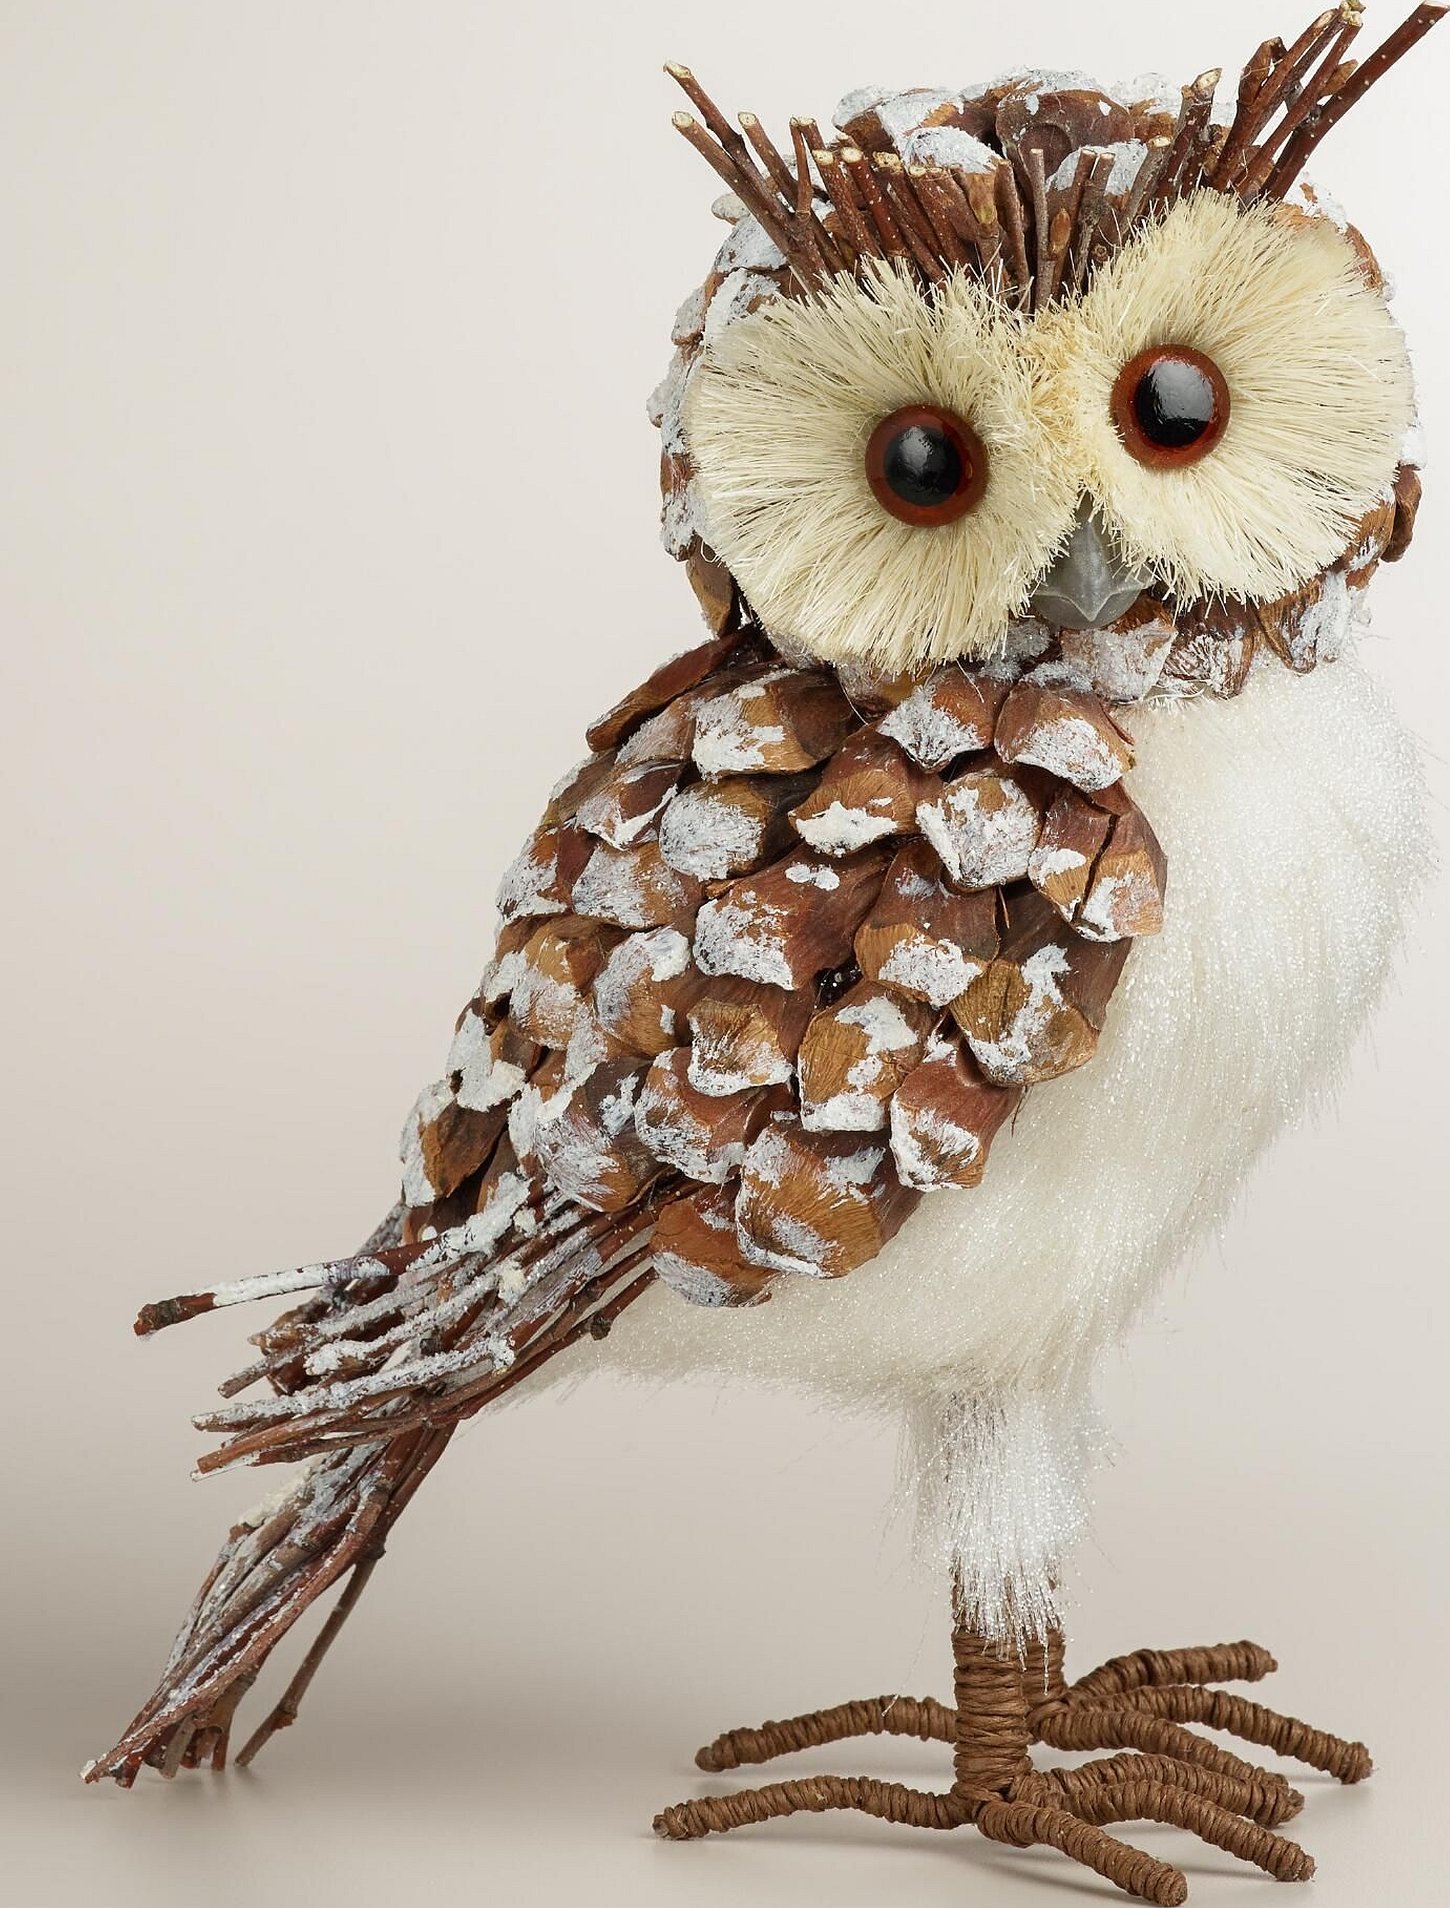
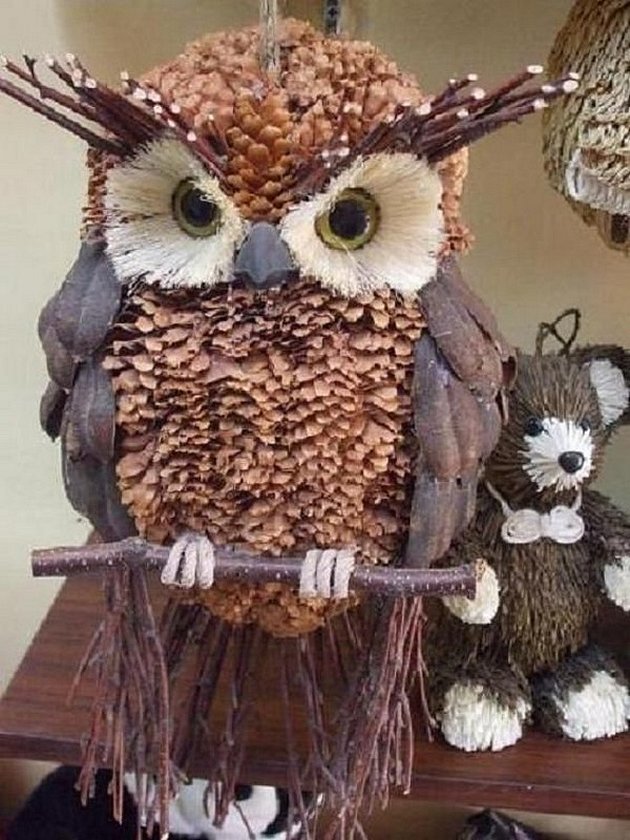
How to make an owl from pine cones
A popular natural material that is widely used in children's creativity are pine cones. They can be found in the forest literally underfoot. Therefore, children often bring pine cones home from walks. And if a handmade owl is chosen as a craft for the competition, it is often made from the fir and pine cones brought. In addition to them, for such a craft you need to stock up on:
- glue gun;
- pieces of felt and felt of different colors;
- with scissors;
- stapler and staples;
- plastic pupil eyes;
- acorn caps.
Please note! To make a beautiful shape of the parts you need to use a pattern.
The creative process involves the following order of actions:
- Cut out an owl's face from black felt.
- To make owl eyes, cut out a couple of blue circles and a couple of brown ones from pieces of felt. Cut the edges of the blue circles.
- Then put blue and brown circles on the muzzle, fix them with staples in the center of the eyes using a stapler. Glue plastic pupils on top.
- Cut a triangular beak out of orange felt and glue it to the muzzle.
- Cut out bird wings from brown felt.
- Choose a nicely shaped cone. Now you need to carefully bend the cone scales and insert the paws and wings there and fix them with a glue gun. Glue all the other prepared parts to the top of the cone.
How to make an owl from wood cuts
A real decoration of the interior of a country house or cottage will be an owl made from tree cuts. Such decorative items were used to decorate homes in the past, and today they are also in demand.
You will need to prepare several wood cuts of different sizes, but approximately the same thickness. Pine wood is best suited for crafts. Working with wooden blanks will require skill and time. And, of course, you will have to learn how to work with an electric saw.
To make the craft you will need to saw off the so-called heels:
- diameter 30 cm – for the base;
- a couple of cuts 20 cm in diameter – for the wings;
- a couple of 10 cm diameter spots for the eyes;
- a cut with a diameter of 3 cm - for the beak.
Manufacturing procedure:
- Initially, all blanks need to be polished. For this, a grinder with a polishing attachment is used.
- Screw 2 ten-centimeter patches – eyes – to the largest cut using self-tapping screws.
- Cut off the tops of PET bottle caps and glue them on as pupils.
- For the wings, cut off about 1/3 of the cut and screw it to the base with self-tapping screws.
- Cut the smallest blank in half to make the owl's beak. Carefully sand the half and nail it to the end.
- The last finishing touch remains - to place the owl on a stand.
Thus, having familiarized yourself with the proposed master classes, you can choose the craft option you like and try to make it yourself.


