The shelves of modern children's stores are full of bright toys of different shapes and sizes. But none of them can compare with those made by the hands of a loving mother. After all, a piece of soul and warmth of a loved one's heart is put into every detail, every stitch. Even a novice needlewoman can sew toys from fleece. A little patience and imagination will turn a soft patch into a unique designer exhibit, which will certainly become a favorite toy for the baby.
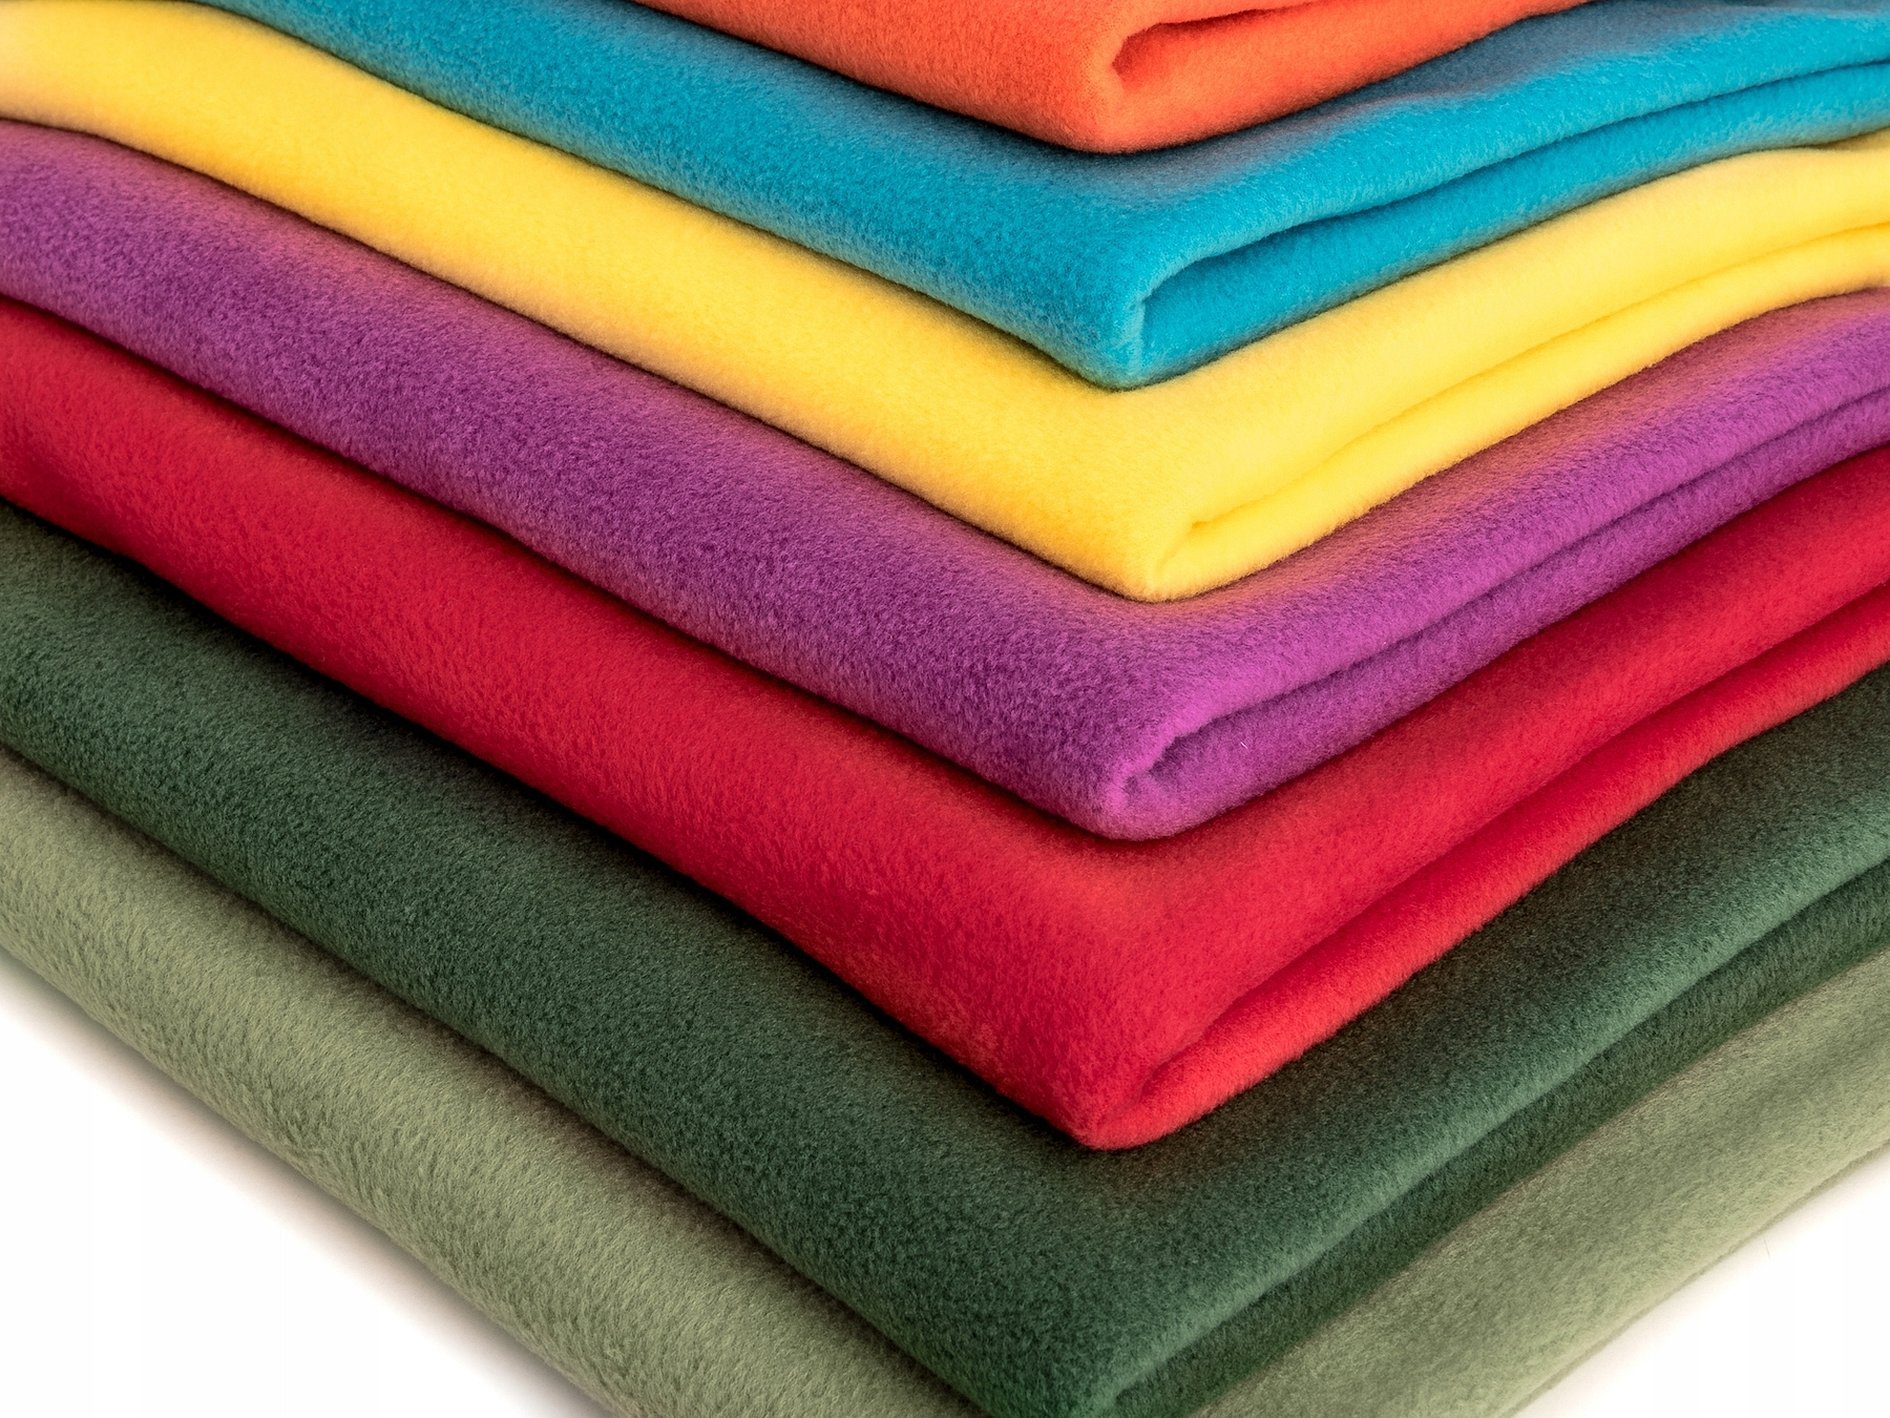
Choosing Fleece Fabric
Fleece in English means "fleece", "sheep or goat wool". In fact, it is an exclusively synthetic fabric that is knitted from polyester fibers and then combed to a fluffy state using special rotating brushes. This material has properties similar to wool, such as softness and the ability to retain heat.
Important! Unlike natural wool, fleece fabric is hypoallergenic, so it is widely used in the production of children's goods.
Fleece, invented in America in 1979, is used to create warm, light and breathable clothing for active recreation. The fabric has a number of unique properties that allow it to be used as a raw material for the production of children's toys, including those made by hand:
- soft and at the same time durable;
- light;
- elastic, perfectly retains the given shape;
- practically does not wrinkle;
- does not crumble at the cut site;
- does not fade in the sun;
- Machine washable, dries quickly.
Please note! Fleece has several significant disadvantages. It is easily flammable, electrified, quickly accumulates dust, and becomes covered with pellets over time.
This should be remembered when giving a finished toy to a child, and timely measures should be taken to prevent possible negative consequences.
When choosing fleece for a soft toy, you should pay attention to the following:
- Pile. It is better if it is located only on one side of the fabric. The smooth reverse side will facilitate the application of chalk markings for patterns.
- Density. The best option is considered to be 220-300 g/m3. This is the fabric that maintains its proportions and does not deform. The thickness of this fabric is about 2-4 mm, taking into account the length of the pile. If there is no density marking on the label, then it can be determined empirically. To do this, you need to stretch the fibers across the factory edge. Fabric that has lost its shape is not suitable for sewing toys.
- Painting. It is worth rubbing the edge of the canvas with a wet napkin. The fabric should not fade.
- Foreign odors. It is necessary to smell the selected fabric. As a rule, a sharp chemical smell is given by cheap dyes containing substances harmful to the human body.
Only the right fleece will guarantee an easy, exciting creative process and a result that will please both adults and children.
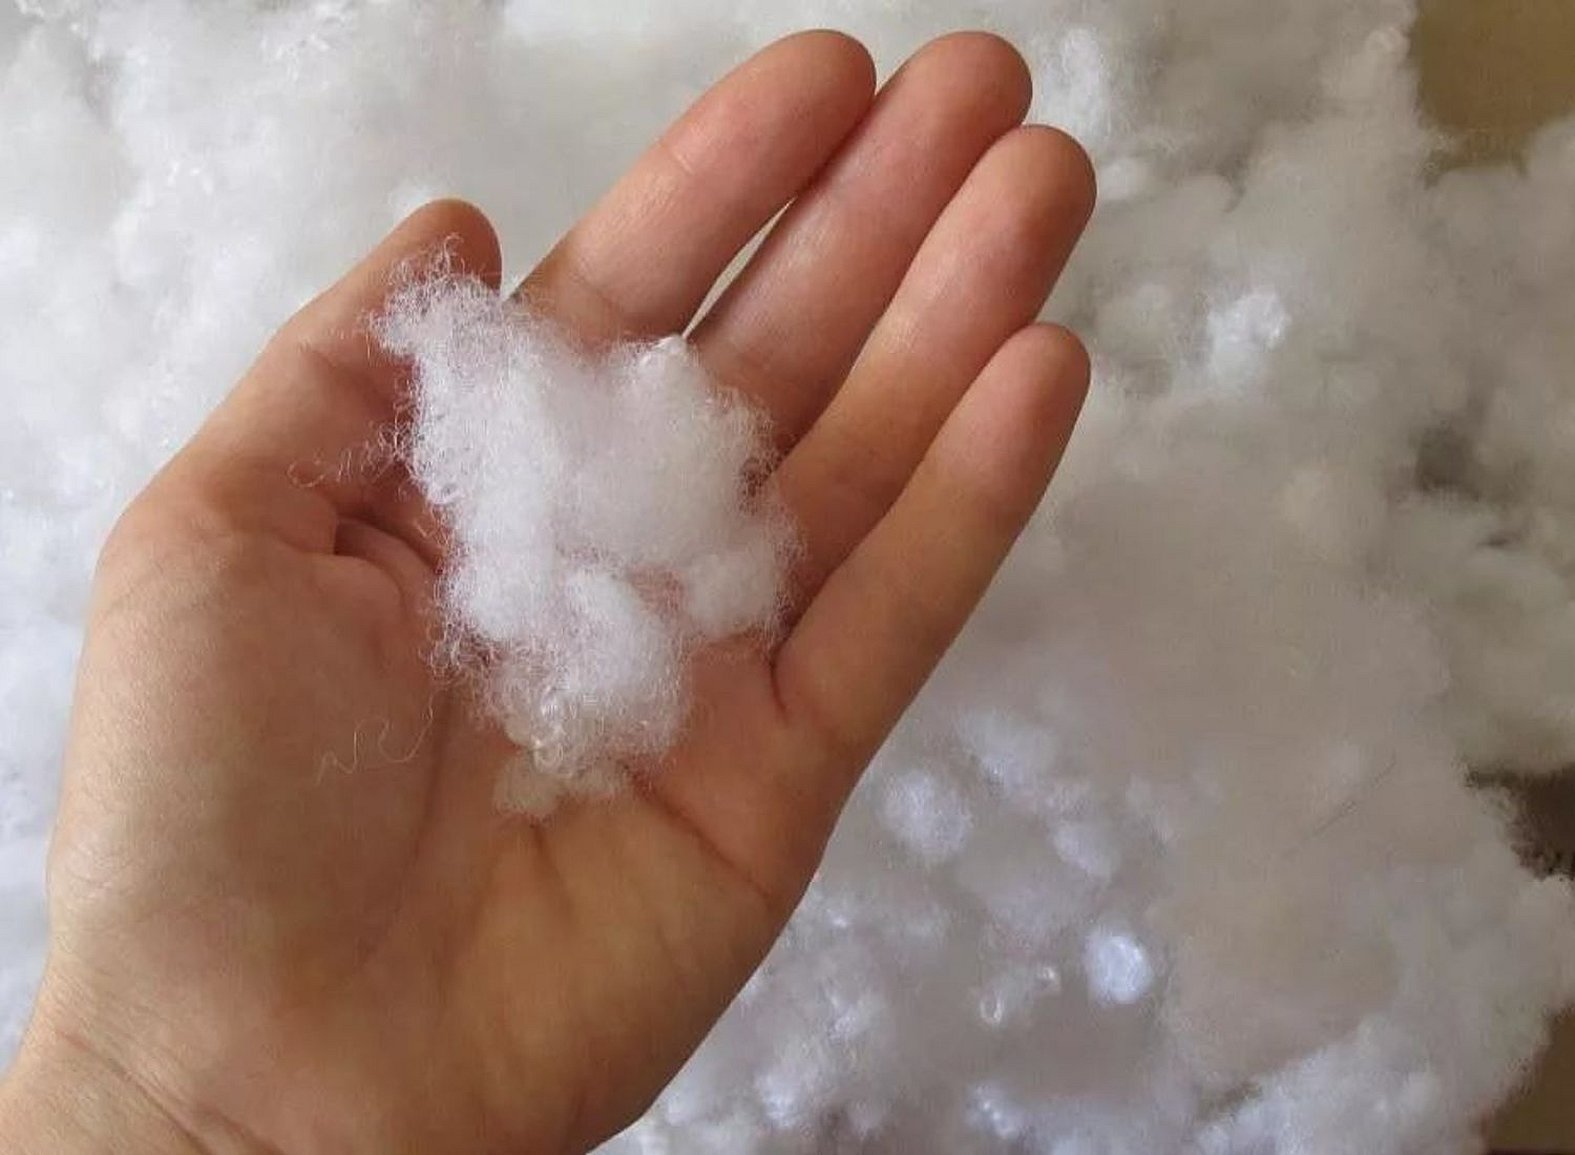
Filler material
In order for a fleece toy to hold its shape, not stretch, look proportional, even and beautiful, it is important to choose the right stuffing material. Today, craftswomen prefer to use synthetic fillers consisting of a mix of polyester fibers of various shapes. They are light, voluminous, do not cause allergies, do not accumulate odors, are easy to wash and dry. These include:
- Sintepon. It comes in sheets of different thickness. To stuff the toy evenly, you will have to cut the material into small pieces and fluff them up, otherwise the toy will turn out flat and bumpy.
- Hollowfiber. These are polyester fibers in the form of small balls that are bonded together. It is considered the best filler, as it can withstand repeated deformation, quickly restores its original shape, and qualitatively fills even the smallest, most complex-shaped parts.
- Sintepuh. As the name suggests, this is a synthetic analogue of natural fluff, retaining all the properties of the latter, but at the same time hypoallergenic. Beginner needlewomen should avoid working with this material, as it is very volatile and can fly apart if handled improperly.
- Comforel. A type of synthetic fluff in the form of silicone-coated balls. Lightweight, hypoallergenic, this material will never attract dust mites and insects.
- Foam rubber. Today it is used less often than others, as it has a dense structure that prevents uniform distribution inside the toy. Over time, it crumbles and accumulates odors.
Among the natural fillers for fleece, the most suitable are:
- Bamboo fiber. An elastic material that tolerates washing well, does not accumulate dust and odors, and does not cause allergies. The only drawback is that such a filler is quite difficult to find.
- Buckwheat groats. Used in toys designed to develop a child's fine motor skills.
Additional information! Today's grandmothers and great-grandmothers played with dolls and teddy bears stuffed with sawdust. This filler is absolutely not suitable for fleece toys.
Very heavy, it will stretch and deform the delicate elastic material. In addition, sawdust quickly becomes damp, accumulates odors and is afraid of water. It is also better to refuse cotton wool and wool. Such fillers cannot be washed, over time they clump together, and become a favorable environment for the development of harmful bacteria and mites.
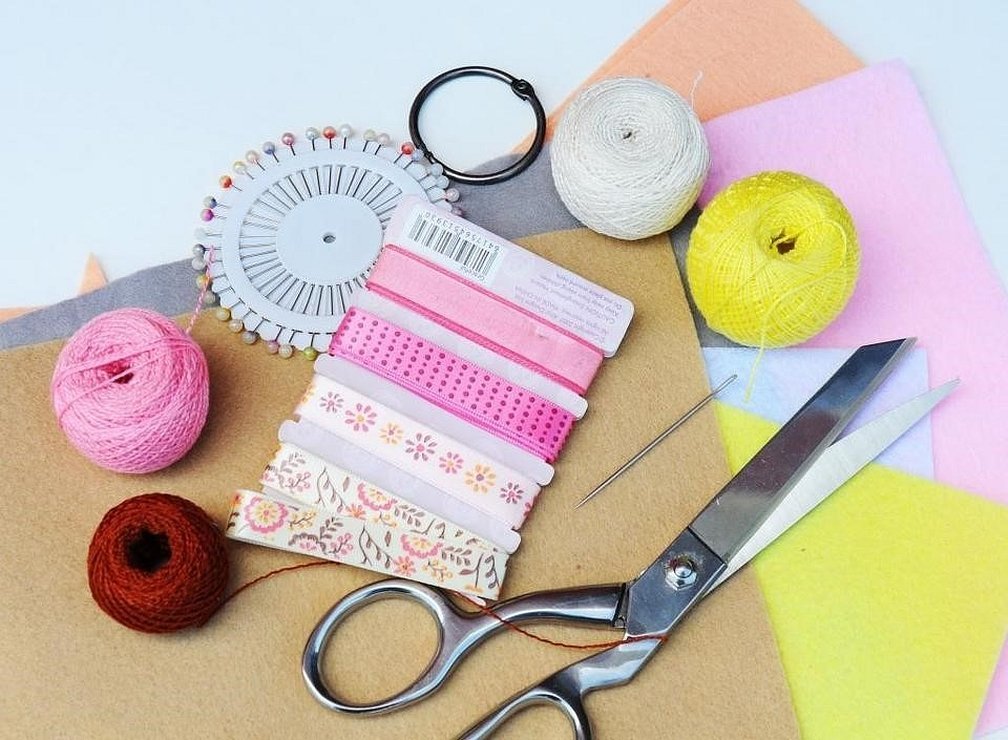
Necessary tools for work
Before you start sewing a toy, you need to prepare your workspace. The creative process should not be interrupted. Therefore, all the necessary tools and consumables should be at hand:
- Cardboard, graph paper, tracing paper - for creating templates and patterns.
- Pencil, ruler, eraser.
- Tailor's chalk for tracing patterns on fabric.
- Scissors for cutting out details.
- Thimble.
- Needles for handwork.
- Threads (polyester threads for knitwear are best).
- A sewing machine and needles with rounded ends that will not damage the structure of the fleecy fabric.
Additional information!Fleece is a shaggy fabric, so it is quite difficult to cut with scissors. You need to constantly monitor the sharpness of the blades and wipe them with alcohol from time to time to remove stuck lint. You will not need an iron when working, since the material does not tolerate ironing and the use of adhesive interlining fabrics.
Patterns of toys
It is not easy to create an original toy pattern. It requires certain knowledge and experience.
Ready-made templates
Although fleece is a pliable material, and the details can literally be “sculpted” to correct the flaws, it is still easier to use ready-made, precisely calculated templates. They are printed from the Internet, transferred to cardboard using tracing paper from the pages of handicraft magazines, or purchased as ready-made kits. And detailed master classes will tell you how professionals make soft toys.
Rules for transferring patterns to fabric
Finding a good pattern is only half the battle. You need to transfer it to the fabric correctly. You can't do without knowing some nuances here. Here is the basic procedure for transferring patterns to fabric:
- Lay the fleece face down on a smooth, flat surface.
Important! With fleece, especially if it is napped on both sides, it can be difficult to determine which is the front and which is the back. To do this, the fabric is carefully stretched across the grain (it is parallel to the factory edge) - the fleece is rolled up in a roll towards the back.
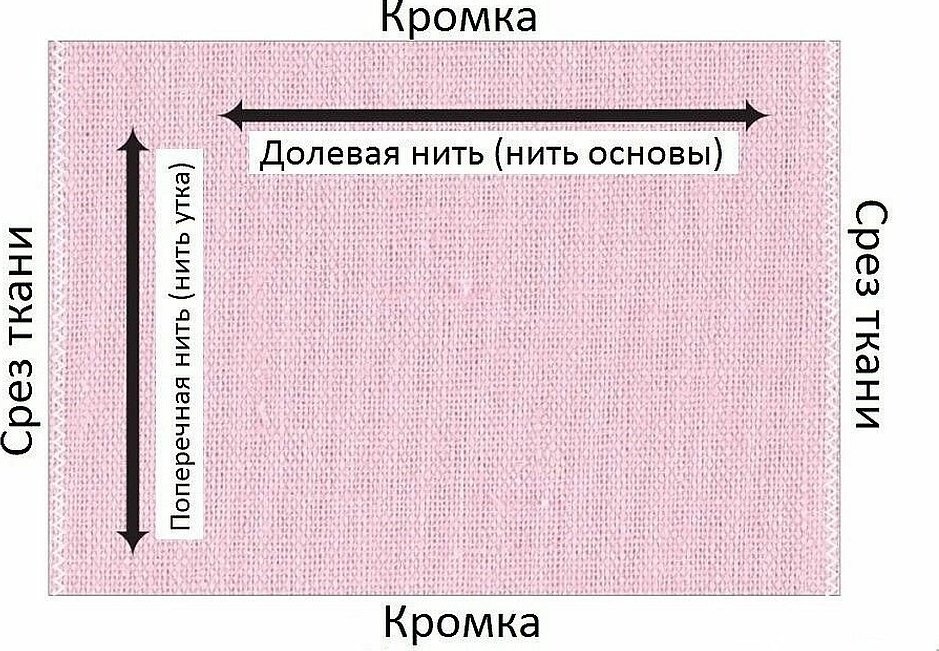
- Place the templates compactly on the fleece. This can be done along or across the grain. This will result in two completely different shaped toys. For example, a bunny cut along the grain will be lower and thicker than the one whose parts were cut across.
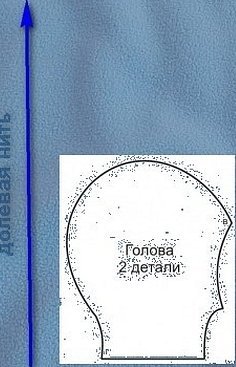
Additional information! Fleece is a voluminous and fluffy fabric. The appearance and shade of the fabric depend on the position of the pile. Therefore, the templates should be placed in one direction.
- Trace the templates with a sharp tailor's chalk or a contrasting pencil, avoiding significant creases in the pile.
- Carefully cut out the elements of the future toy with sharp scissors.
The edges of the cut out parts do not require additional processing, as the fabric does not fray. For greater confidence, you can go along the contour with scissors with a relief edge.
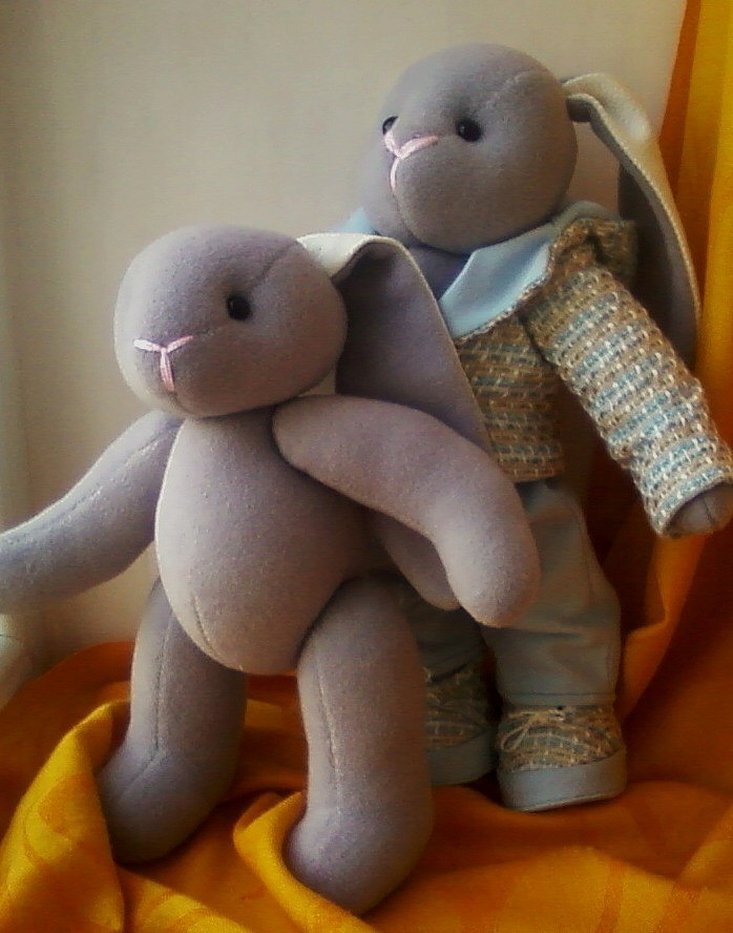
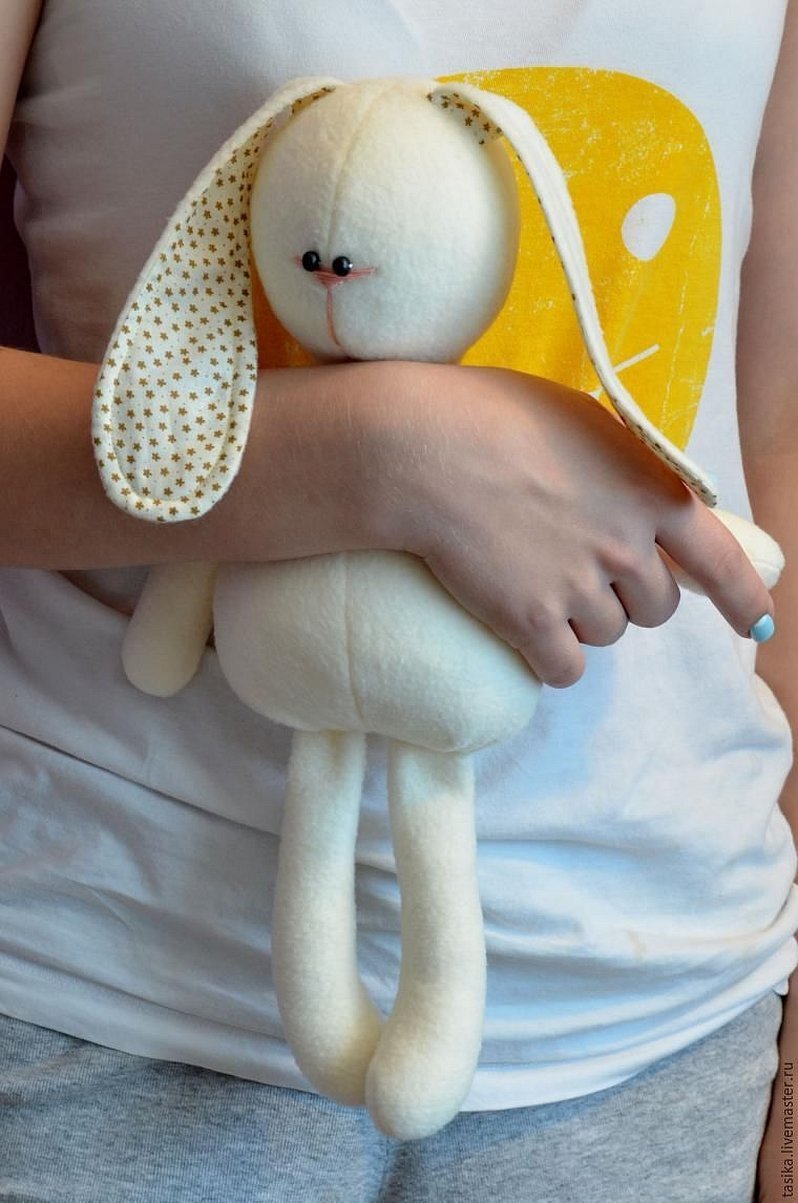
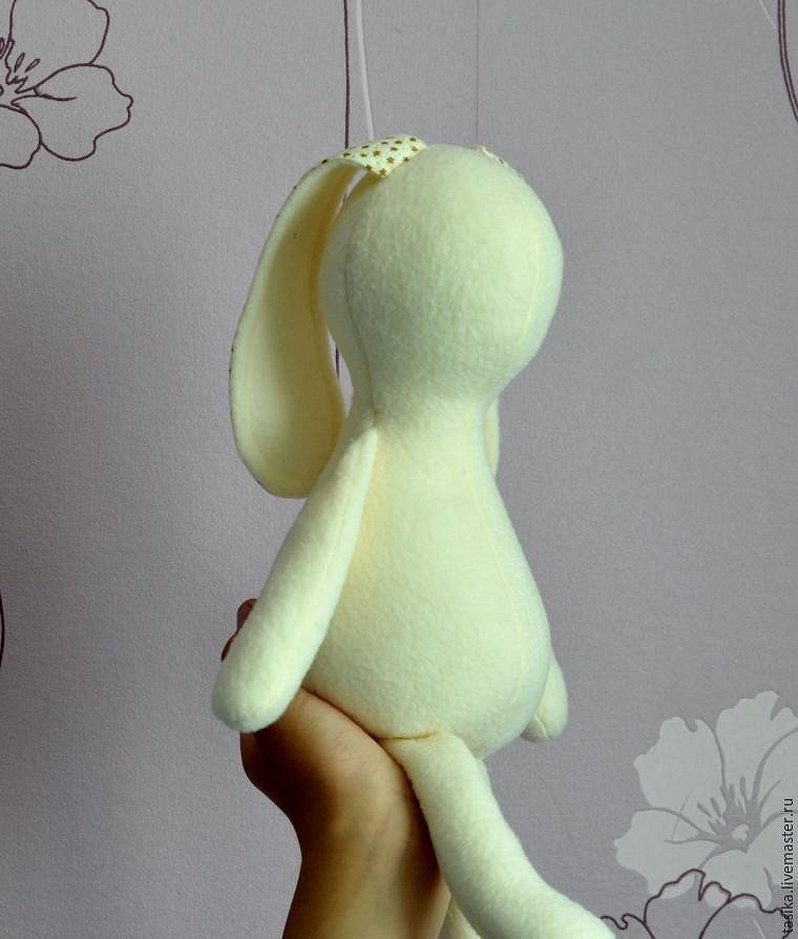
Master class on creating a soft toy hare with your own hands
Detailed master classes will help you create a whole collection of unique soft friends for your child. Of course, a toy bunny made with your own hands will take a worthy place in it.
To make such a cute eared creature you should prepare:
- a piece of light fleece measuring 50 x 50 cm;
- contrasting colored fabric for the ears;
- filler (it is better to use a synthetic one such as holofiber);
- black beads for eyes;
- brown or pink floss for embroidering the face;
- cardboard for making templates;
- colored chalk to transfer them onto the fleece (white will not be visible on a light background);
- sharp scissors;
- needle and thread for knitted fabric (or sewing machine).
Now you can start working. At the first stage, print out the pattern diagrams, transfer them to thick cardboard and cut out along the contour.
The fleece fabric is laid out on a flat surface with the back side facing up. The craftsmen lay out the templates on it so that the pile on all the parts of the toy lies in one direction. The blanks are carefully outlined with sharpened chalk or a soft pencil.
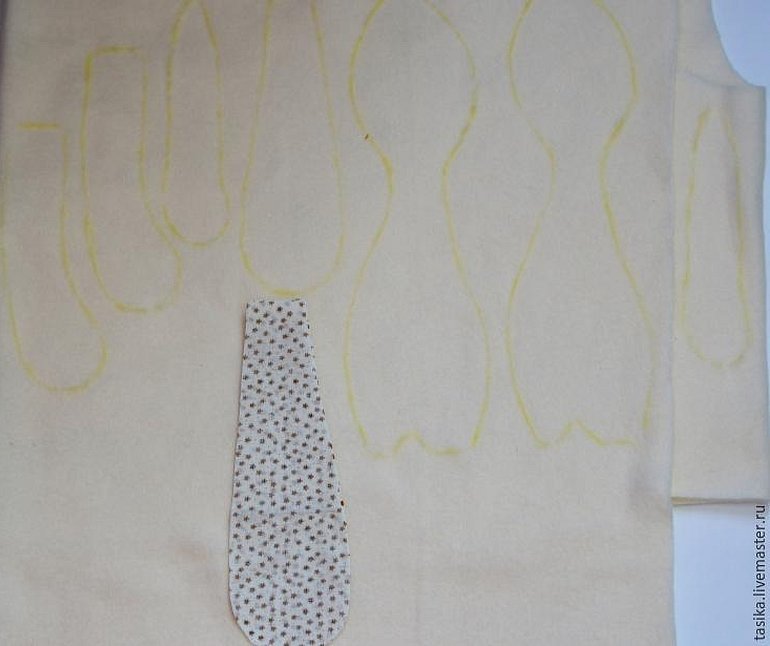
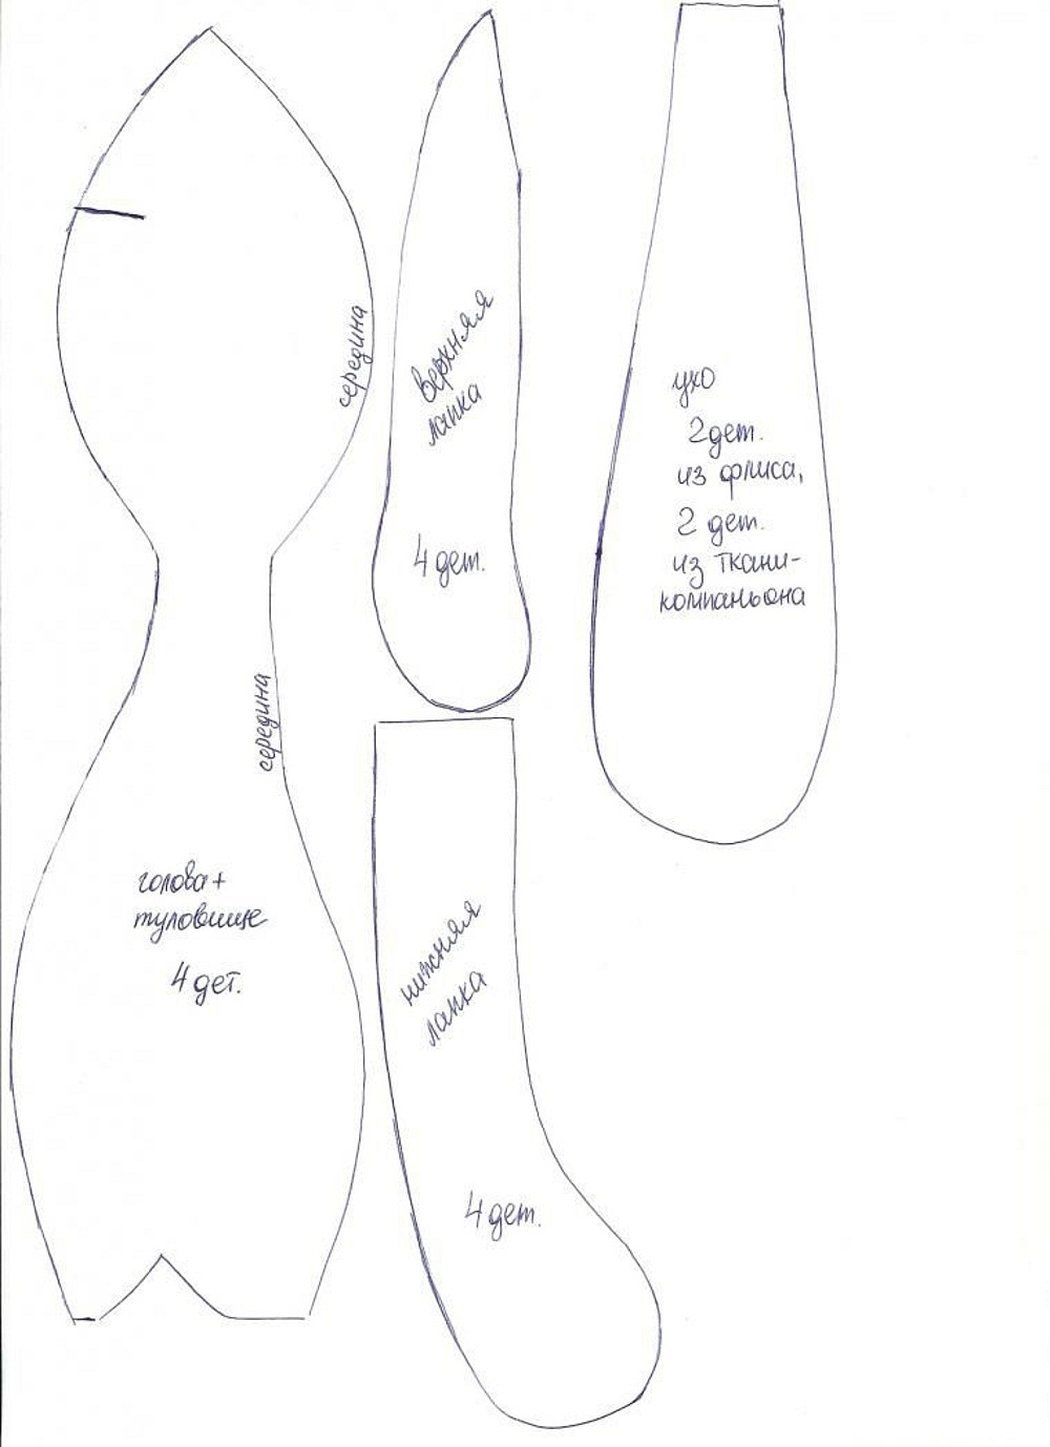
There should be a total of 16 parts. Using a basting stitch, connect the parts of the body, upper and lower legs and long ears of the bunny together, and then stitch them together on a machine or sew them by hand using a stitch "behind the needle".
Important! When sewing the body of the toy, be sure to leave space for attaching the ears and paws, as well as a technological hole for stuffing.
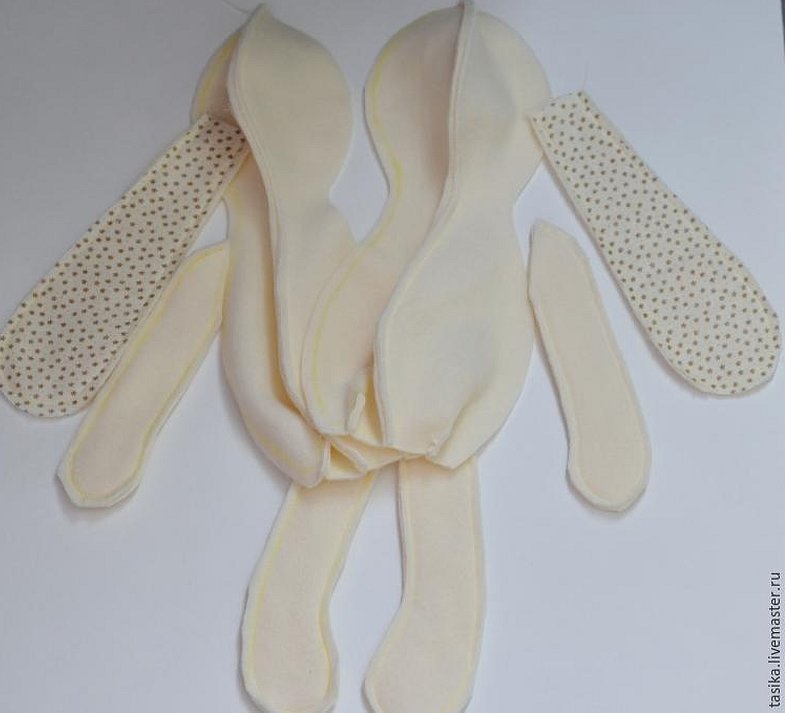
The finished ear parts are inserted into the prepared holes of the head and sewn on from the inside. The same is done with the upper and lower paws, having previously tightly stuffed them with holofiber.
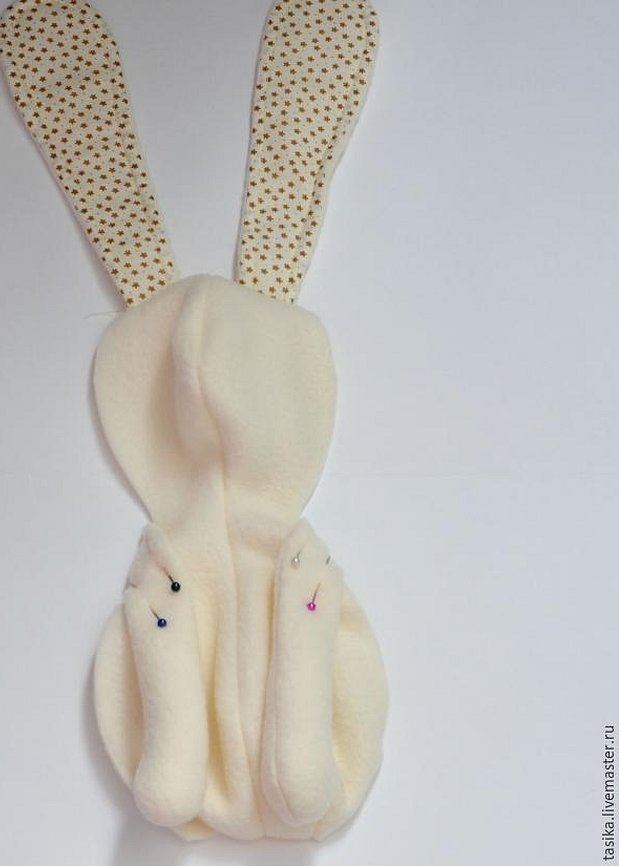
Lastly, fill the bunny’s body and carefully sew up the technological hole at the base of the toy with a blind stitch.
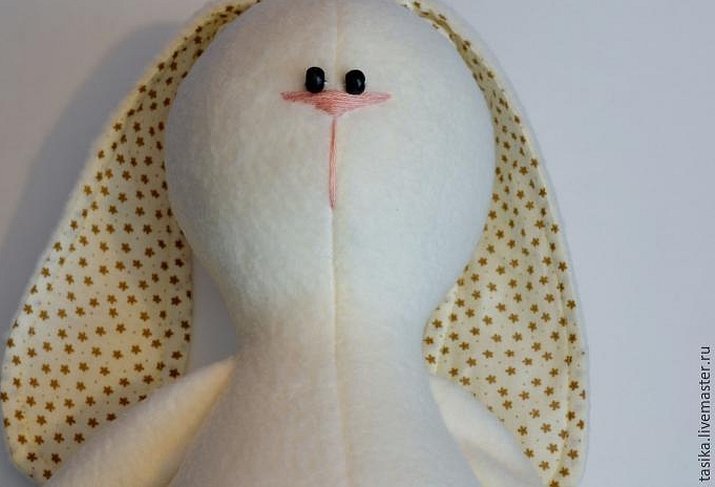
The hare's face is decorated: beaded eyes are sewn on and the nose is embroidered. For the tail, a circle is cut out of fleece and gathered along the edge with a basting stitch. After tightening, a bag is formed, which is filled with holofiber and sewn to the rabbit's body with the same blind stitch.
If desired, the long-eared one can be dressed in a dress or pants. Such toys made of cozy fleece, made with your own hands, are no different from those made in a factory or plant. They will be a good gift for a birthday or New Year, and will also decorate any interior.
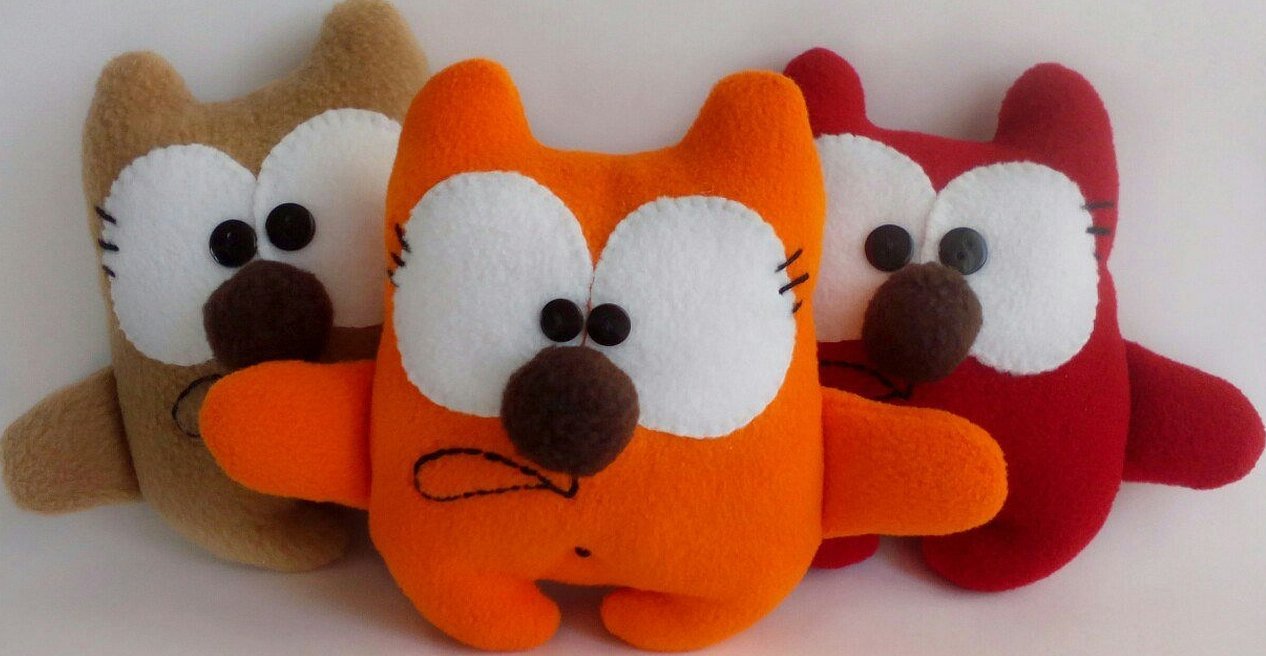
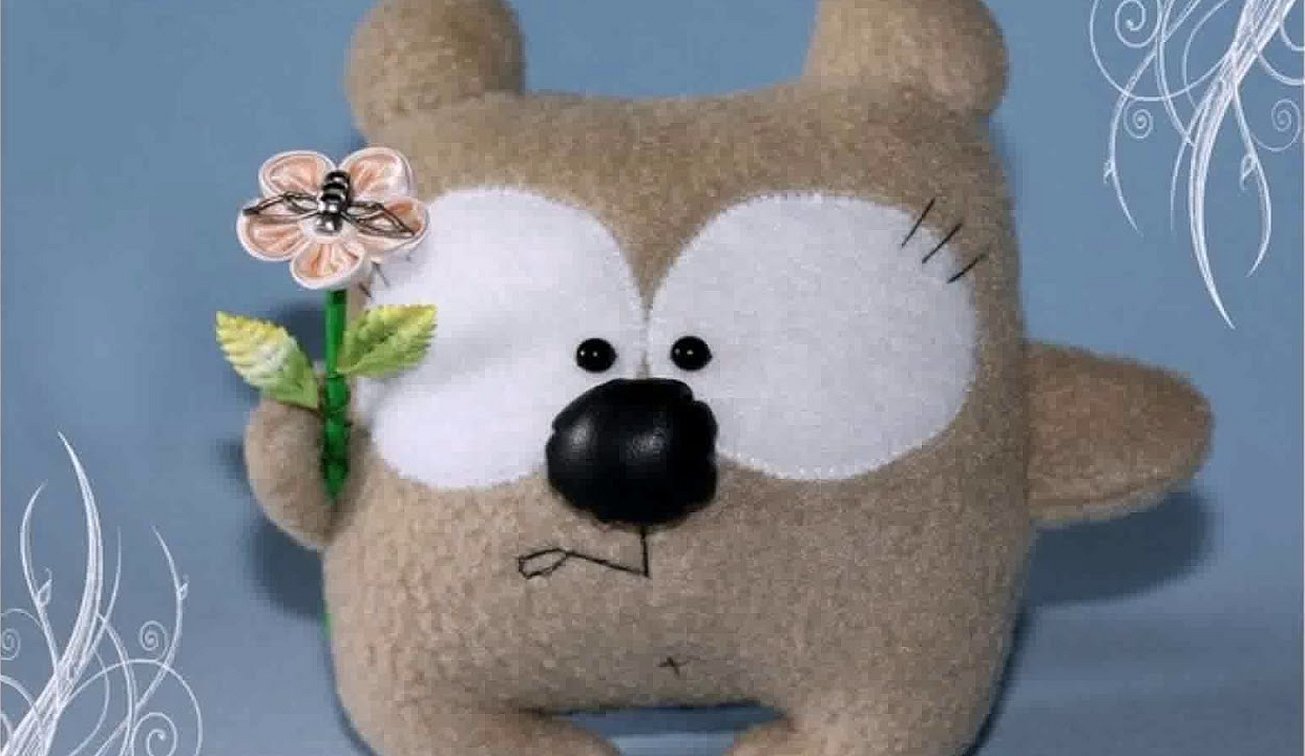
Master class on creating a teddy bear for beginners
Even a child can make a funny teddy bear from fleece. The trick is in the simple form, minimum details and precise step-by-step instructions.
To make a teddy bear you will need:
- small pieces of grey-brown and white fleece;
- black leatherette or felt for the nose;
- two black buttons or small beads for eyes;
- black floss for embroidering eyelashes;
- stuffing material (for example, synthetic fluff);
- cardboard for templates;
- chalk or pencil;
- safety pins for fastening parts;
- scissors;
- threads and a needle.
Traditionally, they start with making templates for the pattern. In this case, there will be two parts for the body, four for the upper paws, two round eyes and a nose.
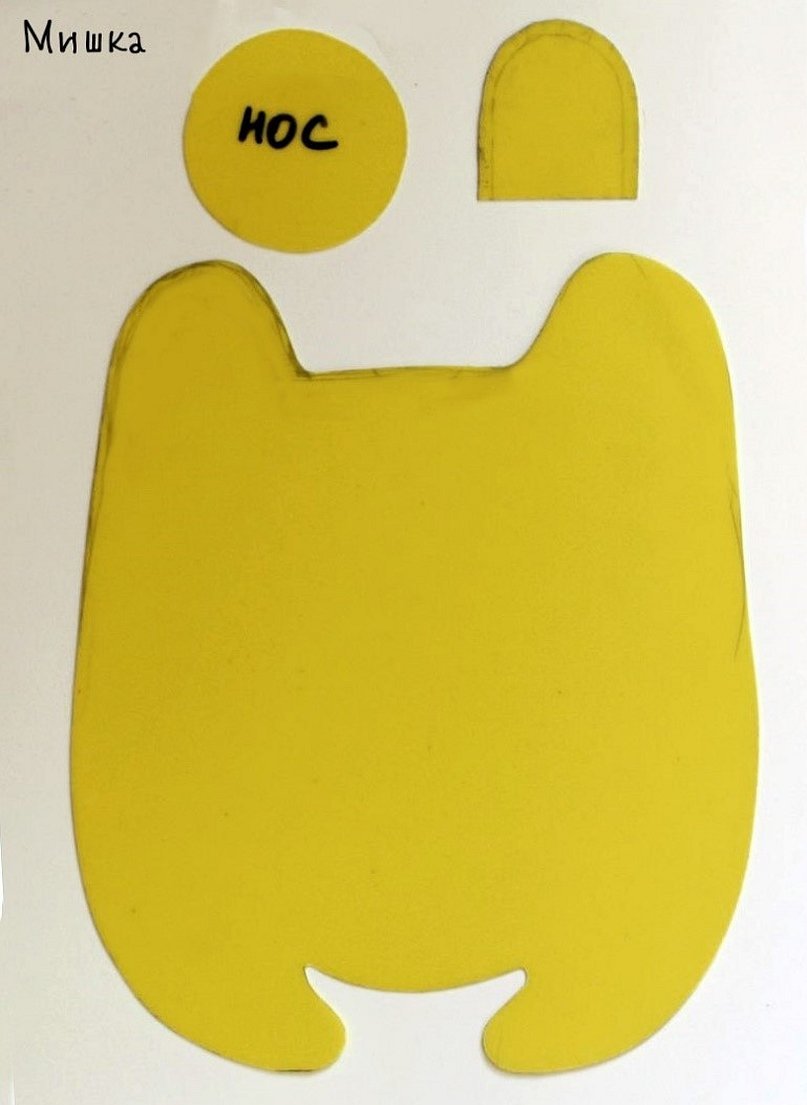
Place the templates of the parts of the future toy on the back of the fabric along the grain line, trace them with chalk and cut them out.
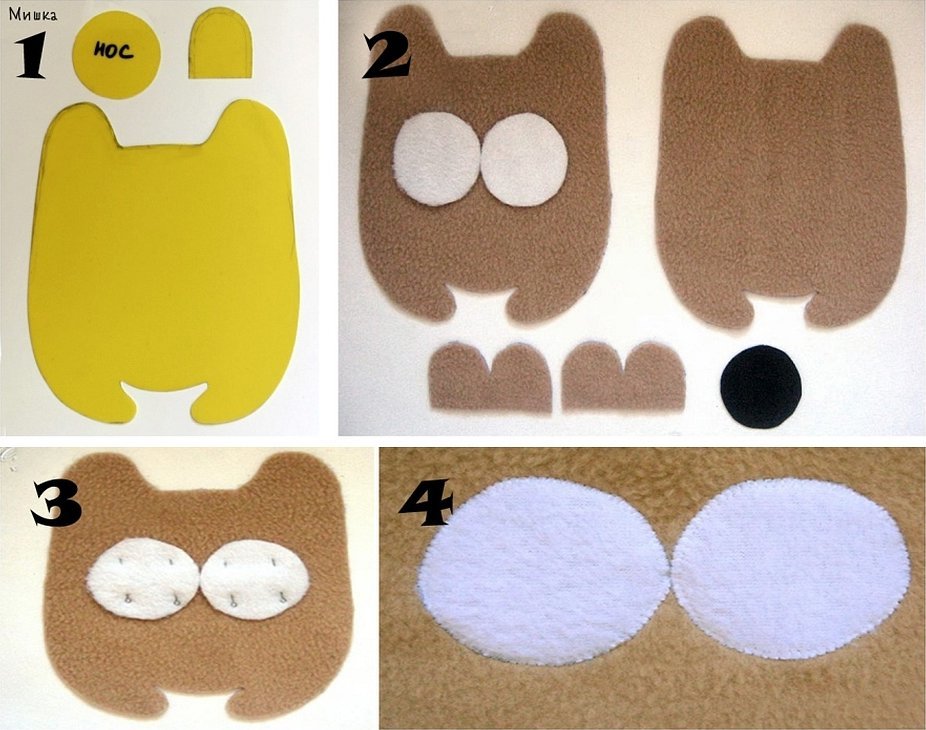
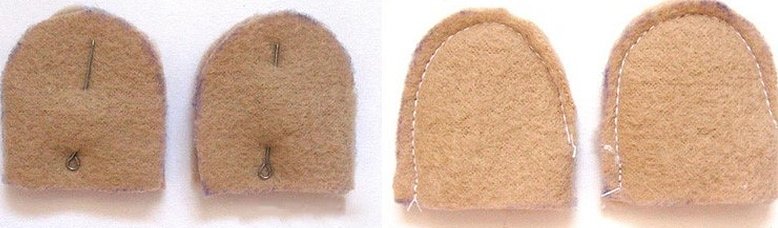
Important! The white bases for the eyes need to be sewn on before assembling the toy, as this will be very difficult to do later. First, they are pinned and then sewn on using an overcast stitch.
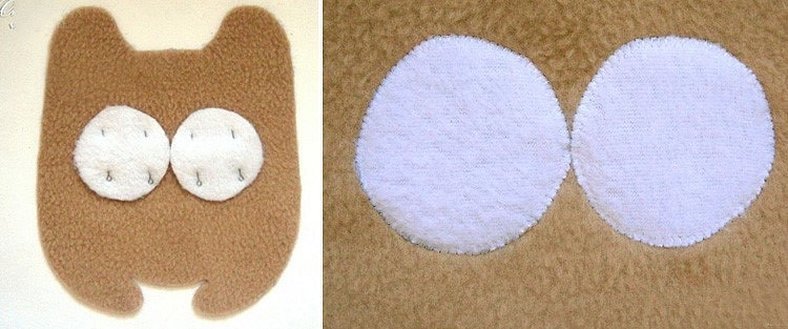
The parts of the bear's upper paws are sewn together in pairs.
Carefully combine the parts of the front and back of the toy's body, not forgetting to insert the upper paws. First, fix everything with pins, and then stitch on a machine or sew by hand with a stitch "behind the needle".

Important! In the lower part of the body of the future bear cub, leave a hole, through which the workpiece is turned inside out and stuffed with synthetic fluff, carefully tamping first one ear, then the other.
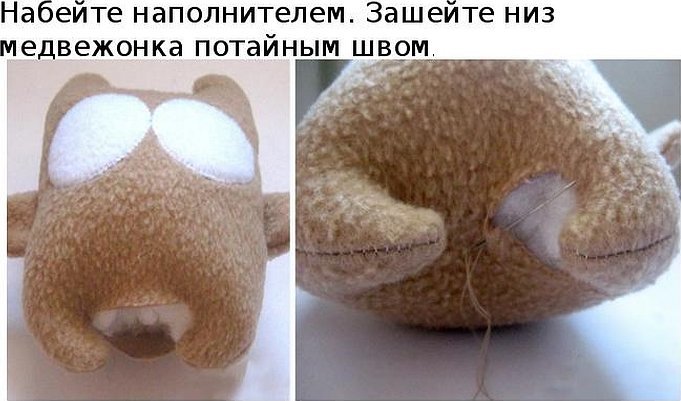
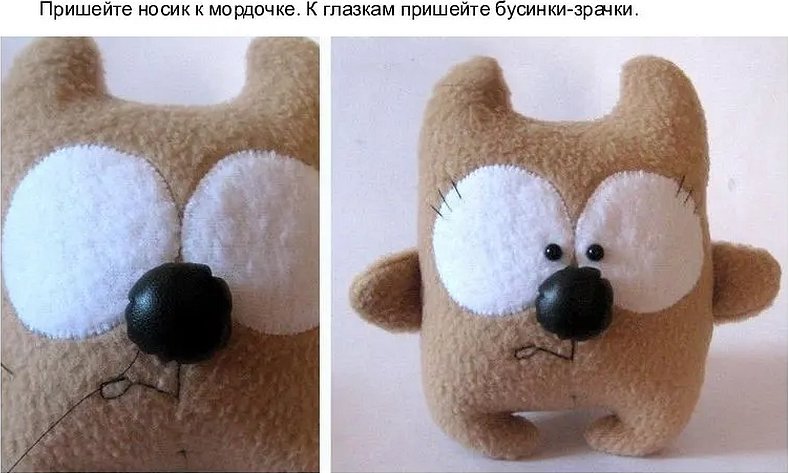
After the technological hole is sewn up with a blind stitch, they move on to the details: sew on the eyes, embroider the eyelashes and mouth, and sew on the leather nose.
The soft toy teddy bear made of fleece, made by hand, is ready!
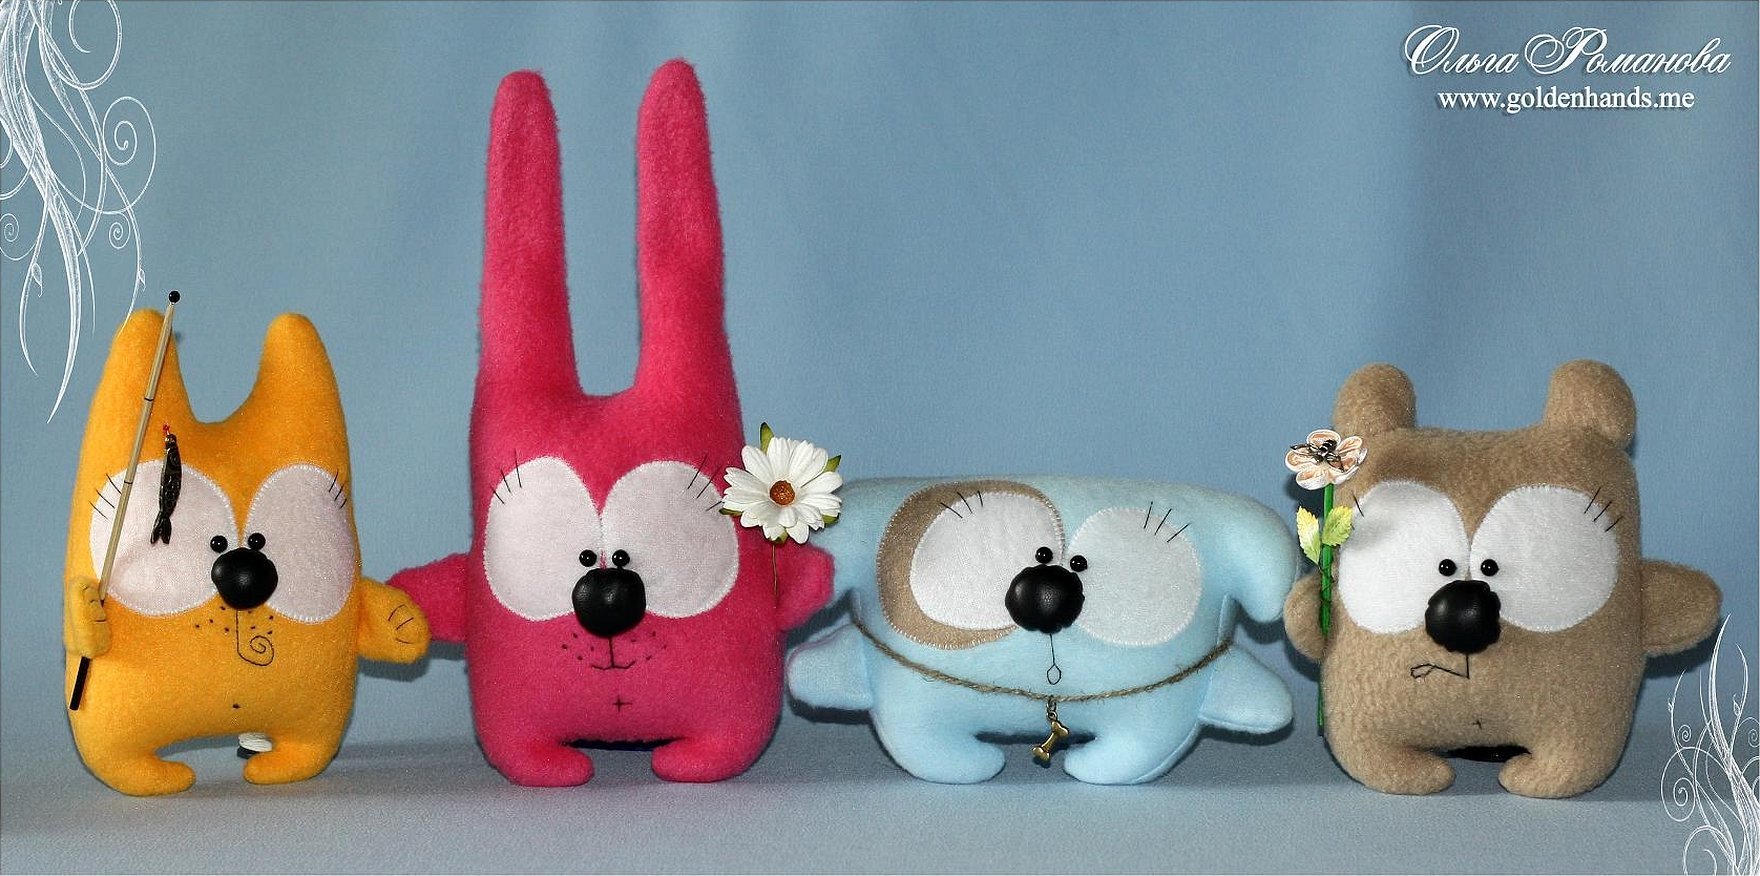
Based on this simple pattern, you can make a cat, a dog, even a whole company from the cartoon "Paw Patrol". You only need to change the shape of the ears. Such toys are made in different sizes. Small ones are used to decorate the New Year tree, large ones are used as pillows.
It is better to sew toys together with the child. This is an exciting activity - the best way to communicate and develop. Such moments spent with mom remain in the soul of every little person for life.


