Toys knitted at home will decorate the interior and make it more cozy. Even a novice needlewoman, guided by the patterns and a detailed algorithm, is able to create a beautiful product.
- What exactly can be connected?
- Necessary tools and materials
- Rules for knitting toys with knitting needles
- Simple diagrams with step-by-step descriptions
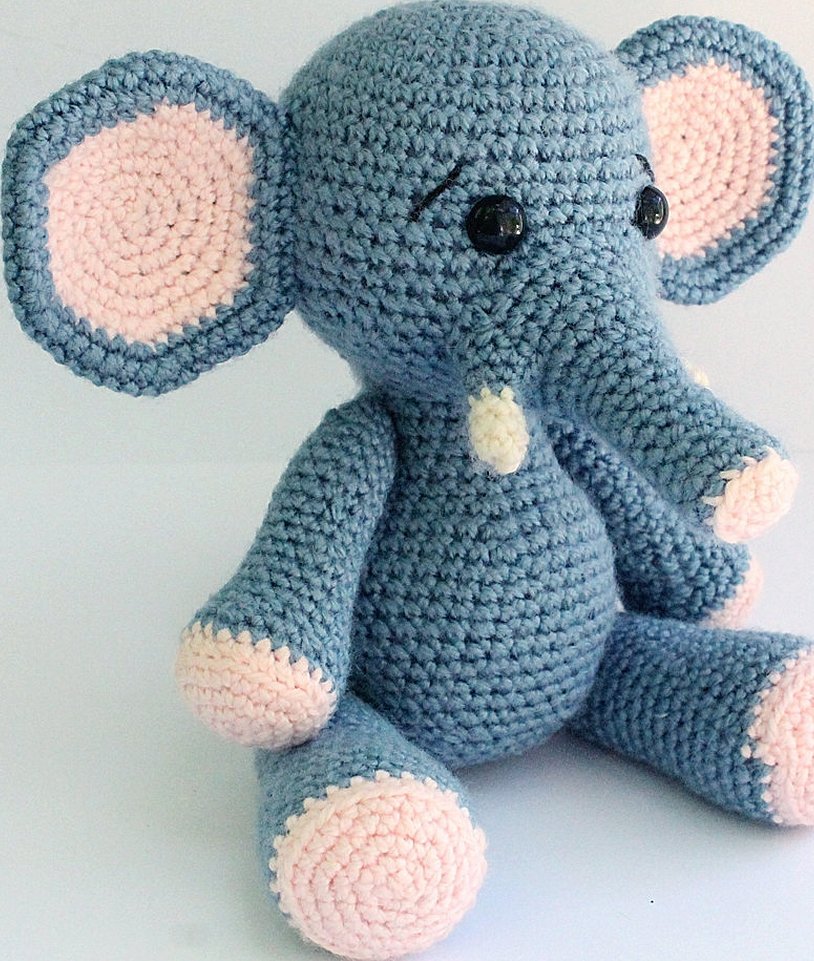
- Elephant amigurumi
- The process of knitting in rows
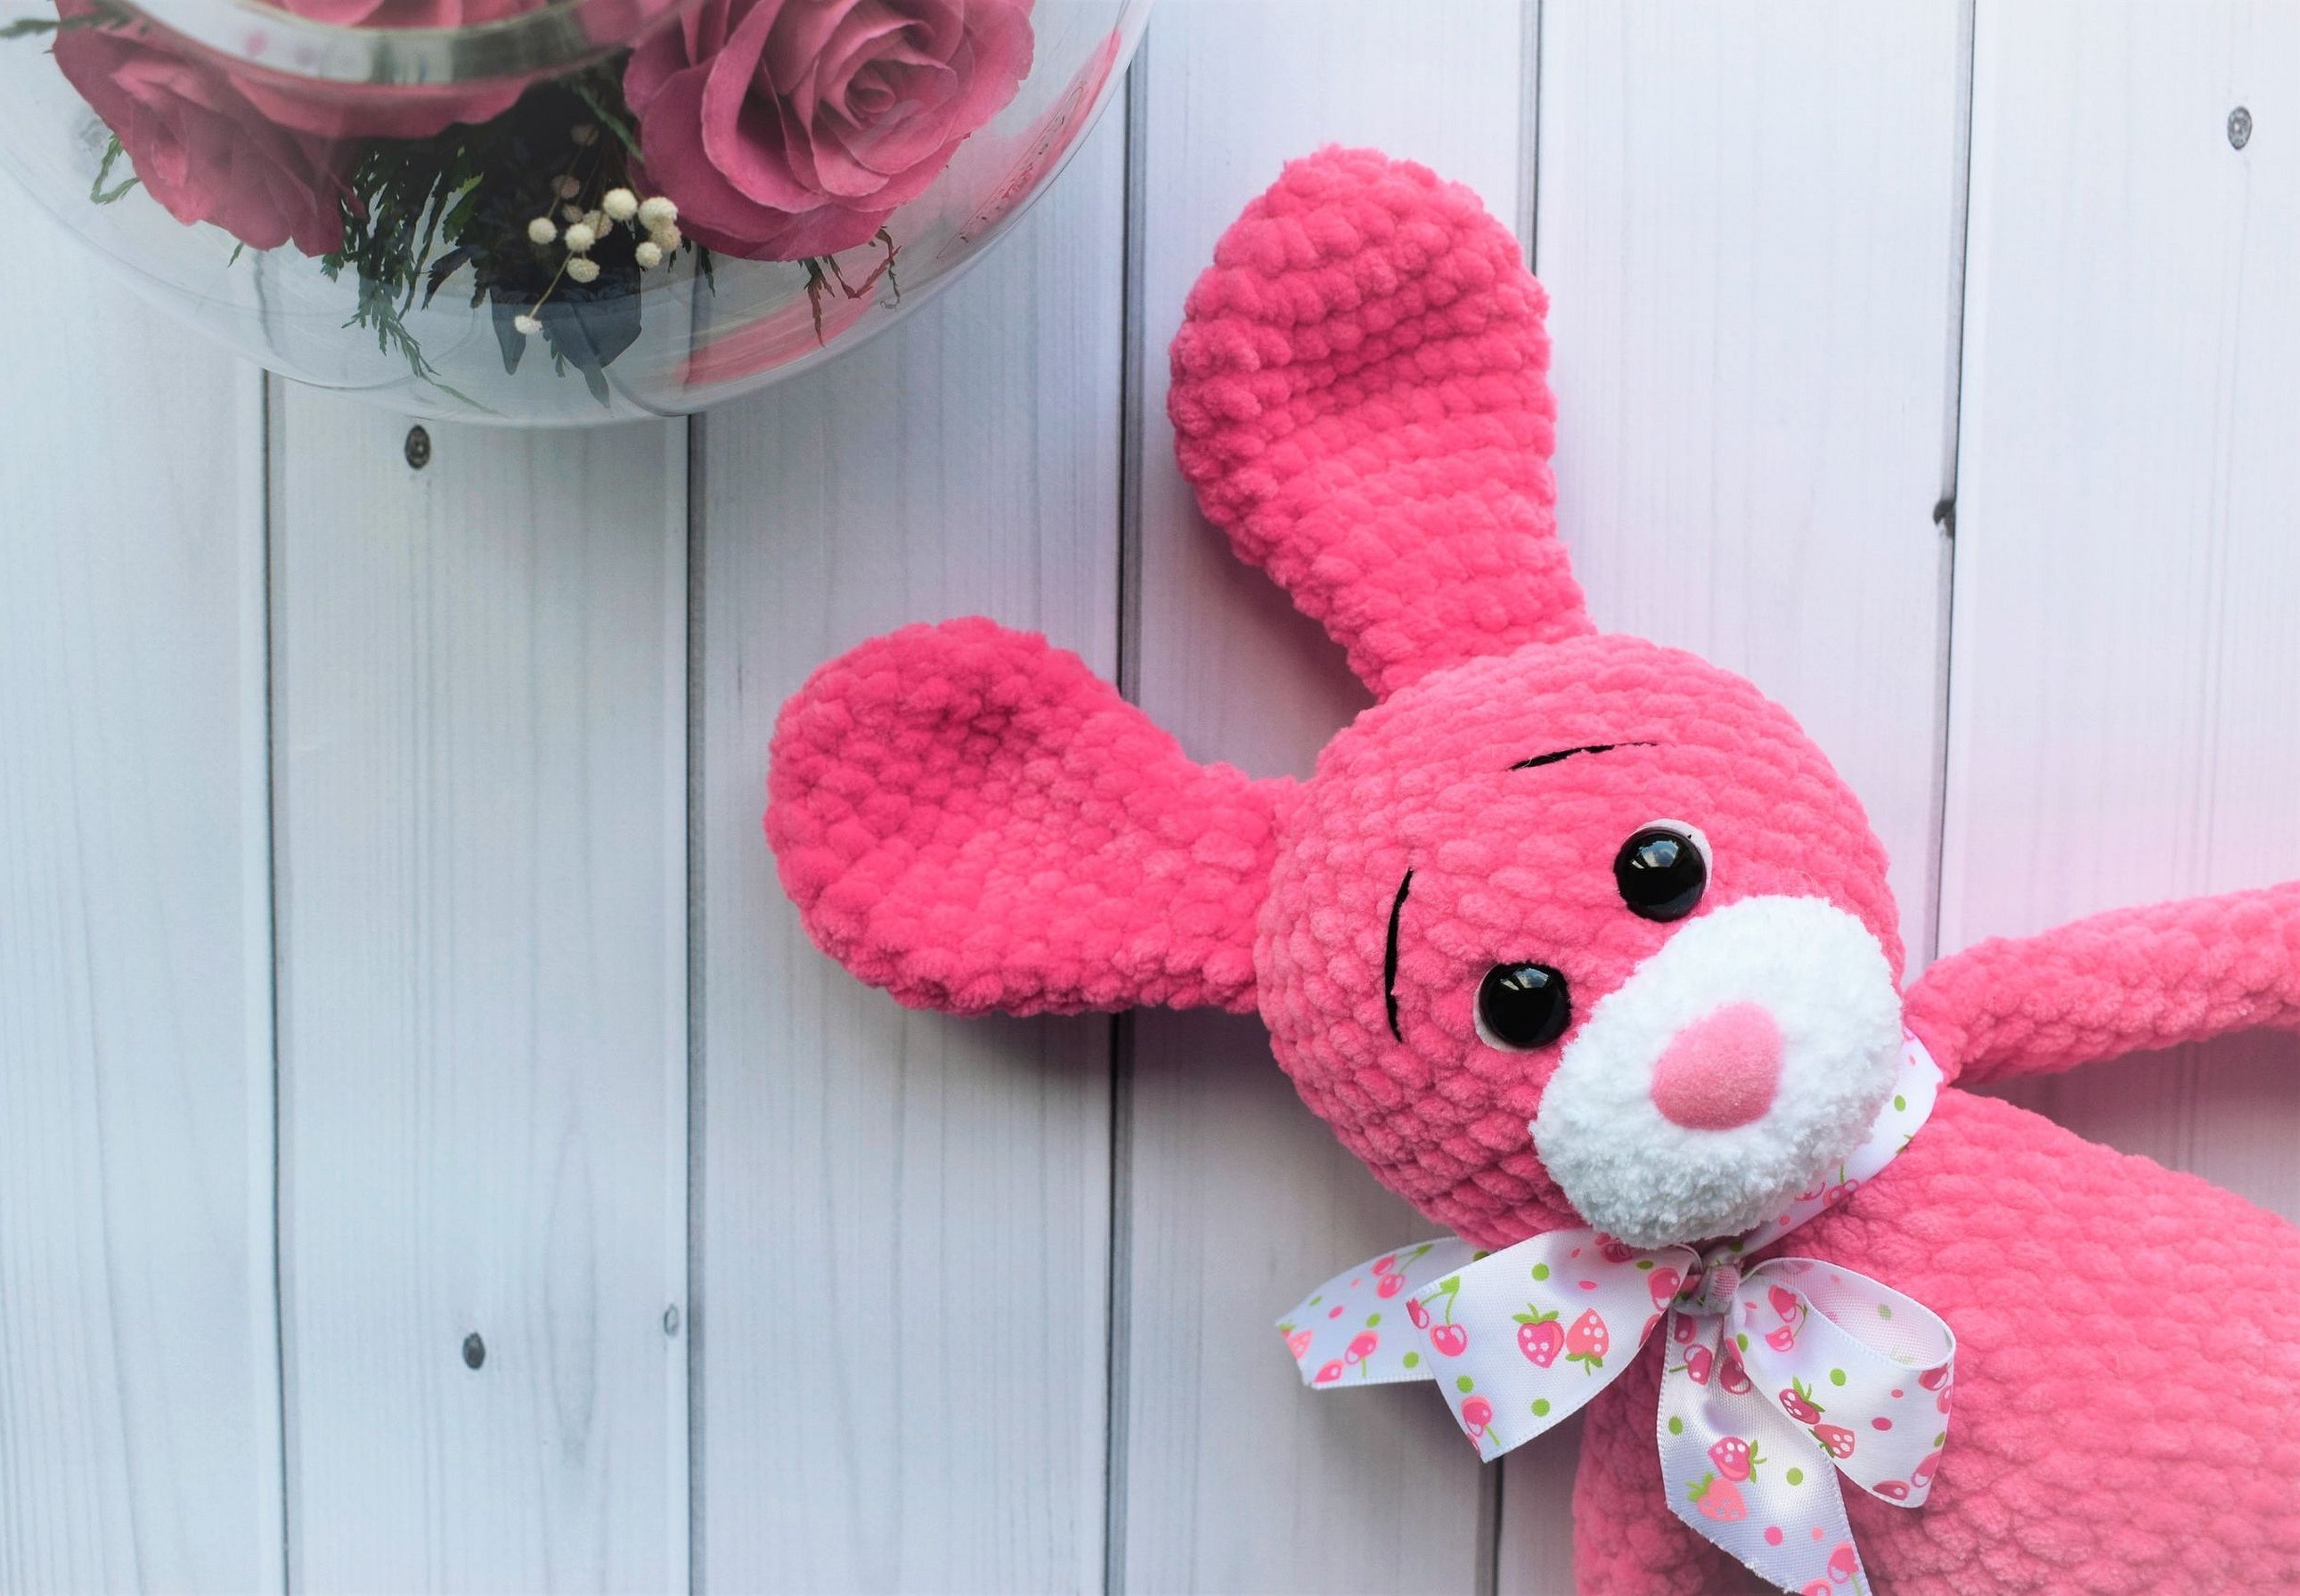
- Children's plush bunny
- Description of the knitting process
- Step by step assembly process
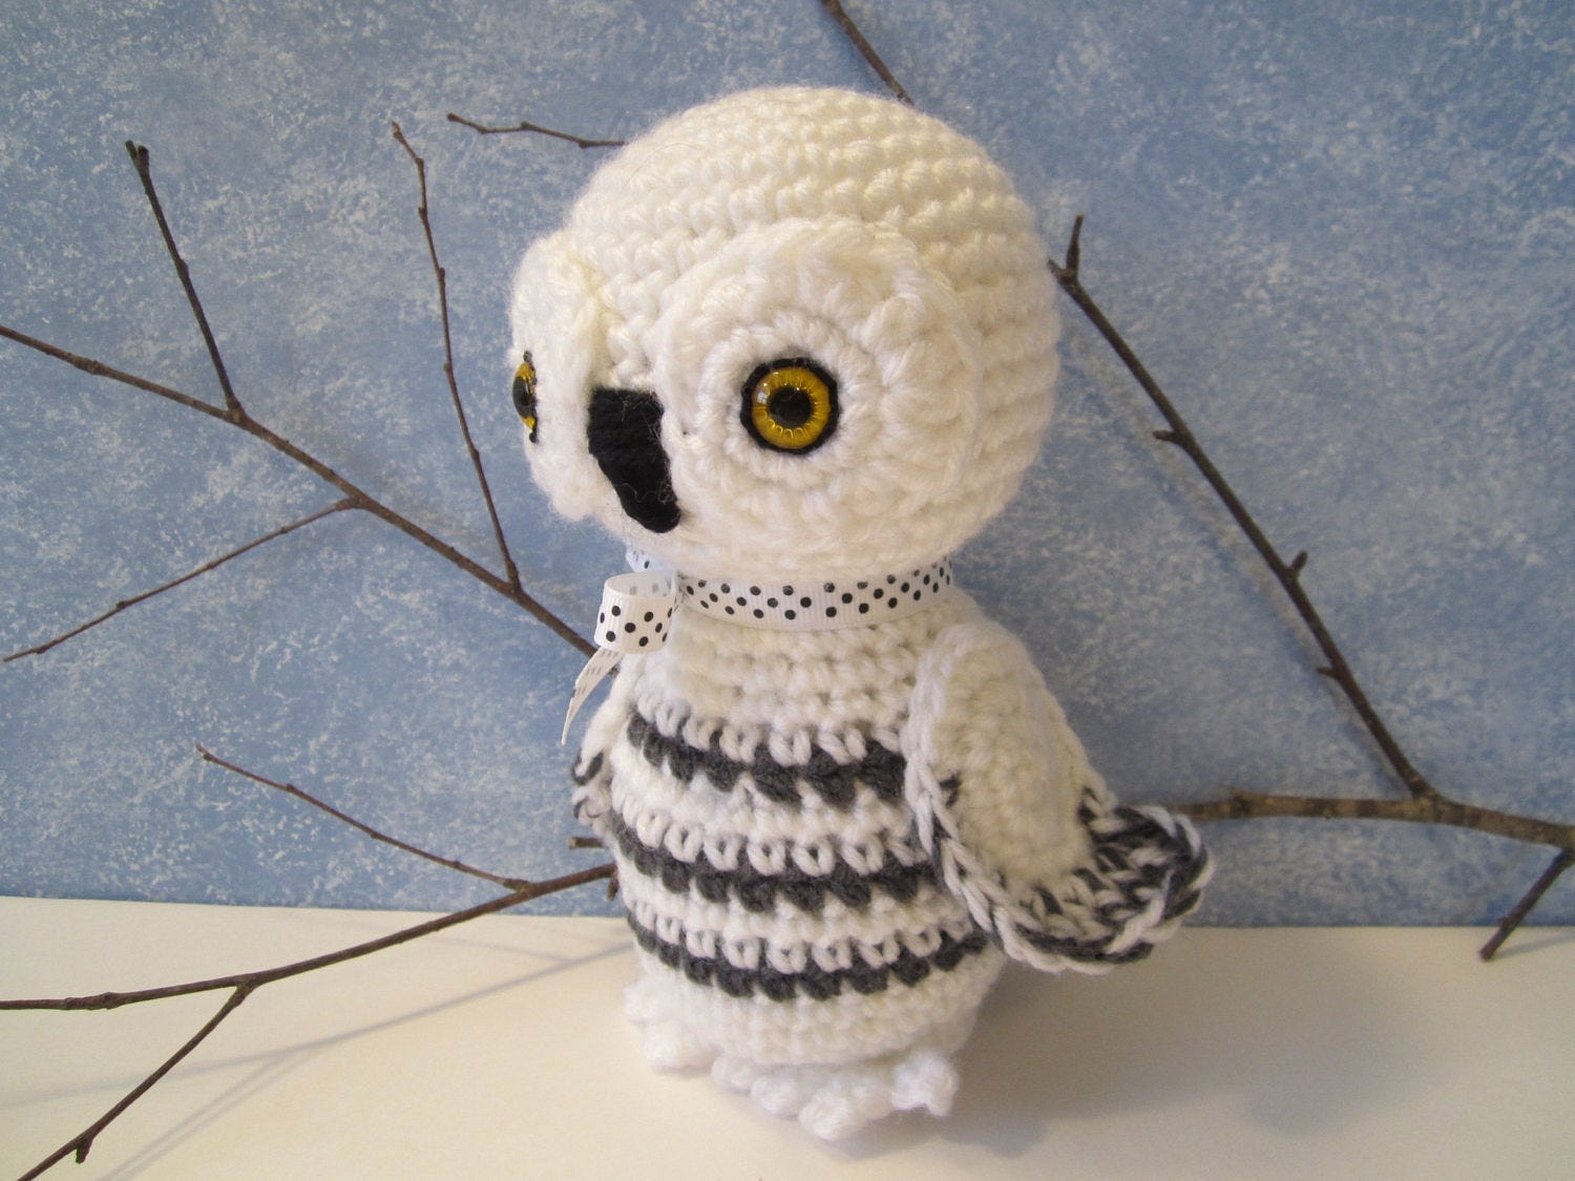
- Knitted polar owl
- Job Description
- Assembly process
- Soft pig
- Description of knitting by rows
- Big teddy bear
- Master class with diagrams
What exactly can be connected?

Many toys are knitted with knitting needles. Among beginning craftswomen, whose experience in this craft does not exceed even a year, the most popular are:
- funny cat;
- bears;
- plush bull;
- sheep;
- New Year's snowman;
- bunny;
- hedgehog;
- foxes;
- dog;
- pandas;
- minion;
- mouse;
- elephants;
- lion;
- hunter;
- butterflies.
Note. Fans of original ideas should get acquainted with the works created by Alan Dart. The toys of this designer are distinguished by amazing accuracy and thoughtfulness of details.
Necessary tools and materials
For handicrafts you will need:
- knitting needles;
- yarn;
- product diagram.
Rules for knitting toys with knitting needles

It is very easy to create knitted toys with knitting needles. The products are softer to the touch, compared to those knitted with a crochet hook.
The general instructions are as follows:
- Find a lesson or master class online.
- Draw a diagram of the future toy.
- Determine what size it should be.
- Choose quality yarn.
- Start knitting the product.
Please note! Beginners should not start with toys that are too large or too small.
Simple diagrams with step-by-step descriptions
The most popular toy options among needlewomen are: an amigurumi elephant, a plush hare, a knitted polar owl, a soft children's pig, a large plush bear. More details on how to make them are written below.
Elephant amigurumi
Materials:
- light gray yarn;
- knitting needles;
- filler;
- eyes with a diameter of 7 millimeters;
- sewing needle;
- scissors.
The process of knitting in rows
Head:
- 1: six single crochet stitches into an amigurumi ring
- 2: 6 increase loops
- 3: (single crochet + increase) x 6 (18)
- 4: (two sc + increase loop) x 6 (24)
- 5: (3 sc + increase) x 6 (30)
- 6: (four sc + increase loop) x 6 (36)
- 7-11: 36 single crochets (36)
- 12: (five sc + increase) x 6 (42)
Insert eyes at a distance of 5 loops and continue
- 13-14: 42 single crochets (42)
- 15: (5 sc + decrease) x 6 (36)
- 16: (four single crochets + y) x 6 (30)
- 17: (3 sc + y) x 6 (24)
- 18: (two single crochets + decrease) x 6 (18)
- 19: (sc + y) x 6 (12)
Secure the thread and insert the filling.
Ears - outer part:
- 1: six single crochet stitches into an amigurumi ring
- 2: 6 increase loops
- 3: (sc + p) x 6 (18)
- 4: (2 sc + increase) x 6 (24)
- 5: (three sc + p) x 6 (30)
- 6: (four single crochets + p) x 6 (36)
- 7: (5 sc + p) x 6 (42)
- 8: slip stitch
Fasten the thread, leaving a long end.

Ears - inner part:
- 1: six single crochet stitches into an amigurumi ring
- 2: 6 increase loops (12)
- 3: (sc + p) x 6 (18)
- 4: (2 sc + increase) x 6 (24)
- 5: (three sc + p) x 6 (30)
- 6: (four single crochets + p) x 6 (36)
Fasten the thread and leave a long end. Sew the inner parts to the outer ones.
Trunk:
- 1: six sc into amigurumi ring
- 2-9: 6 single crochets (6)
- 10: (two sc + p) x 2 (6)
- 11: 8 sc (8)
- 12: (three single crochets + p) x 2 (10)
- 13: 10 sc (10)
- 14: (four single crochets + increase) x 2 (10)
- 15-19: 12 sc (12)
Secure the thread, leaving a long end.
Forelegs:
- 1: six sc into amigurumi ring
- 2: 6 increase loops (12)
- 3: (5 sc + p) x 2 (14)
- 4-5: 14 single crochets (14)
- 6: (five sc + decrease) x 2 (12)
- 7-8: 12 single crochets (12)
- 9: 5 sc, y, five sc (11)
- 10: 4 sc, decrease, 5 sc (10)
- 11-19: 10 sc (10)
Fasten the thread, leave a long end. Fill the front paws halfway.
Hind legs:
- 1: six sc into amigurumi ring
- 2: 6 sc
- 3: (single crochet + increase) x 6 (18)
- 4: 18 sc on the back loops (18)
- 5-8: eighteen sc (18)
- 9: (7 sc + y) x 2 (16)
- 10-13: sixteen single crochet stitches (16)
Fill, do not cut the thread on the second leg. Continue knitting the body.
Body:
- Knit 2 air loops from the second leg and attach to the first with a slip stitch.
- 1: 16 sc on one leg, 2 sc, 16 sc on the second, 2 sc (36)
- 2: thirty-four sc, two increase loops (38)
- 3: increase, 32 single crochets, p, four sc (40)
- 4-8: forty sc (40)
- 9: eight single crochets, y, 17 sc, decrease, 11 sc (38)
- 10: 8 sc, dec, 15 sc, y, 11 sc (36)
- 11: 36 single crochets (36)
- 12: eight sc, decrease, 15 sc, y, 9 sc (34)
- 13: 7 sc, y, 15 sc, decrease, eight single crochets (32)
- 14: 32 single crochets (32)
- 15: seven sc, y, 14 sc, decrease, 7 sc (30)
- 16: 7 sc, dec, 12 sc, y, 7 sc (28)
- 17: 28 single crochets (28)
- 18: (5 sc + y) x 4 (24)
- 19: 24 single crochets (24)
- 20: (four sc + decrease) x 4 (20)
- 21: (3 sc + y) x 4 (16)
Fasten the thread, leave the end. Fill, connect all parts.
Children's plush bunny

Materials:
- pink, white and grey textured yarn;
- 5 knitting needles with a diameter of 3 mm;
- buttons for eyes;
- remnants of black yarn;
- synthetic cotton wool;
- embroidery needle with a rounded end.
Description of the knitting process
Torso and legs:
Cast on thirty-six stitches with white thread. Start knitting in a circular direction.
After 35 rows, separate two parts for the paws, 18 loops in each direction. For each of the paws, dial two sts on the edge. Knit in a circle 19 white and eight pink. Perform a tightening with the main thread.
Forelegs:
Cast on 18 sts with white thread. Knit in a circular direction eight sts with pink and 24 rows with white. Pull the sts together with the main thread.
Head:
Cast on forty loops with white threads. In the eighth row, close 3 sts on both sides. In the 15th row, close the loop on both sides. Repeat the same process alternately in every second and fourth row, five times, one st each. Knit another 22 loops and close.
For reference! During the knitting process, many people use special markers that prevent them from getting confused about the number of loops.
Muzzle:
Cast on twenty-eight pink stitches. In the fourth row, knit 4 rows of every fifth and sixth stitch. After 10 stitches, tighten with the main thread.
Ears:
Cast on sixteen stitches with white thread. In the thirteenth row, close one stitch. Do the same in each 2nd and fourth row five times. Close the remaining four stitches. Cast on four white, eight pink and again four white stitches, crossing on the wrong side.
In the thirtieth row, knit 3 white sts. Remove the fourth as a front st. Knit the first pink st with white thread and pull it through the removed st. Make the middle ones pink. Knit the last pink and white sts. Make three white. Perform the sts alternately in each of the 2nd and 4th rows three times. Continue knitting with white thread, making two sts as front sts in the 2nd and 4th rows. Close the remaining five.
Step by step assembly process
Fill the body with cotton wool and paws. Sew the front ones to the base. Connect the edges of the front part of the head with the oblique edges made by decreasing. Sew the muzzle.
In the middle, use separate stitches to depict the nose. Use double gray thread to make the whiskers. Attach the button eyes. Fill the head with cotton wool, pull it together and connect it to the body.
Pull the voluminous ears together along the bottom edge and sew them to the head. Place the pink ponpon in place of the tail and secure with a simple thread.
Knitted polar owl
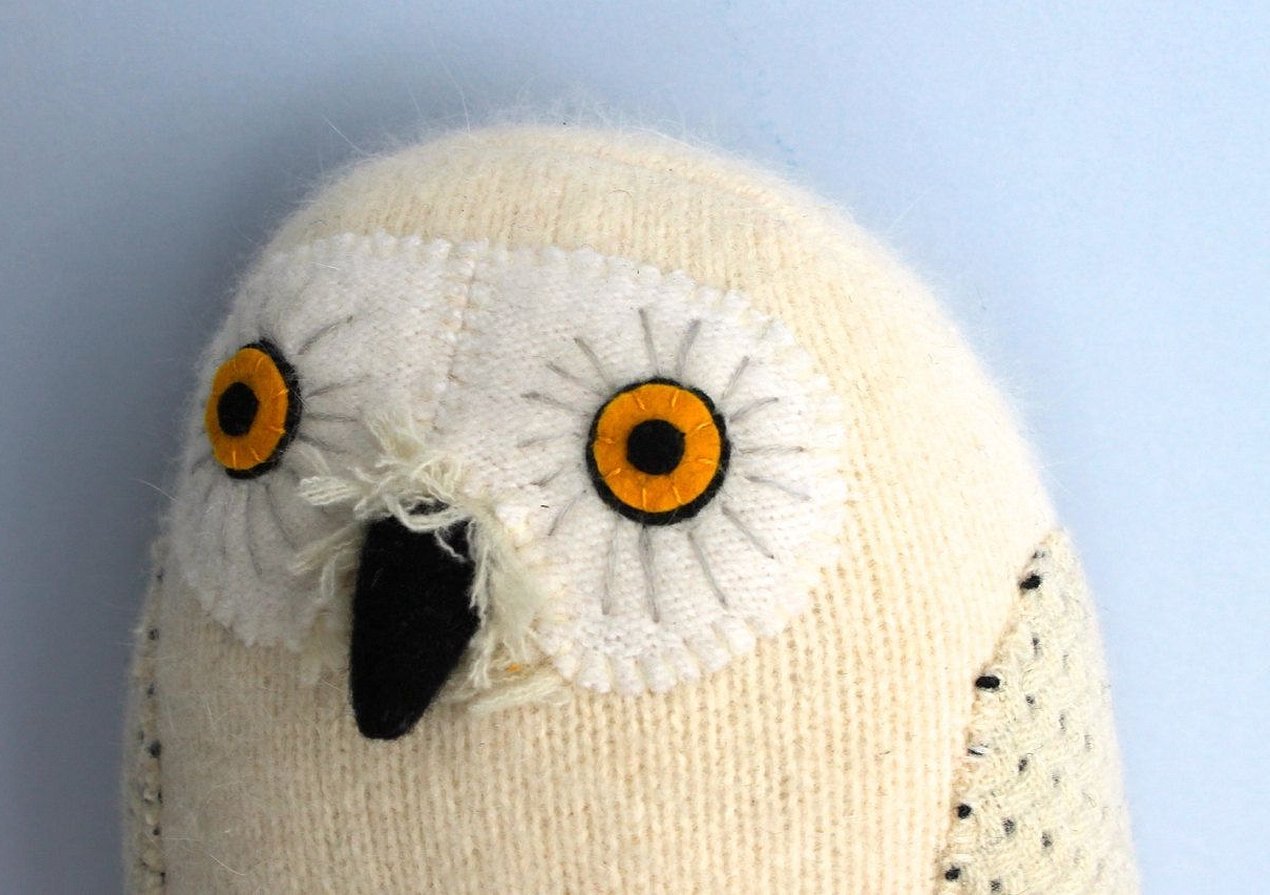
Materials:
- 100 grams of white, 50 grams of grey and black yarn;
- five knitting needles with a diameter of three centimeters;
- two buttons;
- synthetic cotton wool;
- embroidery needle.
Job Description
Body and head:
Distribute 32 white loops on four knitting needles. Knit the body with the front surface. In the first row, add 7 loops. Knit thirty pieces of straight fabric, then tighten with the main thread.
NoteThe change of rows is carried out from the right edge of the diagram.
Wings:
Cast on 5 white sts. Knit with the front surface, adding 8 times a loop in every second row and from the right 4 times in every fourth row. Connect the parts, matching along the edge with eight additional sts. Knit with the front surface, adding on each side on the 4th row four more times a loop. Knit a straight fabric in the amount of 10 rows. Then close the loops.
Tail:
Distribute the cast-on 36 stitches on four knitting needles. Knit in the round with the front surface. After fourteen rows, make rows shortened on the loops of the lower side. Close the loops.
On the upper side, make a row of lines with a white stem stitch. Fold the piece in half along the middle line. Sew the loops of the beginning row.
Paws:
Distribute sixteen grey stitches on four knitting needles. Knit 8 rows in the round with stocking stitch. Close eight sts for the lower side. Before closing the stitches, make six more rows.
Knit a black chain of 20 air loops and tie the first row. Fold the piece in half, connect the sts of the initial row.
Assembly process
Fill the head and body with cotton wool, tighten with a thread 1 row of the body. Draw a black beak with double-sided satin stitch. Attach the eyes. Embroider the lines around the eyes with a black stem stitch.
Soft pig
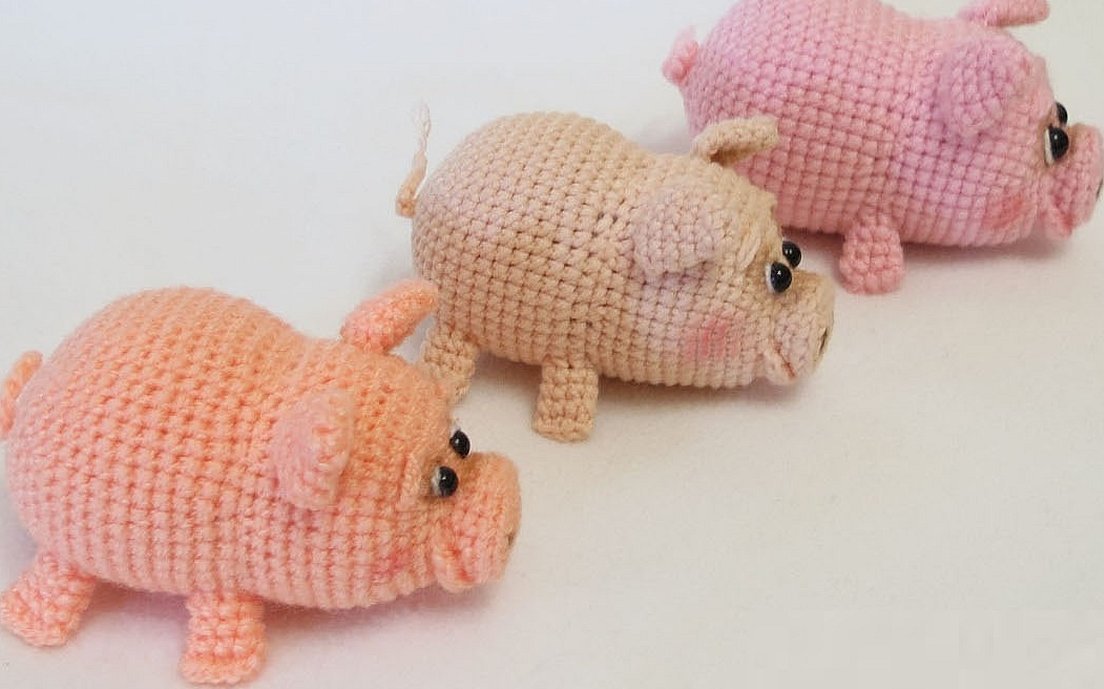
Materials required:
- pink acrylic and black yarn;
- lightweight synthetic filler;
- knitting needles with a diameter of 3 millimeters;
- needle with a wide eye.
Description of knitting by rows
Torso with head:
- Twelve loops
- 1: out.
- 2-3: (front + draw through + l) x 10, front.
- 4-5: persons. (prot. + 2 persons) x 10, l.
- 6-39: knit, (drawing + 3 l.) x 10, knit
- 40-43: knit, (3 knits + 2 knit together) x 8, knit.
- 44-47: front (two knits + 2 together with one front) x 8, front.
- 48-55: 1 knit (front + two knit stitches) x 8, front.
- 56-57: purl
- 58: knit (2 together one knit) x 8, knit
Pull the main thread tight, fill with cotton wool and sew up.
Front paw:
- Cast on fourteen stitches and knit 4 rows in stocking stitch
- 5-9: knit (knit + 2 together purl) x 4, knit.
- 10: facial
- 11: knit (2 together 1 purl) x 4, knit.
Pull the main thread tight, fill it with cotton wool and sew it to the body.
Hind paw:
- 14 loops
- 1: purl
- 2-3: knit, purl, 2 purl to the right, 2 purl to the left, 4 knits, purl.
- 4: knit, purl, 4 knits, 2 purl to the right, 2 purl to the left, 4 knits, purl, knit.
- 5-10: purl (purl + 2 together with one purl) x 4, purl.
- 11: front
- 12: l., (2 together purl) x 4, persons.
Pull the main thread tight, fill with cotton wool and sew to the body.
Ears:
- Cast on seven stitches
- 1: purl
- 2-7: knit, draw through, 2 knits, t-st, knit, 2 together knits left, 3 knits.
- 8-9: 3 y, two knits to the right, y, 2 y to the left, three knits.
- 10-13: knit, 2 together knit left, three knits, 2 knit right, knit.
- 14-15: knit, two knits to the left, 2 knits to the right, knits.
- 16-17: knit, 3 together knit, l.
- 18: three knits
Sew to the head with regular thread.
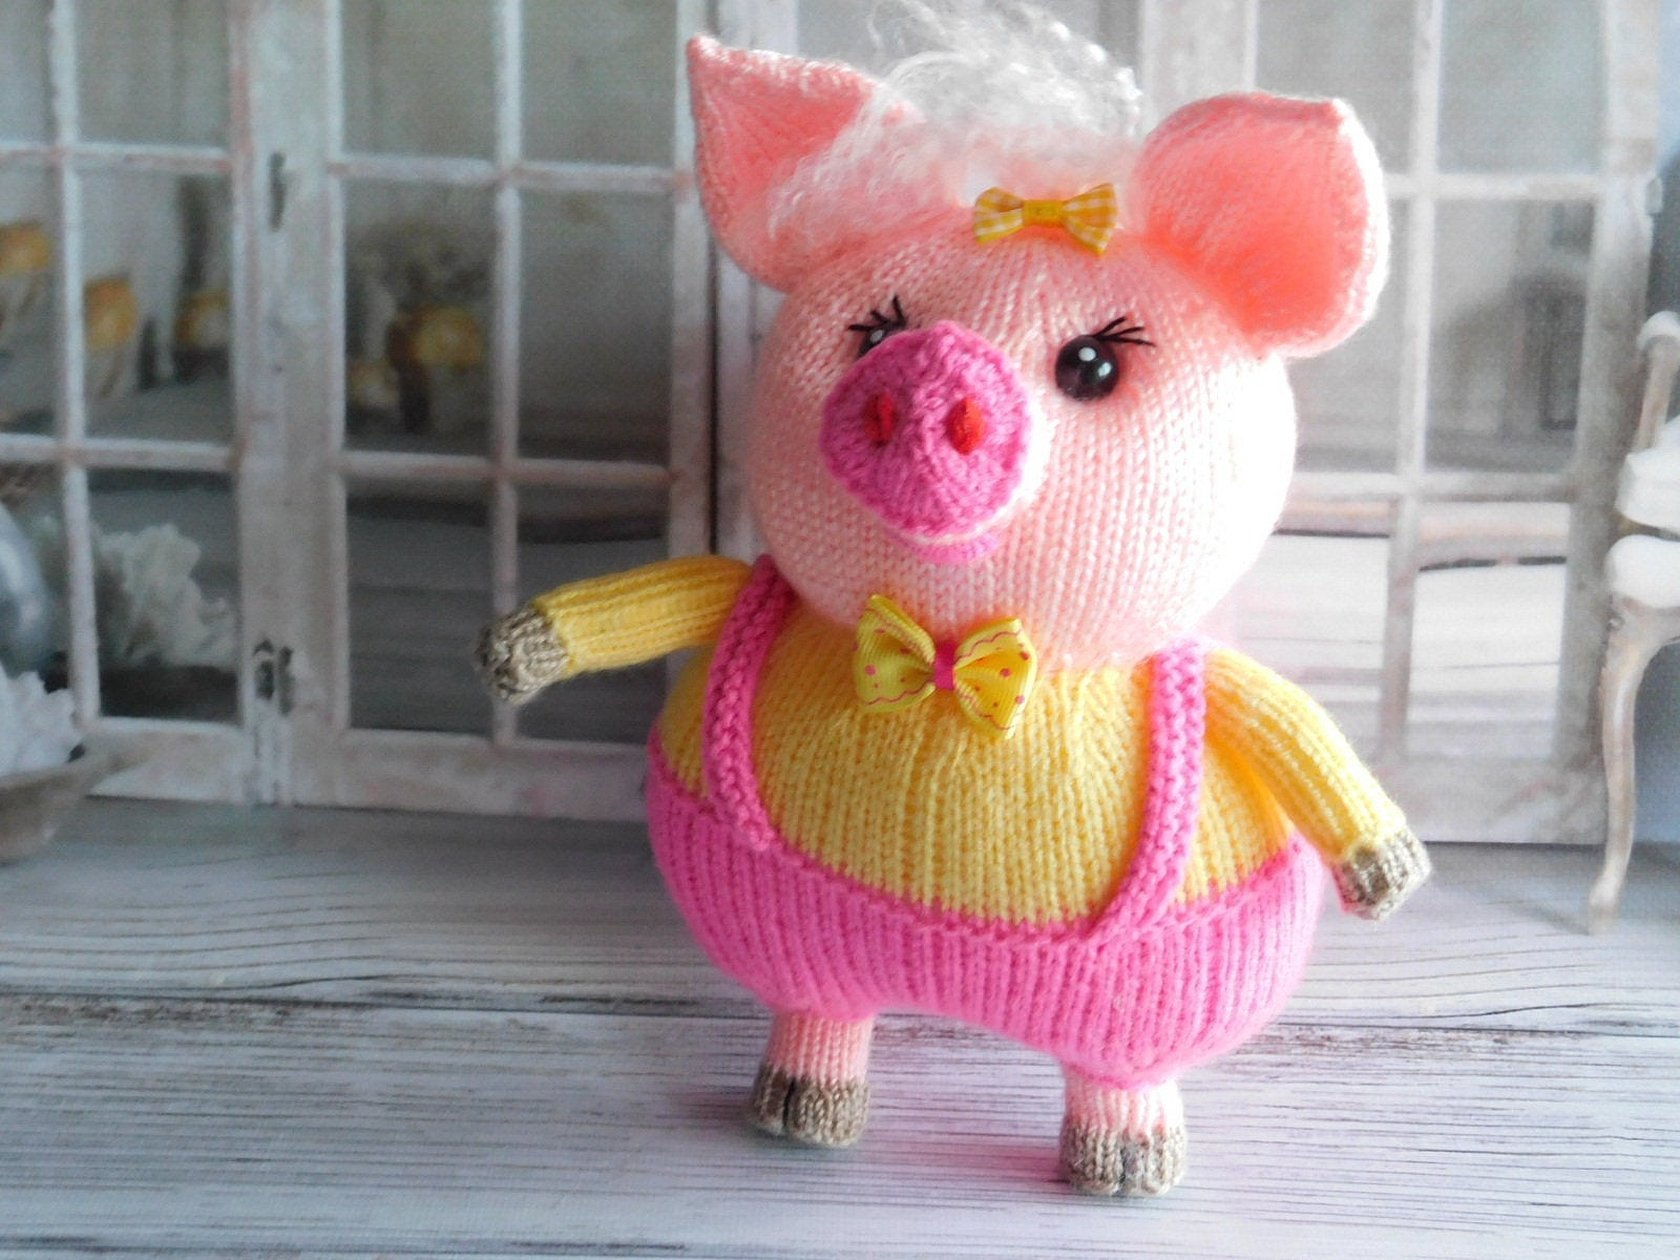
NoteIf desired, you can complicate the composition by adding elements such as grass or a smart blouse.
Tail and eyes:
- Cast on thirteen stitches, close and tighten slightly. Attach the tail to the body. Embroider the eyes.
Big teddy bear
Materials:
- 5 skeins of light-colored yarn;
- black thread;
- knitting needles with a diameter of 3 millimeters;
- soft filling made of synthetic material.
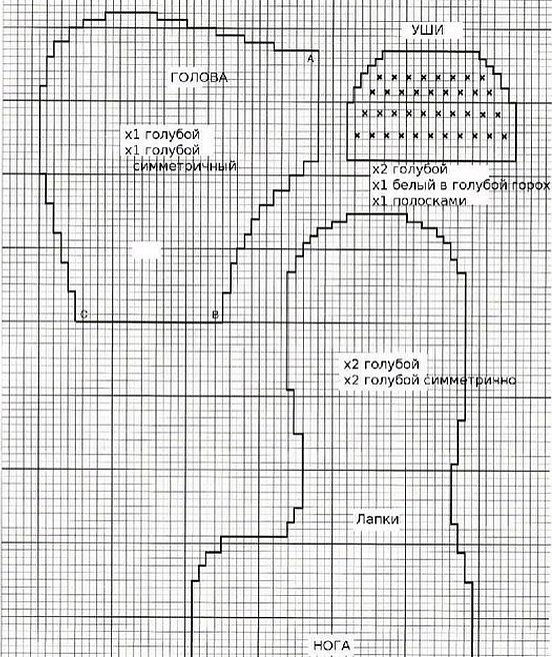
Master class with diagrams
Features of product creation:
The steps shown in the diagrams mk indicate external increases, to the inner edge - decreases. The two halves of the front must be knitted, observing symmetry. The same applies to the paws. Part of the head is knitted according to the diagram, the other part should be symmetrical. The bottom of the paw and the ear are knitted with the front surface in stripes.
NoteThe knitting process of all components is performed with the front surface.
Scheme 1

Scheme 2
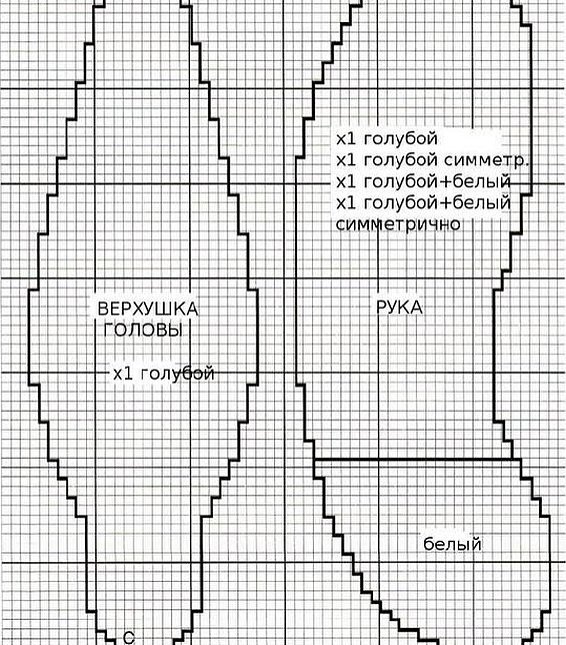
Scheme 3
Assembly:
Each plush arm is sewn from two parts, the bottom is added and a slit is left. After this, the part needs to be filled with padding polyester, the slit closed. Sew two colored parts of the paws, leaving a slit. Fill with padding polyester and sew up. Attach 2 parts of the front, leave the neck open. Fill with synthetic material. Sew two parts of the head. Add the top and add padding polyester. Attach to the body on each side the colored parts of the ear, sewn together, filled with padding. Sew the finished parts to the body. Embroider the eyes and nose with black satin stitch.
With the help of knitting needles, you can create a lot of interesting products. Even a beginner needlewoman can make them. You can add something new to your diary and stock up on original ideas on the World Wide Web. Knitted toys can become an excellent element of home decoration.


