An inexperienced seamstress may wonder how to sew women's trousers with an elastic band with her own hands step by step. There are several simple cutting options that even a beginner can figure out. Such patterns can be used to sew home underpants or dress pants. First, you need to correctly take measurements, construct a pattern and make a blank of the parts for sewing. Small nuances relate to the processing and preparation of all parts and finishing with the installation of additional fittings.
Measurements for sewing
To sew any women's pants with elastic, you need to take the necessary measurements. Thanks to this, you can also determine the size of the future product using summary tables. Before you start taking measurements, you need to inquire about the correct technique for working in this direction.
The parameters of the figure must be determined in order to make comfortable pants:
- Half waist circumference.
- Half hip circumference.
- Distance from waistline to floor in front.
- Distance from the waist line to the floor on the side.
- The distance from the waist line to the bend of the knee at the back through the gluteal muscle.
- The height of the gluteal fold.
- From the waist line to the knee in front.
- The distance from the waist line to the seating surface.
- Half the leg circumference in the knee area.
- Half the circumference of the future trouser leg at the bottom.
- Length of trousers along the inside seam.
- Second waist depth.
Additional information! It is necessary to fix the measuring tape precisely without stretching. It is better to check the measurement readings several more times so as not to spoil the pattern.
To make home or formal trousers from any material, you need to take into account the allowances. For a product with a fitted silhouette, you need to make an allowance for seams of 0.5–1 cm, for a loose one – 1.5–2 cm, for a wide one – from 2 cm to 10 cm.
Main marks on the pattern
Any trousers, even sports ones, require taking measurements before preparing the pattern and sewing. There are standard options for designating all measurements. Such nomenclature simplifies working on the drawing and reading other types of patterns. Conventional designations using the example of already defined values:
In some situations, these designations may vary slightly, but in general they are standard.
Construction of a pattern for trousers
The pattern of trousers with elastic for women begins with the formation of the grid. Here all the details that will make up the legs are built in. Usually this process is very complicated and takes a lot of time, since all the measurements need to be transferred to paper. The calculations use formulas to determine this or that element of the grid.
Net
The easiest way to create a correct base according to the specified measurements is to build a grid. The grid is the skeleton of the future full-fledged pattern. It can be built as follows:
- Draw a horizontal line at the top of the paper, which will be defined as the waist line.
- Draw another line parallel to this one – “hip”. And even lower, a parallel line “seat height”.
- Another 2 parallels "knee" and "bottom". All these lines are located at a distance determined by the measurements taken earlier.
- Intersect all parallels with a vertical line that intersects them at right angles.
- Draw a vertical line from the waist, which determines the length of the leg from the side. Conventionally, it can be called "D₁".
- From the waist line, draw a vertical line called “D₂”, which determines the height from the waist line to the bottom.
- Set aside the vertical line of the hip “D₃” from the parallel “hip” to the “knee”, the length of which is determined by the formula “D₃” = half-girth of the hip / 10 + 3 cm.
- Place a vertical line from the knee to the bottom called "D₄".
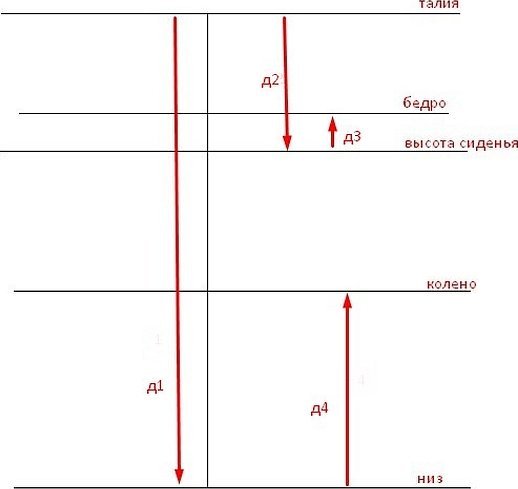
This is a general grid on which, using auxiliary verticals, you can build additional lines that define parts of the pants. This option can be used to sew pants for the summer or create a home version.
Trouser width at the top
This grid detail will help determine whether the pants will be wide or narrow in the end. You need to take tracing paper and make the following constructions:
- Extend the basic vertical line above the waistline.
- From the continued element, extend parallels “Д₅” and “Д₆” in different directions – half-girths of the hips.
- You need to take into account an increase of at least 2 cm.
The increase depends on the type of material. If the textile is stretchy, then you can add only 0.5 cm.
Front half
It is necessary to construct a short line "Д₇", which is set aside from the basic vertical. The parameter can be determined by the following formula "Д₇" = half-girth of the hips / 10 + 1 cm. If you draw a dotted line from the main vertical "Д₈", then it can also become the width of the trouser leg.
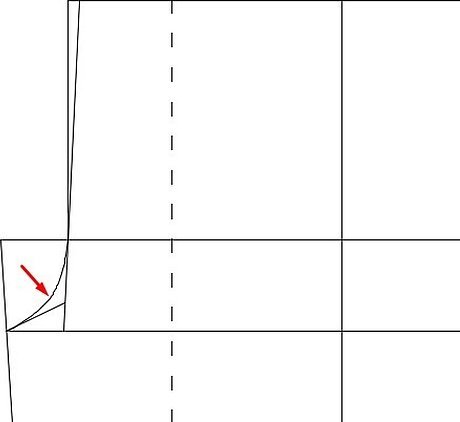
When forming the front half, you also need to make a bend to determine the fit of the product. The process is quite painstaking, but not complicated.
Back half
From the base vertical, draw a line to the left, and you will get the central line of the back half. "Д₉" = A + B. The lines are determined by the following parameters:
- A = ((OB+Increase)/4 + 1)/4 — for a voluminous gluteus muscle; A = ((OB+Increase)/4 — 1)/4 — for a round gluteus muscle; A = (OB+Increase)/16 — for other buttock shapes.
- B = 2 - for normal shapes; B = 1 - for protruding buttocks; B = 0.5 - for flat ones.
Using such adjustments, you can substitute values into the first formula and get an individual version.
Next, all the deferred lines are connected to get a full grid for all parts of the pattern. Next, the pattern of the trousers is prepared in accordance with the prepared grid, the fabric is cut out and the final stitching is done.
Sewing summer women's trousers with and without a pattern
"Lazy" needlewomen often wonder how to sew summer trousers with elastic without a pattern. In fact, this version of the product looks very attractive, and the simple manufacturing option does not affect the quality of the trousers.
Usually such a simple option without a pattern is the pants with a wrap. How to sew women's pants with your own hands without a pattern:
- Make a center seam by folding the halves of the trousers with the right sides together. Neaten the seam allowances together, iron them in one direction from the upper edge to the beginning of the step. Do not iron the seam allowances on the rounding section itself.
- Turn the seam allowances along the upper and lower edges to the wrong side, fold them over and topstitch.
- Fold each tie lengthwise and slant one end. Sew along the longitudinal and slanted short cuts. Turn the tie inside out, topstitch the edges. Sew the ties to the longitudinal cuts at the upper ends and turn them over the stitching seam.
- Put on the trousers, tying the front halves at the back and the back halves at the front. This will give a slight flare at the sides.
This model is very comfortable and versatile. The product will be a great alternative to a summer skirt, beach shorts and a romantic look for a date.
Additional information! The spacious cut and lightweight fabrics give the silhouette such a lightness.
If you use the previously prepared mesh, you can sew more practical and standard-looking pants with an elastic band:
- Make a fabric cutting.
- Grind down the details.
- Perform adjustment.
- Assemble all parts.
It is worth preparing the appropriate tools and materials in advance. The set will depend on the type of fabric chosen. Sometimes you even need to take an awl.
Cutting out the fabric
It is not always possible to sew summer trousers with your own hands quickly without a pattern, since they are definitely not suitable for use in spring, autumn or winter. Therefore, it is better to choose more complex pattern options.
Once the pattern is ready, you can cut out the fabric:
- First, you need to decide on the correct position of the patterns. The direction of the main threads should be towards the bottom of the legs.
- Cut out paper patterns and apply them to the fabric. Secure the pieces with safety pins.
- Using scissors, cut out the pieces from the fabric.
This stage is very important, as the result of the whole event depends on it. It is advisable to process the edges of the cuts as much as possible. You need to use an overlock stitch, which can be easily done on a sewing machine.
Stitching the parts together
Before you finally start sewing all the parts of one product, you need to grind the elements. Then you can evaluate the appearance of the thing. If necessary, you can correct some shortcomings.
To see how the basting stitch is constructed, it is worth using a thread that is a contrasting color compared to the color of the fabric.
The next step will be to stitch together the already processed and carefully prepared parts. It will not take long to sew the product using this principle. You need to take a needle and thread and connect all the parts with a regular basting stitch.
Fitting the product
Before you start the final stitching, you also need to make an adjustment. If you sew a thing without preliminary preparation, the result may not please you. You need to put the pants on the "model". See how it sits on the figure, try to sit down, be sure to evaluate all the components of the product.
If there are any defects, they must be corrected immediately. Cut the seams and remove excess fabric (if necessary). It is advisable to check each overlock seam.
Assembling all parts
Step-by-step sewing, namely the assembly of already precisely fitted parts:
- Measure the waist line on the pants using a tape measure, multiply by two - this will be the length of the waistband, the width of the waistband is the width of the elastic, multiplied by two plus 3 cm for allowances.
- You need to sew a belt to the pants. You can see how to do this in the detailed master class on sewing a belt.
- Use a pin to insert the elastic into the waistband. Sew the ends of the elastic on the machine using a zigzag stitch.
- The pants are ready. It is not difficult for beginner needlewomen to sew pants for a girl.
The finished version of the item needs to be washed, dried and ironed. The product is ready to wear. To simplify this process, you can first wash the parts and then assemble them.
Thus, as it turned out, even for a novice seamstress and needlewoman, sewing this type of clothing will not seem like a very difficult task. You just need to figure everything out and boldly get down to business.


