Dolls created with your own hands are very beautiful. In addition, they have a special energy, how to sew a doll? The question is popular, to sew a toy with your own hands does not require special skills, it is enough to prepare all the necessary materials, you will need a doll pattern and step-by-step instructions.
- Materials for sewing a doll
- Step-by-step instructions for sewing dolls with your own hands
- Sewing a Tilda doll with a pattern
- Sewing a knitted Waldorf butterfly doll with a pattern
- Sewing a doll-amulet in Russian folk style
- Sewing a textile doll for the interior with a pattern
- A doll made of chenille wire and yarn
- Felt rag doll with pattern
- Sewing a lalaloopsy doll
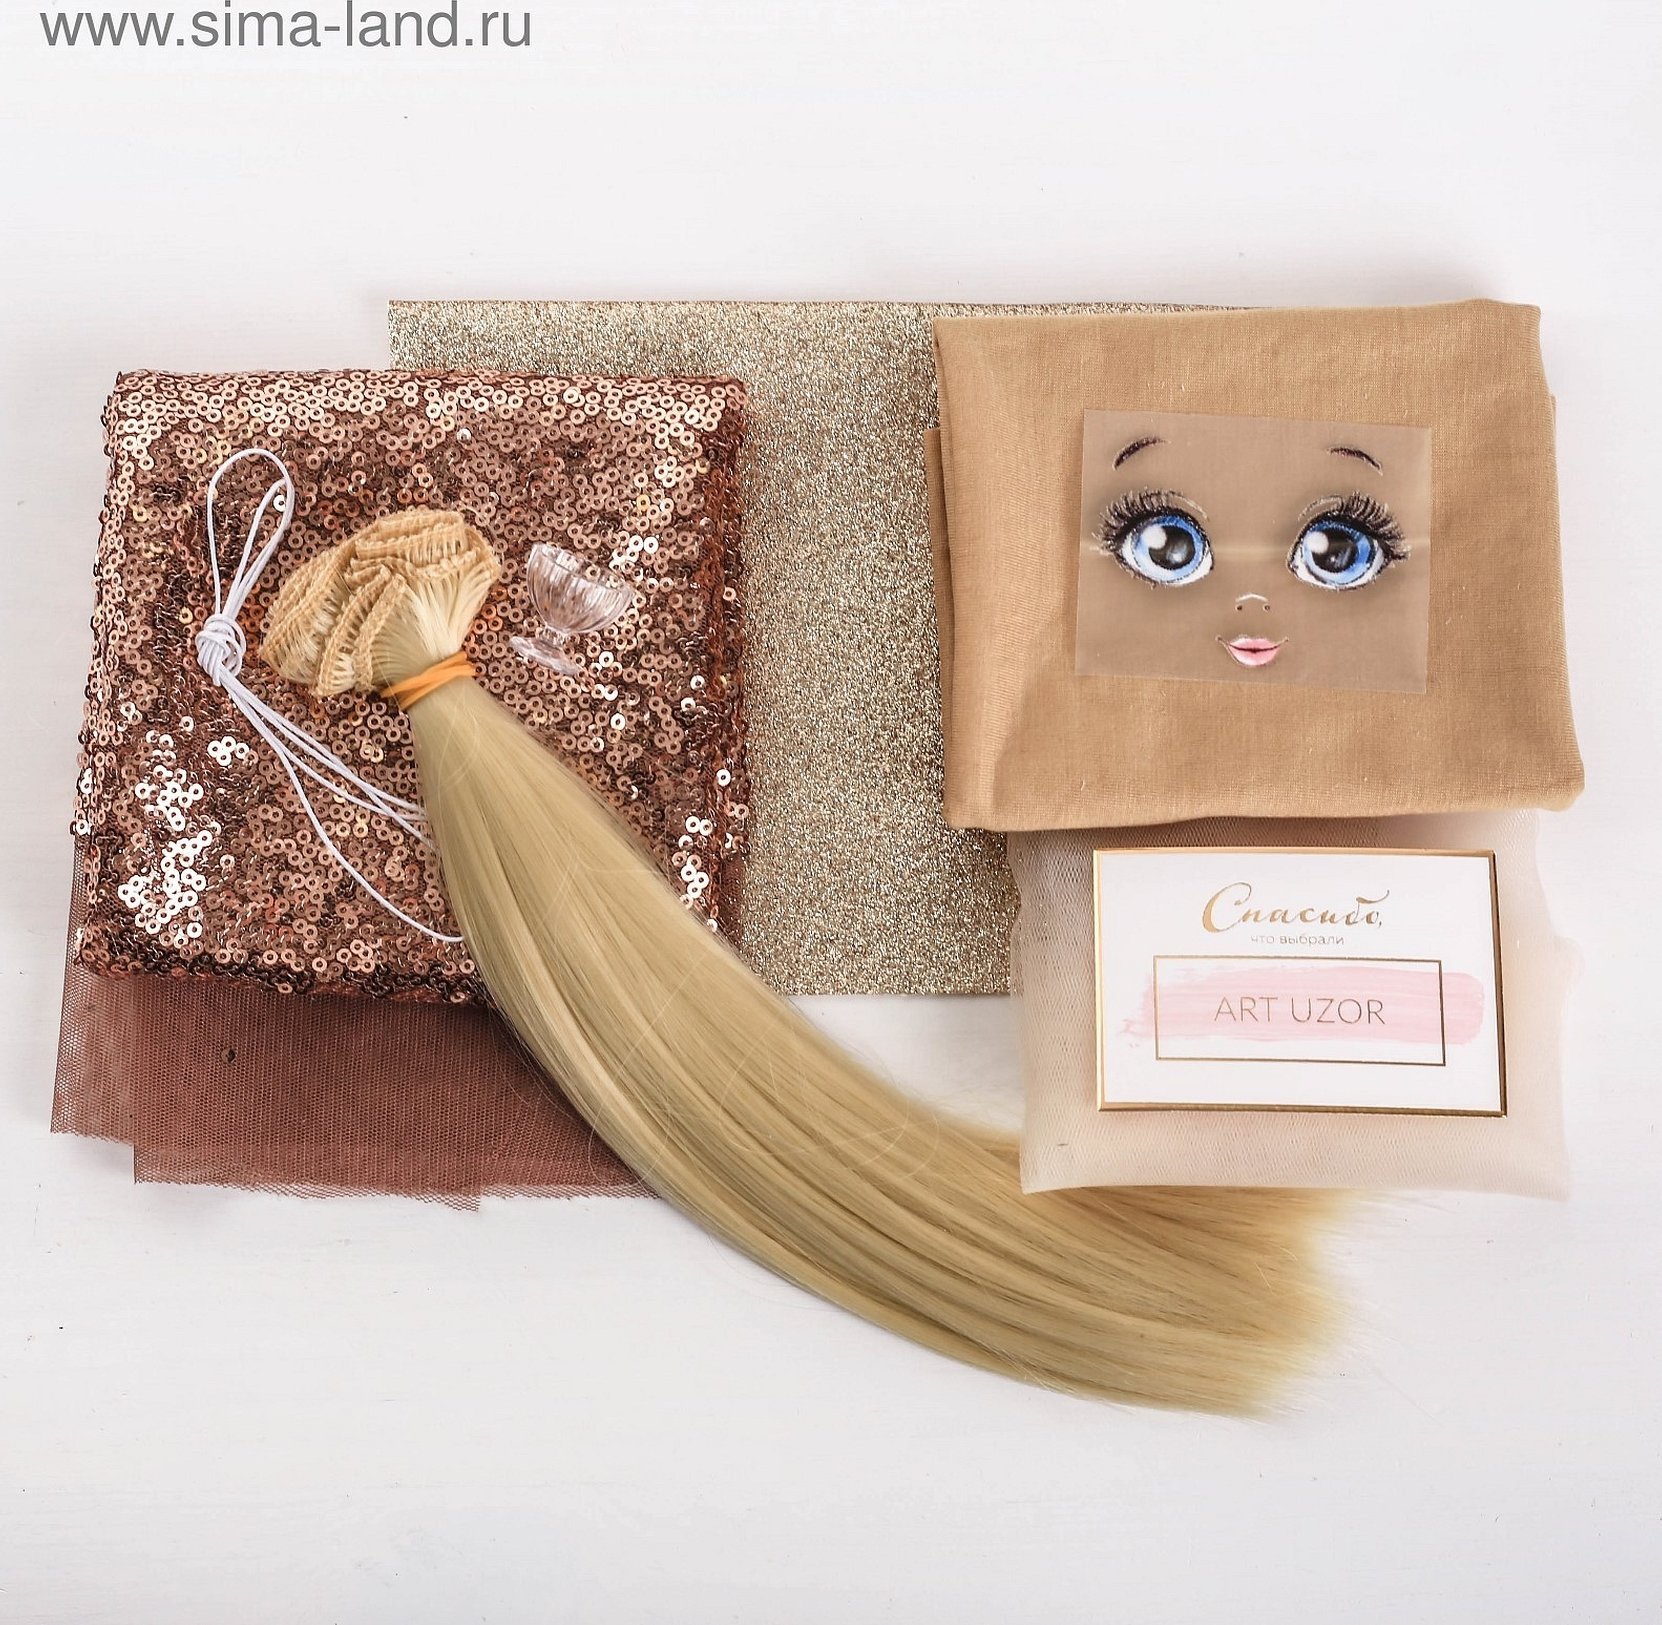
Materials for sewing a doll
In order to sew a doll, you can use improvised means. To do this, you will need to prepare:
- patterns for dolls for sewing with your own hands (or patterns for beginners step by step);
- flesh-colored fabric (you can use an old T-shirt);
- clothing fabric;
- filler (for example, synthetic padding);
- hair yarn;

- beads for eyes and nose (if they are not drawn);
- chalk or pencil;
- needle;
- threads;
- scissors.
Usually dolls are made for more than one year, so it is recommended to take high-quality materials. This way, it will be able to last a long time without tearing or losing its attractive appearance.
Step-by-step instructions for sewing dolls with your own hands
Depending on what doll you want to sew, there will be a different algorithm of actions. To sew, you only need to follow the master class step by step.
Sewing a Tilda doll with a pattern
To make Tilda you will need beige fabric (you can dye white fabric with coffee). It is better to take natural fabrics for sewing, and fleece is good for sewing Tilda-animal. You will also need fabric for clothes.
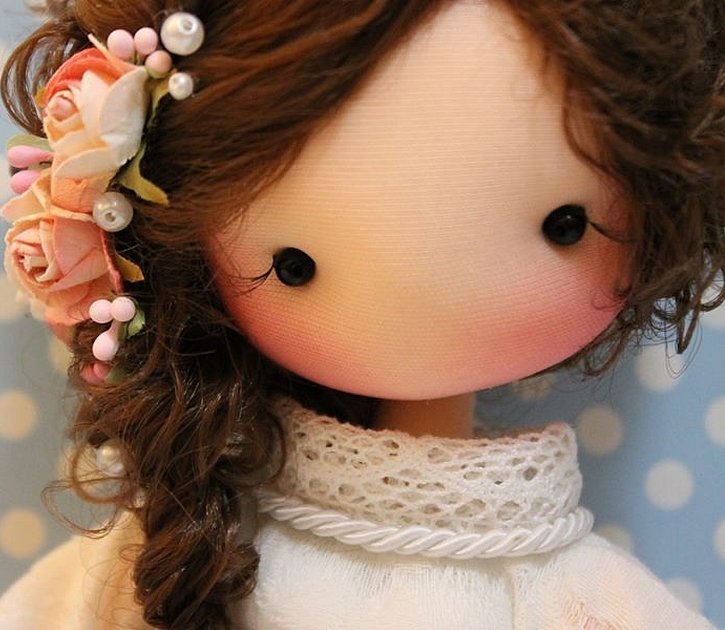
All doll parts are cut out according to the pattern. Each part of the body is sewn and filled with holofiber or synthetic padding. Then all the body parts are sewn together.
After the doll is sewn, you need to add hair to it. The best options are yarn or floss. They can be glued on.
The doll's eyes are sewn on with floss, painted with paint, or small black beads are sewn on.
The last step is to dress Tilda and she is ready. The clothing scheme can be drawn from puka. Do not forget to give names to dolls. For example, Amanda, Lola or Kuzya.

Sewing a knitted Waldorf butterfly doll with a pattern
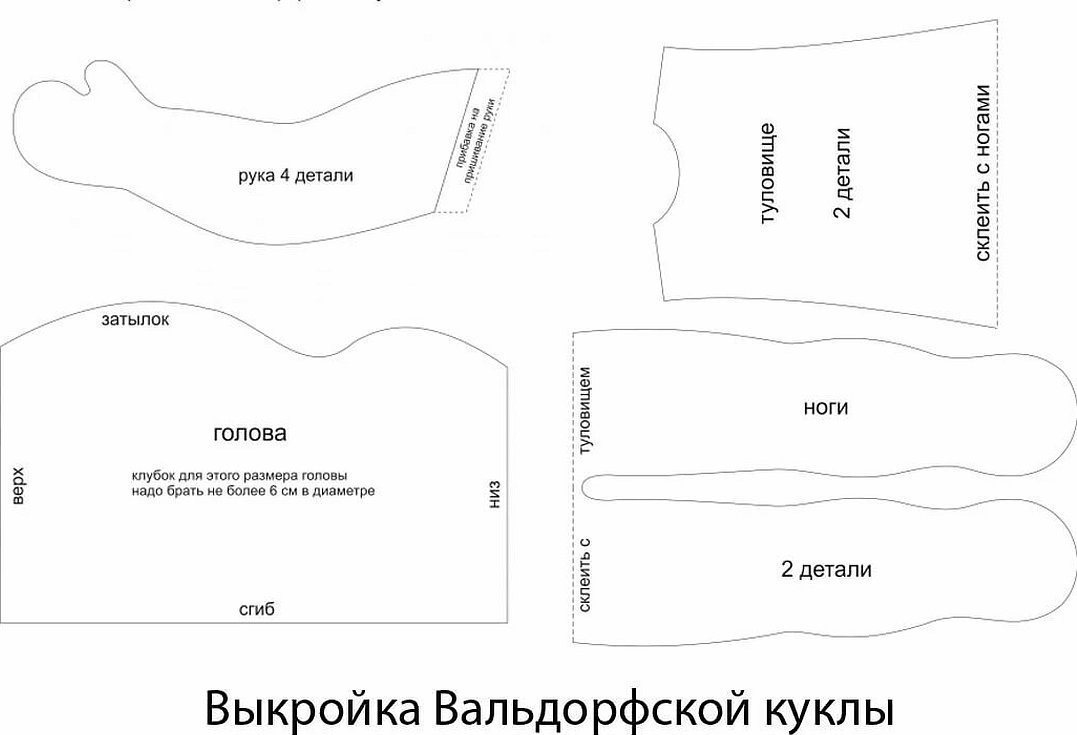
To sew a butterfly doll, the first step is to sew the base of the head. To do this, you will need a piece of flesh-colored knitted fabric about 13 cm long. It is folded in half so that the grooves lie strictly vertically, and then sewn along the long side, stepping back 0.5 cm from the edge. The result should be a tube.
Next, sew a basting stitch along the top edge of the resulting product and pull it together to create a pouch that should be turned inside out.
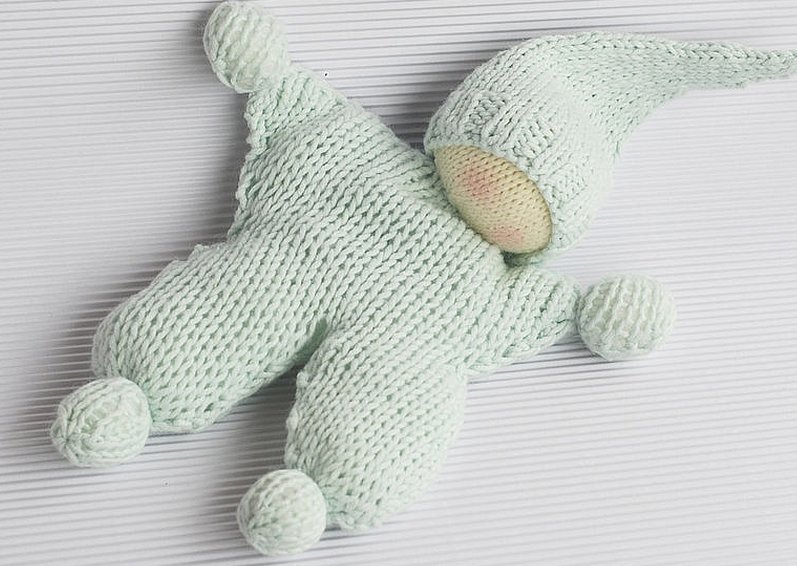
Take a long narrow wool strip and roll it into a tight ball with a diameter of about 5 cm - this will be the head. Place the resulting ball at the base of the head and tighten the base as tightly as possible with a thread on the neck. There should be no empty spaces or folds on the head. The seam of the base should be at the back.
Lay out a star from strips of sheep wool. It should consist of three strips about 20 cm long and 5 cm wide. Put a wool ball in the center. Raise the rays of the star up and tie them so that the ball fits tightly inside. Insert the resulting structure into the remaining free edge of the head base. This will be the body.
Prepare a pattern for the cap, sew the side cut, fold the bottom or sew on the tape and put it on your head. Sew it to the knitwear on your head along the bottom. Draw the face as desired. You can do without it.
Take a piece of flannel, fold it in half from top to bottom and from right to left. Transfer the pattern so that it turns out in the shape of a butterfly. Cut along the contour, leaving a 0.5 cm allowance. Cut out the neckline.
Sew the cut flannel with a backstitch, leaving the neck open. Make 2 vertical cuts on the legs on the seam allowance so that the fabric does not tighten in the corners. Turn the product inside out through the neck.
The next step is to roll 4 balls of wool and insert them into the arms and legs. Secure them in the corners with a basting stitch or tie them with a thread. This will make the doll's fists and feet.
Insert the previously made body with the head into the neck and sew it in the neck area. The doll is ready!
Sewing a doll-amulet in Russian folk style
For the amulet doll, you will need to take a rough cotton fabric 30*40 cm and fold it in half. You will need it to create a twist. Twist the folded fabric very tightly into a column and tie it with red threads along its entire 15-centimeter height. Make a circle from padding polyester and tie it to the twist with threads - this will be the head and neck.
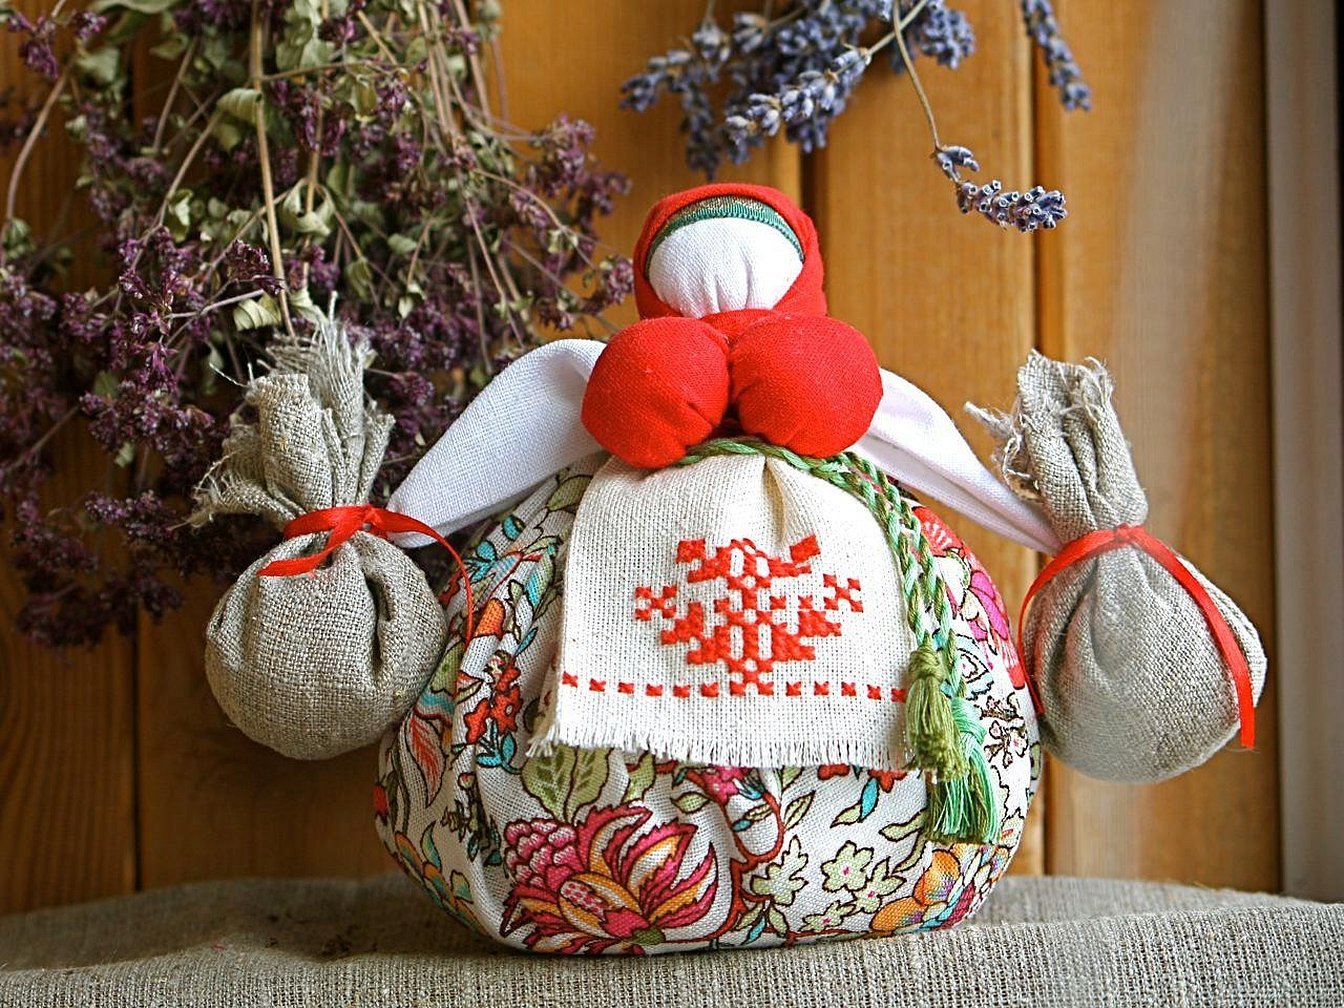
Place a 20*20 cm square on the resulting head and secure it with a red thread on the neck. Take the free edge from the bottom on both sides and tie both corners 1 cm each with a red thread. The result should be a head and a body with arms.
The next step is to mark the waist and tie it tightly with a thread. From the waist, make a skirt using a piece of fabric 12*30 cm. Make an apron on the skirt using canvas. The canvas should be pulled out at the edges to form a fringe.
Important! Tie light lace around the head. Cut out a triangle from red fabric and make a headscarf for the doll. The doll is ready.

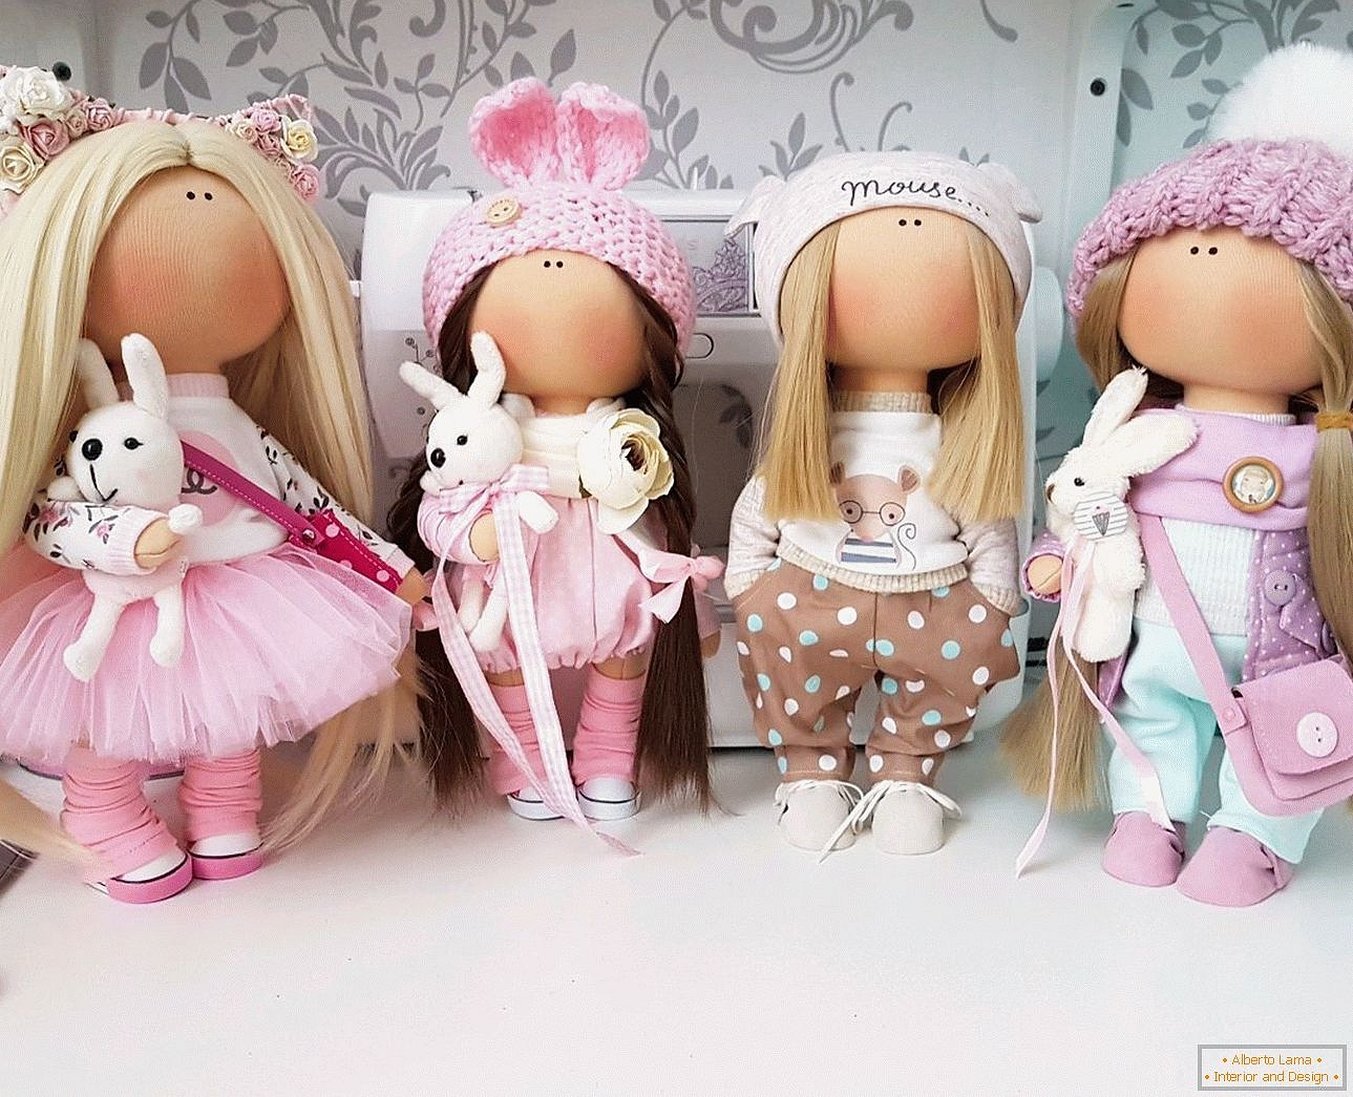
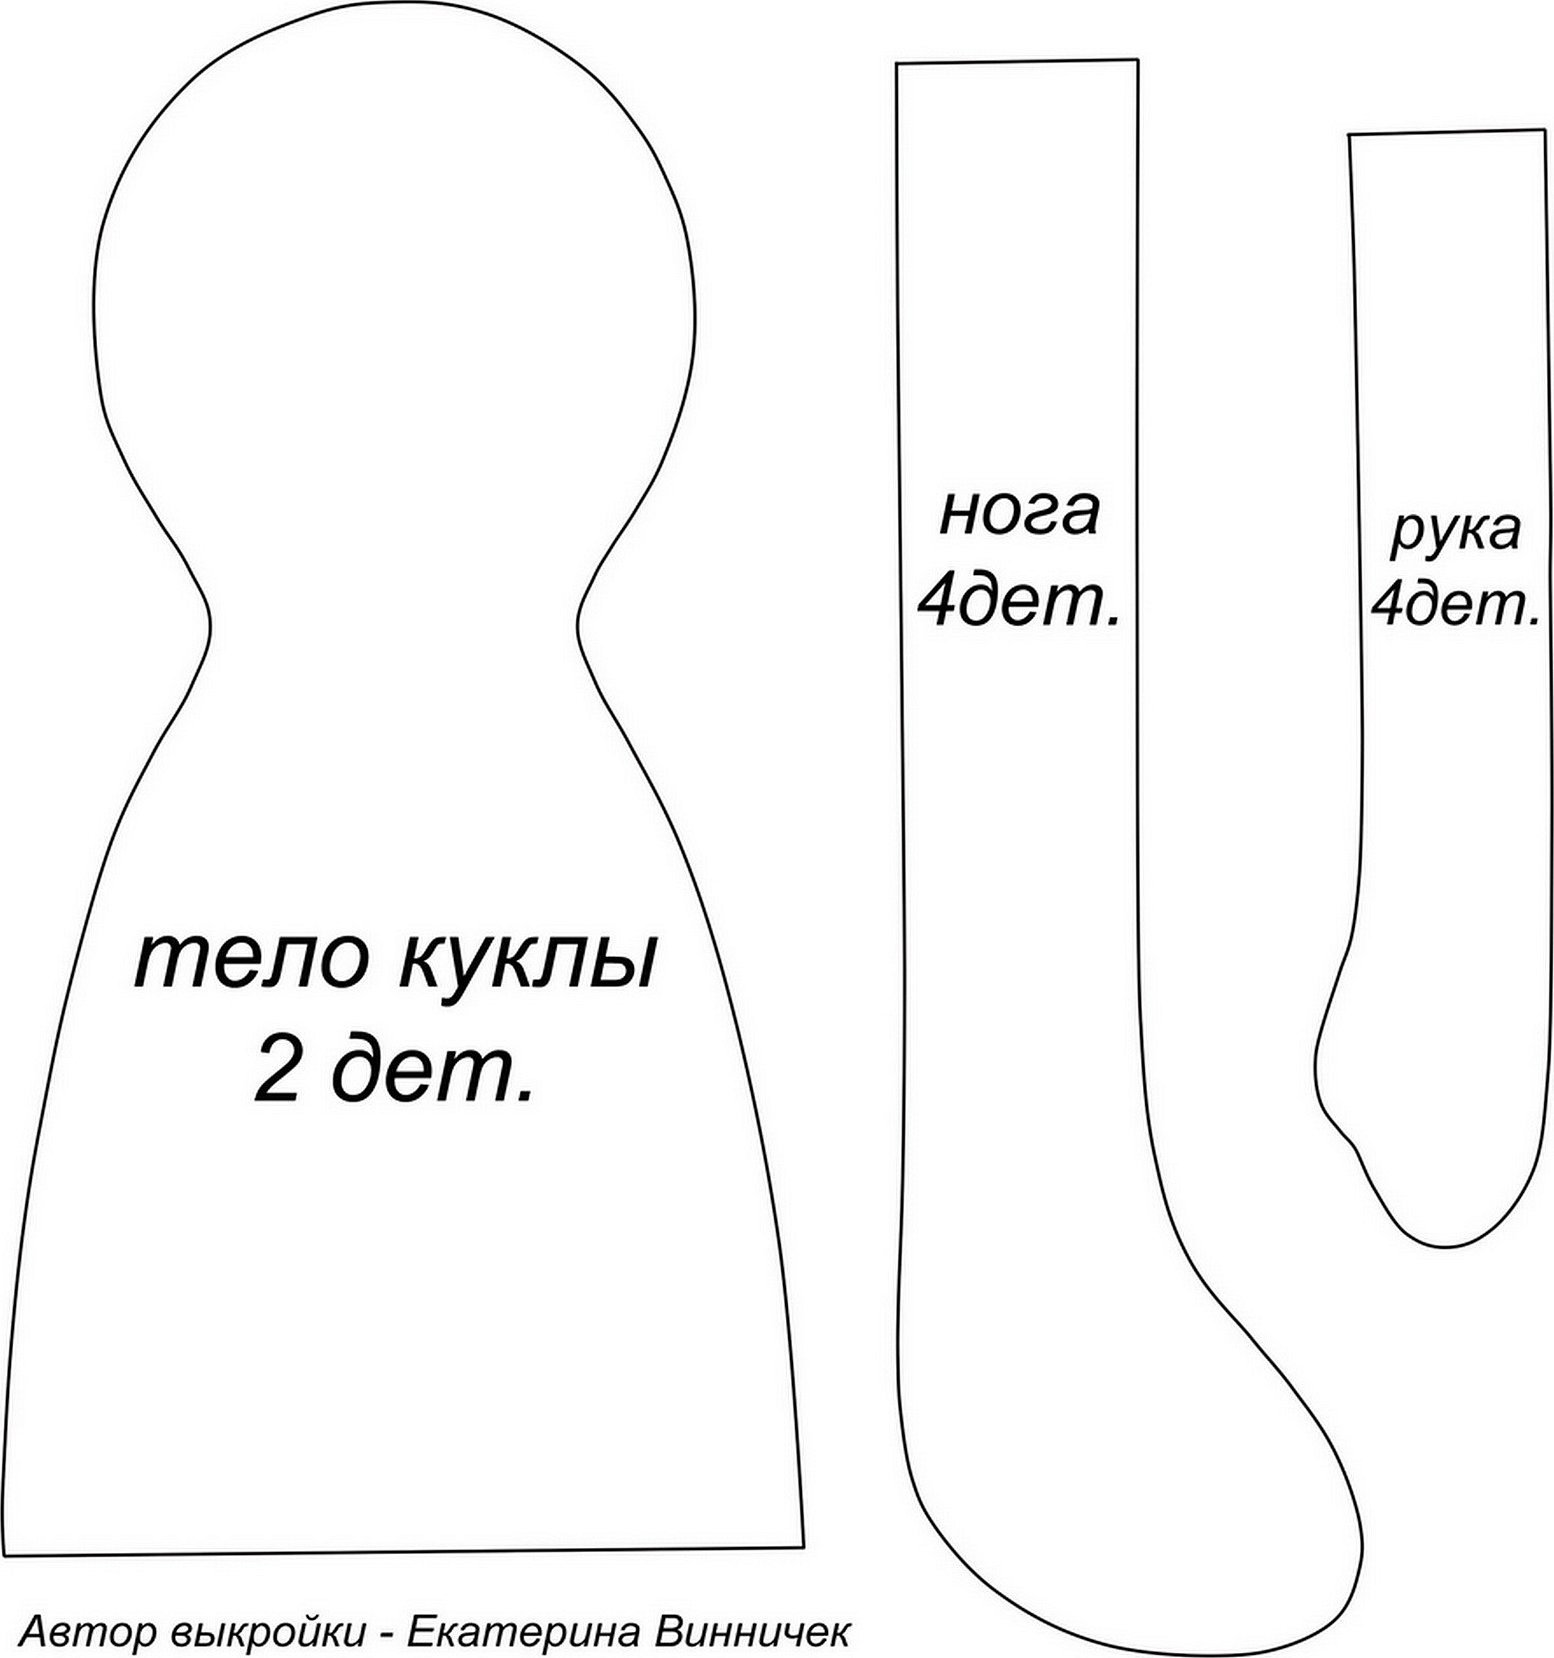
Sewing a textile doll for the interior with a pattern
First of all, you will need to prepare a pattern for the interior doll and transfer it to the knitwear. Place 2 pieces face to face, cut out the body with the head and sew, leaving space for the ball for the head and turning.
Cut out and sew the remaining body parts (the dotted line on the pattern is not sewn). Turn all items inside out.
For the head, take a foam ball with a diameter of 8 cm and completely wrap it with padding polyester. Insert the resulting head into the unsewn part on top of the head with the body.
To make a nose, glue some padding polyester to a safety pin with a ball at the end. Tie it at the base to get a round tip. Mark the location of the nose, stick a safety pin into the foam ball from the inside and close it back with fabric. That is, the nose sticks out from the inside. After that, the head can be sewn up from above.
For the neck, wind the padding polyester around a wooden stick and secure it with glue. Its diameter should be proportional to the head. Insert the neck into the unstitched part of the body. Stick the wooden stick into the ball of the head. Then tightly stuff the body with filler. Make sure that the filling is uniform and not lumpy (this can be achieved by stuffing with small pieces of filler). After that, the bottom can be sewn up.
Stuff the arms and legs, sew up all the holes. Put on the shoes. At this stage, you can immediately sew pants for the doll. After that, you need to start assembling. Insert the body between the legs, fix it with pins and sew the legs with buttons. Put on the pants and sew them to the body.
Dress the doll from above. You can sew a blouse, a robe or a fluffy dress, which will consist of a separate top and bottom. Sew on the arms using buttons.
The last stage is the hair. It can be made from tresses or yarn. They can be either glued or sewn. The eyes on the face are painted with acrylic paint, and the cheeks with regular blush. All decorative elements for the conne doll - jewelry, hat, handbag are made at your discretion. Everyone can make an interior doll thanks to the master class and pattern.
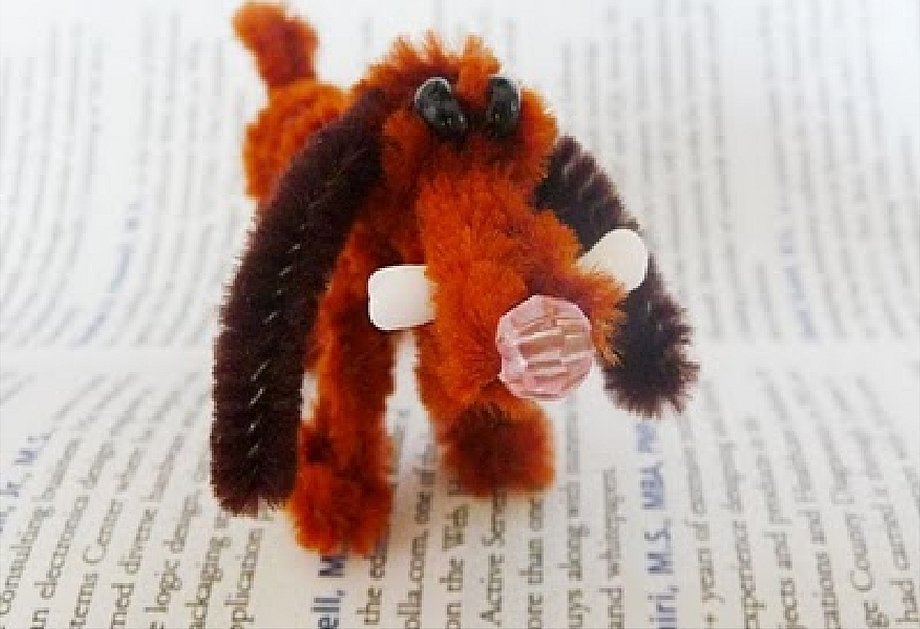
A doll made of chenille wire and yarn
You won't even need a needle and thread to make this doll. The base is yarn, chenille wire, and a 4 cm wooden ball.
The first stage is making hair. The yarn is wound on cardboard and cut off on one side, then the cardboard is not needed.
The chenille wire is bent in half and inserted into the hole of the wooden bead. The hair is inserted into the gap between the two halves of the wire and tightened with the bead. The head with hair is ready.
For the body, bend the second wire in half and wrap it around the neck. Bend the free edges several times to make arms. Twist the rest of the wire that comes out of the bead to the middle of the body to make legs. Bend the ends a little to create feet.
Wrap the whole fluffy wire with yarn on top. Then take gouache and paint the wooden bead white in two layers. Put two dots-eyes on the face with black paint. Create clothes to your taste. The doll is ready. It is well suited as a Christmas tree toy.
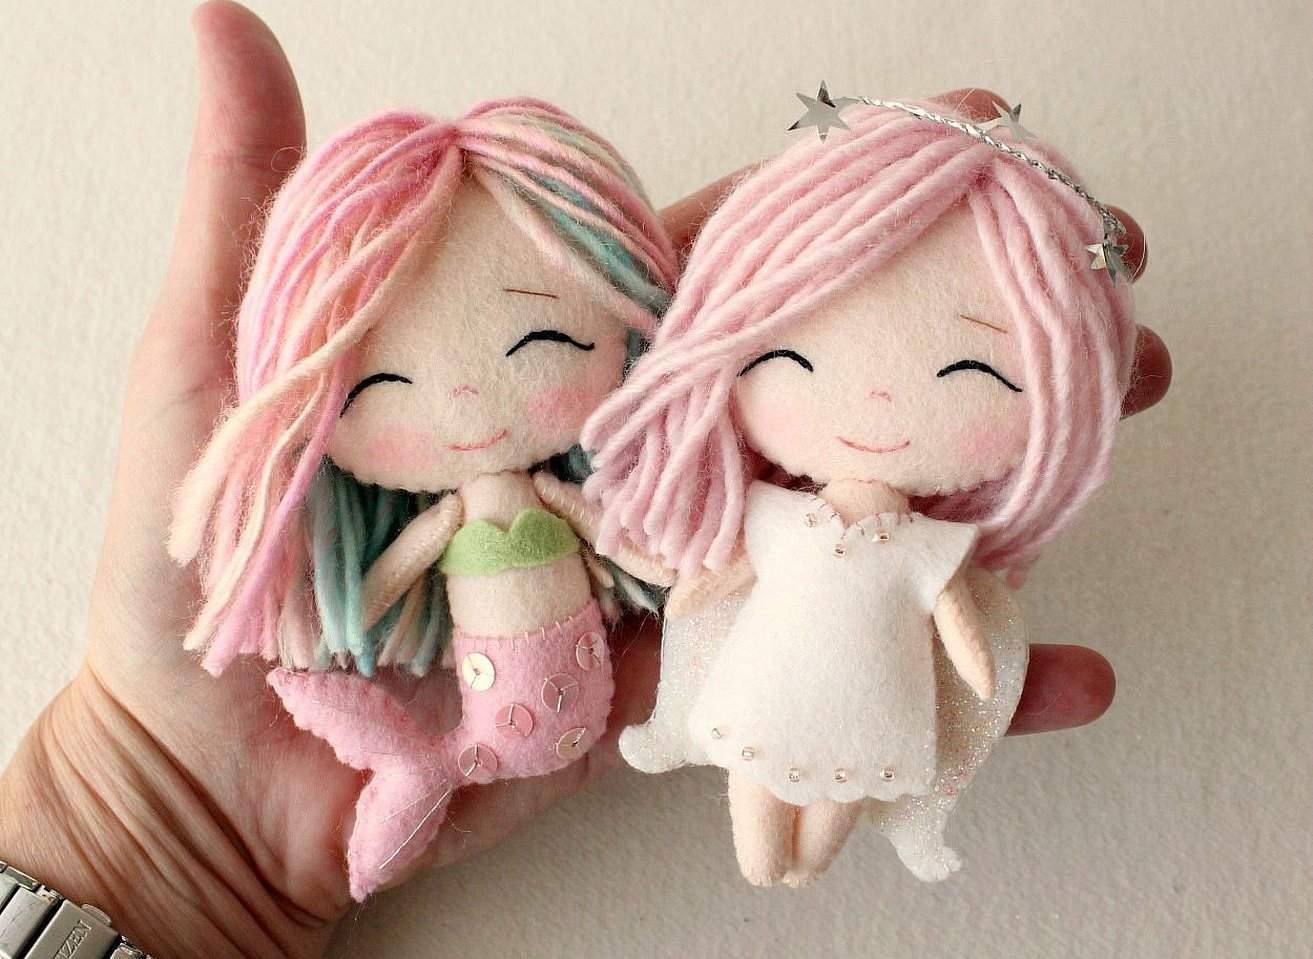
Felt rag doll with pattern
Making such a doll is a very simple and not labor-intensive process. You will need to transfer the pattern-drawing onto beige felt, sew all the paired parts together, leaving holes for stuffing. Fill each part with padding polyester, sew the legs and arms to the body. Cut the hair according to the template and sew it on. Do the same with the clothes. Embroider the eyes and mouth with threads or sew on small black beads. This is the easiest option for sewing a doll yourself.
Sewing a lalaloopsy doll
You can create a pattern for lalaloopsy yourself by copying it from a cartoon character. The main thing is to keep the proportions - a large head, short arms, and thin and long legs.
Transfer the pattern to the fabric, leaving 0.5 cm for allowances. Place the cut parts face to face and sew, leaving space to turn the parts inside out. After they are turned inside out, stuff them with filler. This is done effectively with wooden sticks. After this, all the parts of the toy can be connected.
To make the doll sit, you should insert a wire frame into it before sewing.
When all the details are sewn, it's time to start decorating. Depending on which lalaloopsy is chosen, you should choose the color of the yarn for the hair. In addition, you will need to sew a dress, shoes, and other accessories.
On the face, embroider the mouth with a dotted line, sew buttons in place of the eyes. Sew pink circles of fabric on the cheeks. It remains to dress the toy and it is ready. That's the whole master class on sewing lalaloopsy dolls.
Please note! In addition to these options, you can make a toy from tights or nylon, a reborn doll - a full-size baby, for the theater, a pumpkin head or one that sits on a teapot. They look more interesting than the usual Barbie with a house. The main thing is to have a description with a master class at hand.
Making a doll with your own hands is a very exciting process. In just one day, you can create a real masterpiece with your own hands. A homemade toy will be appropriate to put as a decoration, and let a child play with it, and give it to someone as a gift. It will be the only one and unique. If you have no experience yet, then making dolls with your own hands from fabric patterns for beginners will help you easily.


