Often magazines and books offer ready-made patterns that lack or do not fit bust/waist darts. Women's figures vary greatly, so the pattern requires revision and construction of darts to suit the figure. They are necessary to shape the chest line of the garment and give it the necessary silhouette.
- What is a bust dart?
- How to form a dart on the chest
- Solution of bust dart: table
- Transfer of bust dart
- Transferring the bust dart to the armhole line
- Transferring the bust dart to the side seam line
- Transferring the dart into a side seam at waistline level
- Moving the shoulder dart to the center front
- Transferring the shoulder dart to the neckline
- How to Raise a Chest Dart Much More
- Relief is another version of a bust dart
- Relief from the armhole
- Shoulder relief
- Relief from the neck
What is a bust dart?
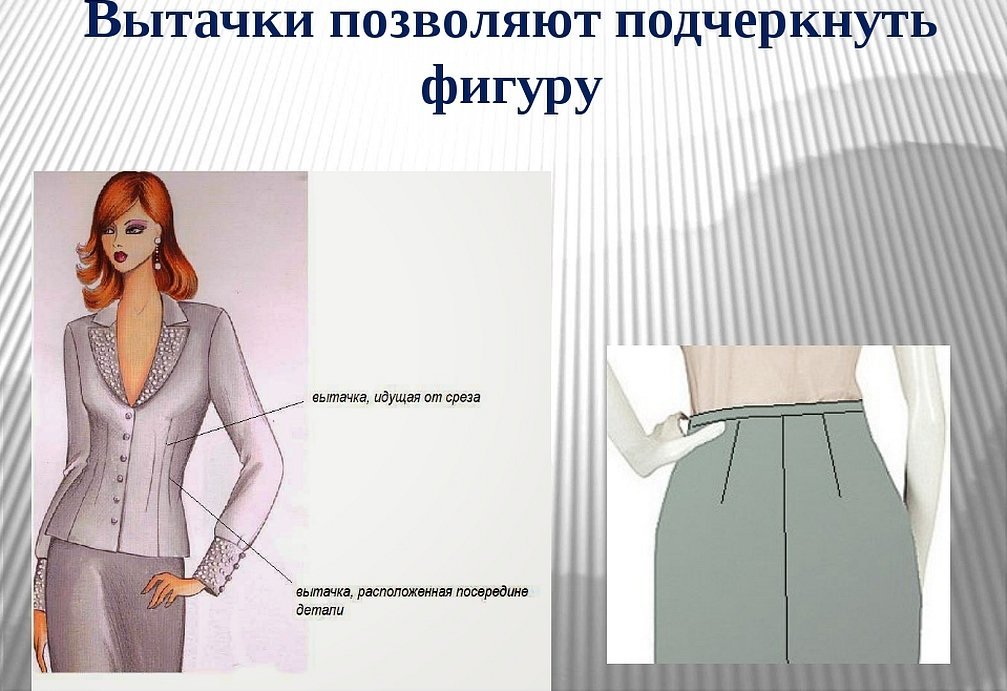
Darts are wedge-shaped seams that give the finished garment a human figure silhouette in the areas of bulges. Bust darts are seams placed on the fronts to give the fabric the shape of the chest.
Depending on the location, chest seams can be:
- from the armhole;
- from the neck;
- from the side cut;
- from the shoulder cut.
The only difference may be the place where the seam starts, it should always end towards the center of the chest. Darts also go from the waist to the middle of the chest, but they are called waist darts. They narrow the product in the waist area and add the necessary volume in the chest area.
The chest strip can have the following sewing methods:
- One vertex. It is a triangle, the vertex of which will be located at the most protruding part of the chest, and the wide part - at the cut, where the seam will subsequently be.
- Two peaks (shaped). They are used on one-piece pieces for a fitted fit, with one peak located in the middle of the chest and the second one below the waist, at the hip line.
Darts can also be:
- ironed and unironed;
- with or without finishing stitching;
- split and unsplit,
- with or without additional bar.
For your information! Each type of seam on the front of the product is good and is used to construct different models. However, it is not easy to construct them because their size cannot be measured, but only calculated.
Construction of a bust dart has been studied by many fashion designers and technologists. There are several methods, for example:
- Method of G. M. Zlachevskaya - a strip is constructed from the armhole using two measurements (the width of the chest in the most convex part and the width above the chest)
- The Muller and Son method takes into account only the chest circumference, not its full size, so sometimes the size is inaccurate.
- The unified method of clothing design of the Central Experimental and Technical Sewing Laboratory (EMKO TsOTSHL) also takes into account the width of the chest at the highest points (SHG 1) and above the chest (SHG 2), and then calculations are made using the formula: 2 (SHG2 - SHG1) + 2 cm. The calculations lead to a very accurate result.
For your information! There are quite a few methods for how to correctly determine the location of darts on the back and chest seams for different types of clothing, with and without formulas, precise and not so. This makes it possible to choose the most suitable one.
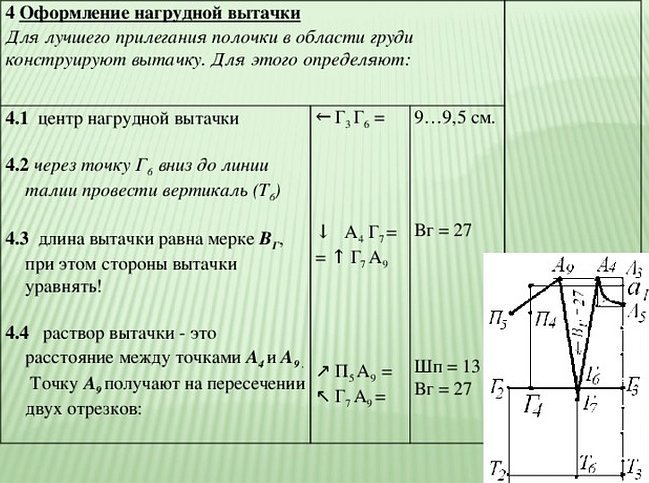
How to form a dart on the chest
The bust dart is a very important element of the product design, its construction requires attention and precision. There are enough methods and techniques that explain how to design it on a pattern, a description of their modeling and construction. All the techniques can be found on the Internet and in fashion magazines, where a detailed description with pictures or even a video is given.
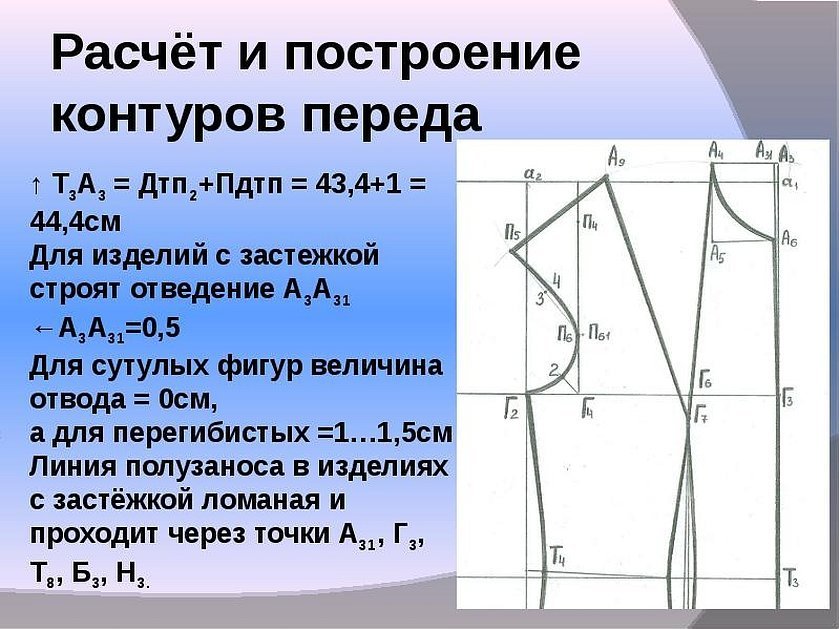
For example: the formation of a shoulder dart is necessary due to differences in figures, stooped figures will require a larger size than people with a straight back. To construct it on the chest, you need to find the following measurements:
- Center of the breast (CB). The distance between the nipple points is measured and divided in half.
- Chest height (CH). Measure from the highest point of the chest to the shoulder seam at the base of the neck and add 0.5 cm.
The angle of the stripe can be built at the discretion of the designer. For example, a slight downward slope adds elegance to the silhouette. And when using fabric with a geometric pattern, it is better to stop at a straight line that will hide the seam.
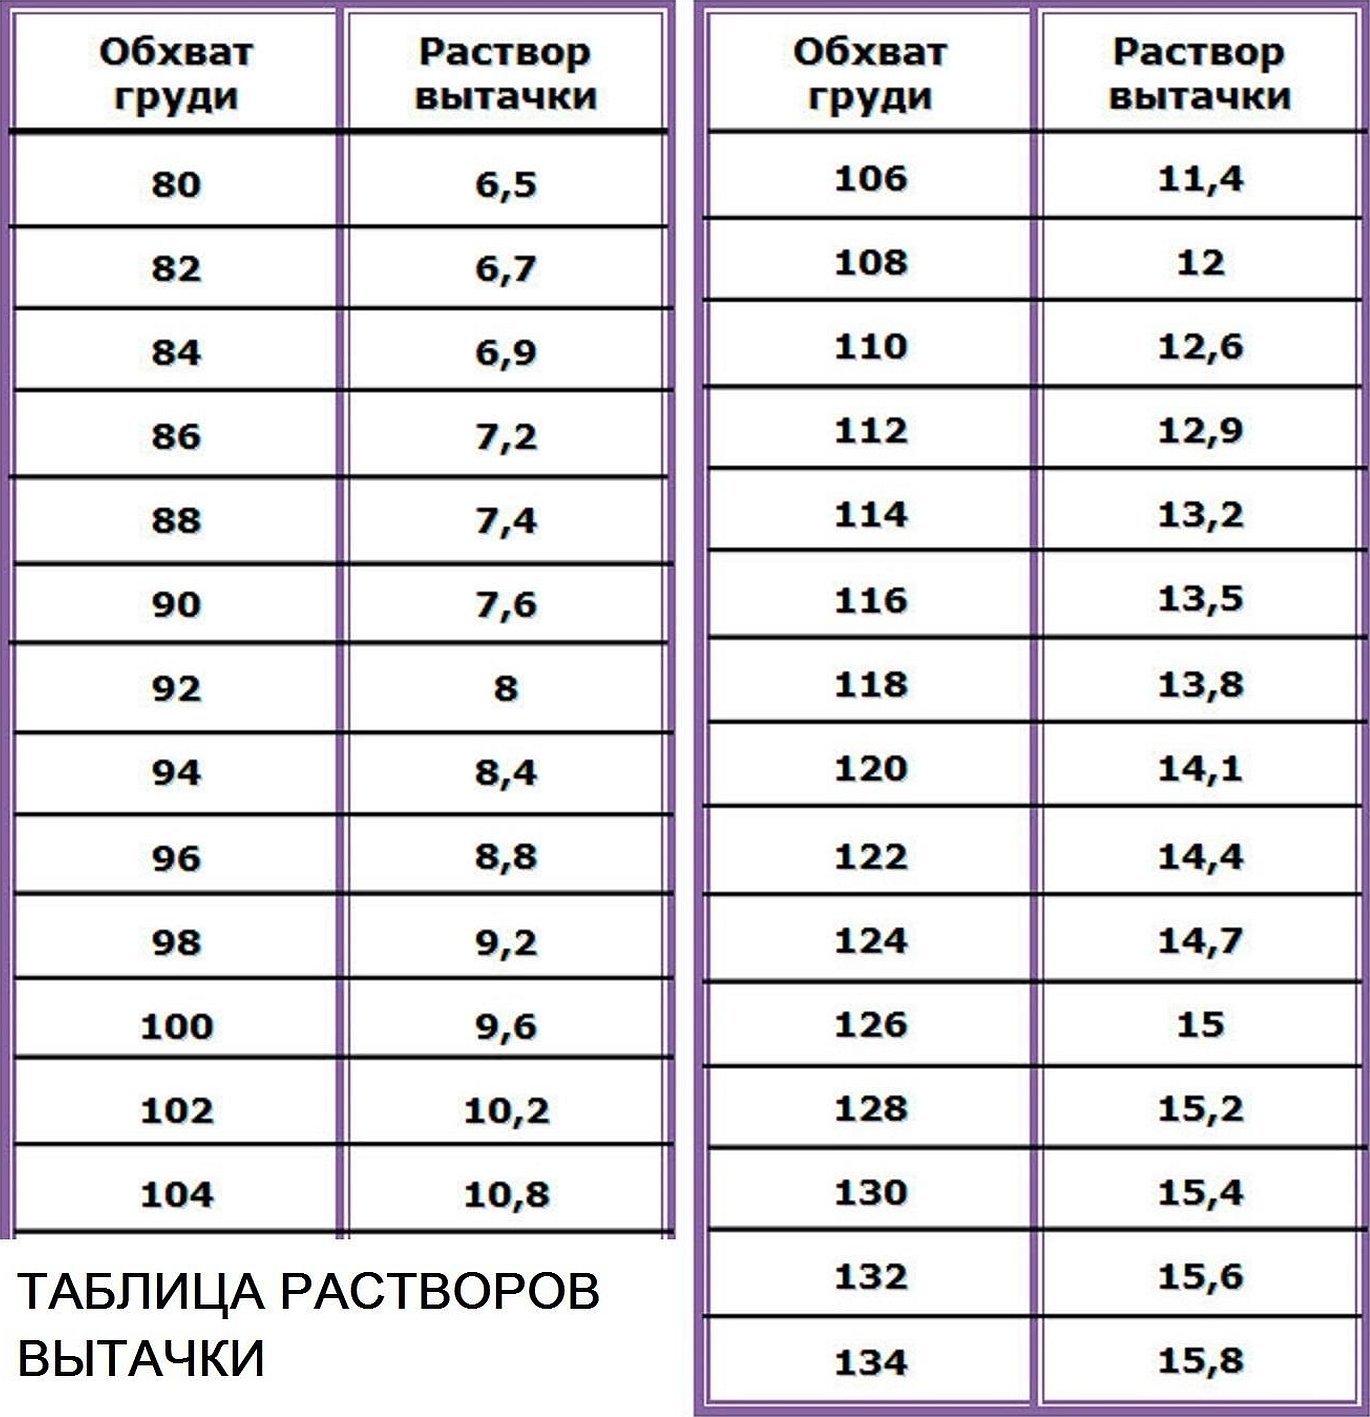
Solution of bust dart: table
The dart solution is its width, that is, the excess fabric that it hides. The solution can change depending on the silhouette, chest shape, width and slope of the shoulders, and other indicators, so there are no exact tables for finding it. You will still have to adjust during the fitting. But while your eye is not yet trained, you can use the approximate table below for correct figures of average fullness and calculate the solution.
| Chest circumference | Solution width |
| 80 | 6.5 |
| 82 | 6.7 |
| 84 | 6.9 |
| 86 | 7.2 |
| 88 | 7.4 |
| 90 | 7.6 |
| 92 | 8 |
| 94 | 8.4 |
| 96 | 8.8 |
| 98 | 9.2 |
| 100 | 9.6 |
| 102 | 10.2 |
| 104 | 10.8 |
| 106 | 11.4 |
| 108 | 12 |
| 110 | 12.6 |
| 112 | 12.9 |
| 114 | 13.2 |
| 116 | 13.5 |
| 118 | 13.8 |
| 120 | 14.1 |
| 122 | 14.4 |
| 124 | 14.7 |
| 126 | 15 |
| 128 | 15.2 |
| 130 | 15.4 |
Transfer of bust dart
If there is a ready-made pattern that includes darts to emphasize the bust line, but they do not fit in size or fit, they can be transferred. The transfer can be done in different directions: to the armhole line, to the side seam line, including at the waist line, to the middle of the front, to the neckline.
Important! An essential condition is that the seam should tend to the center of the chest (CG). The first step in transferring is to prepare a copy of the pattern of the required part on tracing paper.
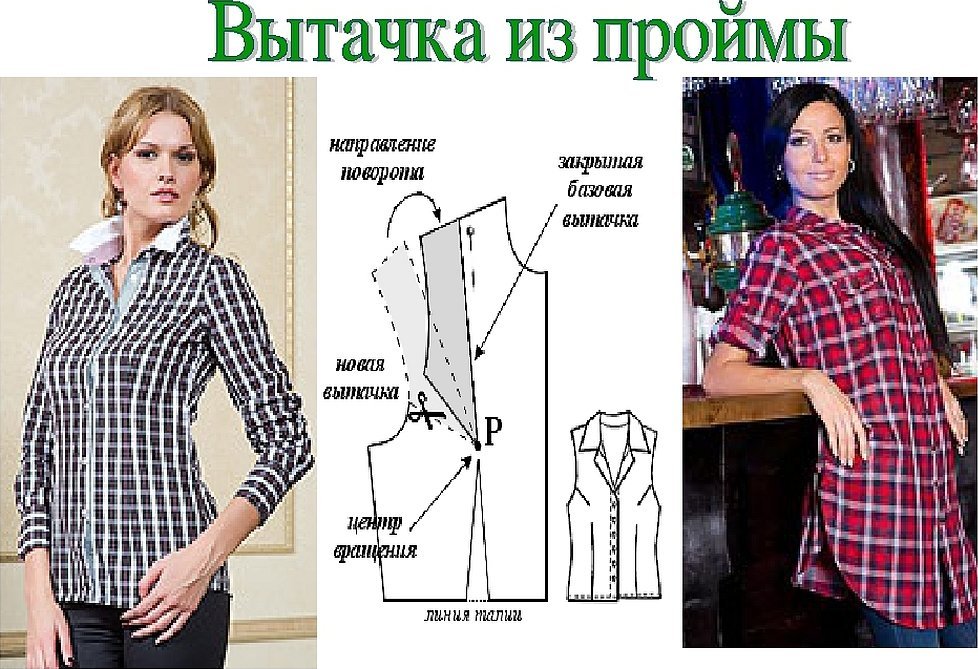
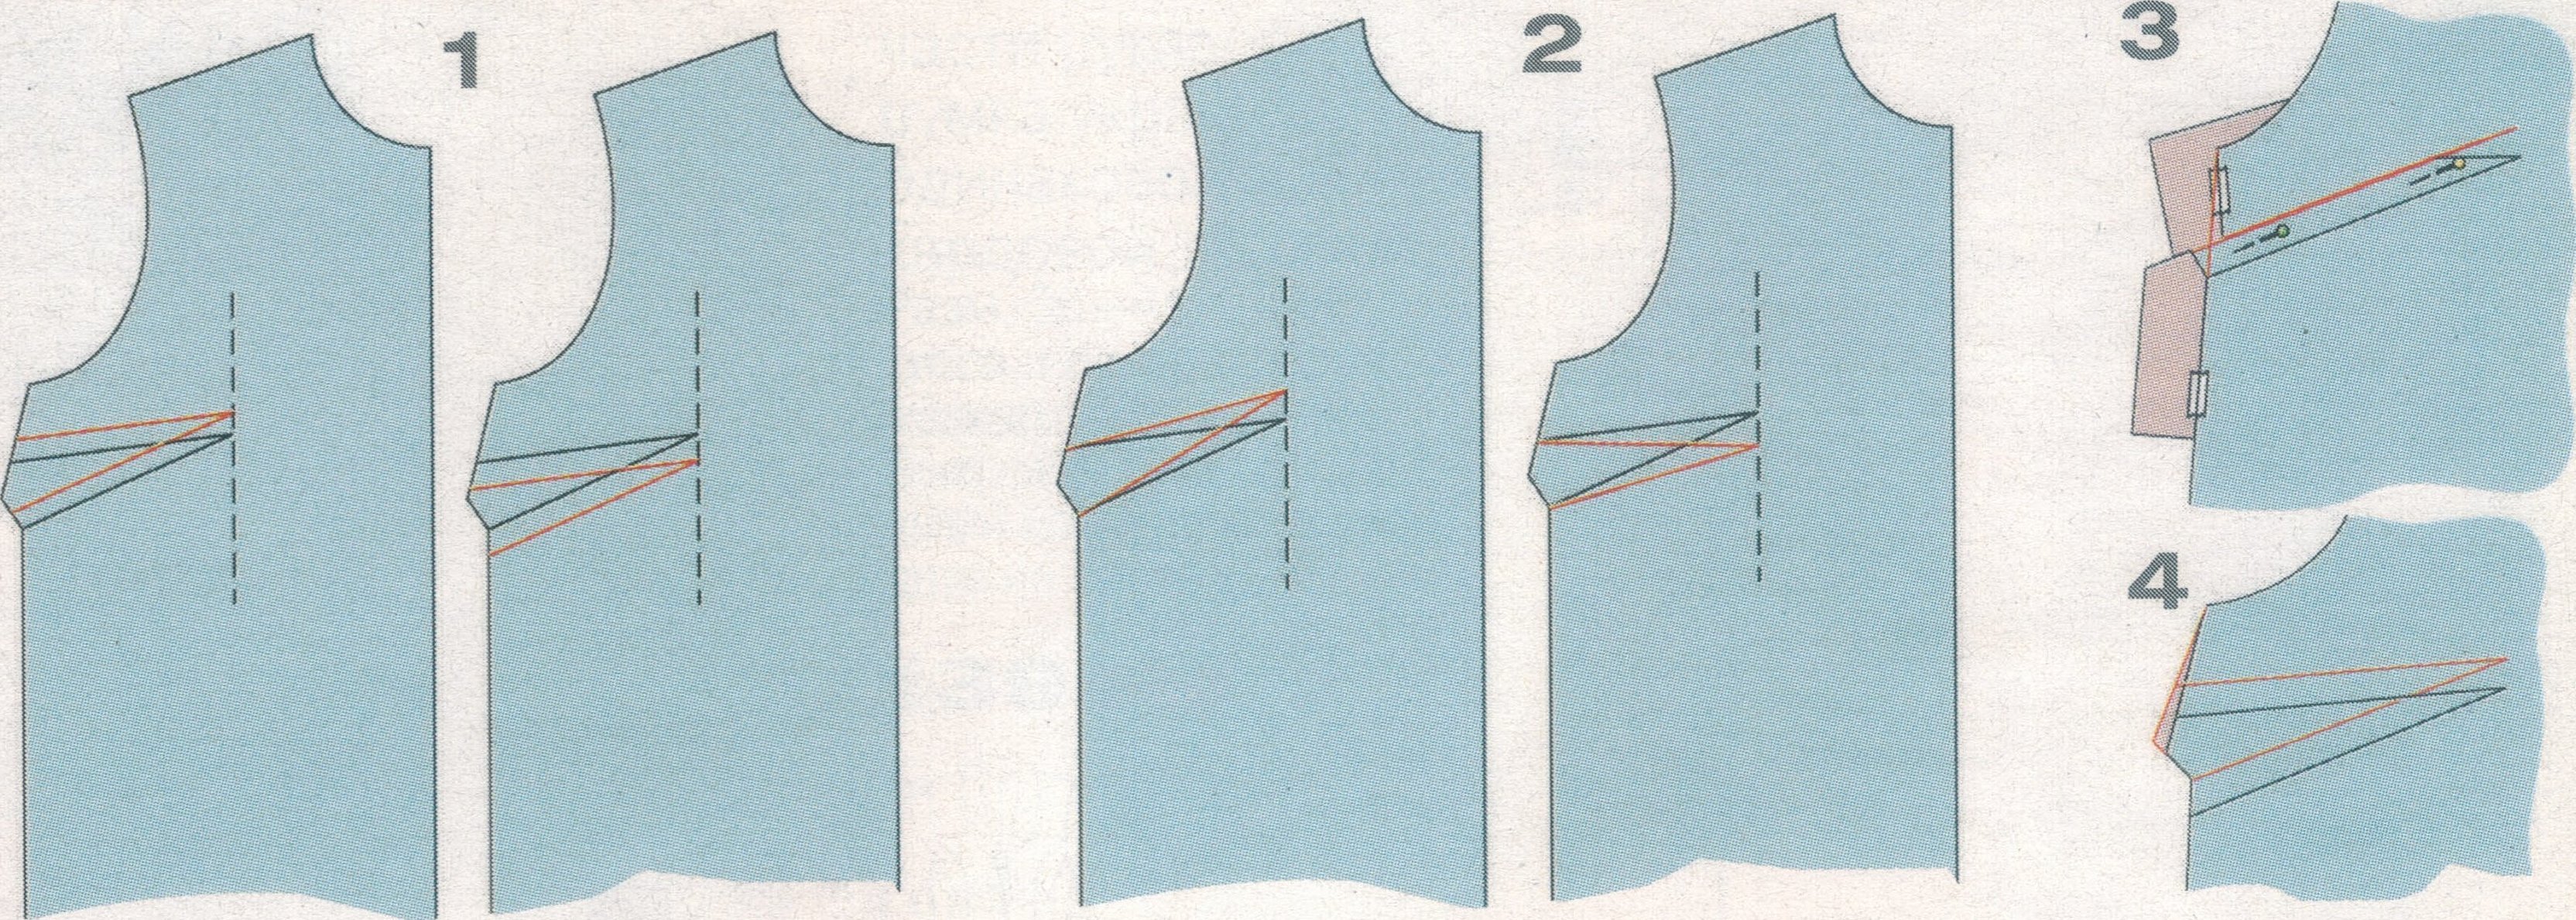
Transferring the bust dart to the armhole line
To transfer to the armhole line, it is enough to mark the point CG and draw a straight line from it to the armhole line. After that, cut along the resulting line (leaving 2-3 mm short) and close the solution from the shoulder seam.
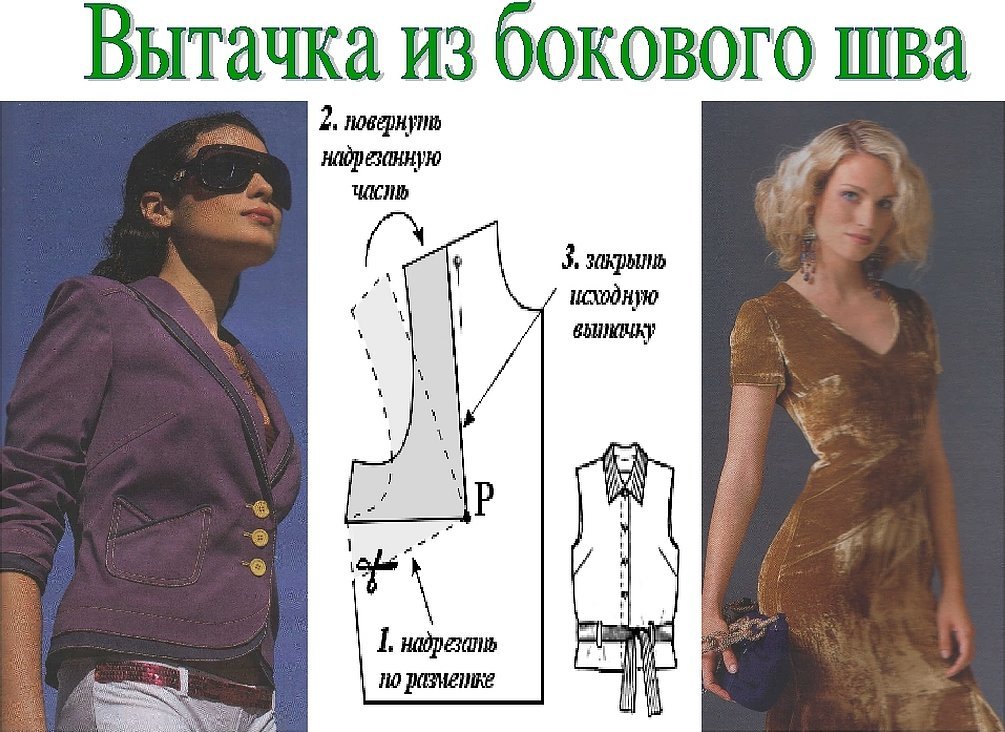
Transferring the bust dart to the side seam line
The most popular and simple method of transferring the chest seam is to transfer it to the side seam line.
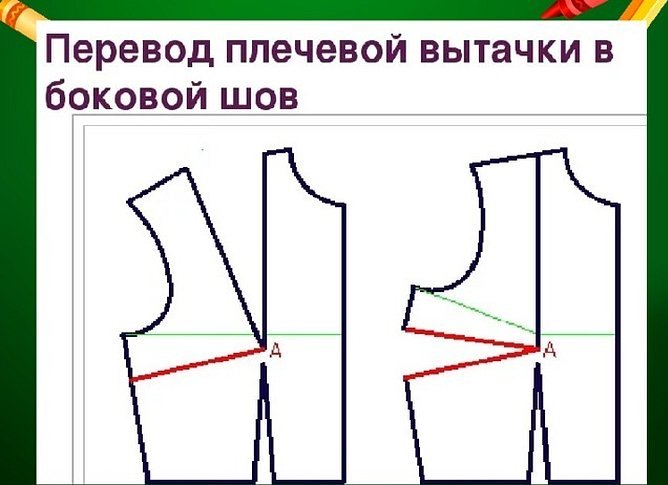
In this case, the new line can be horizontal or slightly lowered. Having chosen the desired point on the armhole, it is necessary to set aside 4-5 cm from the bottom of the armhole and connect it with the point ЦГ, make a cut along the resulting strip and close the upper dart.
Transferring the dart into a side seam at waistline level
Before transferring the dart on the front to the waistline, you need to determine its new location, cut the image along the drawn line, close the main dart and open the new one.
Important! To give the product a smooth look, using the transfer of darts on the bodice, it is recommended to not reach 1–2 cm before the center point of the chest when creating the pattern.
You can sew it partially or completely, depending on the fabric, determining the softness under the chest. To brighten up the resulting layering of fabric on the waistline, you can make a fold. In this case, to form an overlap, you need to lengthen the bodice by 3-5 cm. If the opening is very wide, you can model several folds or small tucks of drapery on the skirt.
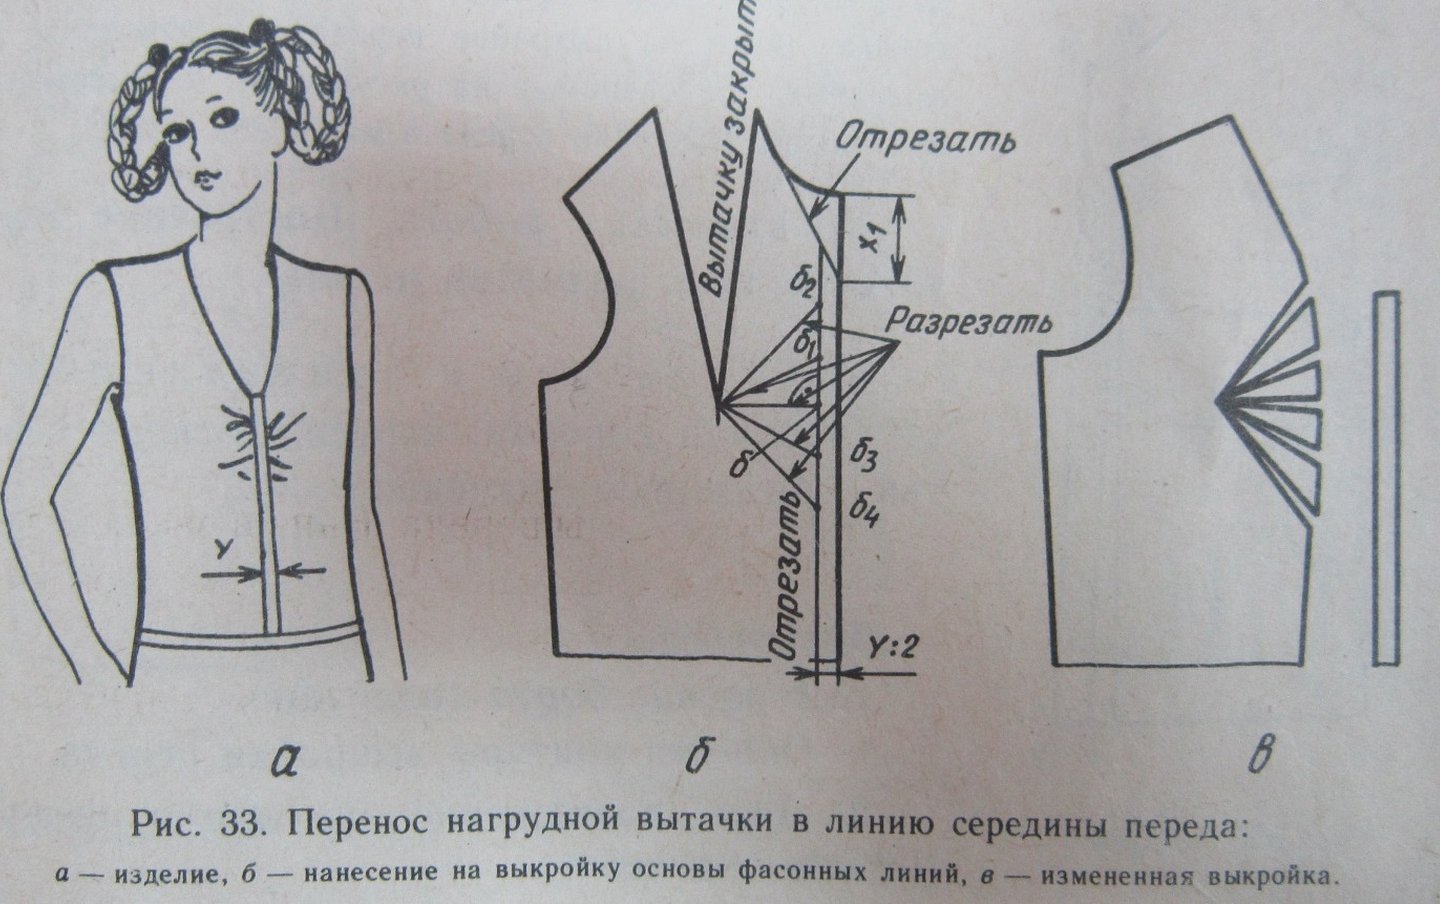
Moving the shoulder dart to the center front
To transfer to the center of the front, find a point 2 cm below the chest line and the center of the front, then connect these two points. The resulting line will show the direction of the seam. Then connect the center on the chest and the center on the waist. Cuts are made along the obtained lines, and the base is combined. The solution that was obtained is laid in the direction of the belt, after which the center of the front line is aligned. The angle of the seam depends on the size of the chest and waist size, and for accuracy can be marked on the figure.
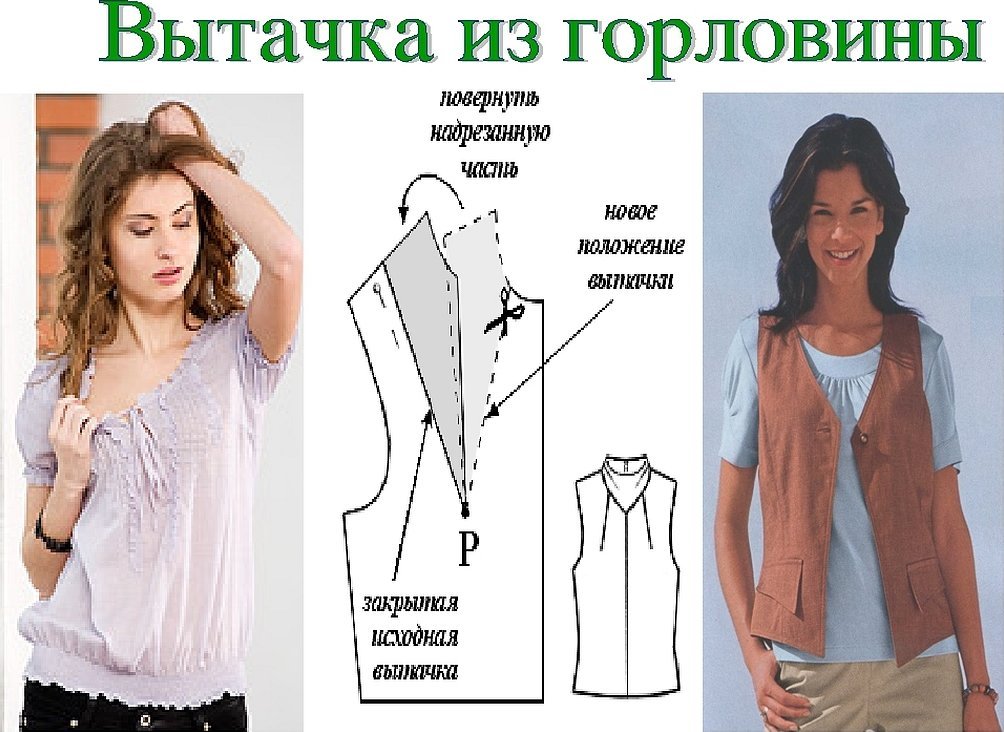
Transferring the shoulder dart to the neckline
To move the shoulder dart to the neckline, determine the direction of the seam and make a new cut, while closing the old one in the shoulder direction.
Attention! Darts on the fabric can be sewn from the inside and stitched along the front side of the product, leaving a soft volume above the chest line.
You can also decorate the neckline using gathers.
How to Raise a Chest Dart Much More
If changing the location of the top point is not enough and drastic measures are required, you can try changing the line by lowering or raising it along the figure.
Important! When changing the depth of the neckline, the waist seam also requires changes.
If the situation requires raising the stripe on the chest significantly, you can do the following:
- Draw a line on the chest that will pass under the dart, turn it upward at a right angle just behind its top point.
- Make a cut along the resulting L-shaped line and fold it up to the height of the new seam.
- Glue the missing paper.
- Lengthen the seams at the waist.
Relief is another version of a bust dart
In order not to change the position of the dart, you can transfer it into pleats, yokes or relief seams. Reliefs are lines that connect the chest and waist darts, they can originate in the armhole, shoulder seam, neck.
Attention! When creating a relief, one shelf is transformed into two.
The main attention should be paid to the smoothness of the lines, the location of which depends on the figure and the model of the product.
Relief from the armhole
A smooth relief line is drawn from the armhole, through the most protruding point of the chest and goes to the beginning of the waist dart. Then the seam is connected to the bottom line.
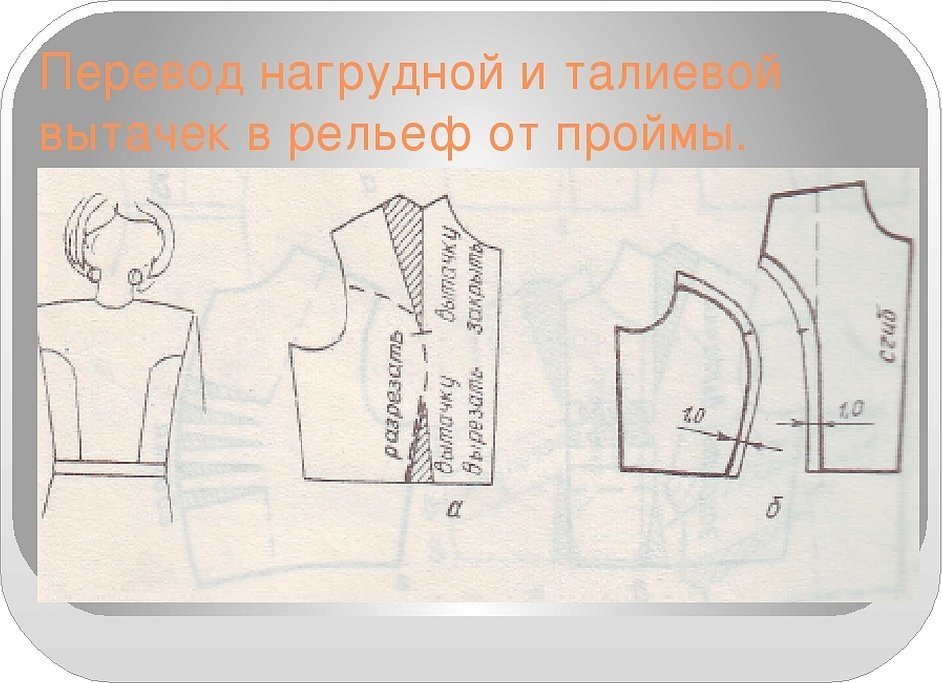
The pattern is cut along the drawn relief lines with rounded corners, the remaining seam goes into the armhole.
Attention! For ease of joining the parts later, it is recommended to mark control transverse lines for joining before cutting the pattern.
Shoulder relief
The shoulder relief is formed by connecting the chest and waist darts, and their lines will coincide. With a straight line, the relief goes down to the bottom line. If the relief should go to the side seams, then using a pattern, a smooth line is drawn from the top of the waist dart to the side seam. All that remains is to cut the patterns.
Relief from the neck
For relief from the neck, points are determined on the neck, from which the relief line smoothly passes through the protruding points of the chest to the waist seams and then vertically to the hem. The pattern is cut out, while the dart (side or shoulder) is closed, passing into the neck.
The lower relief is built from the waist dart to the side seam using a pattern.
Without darts on the chest, clothes will look baggy and voluminous, they are necessary to create a fitted silhouette, emphasize the chest line and the entire figure, therefore, the article examined in detail the question of how to make a dart on any pattern, be it a dress, blouse or light coat.

Although sometimes they can be difficult to calculate and draw correctly on the pattern, you can always determine their location directly on the figure during the fitting. Bust darts will help save a blouse that has become too big, or give a more feminine and elegant silhouette to a dress. And relief seams can also save fabric and make the figure look slimmer.


