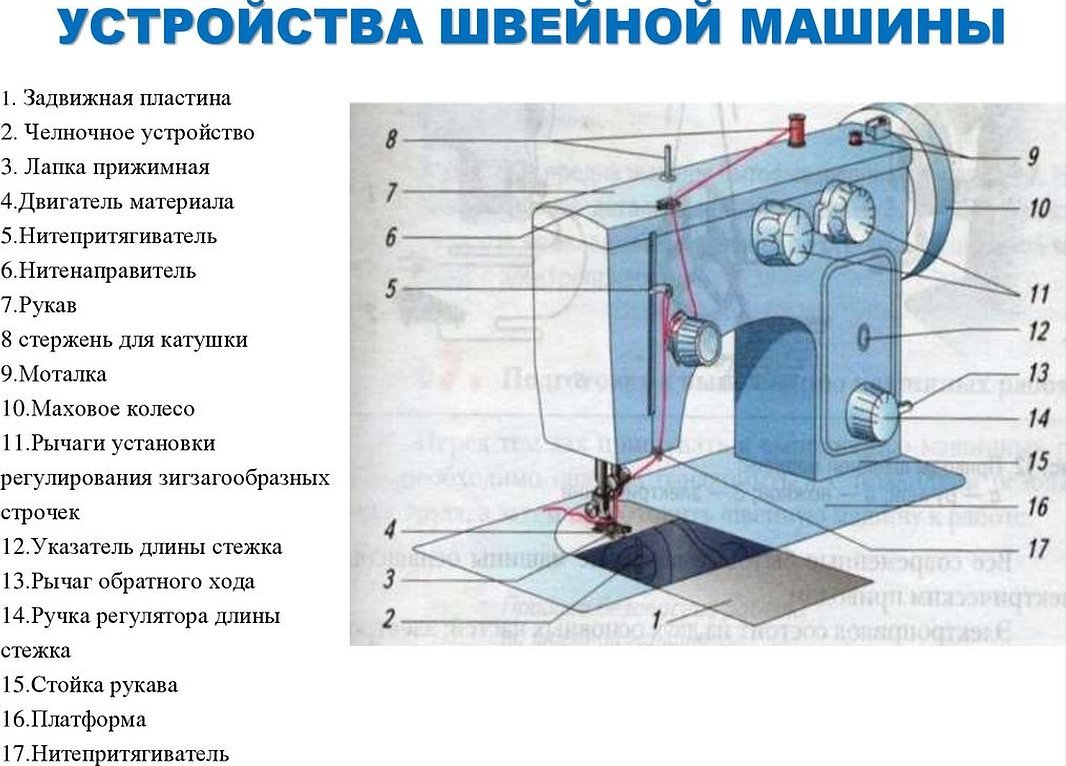
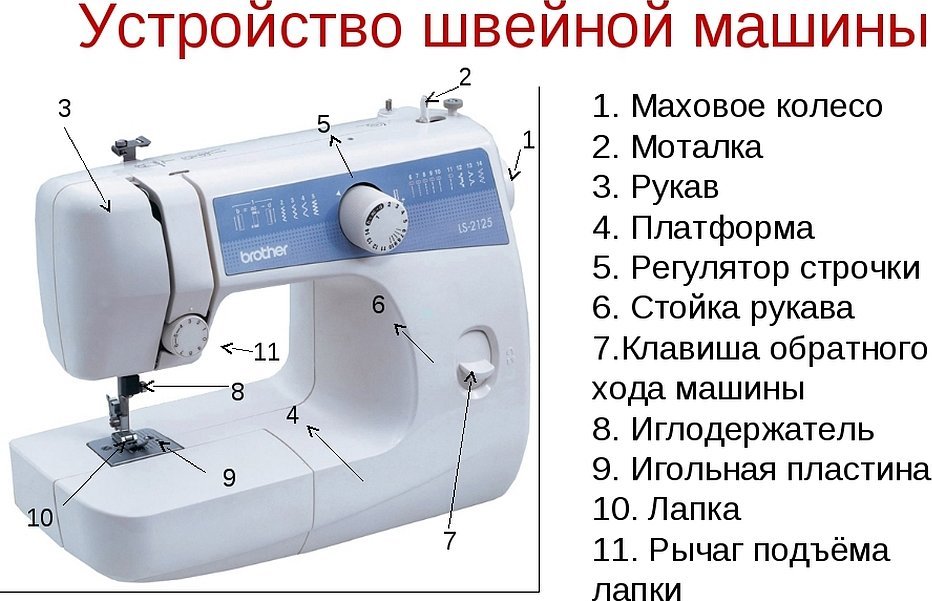
You can set up a sewing machine at home. It is important to know the structure of the model. You should not start setting it up without basic theoretical knowledge. It is recommended to learn the basic rules of operation and maintenance. And also consider the rules for adjusting the machine.
- Basic operating rules
- Reasons for breakdowns
- What parameters can be adjusted?
- What is needed to set up a sewing unit
- Instructions for winding thread onto a bobbin
- Eliminating knocking noise
- Rules for setting up modern machines
- Setting stitch length and type
- Adjusting the interaction of the needle and shuttle of the sewing machine
- Fastening the needle bar and tensioner
- Adjusting the upper thread tension
- Adjusting the lower thread tension
- Adjusting the height of the toothed bar
- Height of teeth for fabric advancement
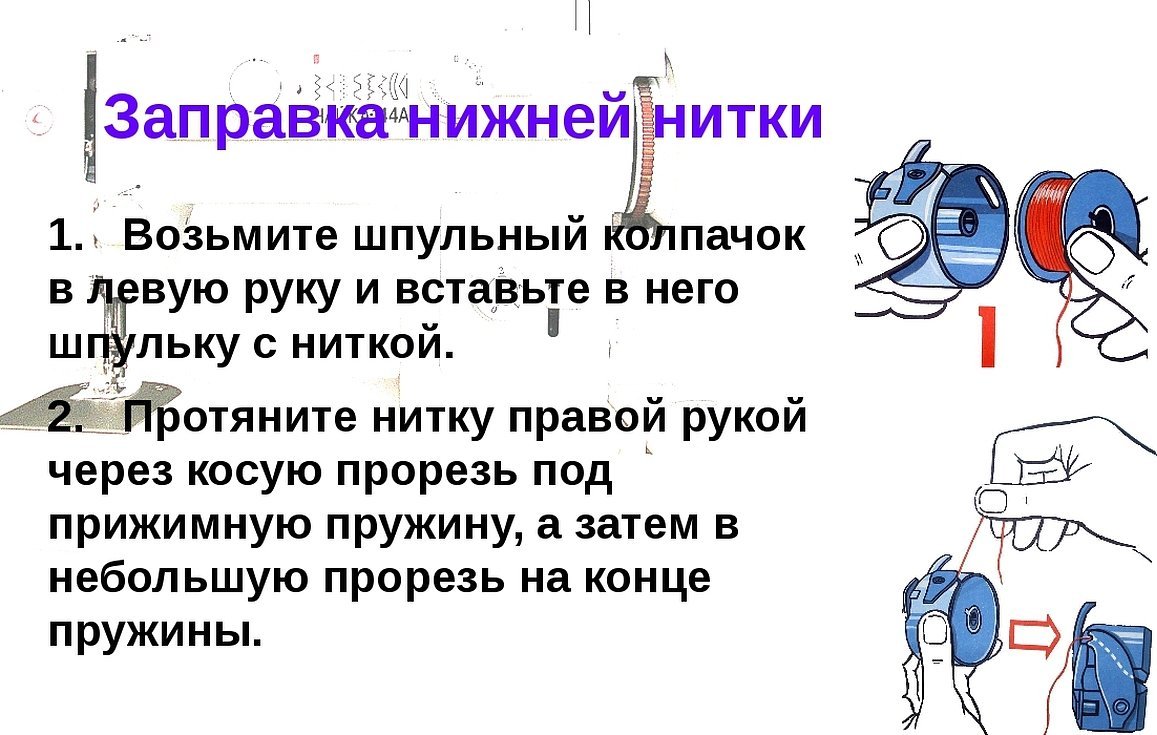
- Threading the lower thread into the bobbin case
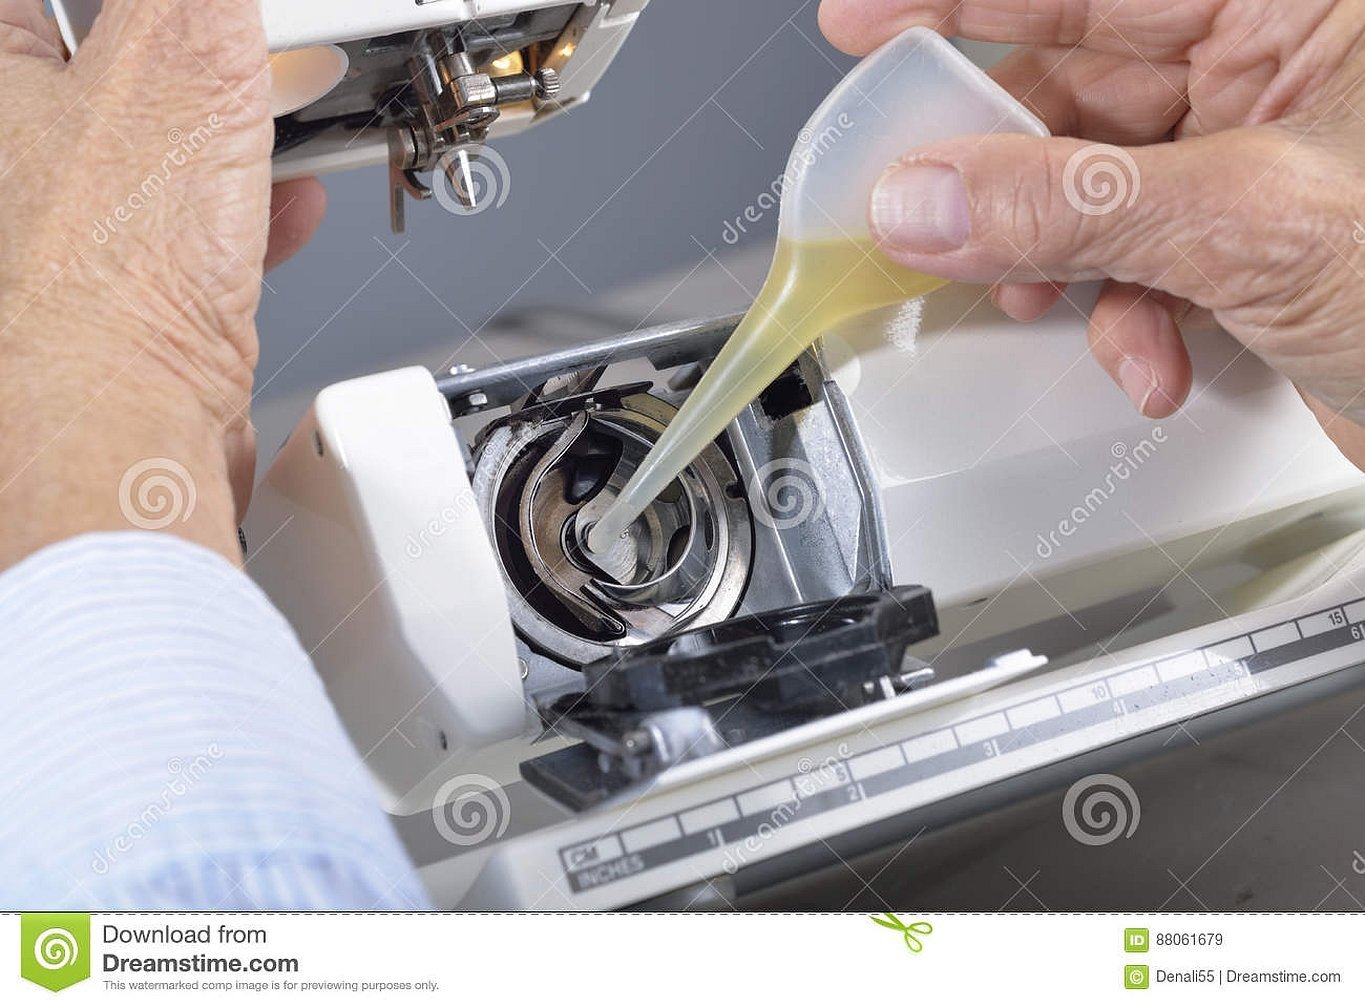
- Lubrication of mechanisms
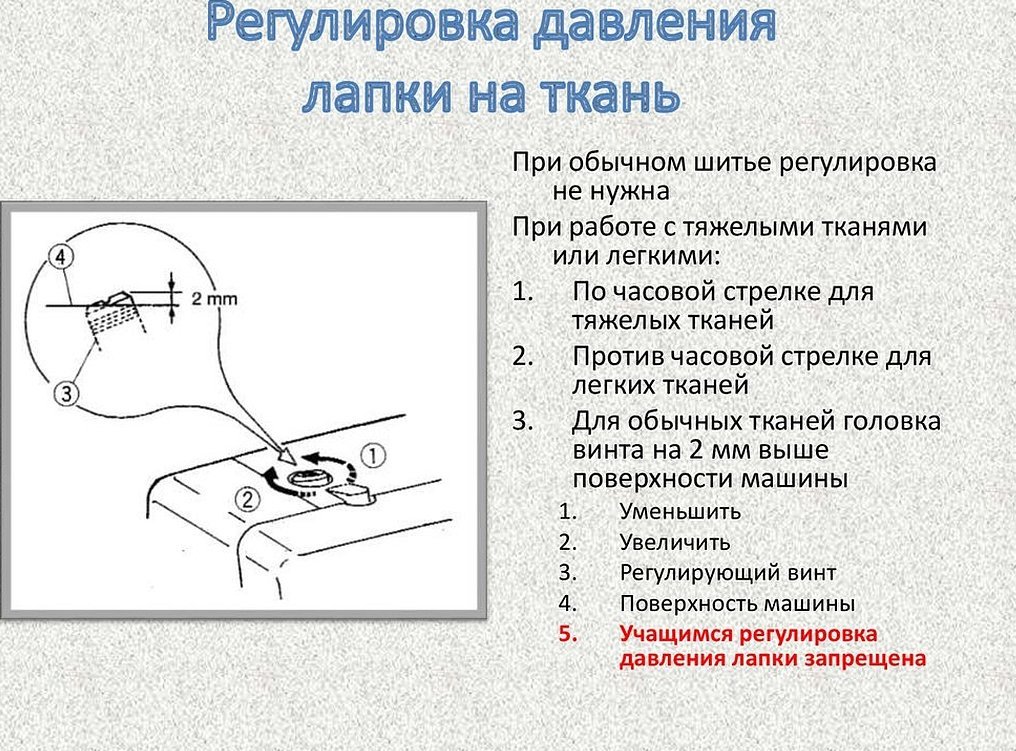
- Setting the pressure of the foot on the fabric
- Sewing machine "Chaika": setting and adjustment
- Setting up mini-cars
- Setting up manual machines
- Preventive care
Basic operating rules
Setting up a sewing machine will be easy if you familiarize yourself with the basic operating rules of the device and follow them. The exact requirements are described in the instructions for each model. But there are basic recommendations that will help you understand different machines:
- the machine is rotated only in the direction towards you;
- you can't "sew" on a machine if there is no fabric under the foot;
- You must not pull the fabric while the sewing process is taking place;
- it is necessary to lubricate the mechanisms in a timely manner using the products recommended in the instructions;
- It is important to fill the machine in strict sequence.
Important! Not all machines require lubrication.

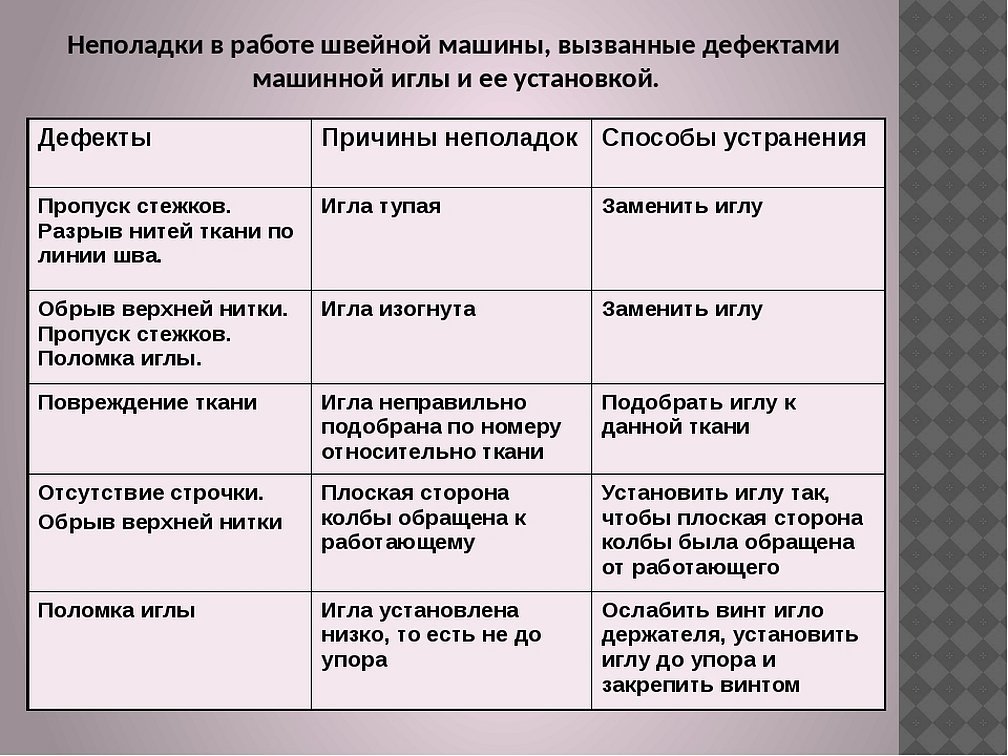
Reasons for breakdowns
Sewing machines should be adjusted only after the cause of the breakdown has been determined. Craftsmen identify several main faults:
- the threads break along the seam after sewing. This happens because of a blunt needle;
- skipped stitches due to the needle type not matching the thread;
- the fabric is damaged due to incorrect selection of material and needle size;
- the top line is missing due to incorrect position of the flask;
- The needle breaks if it is bent or installed incorrectly.
Important! Masters often notice broken needles in Artista machines.
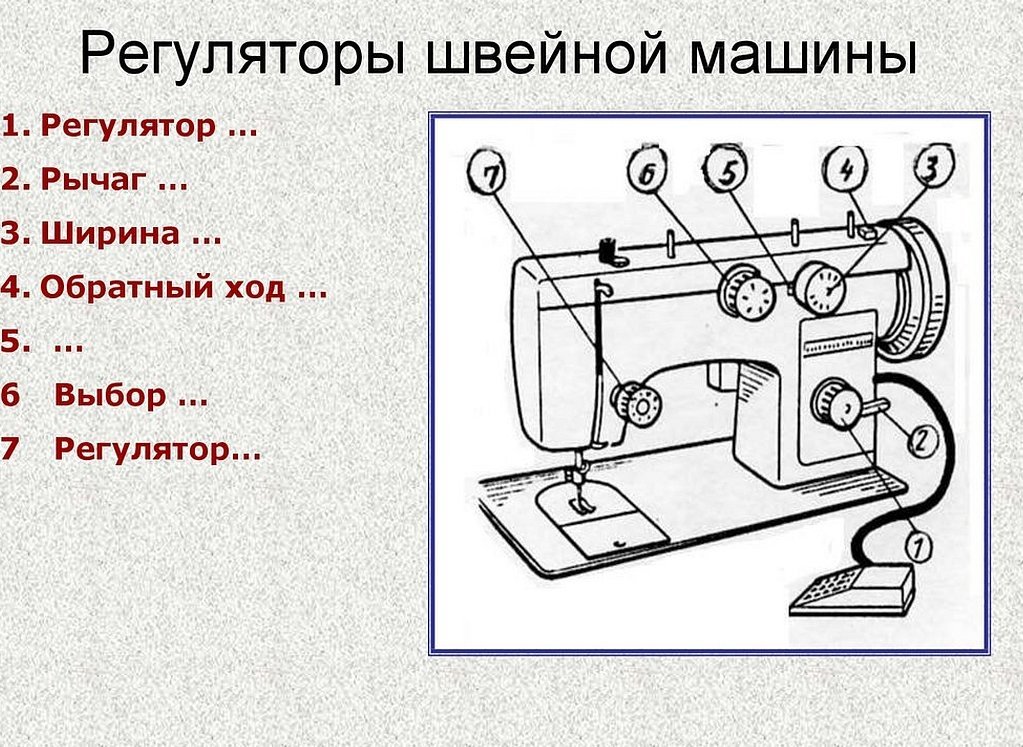
What parameters can be adjusted?
Adjusting a household sewing machine does not take much time. There are few parameters that can be adjusted.
- stitch length;
- reverse;
- paw pressing force;
- thread tension;
- height of teeth.
Important! The wobbling shuttle of Bernina machines often bends needles and breaks threads.
What is needed to set up a sewing unit
Setting up a sewing machine often does not require special tools. At home, use a syringe to inject grease. And also a screwdriver to tighten the bolts. Adjustment of parameters occurs without tools. They may be needed if a breakdown occurs. But in this case, the machine is taken to a technician who will repair the device.
New models of machines, such as Brother lines, are sold complete with all the equipment necessary for setup.
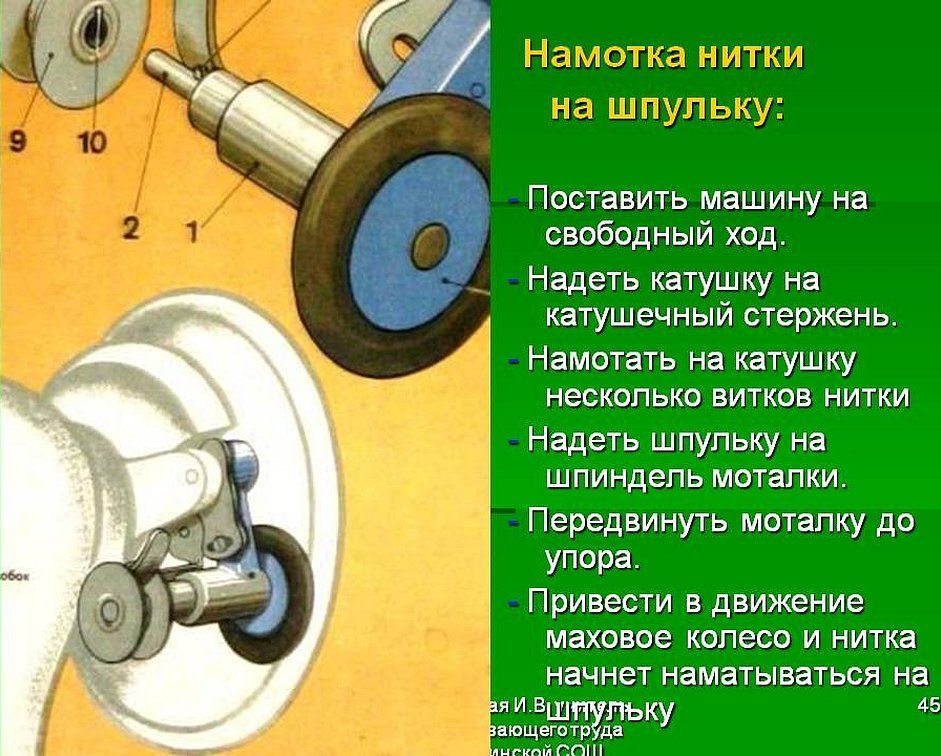
Instructions for winding thread onto a bobbin
Setting up the machines at home does not require much effort. Any owner of a sewing machine can handle winding the thread onto the bobbin.
How to proceed:
- Place the coil on the vertical pin.
- Pass the thread through the thread guide.
- Pull the thread between the tension discs clockwise.
- Insert the tip into the hole on the bobbin. Put it on the spindle of the winding unit.
- Press the bobbin and move it to the right.
- While holding the thread, press the pedal.
- Make a few turns and cut the end of the thread.
- Continue winding at speed.
- Move the bobbin to the left.
Important! When the bobbin is full, it stops rotating.
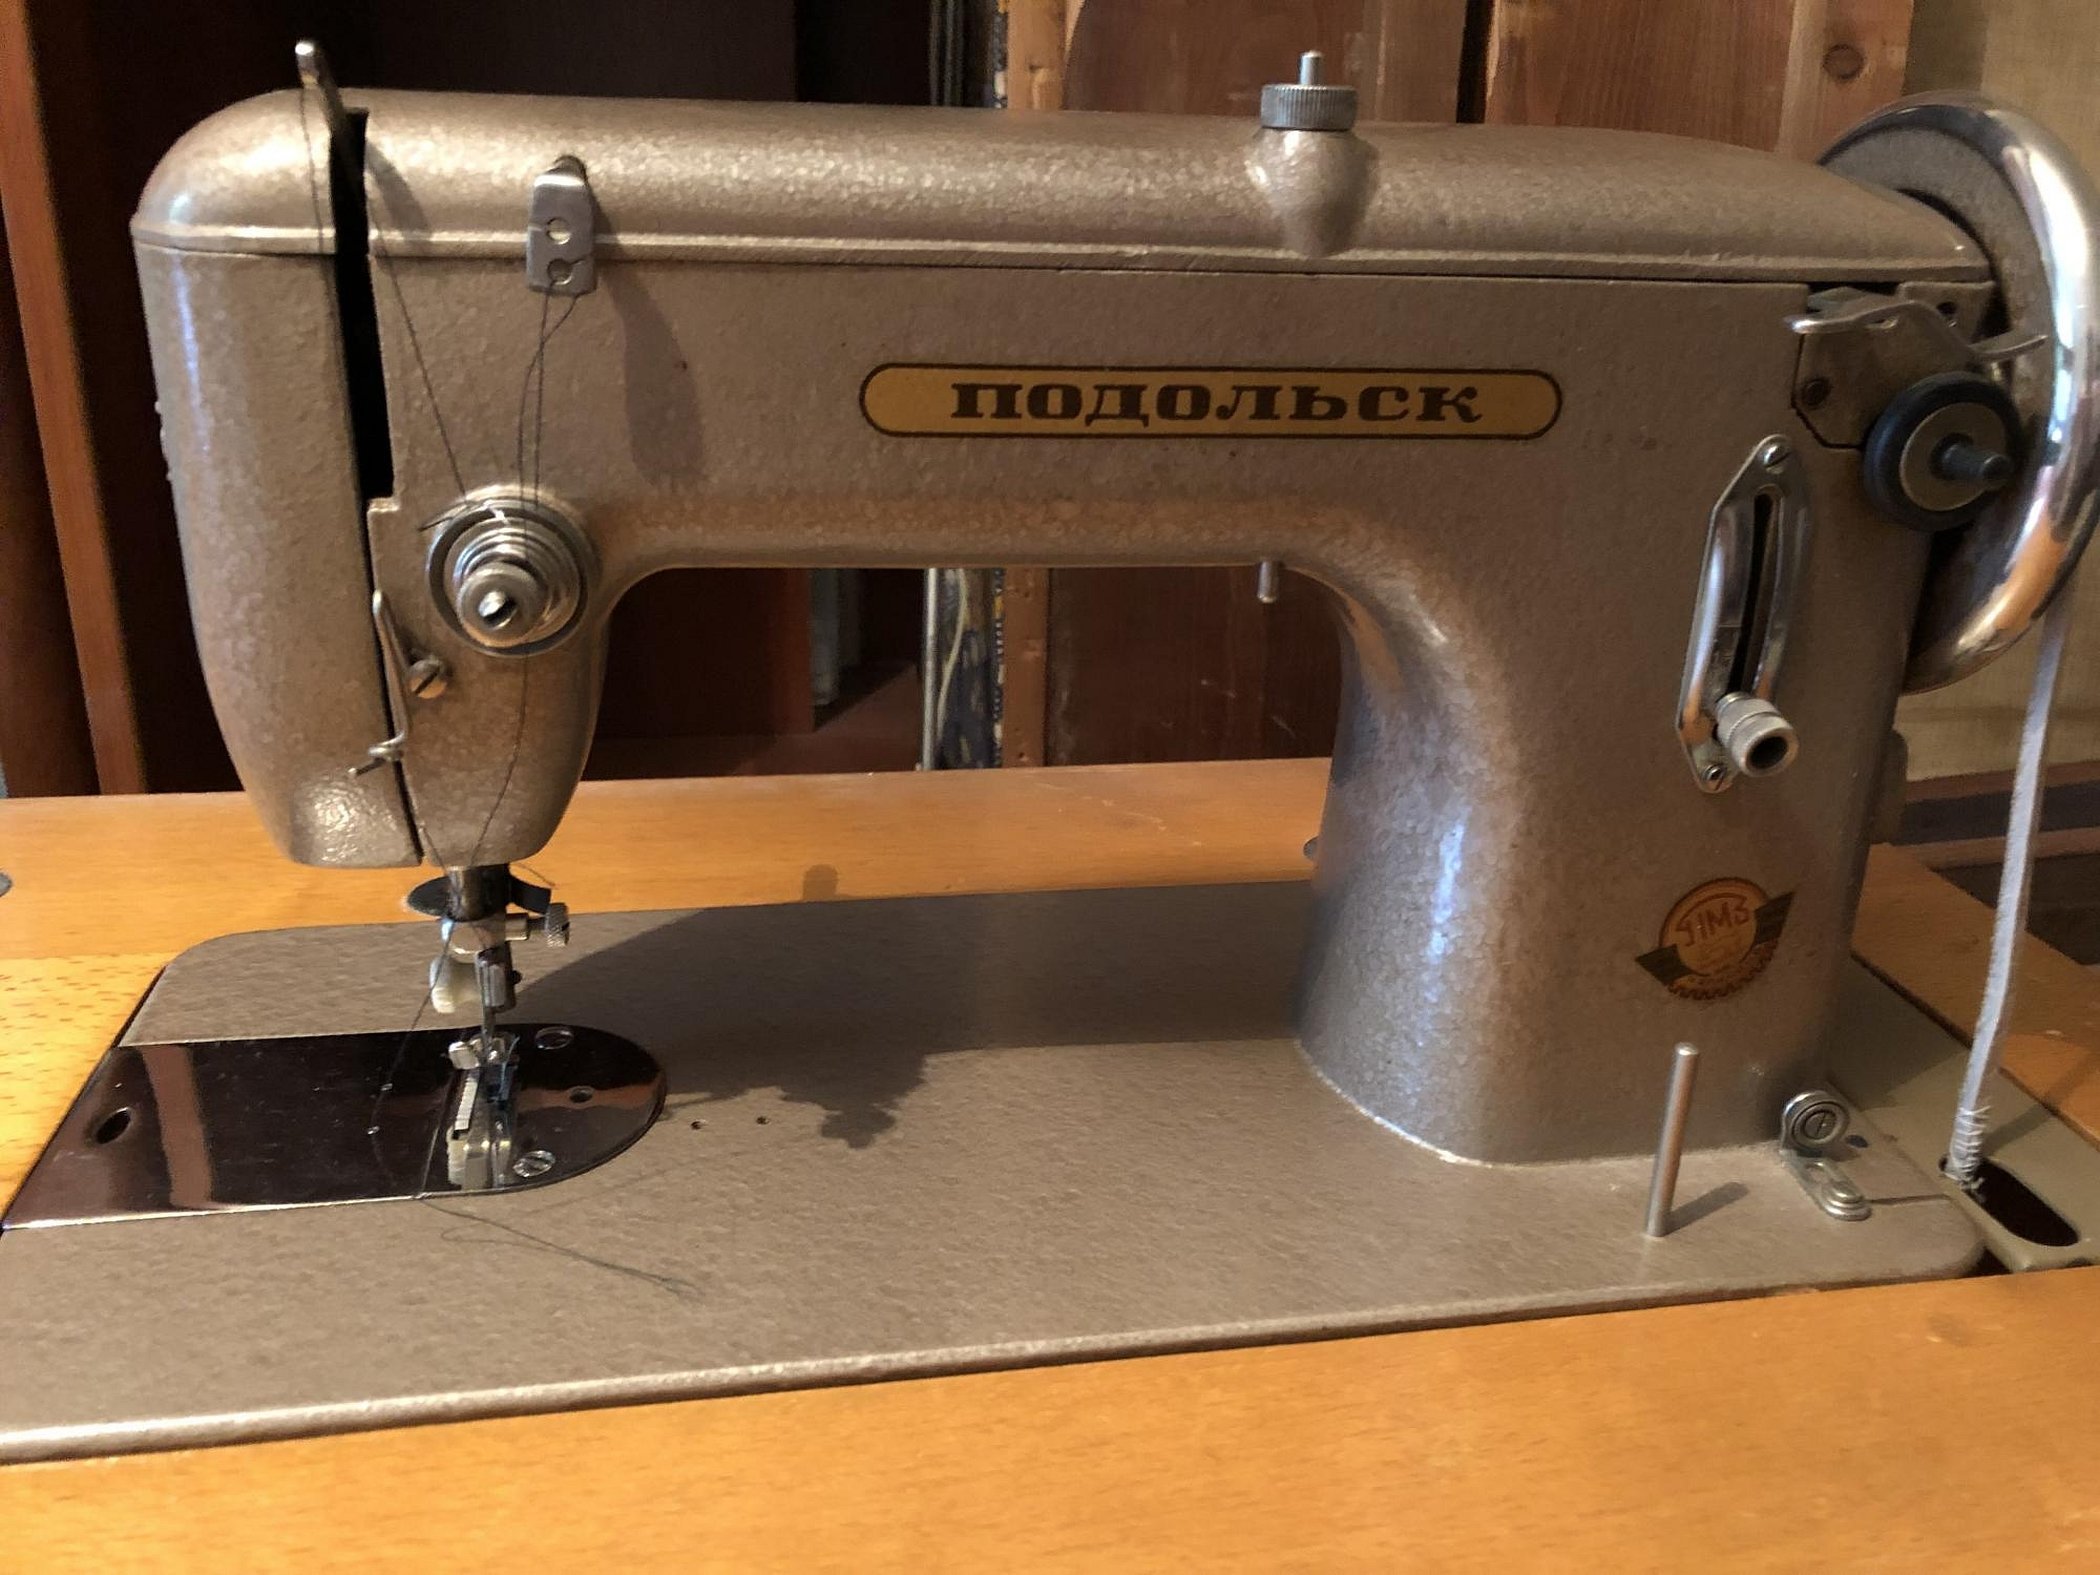
Eliminating knocking noise
The adjuster always knows how to get rid of the knocking. Seamstresses often face this problem when working on the Podolsk unit. To do this, pull the flywheel in the axial direction from the machine. In most cases, the trick helps. Sometimes you have to disassemble the device. You need to unscrew the limiter in the form of a screw under the drive. Remove the flywheel. And also the bobbin and bushing. The master puts on a washer, which he can make himself. This trick helps get rid of the knocking for a long time.
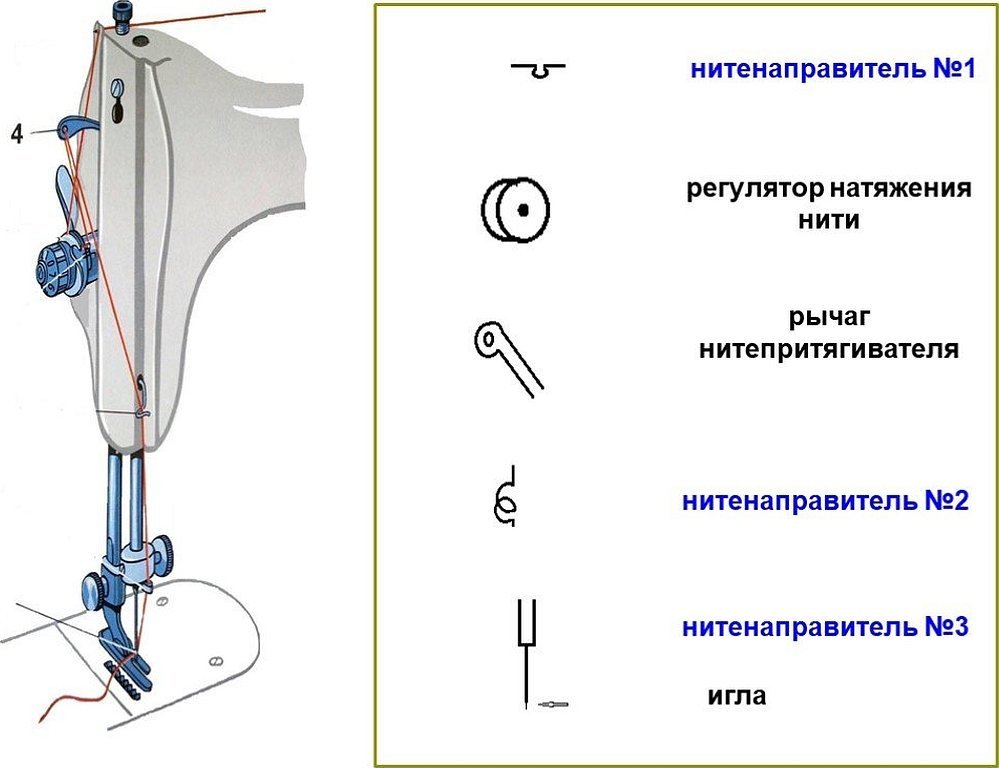
Rules for setting up modern machines
Repair and adjustment of modern sewing machines differs. At home, adjustment is done a little differently. In a set with a new model with an electric drive, the buyer receives control wheels for manual adjustment, for example, like with Janome.
The spring is used to press the thread during winding. Then the upper thread is passed through the eyes, tension regulator, thread puller, staples, and needle. The pressure of the foot is regulated by the spring.
To prevent the adjustment from causing a breakdown, use the instructions for a specific model. Use the tools that come with the machine. Do not use other improvised means. In case of problems, contact a specialist.
Setting stitch length and type
The manufacturer has provided different types of lines for all materials. For knitwear or thick fabrics, lines are selected separately. The purpose of sewing also affects. Therefore, the length and width are set on the machine.
Important! The thinner the fabric, the shorter the stitch should be.
The width of the zigzag and other types of stitches is set. The types of needles are selected for these parameters. Each stitch has a purpose.
In the instructions for the machines, manufacturers indicate the correspondence of stitches, material, threads and needles. Therefore, it is not difficult to select them.

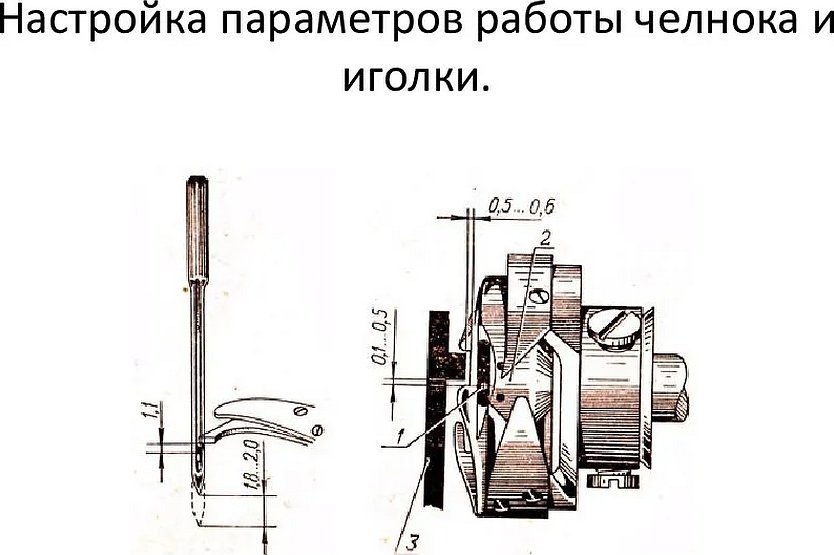
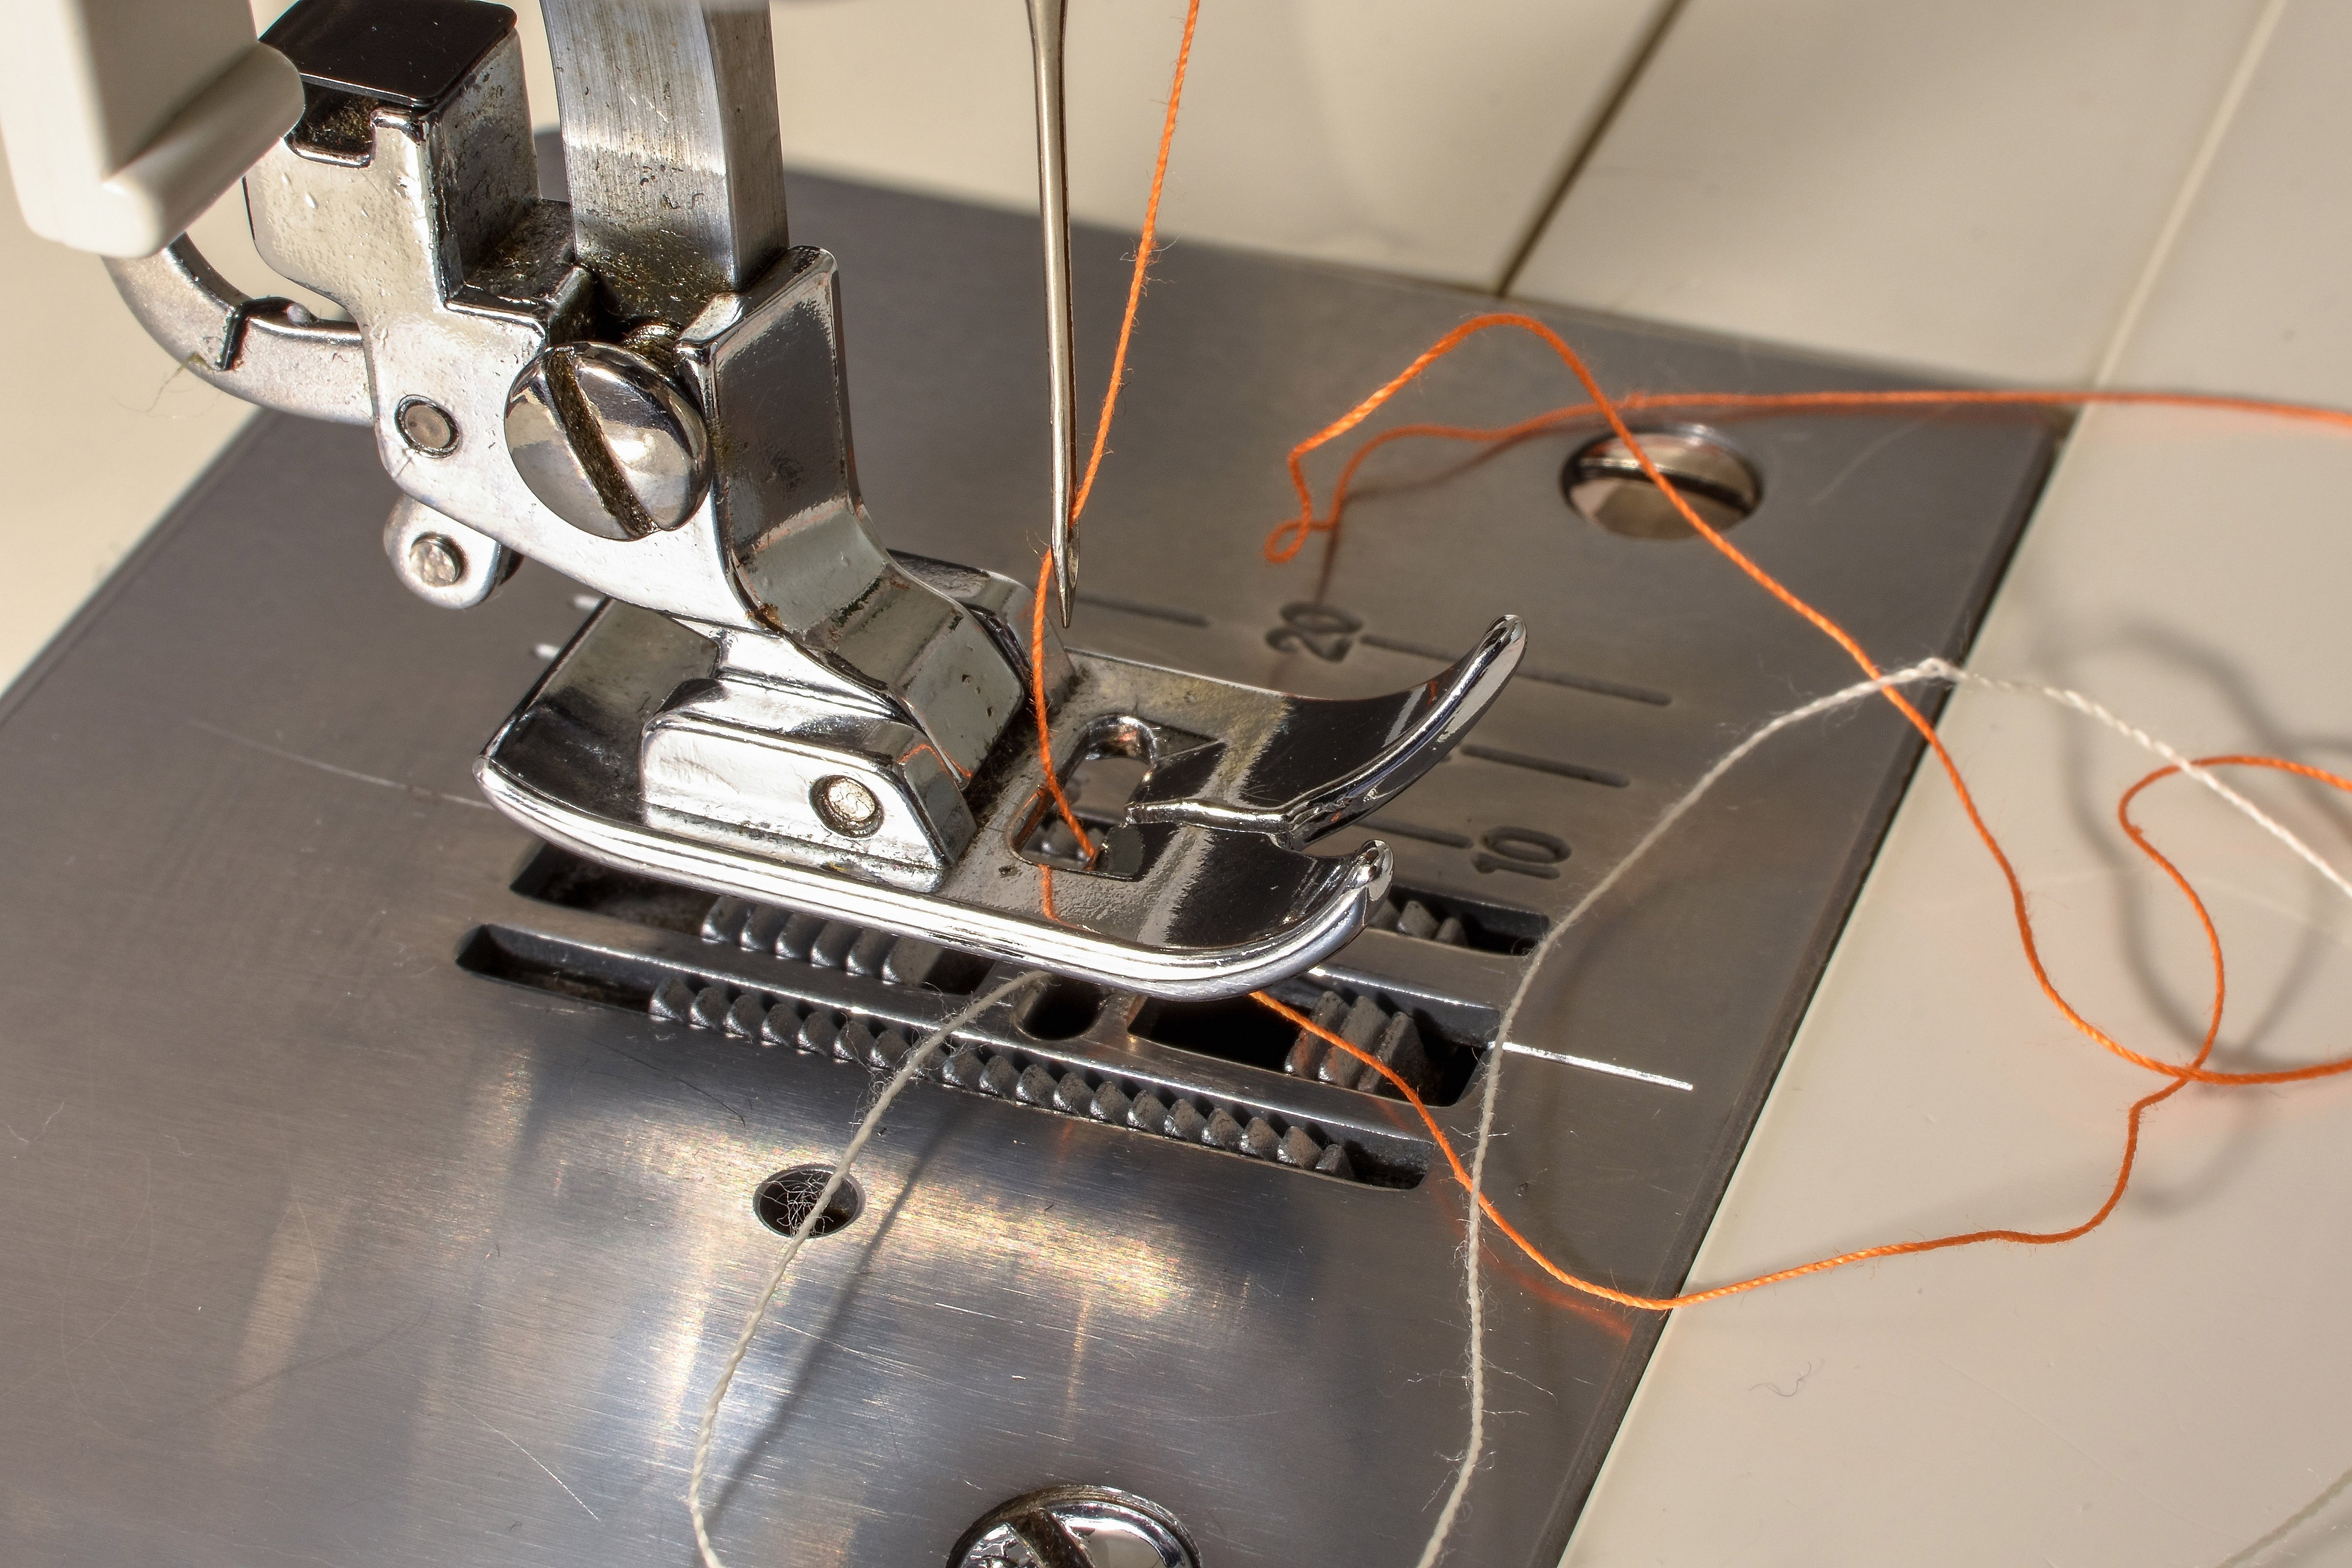
Adjusting the interaction of the needle and shuttle of the sewing machine
The shuttle must interact correctly with the sewing machine needle. This parameter is especially important if a zigzag is performed. The position of the looper nose is set above the needle eye by several millimeters.
The nose of the shuttle normally passes closely with the needle. In this case, there are no gaps. The ratio is adjusted by loosening the screw with a key and holding the flywheel with your hand. The needle should drop to the lowest point and meet the shuttle when raised by 1.8 mm.
The sewing unit should be taken to a specialist if it is not possible to establish interaction.
Fastening the needle bar and tensioner
Often the machine stops working because the upper thread breaks and loops. There are skips, the lines are uneven. Everything depends on the tension regulator fastening. The tensioner wobbles or falls out. The needle bar moves up together with the needle.
To correct the situation, loosen the screw, adjust the position. The blades and the needle groove should touch correctly. If problems arise, check the interaction of the needle and the shuttle.
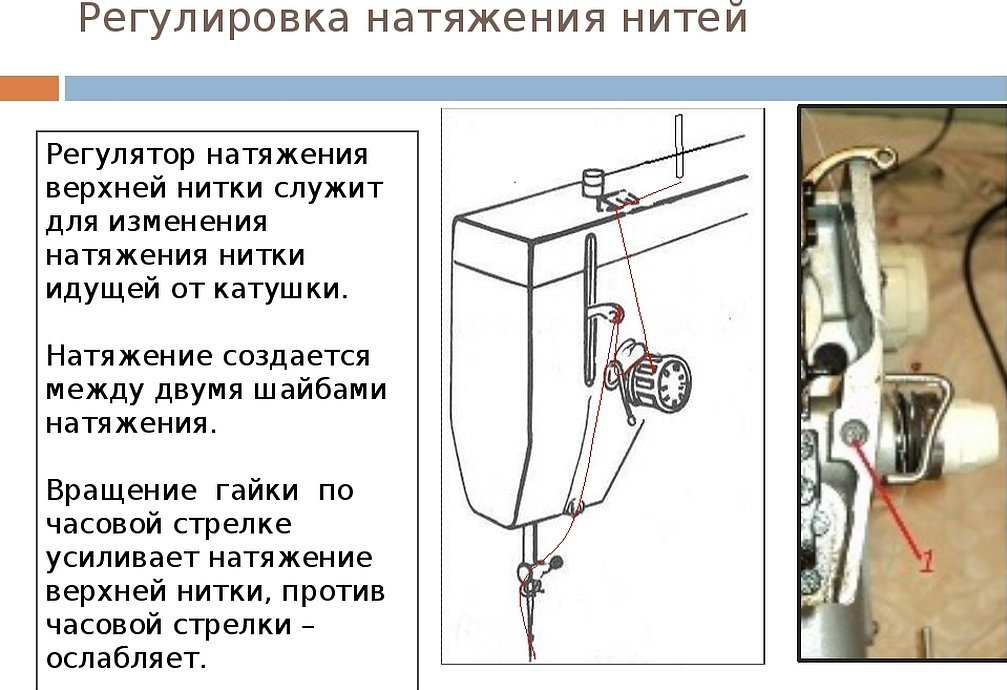
Adjusting the upper thread tension
Adjusting the tension helps to cope with the problem of uneven and unsightly lines. Most often, it is excessive. To reduce the tension of the upper thread, turn the regulator in the direction of decreasing numerical marks. Do not turn it all the way to the division at once. Check the lines periodically. The lower thread should not show through on the upper side. If the adjustment does not work, try to correct the lower thread.
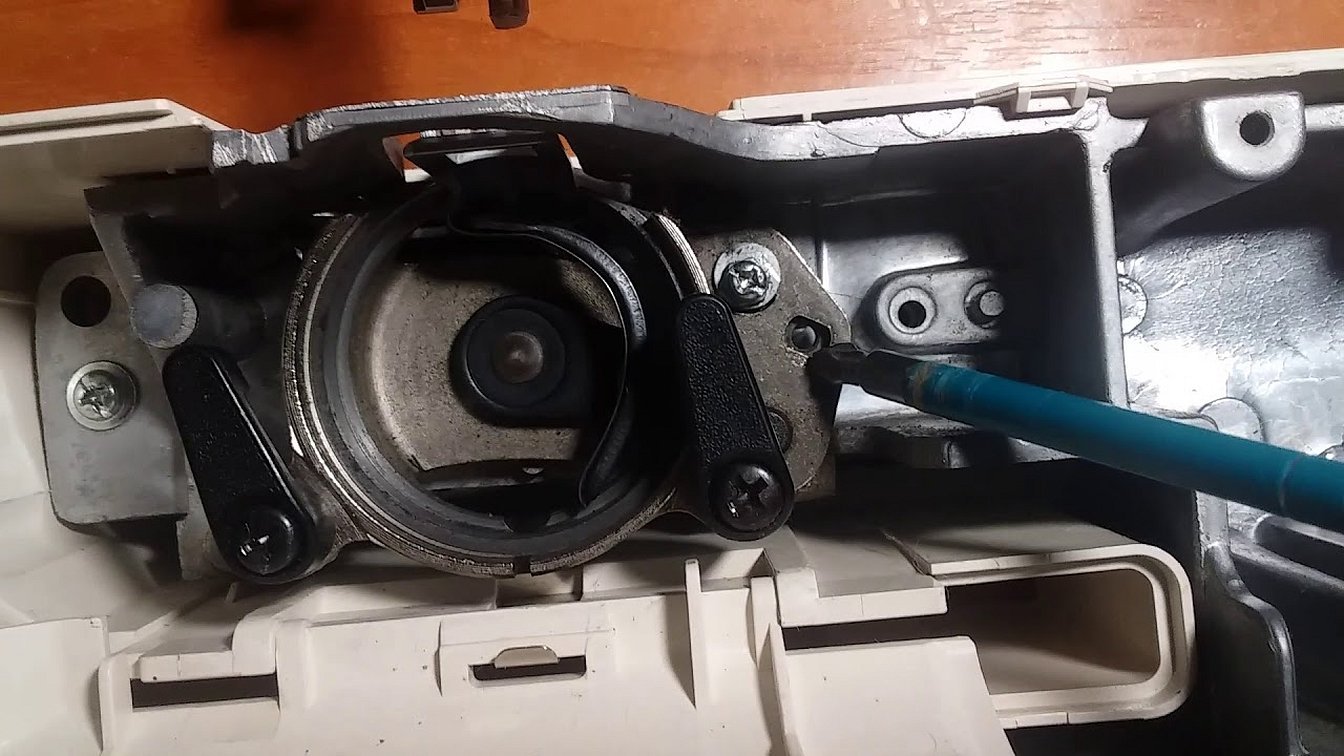
Adjusting the lower thread tension
The tension of the lower thread is checked using a removable shuttle. If it is hung by the end of the thread coming from the bobbin and does not unwind it, it needs to be loosened. If the bobbin unwinds strongly, the tension is, on the contrary, weak.
Use a screwdriver to turn the adjusting screw clockwise to increase. Counterclockwise to decrease. Then check. Scroll until the shuttle drops a few cm. Test lines are periodically laid for proper adjustment.
Adjusting the height of the toothed bar
The toothed bar affects the movement of the material relative to the machine and the needle. When the needle pierces the fabric, the top of the bar should be at the level of the work surface. If the height is set incorrectly, sewing occurs in one place or fabric tears. Often the lines are uneven. The quality of sewing decreases.
To adjust, lift the foot lever and move the rack to the normal position. It is indicated in the instructions. Turn the flywheel towards you.
Height of teeth for fabric advancement
Often the teeth are not raised above the plate enough. The height is adjusted. To do this, tilt the machine. Then loosen the screw and set the height. Normally, only the teeth rise above the plate in the middle part. In this case, the front part is higher than the back by 0.5 mm. In difficult cases, it is necessary to install spacers between the platform and the teeth.

Threading the lower thread into the bobbin case
To thread the lower thread into the bobbin case, just follow a few steps. How to thread:
- Insert the bobbin into the cap.
- Thread the thread into the slot under the spring.
- Insert the cap into the shuttle.
- Switch the machine to working mode.
- Bring the thread to the top.
Modern machines have a vertical or horizontal shuttle. It is easier to work with it in a vertical position. But seamstresses claim that it is recommended to buy a model with a horizontal device. It is more reliable.
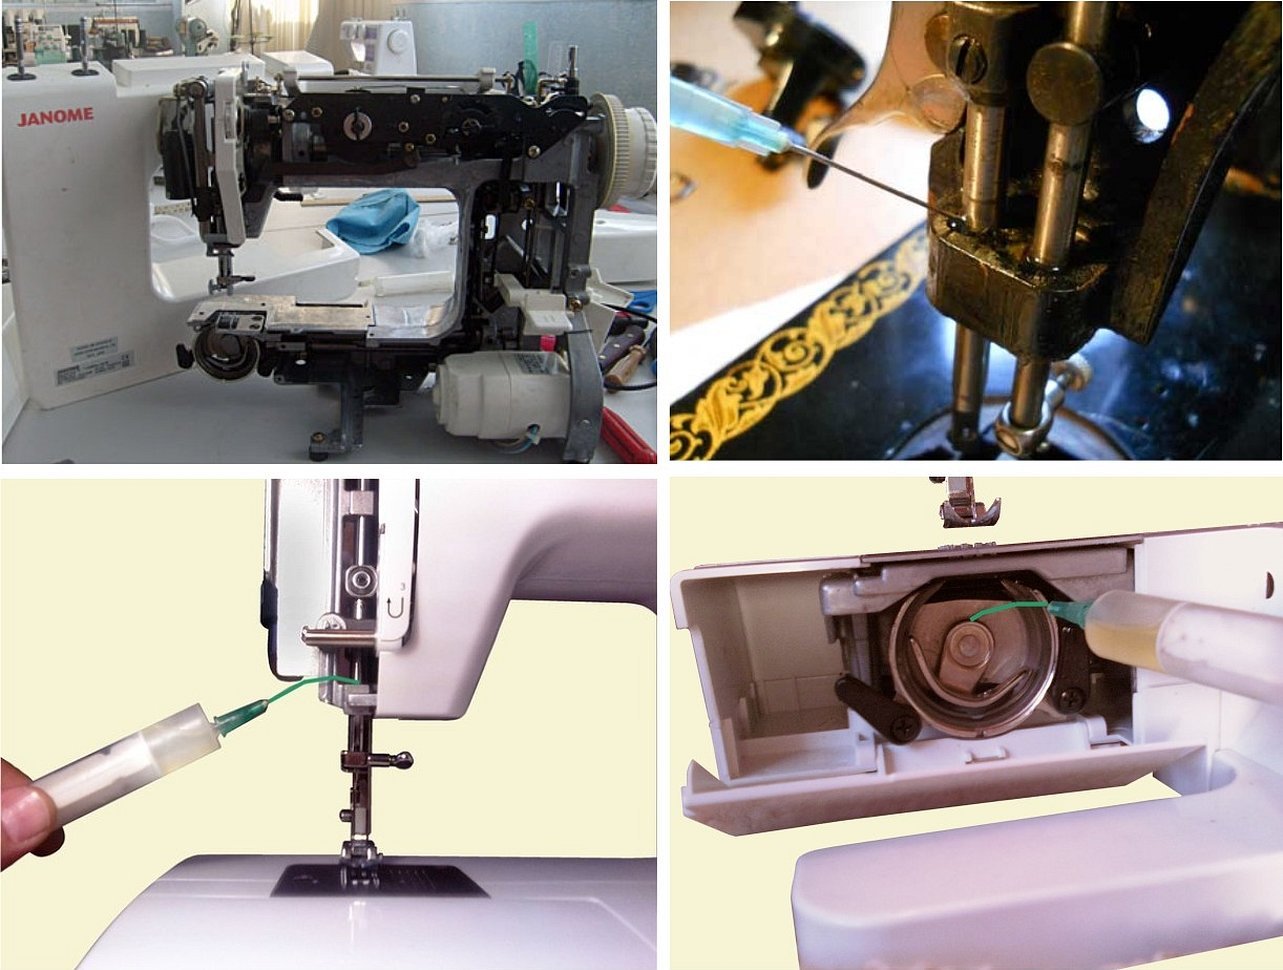
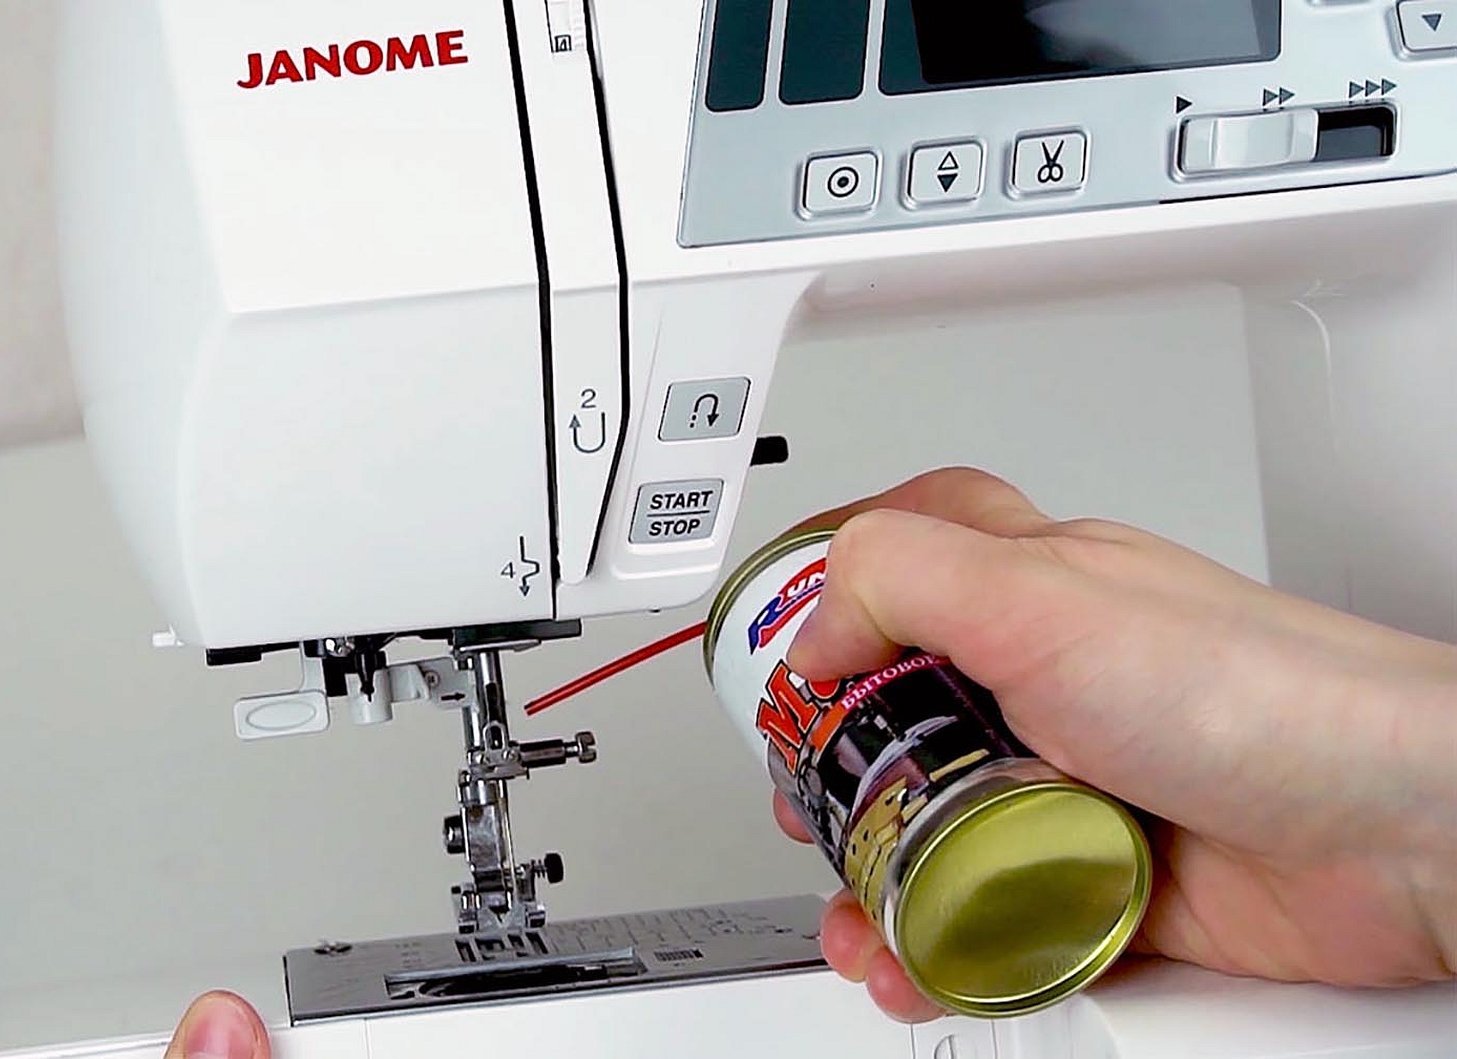
Lubrication of mechanisms
Lubrication of sewing machine parts is necessary to extend its service life. Due to friction, mechanisms wear out quickly. Frequent sewing requires monthly lubrication. If the seamstress rarely sits at the machine, 3 times every six months will be enough.
The oldest method of lubrication is the use of vegetable oil. But it evaporates quickly and also oxidizes. Motor oil is chosen with a low viscosity.
Important! You cannot use solidol or lithol.
For modern models, manufacturers recommend purchasing special store-bought compounds. For precise dosing, use a regular syringe.
Setting the pressure of the foot on the fabric
The uniformity of stitches and the quality of sewing products depend on the force with which the foot presses on the fabric. To adjust this indicator, a screw located on the rod was used on old machines. In modern devices, there is a regulator located on the top of the body. It is used according to the instructions.
Important! Computerized models do not require such adjustments.
Self-tuning of the Podolsk machines does not take much time. These units are distinguished by their ability to work with dense fabrics. In order for the products to be of high quality, it is important to properly prepare the device.
The setup begins with threading the thread. Then install the needle. Then thread the upper thread from right to left. Turn the flywheel toward you, and the handle away from you. When the machine is idle, lift the foot.
Sewing machine "Chaika": setting and adjustment
"Singer", "Chaika", "Veritas" and other machines are adjusted according to similar principles. The adjustment of modern machines is different, there some operations are performed automatically.
The "Seagull" is set up by installing the needle and thread. Then the tension is adjusted. The spool is placed at the top. The thread is threaded through the entire mechanism.
Important! There are no special features in preparing for sewing.
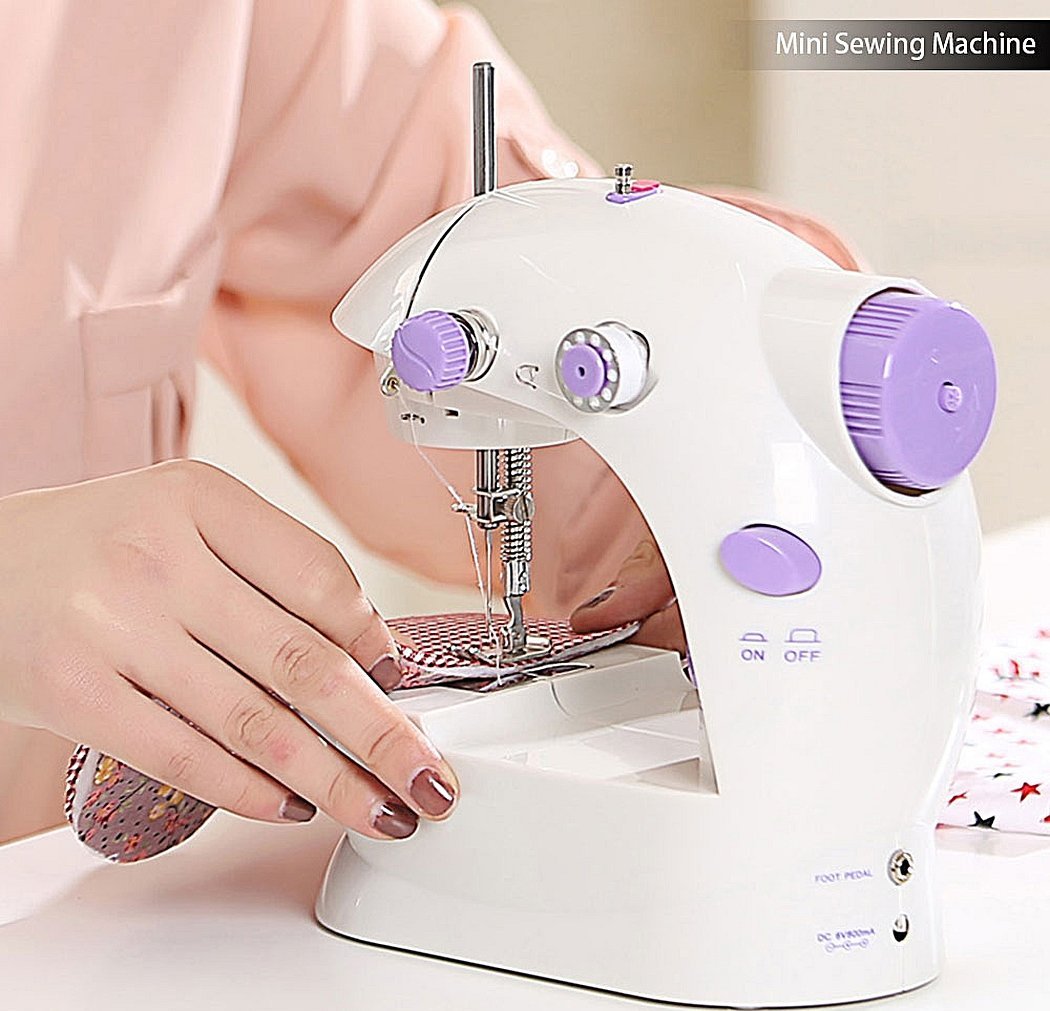
Setting up mini-cars
Even a small machine is set up similarly. These are mainly modern models. It is recommended to prepare them for work strictly according to the instructions. Craftsmen recommend not to buy such devices. They are often brought in for repair. However, it is difficult to find parts or fix them. Most often, the units cannot be repaired. They use fragile parts.
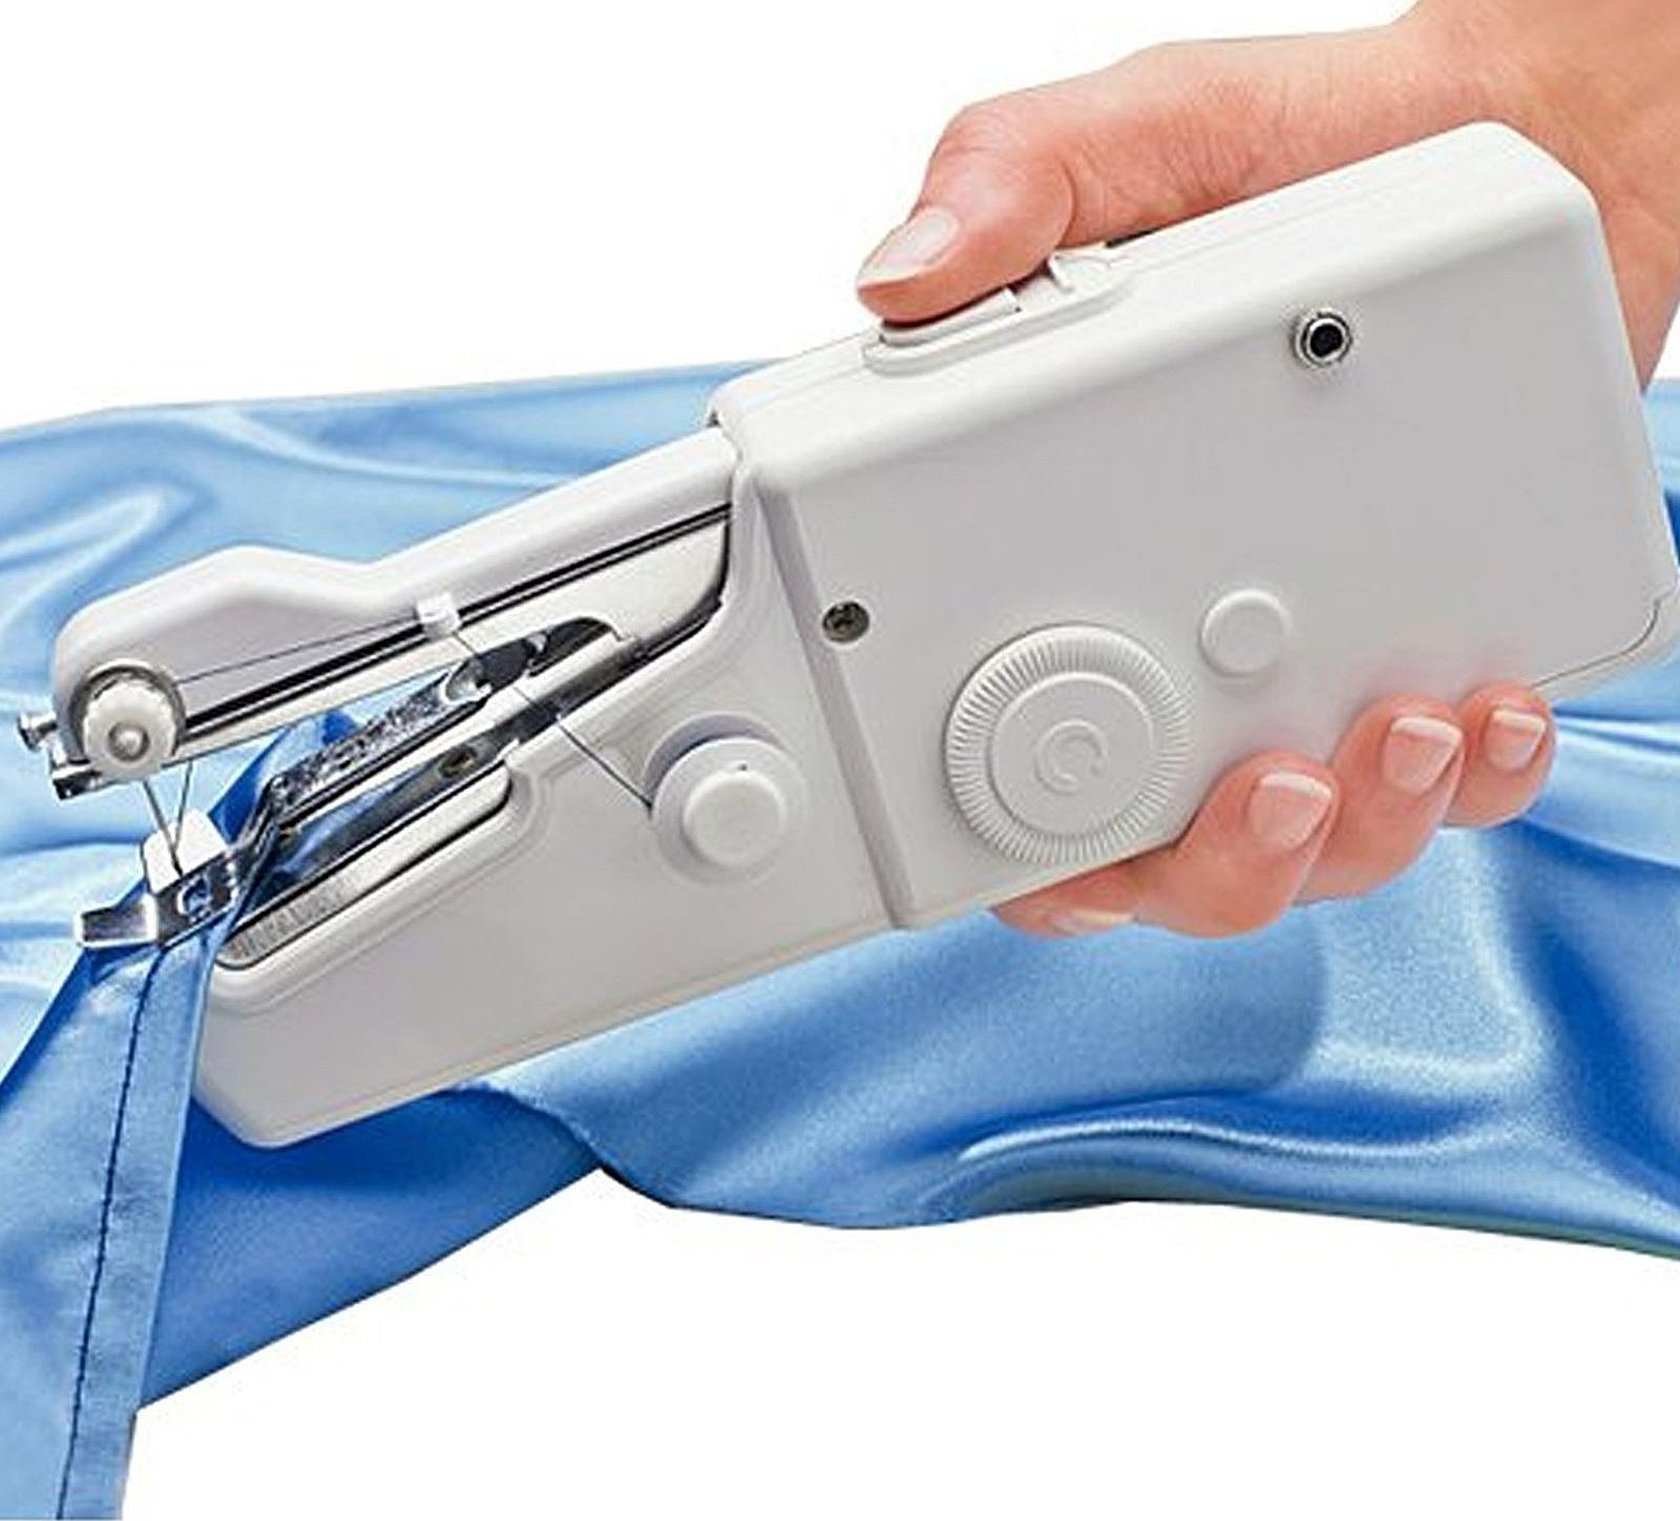
Setting up manual machines
Setting up machines in the form of a stapler is different. The seamstress only needs to wind the threads on the spool that comes with the kit. And then insert it into the device from the side. It is recommended to use only for sewing from thin fabrics not on a permanent basis.
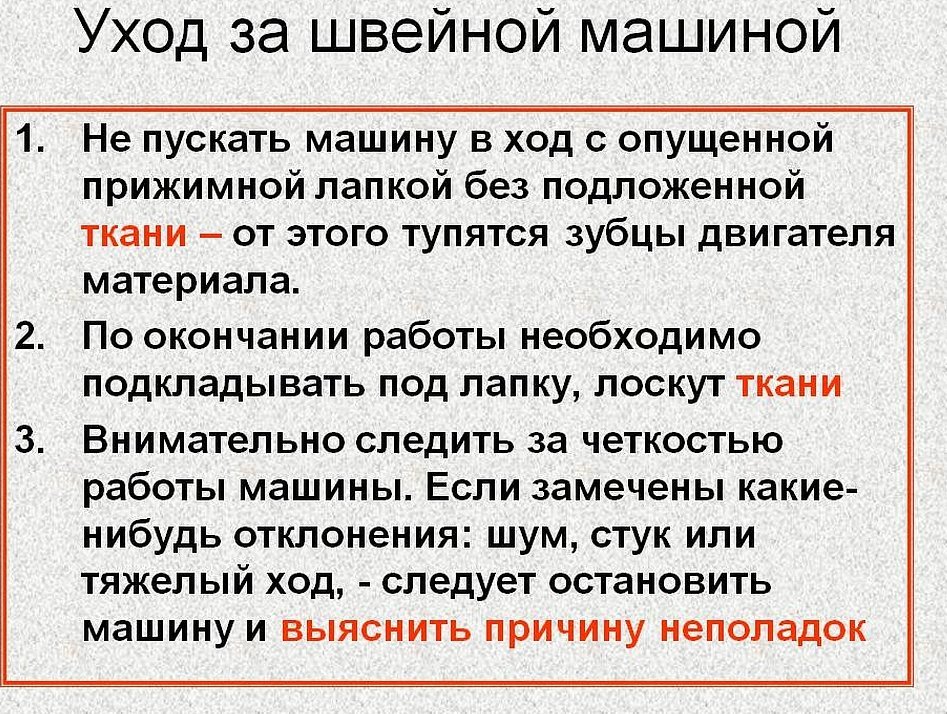
Preventive care
To make sewing enjoyable, it is necessary to take care of the prevention of dirt and breakages. Any machine should be looked after.
Preventive care rules:
- Store the machine only in a cover. This will protect it from contamination.
- Regularly clean the device with a brush to remove traces of fabric after sewing.
- Periodically lubricate the mechanisms with the product recommended by the manufacturer.
- Clean the bobbin case from dust.
- Use suitable sharp needles.
In order for the machine to serve for a long time, it should be looked after. And also all parameters should be adjusted correctly and prepared for work. There is a sequence that should be followed. Manufacturers give individual recommendations for setting up modern models.


