A jacket or blazer is an indispensable item that must be present in a woman's wardrobe. The item of clothing is ideal for creating a classic, business or casual look. Fashion designers provide a large number of different variations of the jacket, among which you can find the best option for yourself. In addition, a jacket for women can be sewn independently at home. This will require the necessary materials, tools, a little patience and free time. This article will tell you how to sew a jacket with your own hands.
- How to choose the right style
- Materials and tools needed for the job
- Taking measurements
- Basic pattern of a women's jacket for any body type
- Building a grid for the base of the pattern
- Construction of the back and front
- Working with the waist line
- Construction of a one-piece sleeve on the armhole
- Tricks of cutting and assembling the product
- Sewing the product
How to choose the right style
Before you start sewing a jacket, you need to choose a style that will successfully emphasize all the advantages of the figure and hide the disadvantages. Usually this criterion, like the color, type of material, length of the product and length of the sleeves, is chosen based on your own preferences. A jacket for girls can be short or elongated, fit tightly to the figure or sit loosely.

Beginners in sewing should not immediately take on complex models. It is recommended to look for jackets with patterns for 52, 54 and other sizes on the Internet or in sewing magazines. It is better to choose from simple options to try your hand and gain skill. The easiest way to start is to create a product without a collar and lining, because such models require less time and skills.

Materials and tools needed for the job
The choice of fabric for sewing a jacket is a very important event that requires attention. Each type of figure is suitable for a certain density, color and texture of material. In addition, when choosing a fabric, it is important to focus on the style of the jacket and weather conditions.
Thus, tweed fabric is suitable for the cool season. Festive options are satin and velvet. The best materials are jersey, corduroy, cotton and denim.
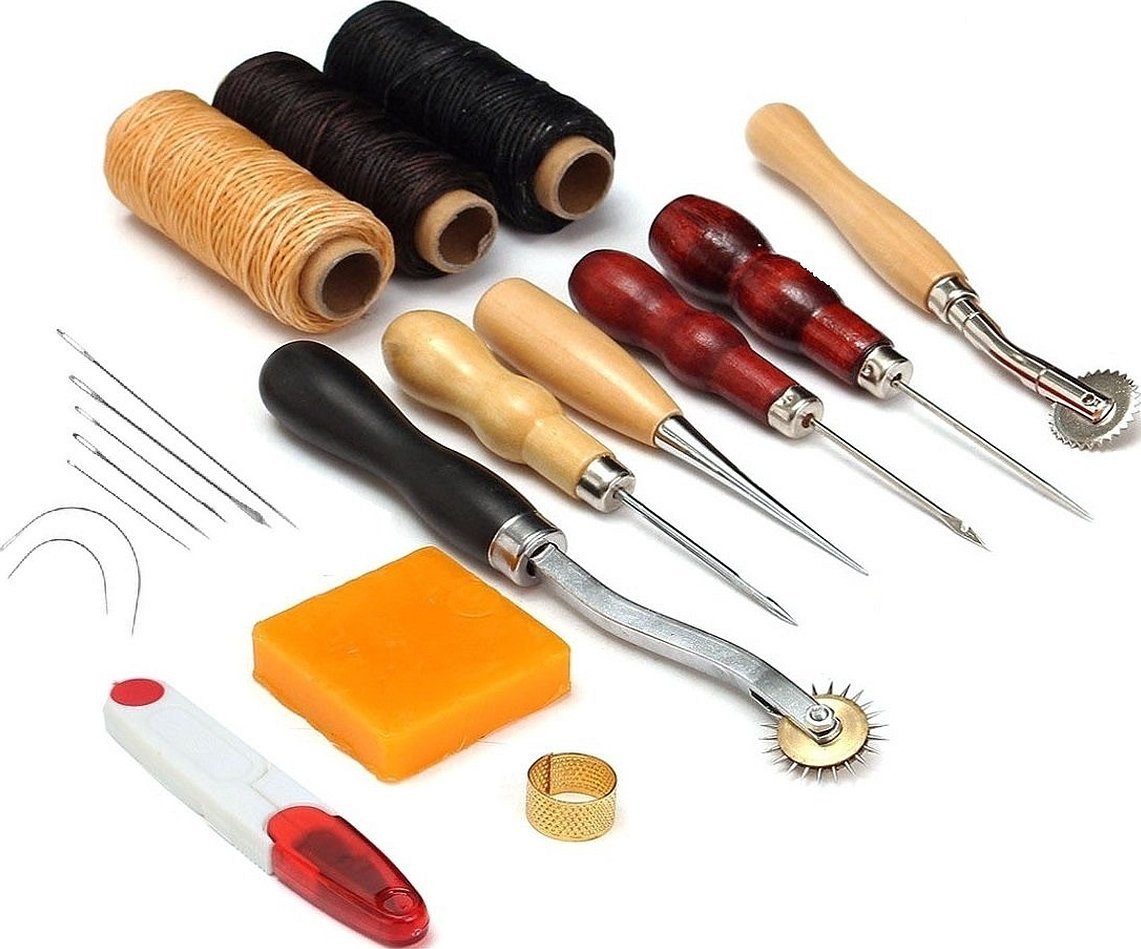
It is impossible to create a product without having a set of necessary tools at hand. The list of important materials includes scissors, a ruler, a tape measure, chalk or a piece of soap, pins, threads, needles and a sewing machine. For thick fabrics, you may need the help of an awl.
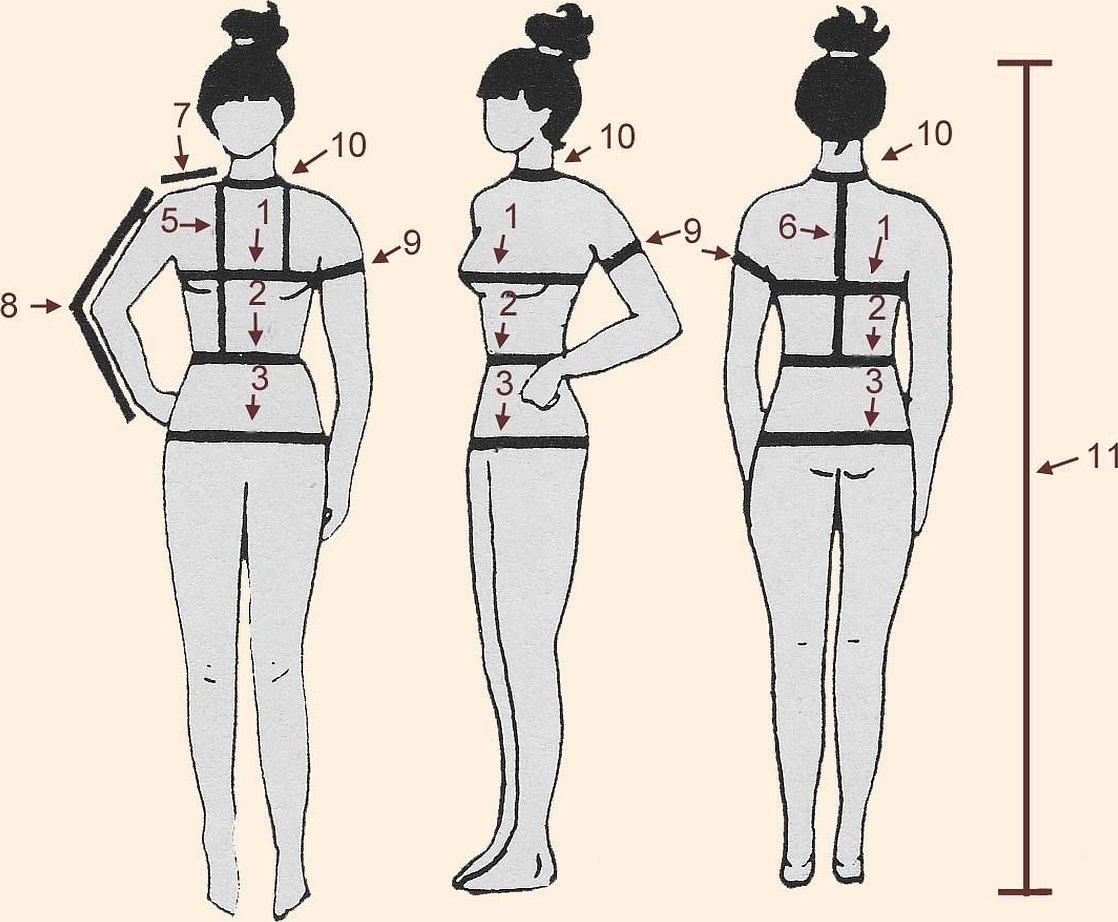
Taking measurements
Before sewing a women's jacket, you need to know the model's measurements. When taking measurements, you need to act carefully and clearly. In order for the finished product to look good on the model, it is important to correctly and accurately determine the dimensions. To sew, you need to measure the girth of the neck, wrist, arms in the shoulder area, chest and waist; measure the distance from the neck to the waist, the width of the shoulders and mark the length of the sleeves. In order to get a loose-fitting product, you need to add 6 cm in the sleeve area and 8 cm in the waist area.
Basic pattern of a women's jacket for any body type
This pattern of a women's jacket will allow you to create a product that will suit all body types. The best material will be black wool, and the finished product will look harmonious with a skirt, trousers or jeans.
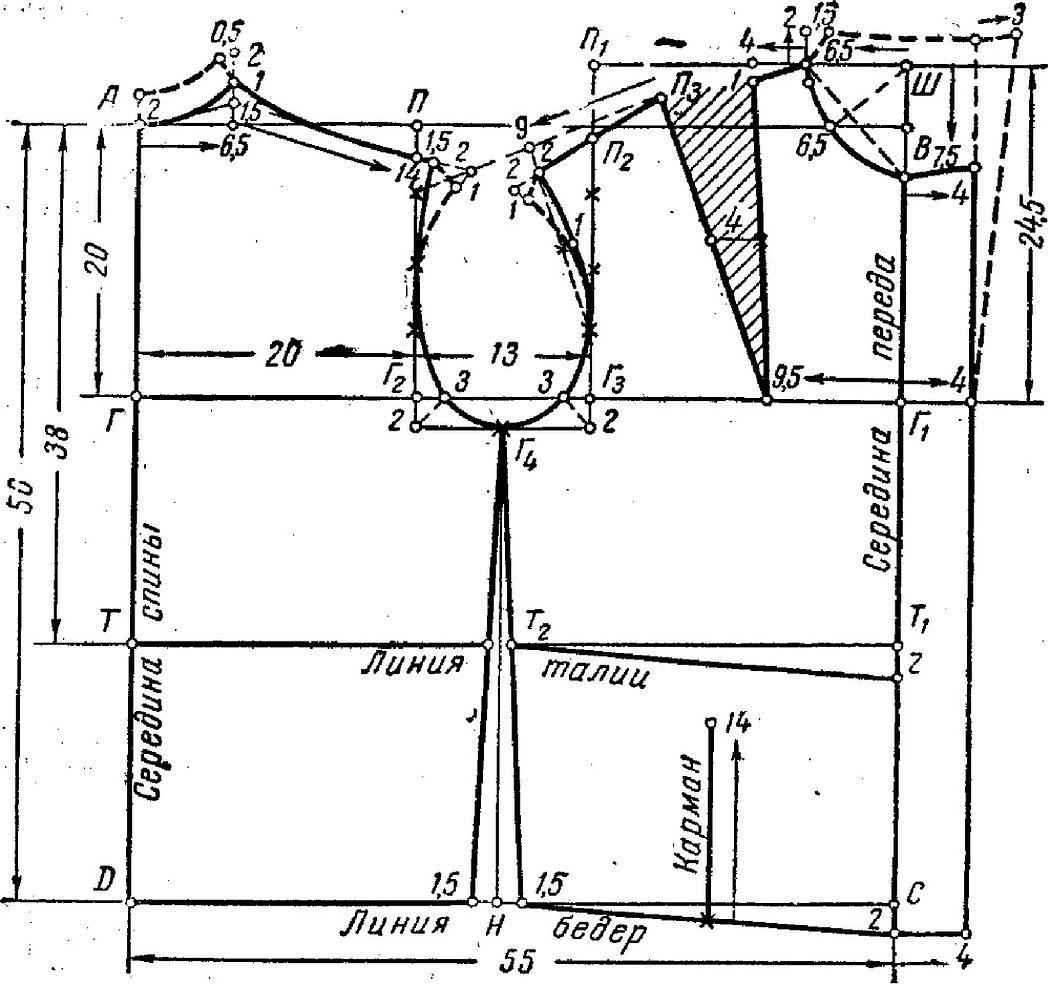
Building a grid for the base of the pattern
An important detail that is created before the sewing process begins is the pattern. To create it, you will need to arm yourself with a pencil, paper, ruler and eraser. It is best to do all the constructions on graph paper, on which the cells are drawn by 1 mm. This way the template will be more accurate, and the time for its creation will be significantly reduced.
The basis for construction is a grid, which is a rectangle. It is recommended to go down 10 cm from the beginning of the sheet and start construction from there.
- Draw a segment AB, the length of which will be equal to ½ the width of the back + the width of the armhole + ½ the width of the chest + 4 cm for allowances. The last figure can be increased if the model so wishes.
- From the extreme points of the resulting segment, draw parallel lines downwards that will be perpendicular to the segment.
To find out the armhole width, you need to clamp a 3 cm wide paper strip under your armpit. At this time, you need to stand straight and keep your arms free. Markers are placed on both sides of the hand, the distance between which is the desired one.
- On the line drawn downwards from point A, draw segment AP equal to the depth of the armhole + 3 cm.
- Construct a segment AT equal to the length of the back to the waist + 1 cm.
- Conduct a TB that is equal to the height of the hips.
- Construct AH equal to the length of the product.
- On the line drawn from point B, the same segments are laid out, only the numbers 1 are added to the letters.
- Connect the resulting points with 4 parallel lines.
- Set aside from G to the right GG2: ½ the back width + 1 cm. Set aside from G2 to the right G2G3: Armhole width + 2 cm. Divide the resulting segment by 2 and place G4 there.
- From two points G2 and G3 draw perpendiculars upward to the edge of the frame.
- From A draw AA1: 1/6 of the neck circumference + 1 cm. You will get a hole for the neck.
- From the waist line draw T2A2: back length to waist + 0.5 cm. Shape the neckline AA2 according to the pattern.

Construction of the back and front
When constructing a back template, you need to know the total length of the entire product, which is selected based on the size and desires of the model. It is also important to set the shoulder width and waist circumference. The pattern for the back can be made only for half, and the second will be symmetrical. How to make a template is up to everyone: for some it is more convenient to create one solid piece, and for others it is easier to model it from two. The construction of the shelf consists of two parts. For the pattern, you need to know the length of the jacket and the shoulder circumference, as well as the chest and waist sizes.
- Construct the slope of the shoulder. From T draw an arc whose radius is equal to the oblique height of the shoulder + 0.5 cm.
- From A2 draw A2P: shoulder length + 1.5, so that P is on the arc.
- Divide the auxiliary armhole line on the left into 2. From the lower corner of the armhole, draw a bisector with a length of 2 cm. Shape the back armhole according to the pattern to G4.
- From T1, set aside a segment equal to the length of the front to the waist + 0.5 cm.
- From point 1 draw a bust dart and mark point C; the length of the segment is equal to the height of the bust.
- From C, put Zh upwards, and to the left of it, draw Zh1. Length Zh1: chest width - width above chest, divided by 2.
- Draw SP2 equal to the length of segment 1-C.
- From T1 draw an arc with a radius of oblique height of the front shoulder + 0.5 cm.
- From P2, draw P2P3, equal to the length of the shoulder - 4 cm. P3 should lie on the arc.
- Divide the right auxiliary armhole line into 4 equal parts. From the bottom corner draw a bisector with a length of 2 cm. Draw the armhole from P3 to G4.
Working with the waist line
The waist line will be indicated by segment TT1.
- Waist darts are calculated using the formula: chest circumference - waist circumference, and the difference is divided by 2.
- The dart is located in the center of the waist from the back. To find out its length, you need to step back 4 cm from the armhole down and 2 cm from the hips up.
- From C draw a vertical line that reaches the hips. Lower it 6 cm down and draw a dart to the hip line.
At this point the straight jacket pattern is ready. All that remains is to transfer everything to tracing paper and start cutting.
Construction of a one-piece sleeve on the armhole
When creating a sleeve pattern, you need to know its length and the circumference of the arm at the shoulder and wrist.
The armhole depth is calculated using the formula: 1/10 chest circumference + 10 cm.
When sewing a sleeve, you need to know the height of the sleeve cap, which is equal to 3/4 of the armhole height. The width of the sleeve at the armpit level - the sleeve circumference - is equal to the measured value + 8 cm for a loose fit.
- The main line OO1 is equal to the width of the sleeve. It is drawn 25 cm from the top of the paper.
- The central line of the sleeve — CR — is located depending on the size and circumference measurement. To calculate, you need to divide OO1 by 2 and shift the line to the right by half a centimeter. If you add 0.5 to the resulting value, you will get the OS line.
- From point C draw OB vertically. Length OB = sleeve cap height. For example, with size 46, the value will be 15.5 cm.
- From B, draw a distance in two directions equal to ¼ of the width of the front and back halves. So, for size 46, you get 4.5 and 4 cm, respectively.
- Do the same step on the sleeve width line—OO1.
- Draw connecting lines smoothly.
Tricks of cutting and assembling the product
Before cutting, it is recommended to do the following with the fabric. Wet the material in water and iron it with a hot iron. Thanks to this simple trick, the product will eventually shrink correctly, and the fabric will be protected from deformation for a long time.
Not every material can be wetted. Before carrying out the decatizing process, it is recommended to familiarize yourself with the characteristics of the fabric.
The material must be laid out on a flat, smooth surface, free of foreign objects. It is most convenient to work on a large table. The main parts are laid out in front of you, and the assembly process begins.
Important! Before cutting, it is necessary to take into account some features of the materials. Velvet and velveteen have pile, the direction of which should be set in one direction.
The shelves, back and sleeves are placed according to their places. The collar and pockets are placed between them, if necessary.
After cutting, the pieces are laid out in such a way as to simulate the finished product. This step is necessary to ensure that all pieces have been cut out.
Sewing the product
You can sew a jacket with your own hands without a pattern and quickly. A ready-made template can be found on the Internet and printed out.

Step-by-step instructions for making a jacket:
- Sweep all the parts together and try to carefully try on the blank.
- Sew the sleeve parts from the inside and run the seam along the length of the entire piece. Repeat the process with the second sleeve.
- Skip the seam along the bottom of the back and also along the front parts.
- Glue the facings with dulerin and sew them on, taking into account the direction of the pile or pattern.
- Place the pockets in the area designated for them and sew the seams.
- Create buttonholes.
- Sew one front to the back, leaving the sleeves intact. Do the same with the other side.
- Sew in the sleeves.
This completes the sewing work. After that, you need to try on the product and, if desired, paint the jacket with decorative elements. It will go well with a dress, especially if it is Chanel. If all the sewing rules are followed, the finished product will fit well on the figure.
A loose-fitting women's jacket suits absolutely all representatives of the fair sex.
Thus, it is quite easy to create a women's jacket at home. You do not need to be an expert in sewing and cutting. It is enough to show imagination, perseverance and accuracy to get a beautiful wardrobe item as a result.


