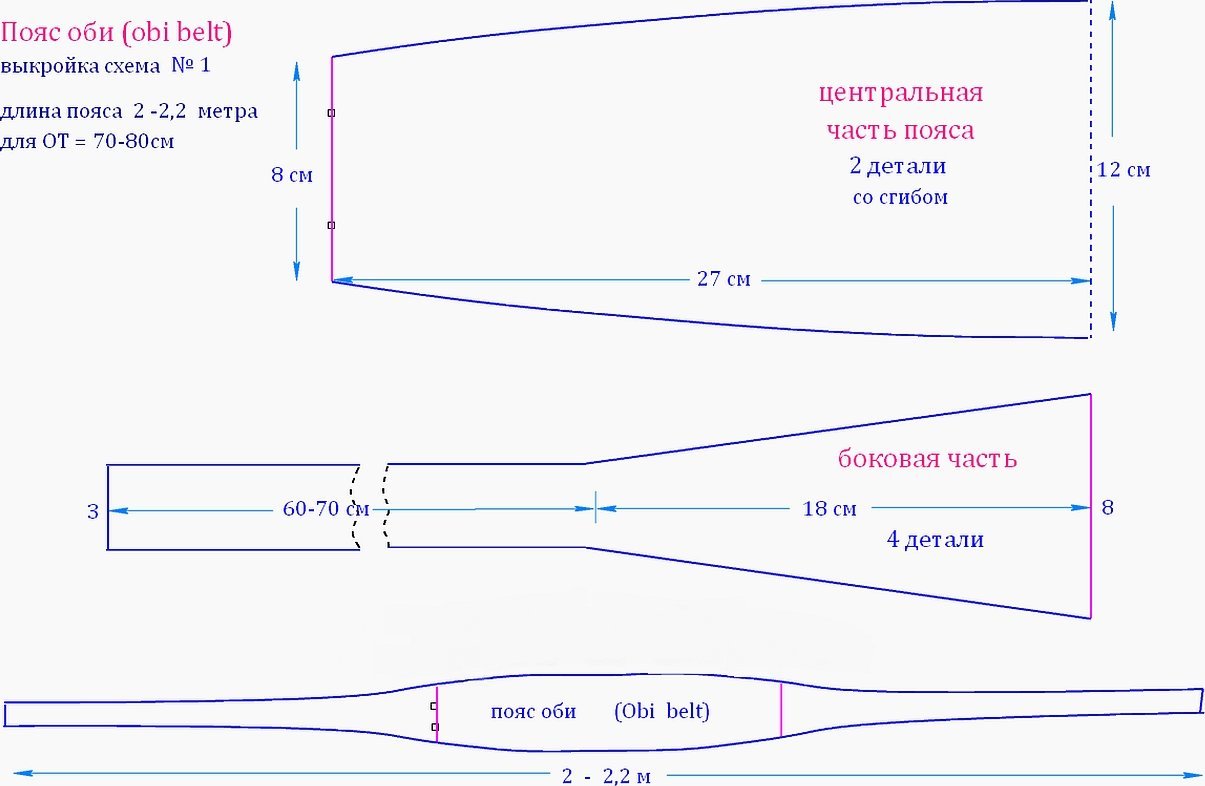
To complement your everyday or evening look with an accessory that will perfectly match the chosen outfit, a belt will do. Such an accessory will be more appropriate than ever if you need to emphasize outstanding shapes or complement a plain dress. The main advantage of such a thing is that it can be made independently and for any taste. Below you will find out how to sew a sash belt, a pattern for a wide belt, and also a pattern for an obi belt.
- Types of fabric belts
- General recommendations
- Necessary materials
- How to take measurements and calculate the length and width of the belt
- How to sew a fabric belt with your own hands
- How to sew a wide fabric belt on corset hooks
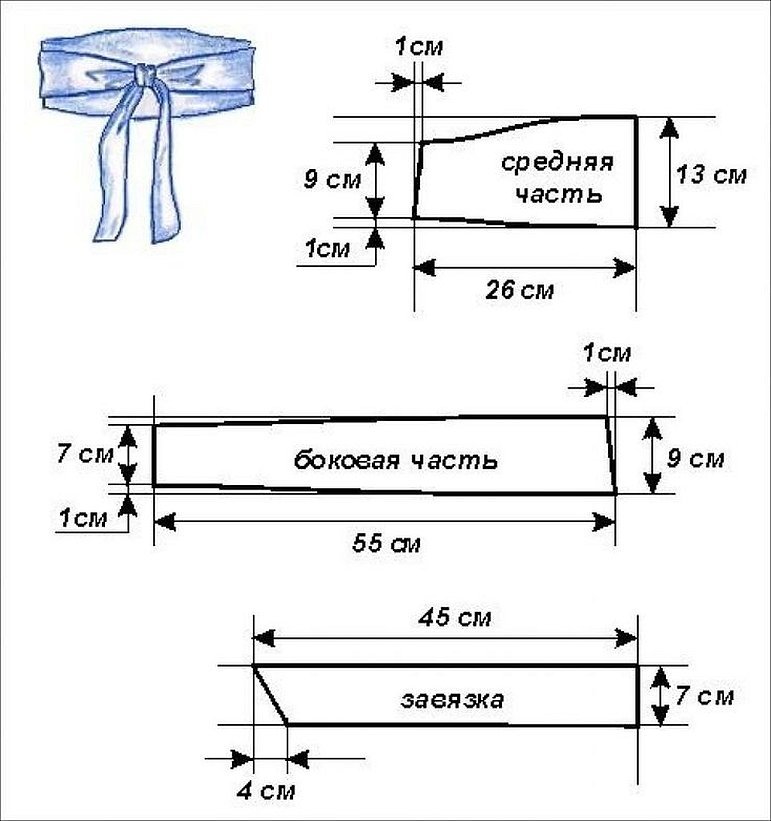
- How to sew a sash belt with your own hands
- Belt sewn onto a skirt: description of work
- If the fabric is not long enough
- How to strengthen a waistband
Types of fabric belts
Today, you can choose a belt element for all occasions. They are divided into several types, differing in the methods of fastening.
- Belts with a fastening mechanism: Velcro, snaps, buttons, rings, yarn, hooks.
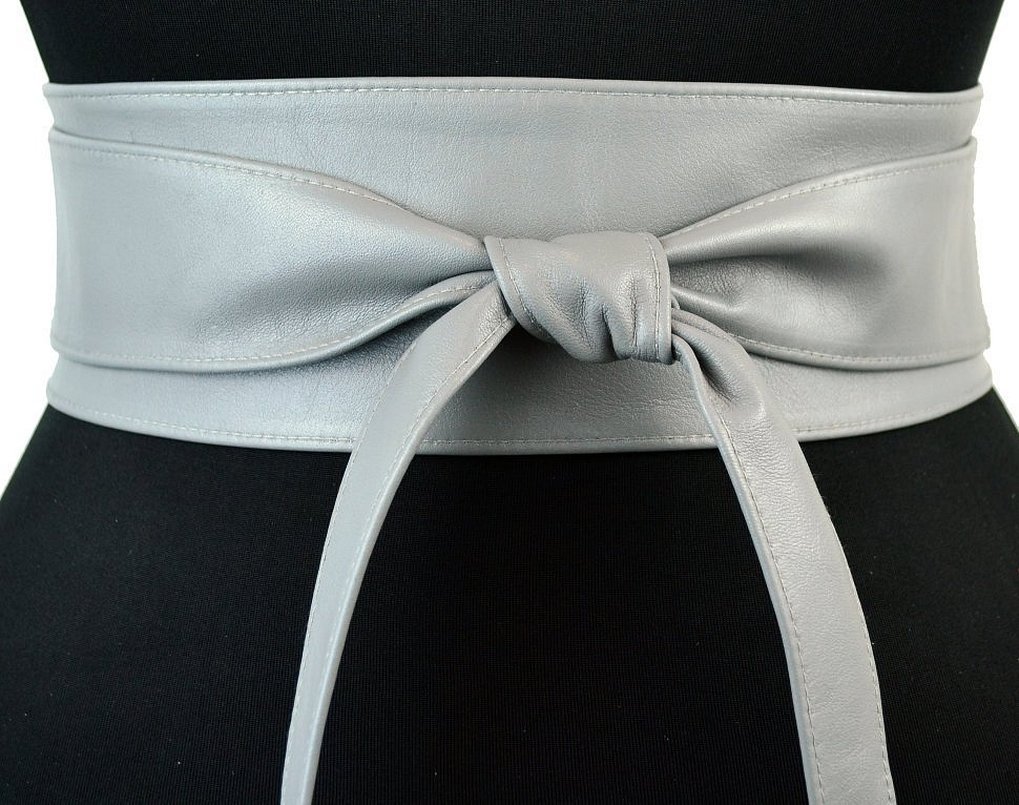
- Wrap-around belts: one-piece ties and those that are sewn onto the main part of the element.
- Mixed belts. A type of element in which there is a tie on one side of the accessory and a small ring for fastening on the other.

Important! In the case where it is necessary to sew a belt for clothes that ties at the back, it should be taken into account that much more material will be needed.
General recommendations
Before you start making, you need to decide on your preferences. Think up the shape, texture, clasp and color of the accessory in advance. Also, before going to a specialized store, you should follow some recommendations, namely:
- Decide for what purpose the element is needed. For a casual look, an evening or business suit;
- Such an accessory must necessarily match the chosen suit, or be universal, which can match even the most unexpected outfit;
- Choose the method of using the element. As a decorative item or to express the shape of the bow.
Necessary materials
To make a fabric belt with your own hands, you need to prepare the materials that you will need for sewing, namely:
- Yarn. This item does not necessarily have to be purchased in stores, it can be taken from an old belt and used in a new product;
- Fabric (satin, leather, leatherette, stocking material);
- Lining;
- Threads in the color of the belt;
- Sewing machine;
- Measuring tape;
- French pins;
- Scissors:
- Standard large pin.

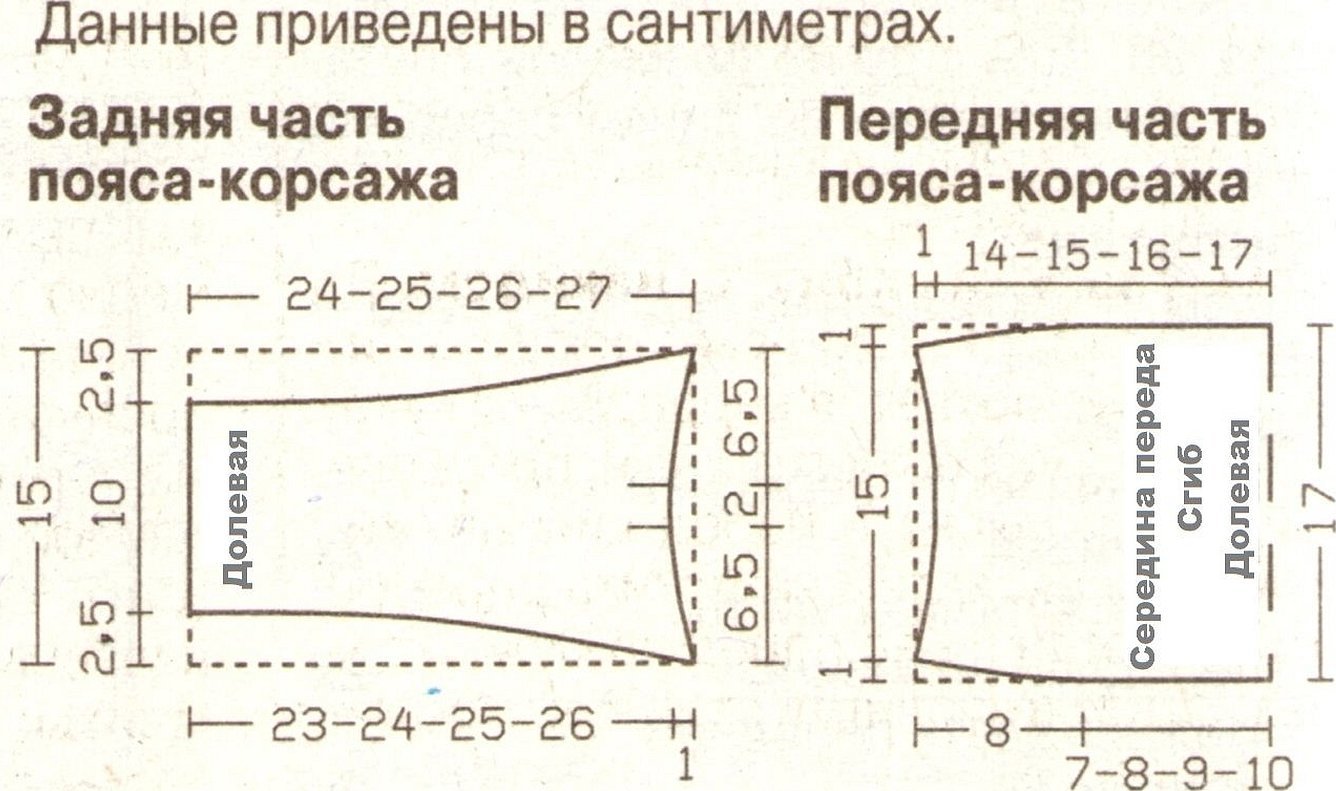
How to take measurements and calculate the length and width of the belt
Before you start working, you need to take measurements. Because without them, you may get a belt that is not the right size. To avoid this, you just need to follow a few steps, namely:
- Take an old belt that you would like to change.
- Place it on a flat surface, such as a table, stool or floor.
- Measure the length using a tape measure or measuring tape and remember the result, which will be used to make a new sash.
How to sew a fabric belt with your own hands
Many people are interested in how to sew a belt for a dress from fabric. To do everything qualitatively and reliably, you should follow the step-by-step instructions:
- Cut a couple of strips of fabric and one strip of interfacing, about 2 centimeters or more in size;
- Connect all the strips with pins and sew them together, removing the pins as you go;
- Next, you should cut off the remaining fabric with scissors, turn the product inside out and insert a pin into the fabric, pulling it through the end of the belt and grouping the material into small folds;
- After this, you need to finish the seam with a straight stitch, turn it inside out and iron it;
- Next, you need to hide one end inside the sash and finish it with a regular straight stack;
- The final step is to pull the finished end of the belt through the yarn and sew it to the base of the piece so that the buckle is firmly secured in the ring of material.
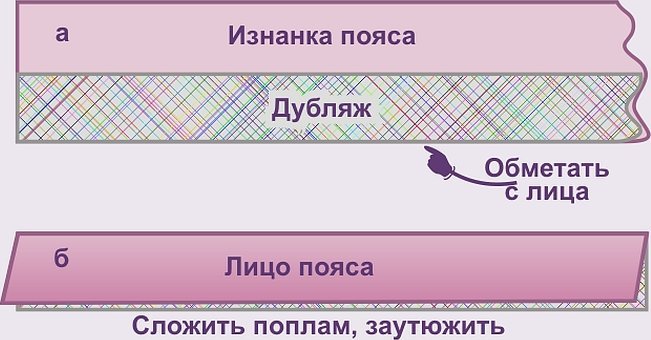
How to sew a wide fabric belt on corset hooks
Step-by-step instructions for sewing a wide fabric belt:
- Cut a strip of material twice the width of the desired result.
- Prepare two cut strips of interlining and iron them with an iron at a high temperature on all sides, keeping the distance between the interlining strips at approximately one millimeter.
- It is necessary to iron the allowances. In case the fabric does not yield to the iron, it should be fixed with adhesive tape.
- Prepare the corset hooks by cutting off the required length and width, and fix them with a web, turning them inside out a couple of times. These actions are done with the right part of the corset hooks. The left part must be cut off, folded in half and the edges ironed.
- Using adhesive tape, you should secure the hooks inside the waistband and similarly connect all the open sides, and also stitch along all sides of the product.
How to sew a sash belt with your own hands
The technology for making a sash-type bodice is as follows:
- It is necessary to cut out three parts of the element: the middle, the wide and two parts of the ties. To avoid uneven ties, it will be easiest to cut with a knife on a carving mat, and also to use a metal ruler.
- Match the threads by color. Then sew the ties to the middle part of the belt using a zigzag stitch. This stitch is common to almost all household sewing machines. If it is unable to take the leather product or skips stitches, you can sew it yourself.
- Stitch the perimeter of the belt using tacks. This action is necessary so that it cannot stretch during wear. It also looks quite attractive, and absolutely any sewing machine can handle this type of work.
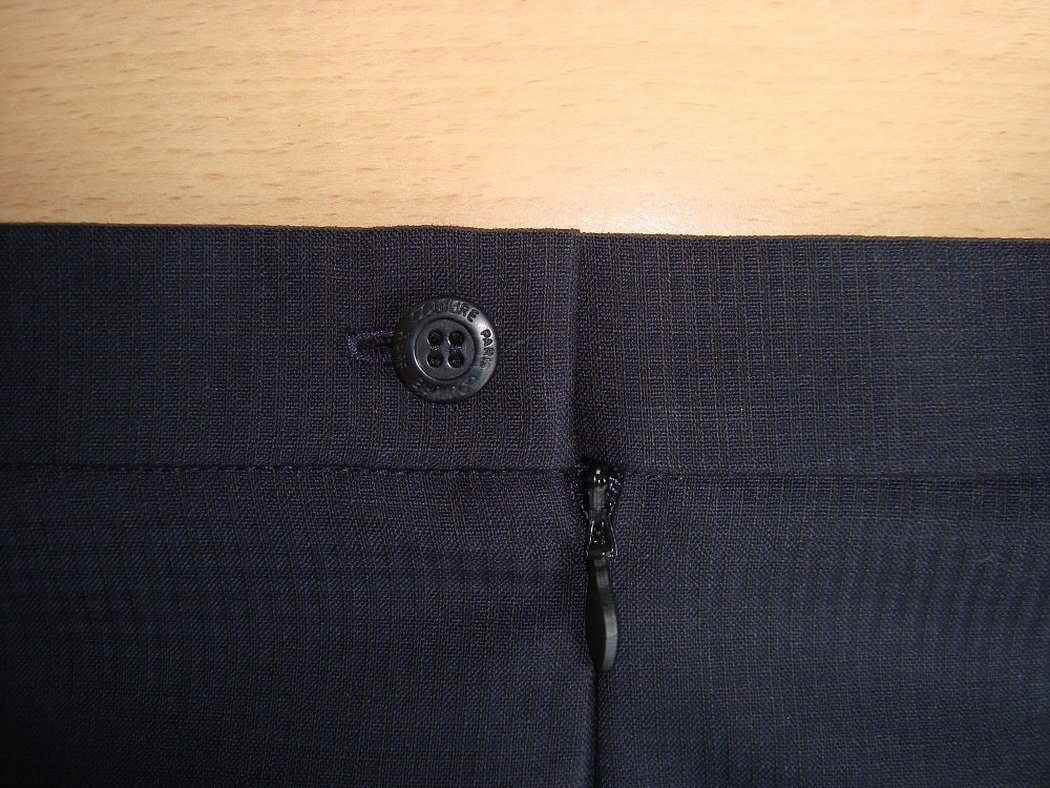
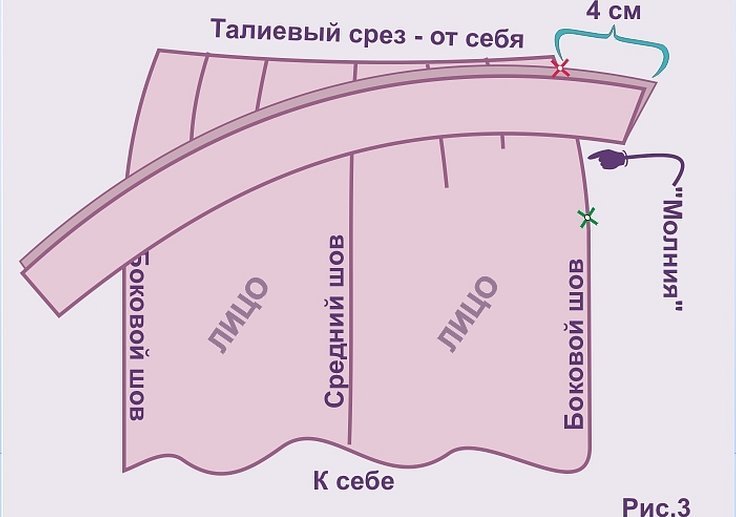
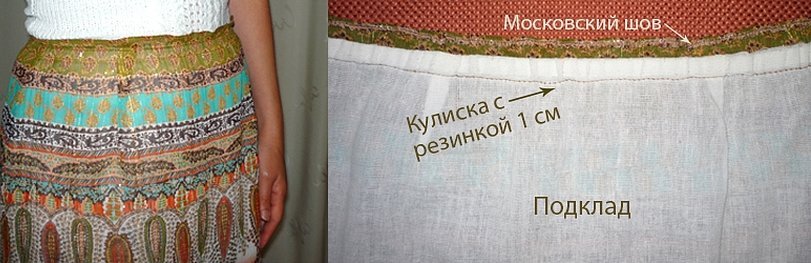
Belt sewn onto a skirt: description of work
The attached belt for the skirt is sewn using the following technology:
- Cut out the belt and secure it with a corset ribbon;
- Attach the belt to the skirt, pinning it in place;
- It is necessary to sew on the belt by folding it in half and stitching the seam allowance under the fastener;
- Trim the seam allowances on the short sides, turn the waistband right side out and start basting;
- Fold the waistband down the bottom;
- The belt loops need to be raised up, the upper allowance needs to be folded along the edge of the belt, then pinned and stitched with a seam;
- The final step is to iron the belt with a hot iron and sew on the clasp.
If the fabric is not long enough
There are cases when, when purchasing material for a belt, the wrong size is mistakenly taken and it turns out to be insufficient for production. For example, there is a piece of fabric measuring 60 centimeters, and the belt needs to be cut out 75 centimeters or more long. In this case, it is necessary to sew ribbons of the appropriate size to the extreme points of the belt, thus adding the missing length of the material. Bows or knots can be tied from ribbons to make the belt look more elegant. You can also use ribbons of contrasting colors, in this case a visible effect is created that the waist seems narrower, and the figure acquires the outlines of a slender figure.
How to strengthen a waistband
Many people notice that when worn for a long time, the belt wrinkles, stretches, thereby acquiring a not very attractive appearance. To avoid this, you can make internal reinforcement using an edge pad or interlining. The width of the pad or sealant should be the same as the width of the finished product.
Important! The edges of the edge strip are treated with a special substance that secures the cuts and for this reason they should not be trimmed to avoid damaging the material.
Thus, it was considered what is an obi belt, a pattern and sewing of this product. Sewing a wide belt for a dress with your own hands, like any other, using almost any technology will not be difficult, and any household sewing machine can handle it. After manufacturing, the belt will emphasize the figure and decorate any skirt, dress or business suit.


