If you are sewing clothes yourself, it is important to skillfully create different collar options. Stand-up collars look elegant and trendy. There are several styles, each of which is realized using a specific pattern. Construction/modeling is usually carried out in several stages, taking into account the darts on the shelves of the item itself.
- How to design
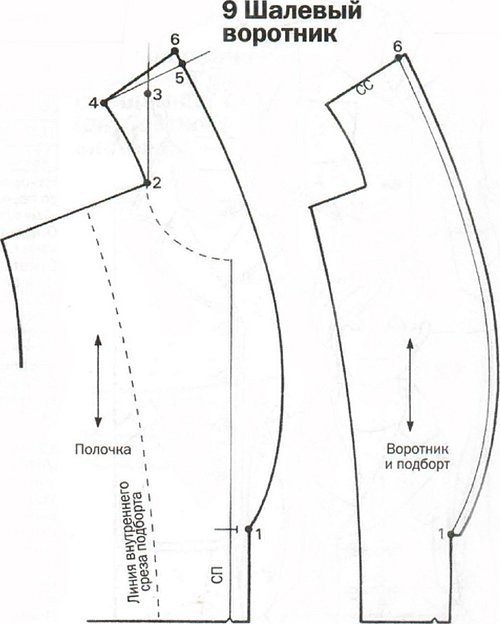
- Shawl Lapel Stand-Up Collar Cut
- One-piece stand with shelf and back
- Stand-up collar, close-fitting to the neck
- Products with a seam at the center of the back
- Turn-down collar with a cut-off stand
- Shirt collar on a stand
- Rectangular stand-up collar
- Opening
- Processing technology
- How to sew a collar to a shirt
How to design
Before constructing the collar shape, you need to know the basic rule - first you need to model the neck itself. It is important to choose the right depth and width of the neck. It is thanks to these parameters that the shape and type of the stand-up collar are determined.
Modeling is carried out in accordance with the following stages:
- The style of the gate-post is selected.
- Next, the size of the neck is determined - depth, width and height.
- Then a drawing-pattern is made.
- Next, the pattern is transferred to the fabric - templates are prepared.
Many variants of racks are integral with shelves and backs of the product itself. It is necessary to carefully follow the principle of forming additional darts.
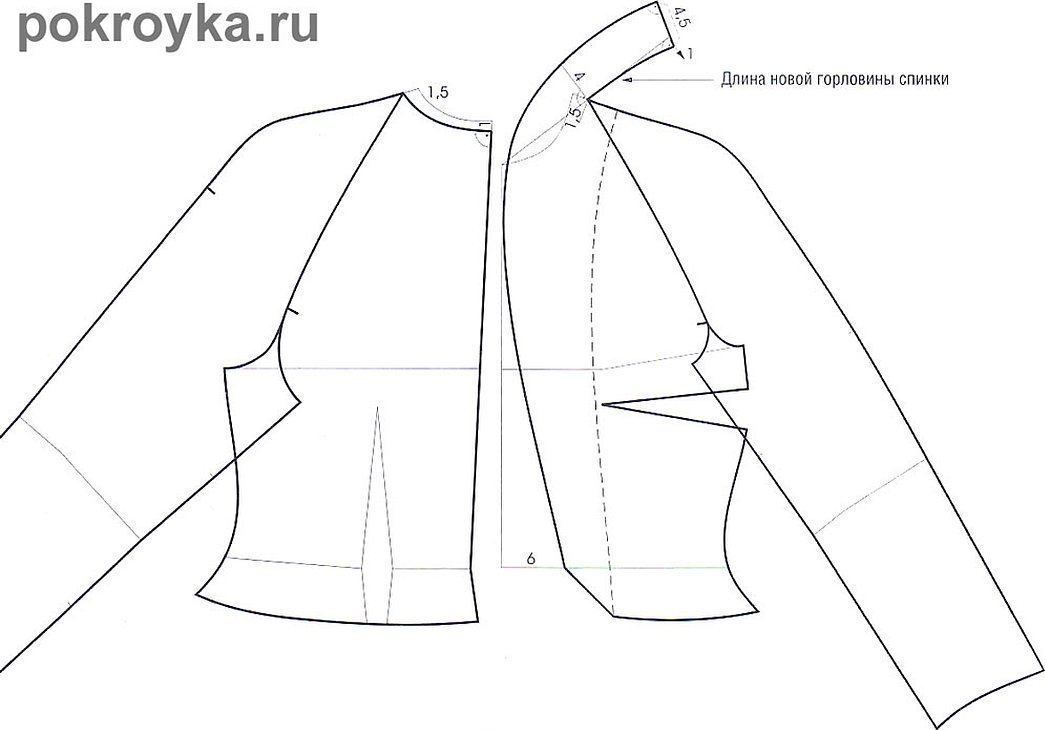
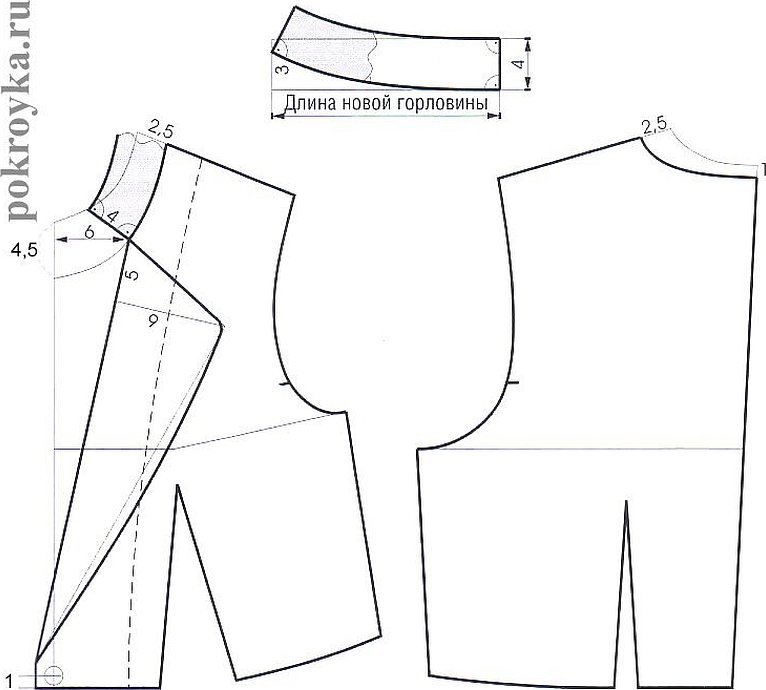
Shawl Lapel Stand-Up Collar Cut
A stand with a shawl lapel is quickly and clearly formed on the basis of a one-piece shelf. In this case, a regular stand turns into a lapel, which is approximately reminiscent of a shawl. How to make a pattern for such an element if the shelf is already ready:
- You need to make a cut from the neck to the point where the center will be located.
- Connect the side darts located on the chest. In this case, you need to raise about 0.7 cm to the neck, and lower the rest to the waist.
- Widen the neckline on the shoulder by 1.5 cm, on the back - 1 cm. You need to make a new drawing in the back area in relation to the center line.
- It is necessary to form auxiliary lines that will pass through the extreme points of the neck, back and front.
- From the tops of the updated neckline in the area of the shelves and back, draw perpendiculars to the auxiliary lines. The height of the stand is measured along them - 4 cm. Continue the middle line on the back upwards, measure the height of the stand - 4.5 cm.
- Draw a straight line parallel to the center line of the shelf for the edge, the lapels and the fold of the lapel, determine the location of the buttons. Organize the cuts of the lapel and collar.
At the bottom of the lapel there can be a clasp, which will be an ideal complement to the elegant shape of the clothing detail. This type of element is ideal for a jacket or a natural fur coat.
One-piece stand with shelf and back
The one-piece stand-up collar style will make a classic coat even more elegant. This option can be used in the process of sewing blouses and shirts. Algorithm for creating one-piece collars:
- Form an additional dart that will move along the convexity of the shoulder blade to the upper edge of the neck (stand).
- To these cuts you need to add 0.5 cm on each side. This will allow you to lengthen the cut on the back.
- You need to shorten the shoulder blade bulge by 9-10 cm. You should move from the neck to the back.
Please note! Before making a dart on the fabric, you need to correctly determine the direction of the main thread.
Before final preparation of the pattern, you need to adjust all cuts and transferred parameters.
Stand-up collar, close-fitting to the neck
A stand-up collar that fits the neck, the pattern of which is built according to a very simple scheme, looks very impressive. This style is considered especially relevant when modeling blouses. To accurately perform the construction, it is worth using this scheme:

Usually this option is one-piece with a shelf and a back. Such fixation simplifies the procedure of creating such an element.
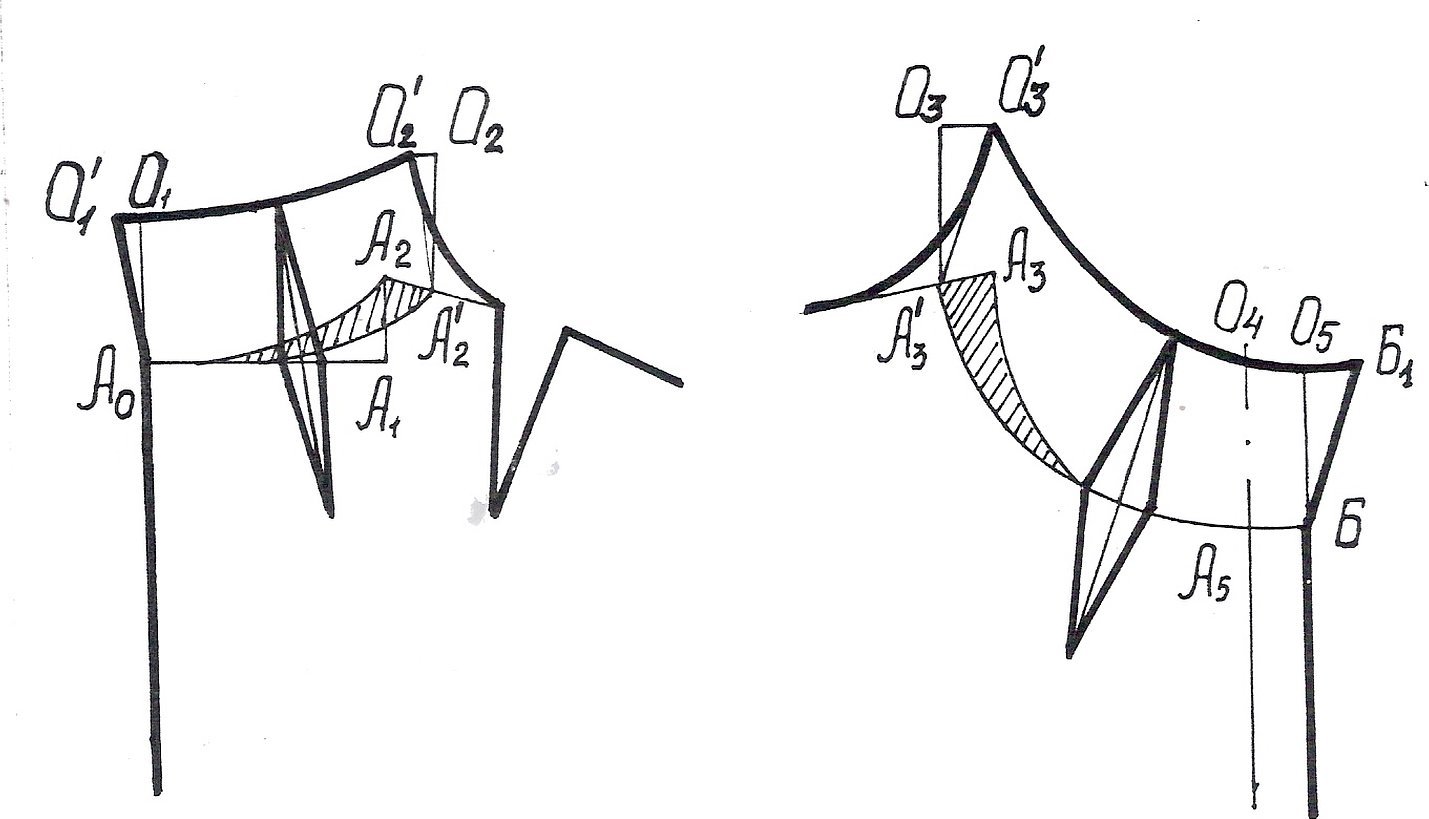
Products with a seam at the center of the back
There are variants of the garment detail that assume a single base with a shelf, but in this case the seam at the back of the element is used as a dart. How to cut out a stand-up collar with a seam in the center of the back:
- Connect the sides of the dart on the chest and temporarily move the straight lines to the side line.
- Turn the neckline over the shoulder of the front and back by 2 cm.
- In the center of the back, deepen the neck opening by 1 cm.
- Draw a new neckline on the back at a right angle to the center line of the front
- Draw an additional line passing through the extreme points of the enlarged neckline only on the shelves. Extend this pattern element so that it is equal to the length of the constructed back neckline.
- From the last point, draw a perpendicular to the auxiliary line 1.5 cm long. The distance is determined by the features of the model.
- The angle of the back of the collar depends on the value provided. Draw the line of the lower cut on the back. Draw the middle line at an angle of 90 degrees to the formed line.
From the top of the unfolded neck of the shelf, draw a perpendicular to the auxiliary line, along which to mark off the height. Along the middle line, mark off 4.5 cm. Draw the line of the upper cut of the collar.
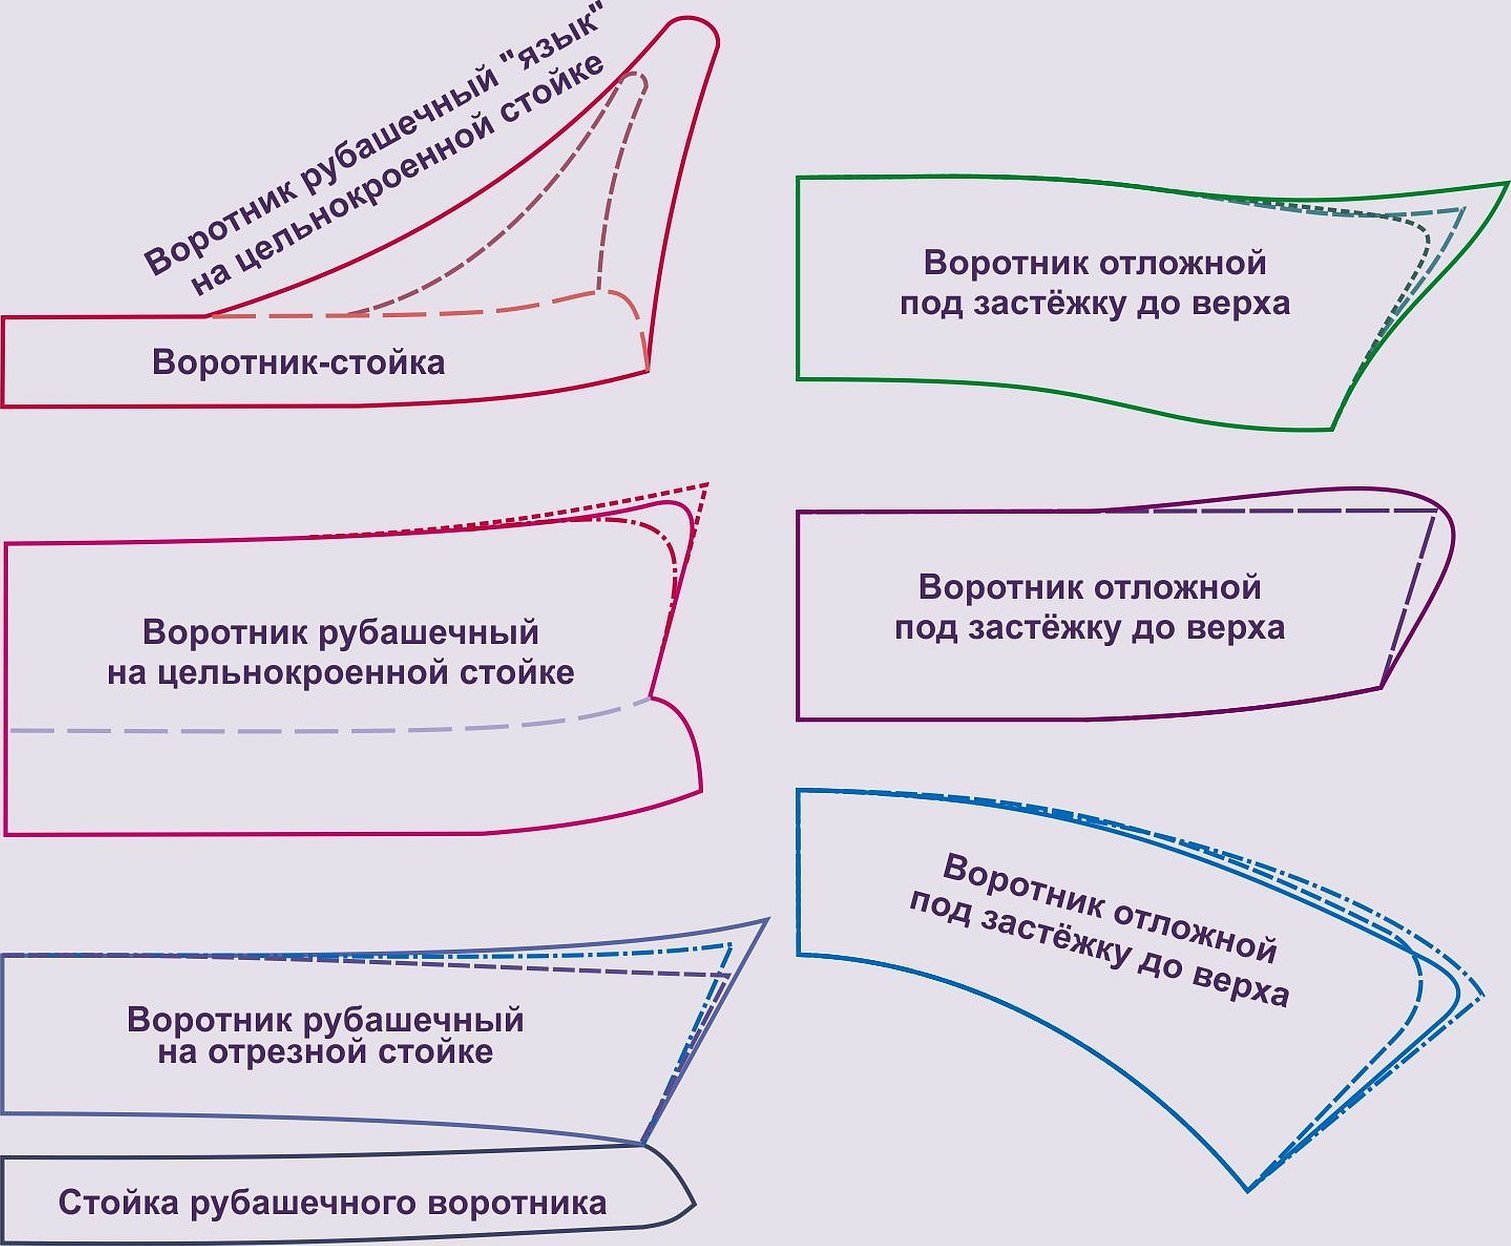
Turn-down collar with a cut-off stand
The turn-down collar with a cut-off stand looks absolutely unique and is suitable for modeling a jacket or blazer. The principle of creating a pattern:
- Increase the neckline in the shoulder, back and front areas by 2.5 cm.
- Additionally, the shelves are deepened by 4.5 cm and the back by 1 cm.
- A parallel is drawn relative to the middle of the shelf, which will determine the edges of the side.
- A line is formed that defines the bend of the lapel. Additionally, it is necessary to mark the places for the loops and buttons.
- The contour definitions of the lapels are depicted on the very shelf of the pattern.
- Construct a cut-off stand-up collar using a right angle. Measure the length of the updated neckline in the area of the front and back.
- Set aside this value along the horizontal line of the initial point. From it, set aside 3 cm vertically upwards to form the value of the front part rise and draw the lower cut. The height along the middle line will be 4 cm.
Check all cuts at the darts connection points, determine the direction of the warp thread and show it on the pattern.
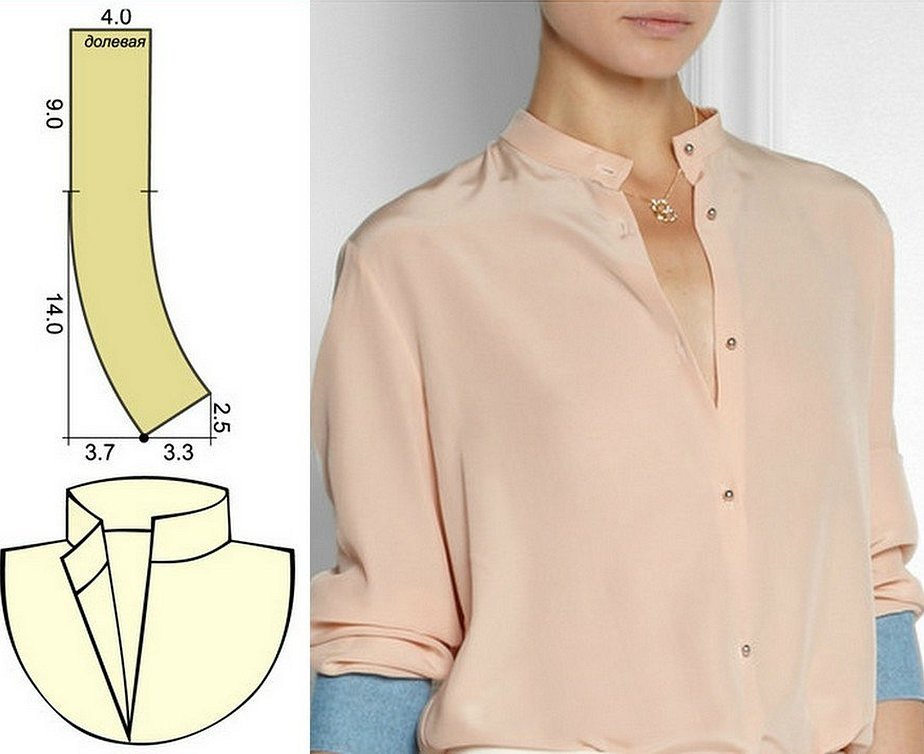
Shirt collar on a stand
The men's and women's version of the shirt stand is considered the most popular and simple in terms of cut. You can make calculations and make a preparatory modeling plan in accordance with this scheme:
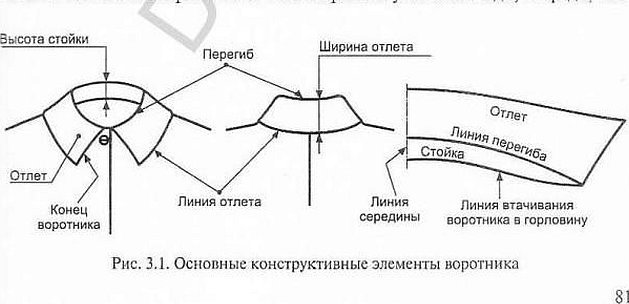
The collar pattern is prepared in accordance with the basic measurements and structures of the sketch. There are only 3 basic elements - the turn-down, the fold line and the collar stand itself. Having calculated all the parameters, you can get the ideal element of shirt decoration.
Rectangular stand-up collar
This collar is cut out in one piece as a rectangular strip. The grain line in this case should be at an angle of 45° to the collar stitching line. This is necessary for a beautiful, soft collar placement. It is advisable to widen the neck.
How to sew a rectangular stand-up collar:
- From the starting point, measure up two widths of the finished rack and place two base points.
- It is advisable to construct a pattern to determine ½ of the entire collar.
- From the first point a segment is constructed horizontally, and from point C another segment is laid off horizontally.
- Let's connect the base (horizontal) points of the first edge with a straight line.
- The bottom line is a fold.

To ensure that all parts of the product are even and uniform, it is worthwhile to accurately determine the parameters and draw lines with the required geometry.
Opening
First of all, you need to consider what material this particular garment is made of. If knitwear is used, then you need to take significant allowances for the seams so that the shape does not deform as a result of stretching the fabric.
The stand-up collar, the pattern of which is based on the basic rules of work, will be made as follows:
- Cut out a piece from paper.
- Apply the blank to the fabric.
- Transfer all lines and silhouettes onto textiles.
- Sweep and prepare the base elements.
Fur and other dense fabrics do not require significant seam allowances; additional fabrics are often used. They act as linings so that the main material lies more evenly.
Processing technology
Before sewing all the parts of the collar, it is worth doing some preliminary processing. The procedure is as follows:
- First you need to glue the collar.
- The parts are being ground down.
- The allowances are ironed out.
- The lower and upper pillar parts are fixed.
- The stitching is done on a sewing machine.
- Turning the edges of the collar.
Important! If natural material is used, then you cannot count on its flexibility.
Other stages may be present if the model is too complex in terms of shape or size.
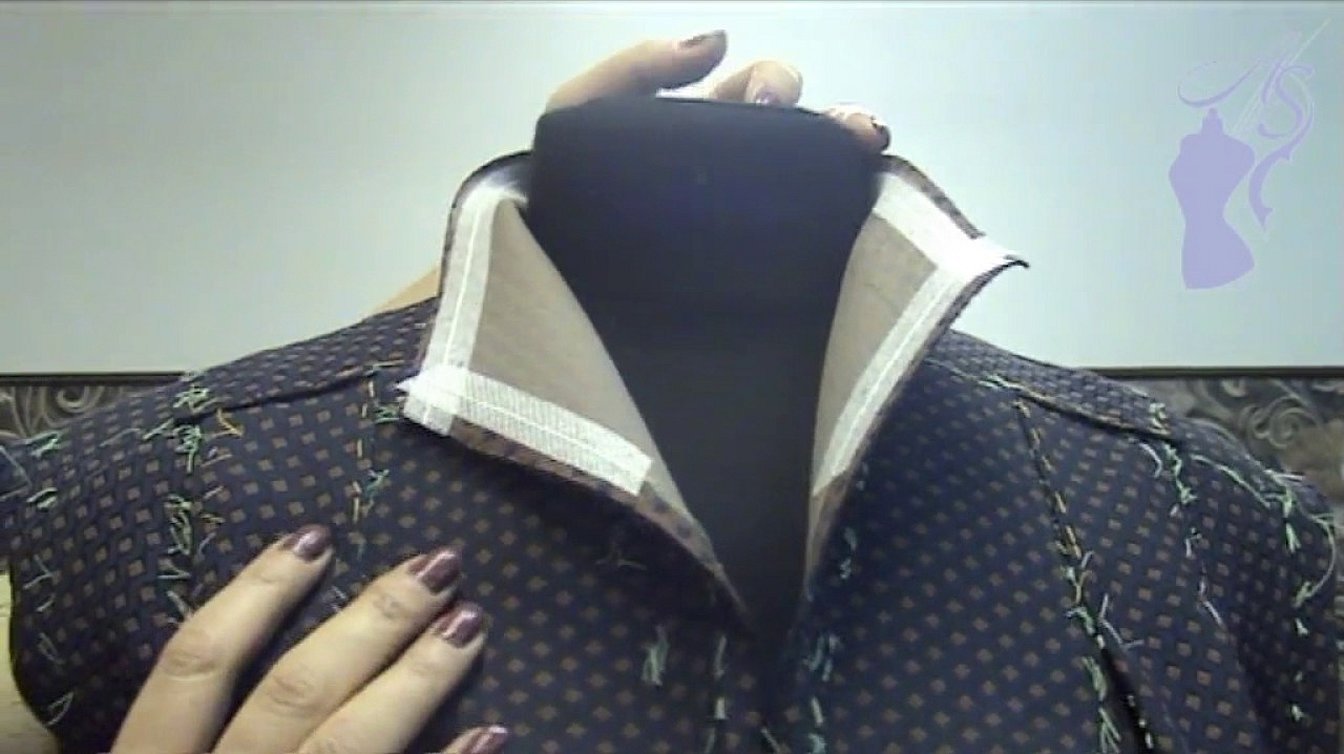
How to sew a collar to a shirt
The stage of how to sew a collar into a shirt remains difficult. But this problem can be solved quickly and easily. How to sew a collar to a shirt step-by-step instructions for beginners and experienced needlewomen:
- Stitch the already assembled collar on the machine to obtain the width of the allowance for sewing in.
- Cut off excess material and turn the stitching inside out.
- Attach the element to the shirt by threading the needles through the stitching.
- Sew the parts together.
It doesn't matter whether you are preparing a collar pattern for a dress, shirt, fur coat or jacket, if the basic patterns are already ready. The modeling procedure can be completed in 1-2 hours. You will get an original stand-up collar with an elegant distinctive element.


