Every adult has worn a T-shirt at some point, but this wardrobe item only became popular in the 1950s with the release of Marlon Brondo's films. And now half of Americans own more than ten of these items. Folded in a row, they would circle the equator 34 times. Here are the mechanisms for making this popular wardrobe item.
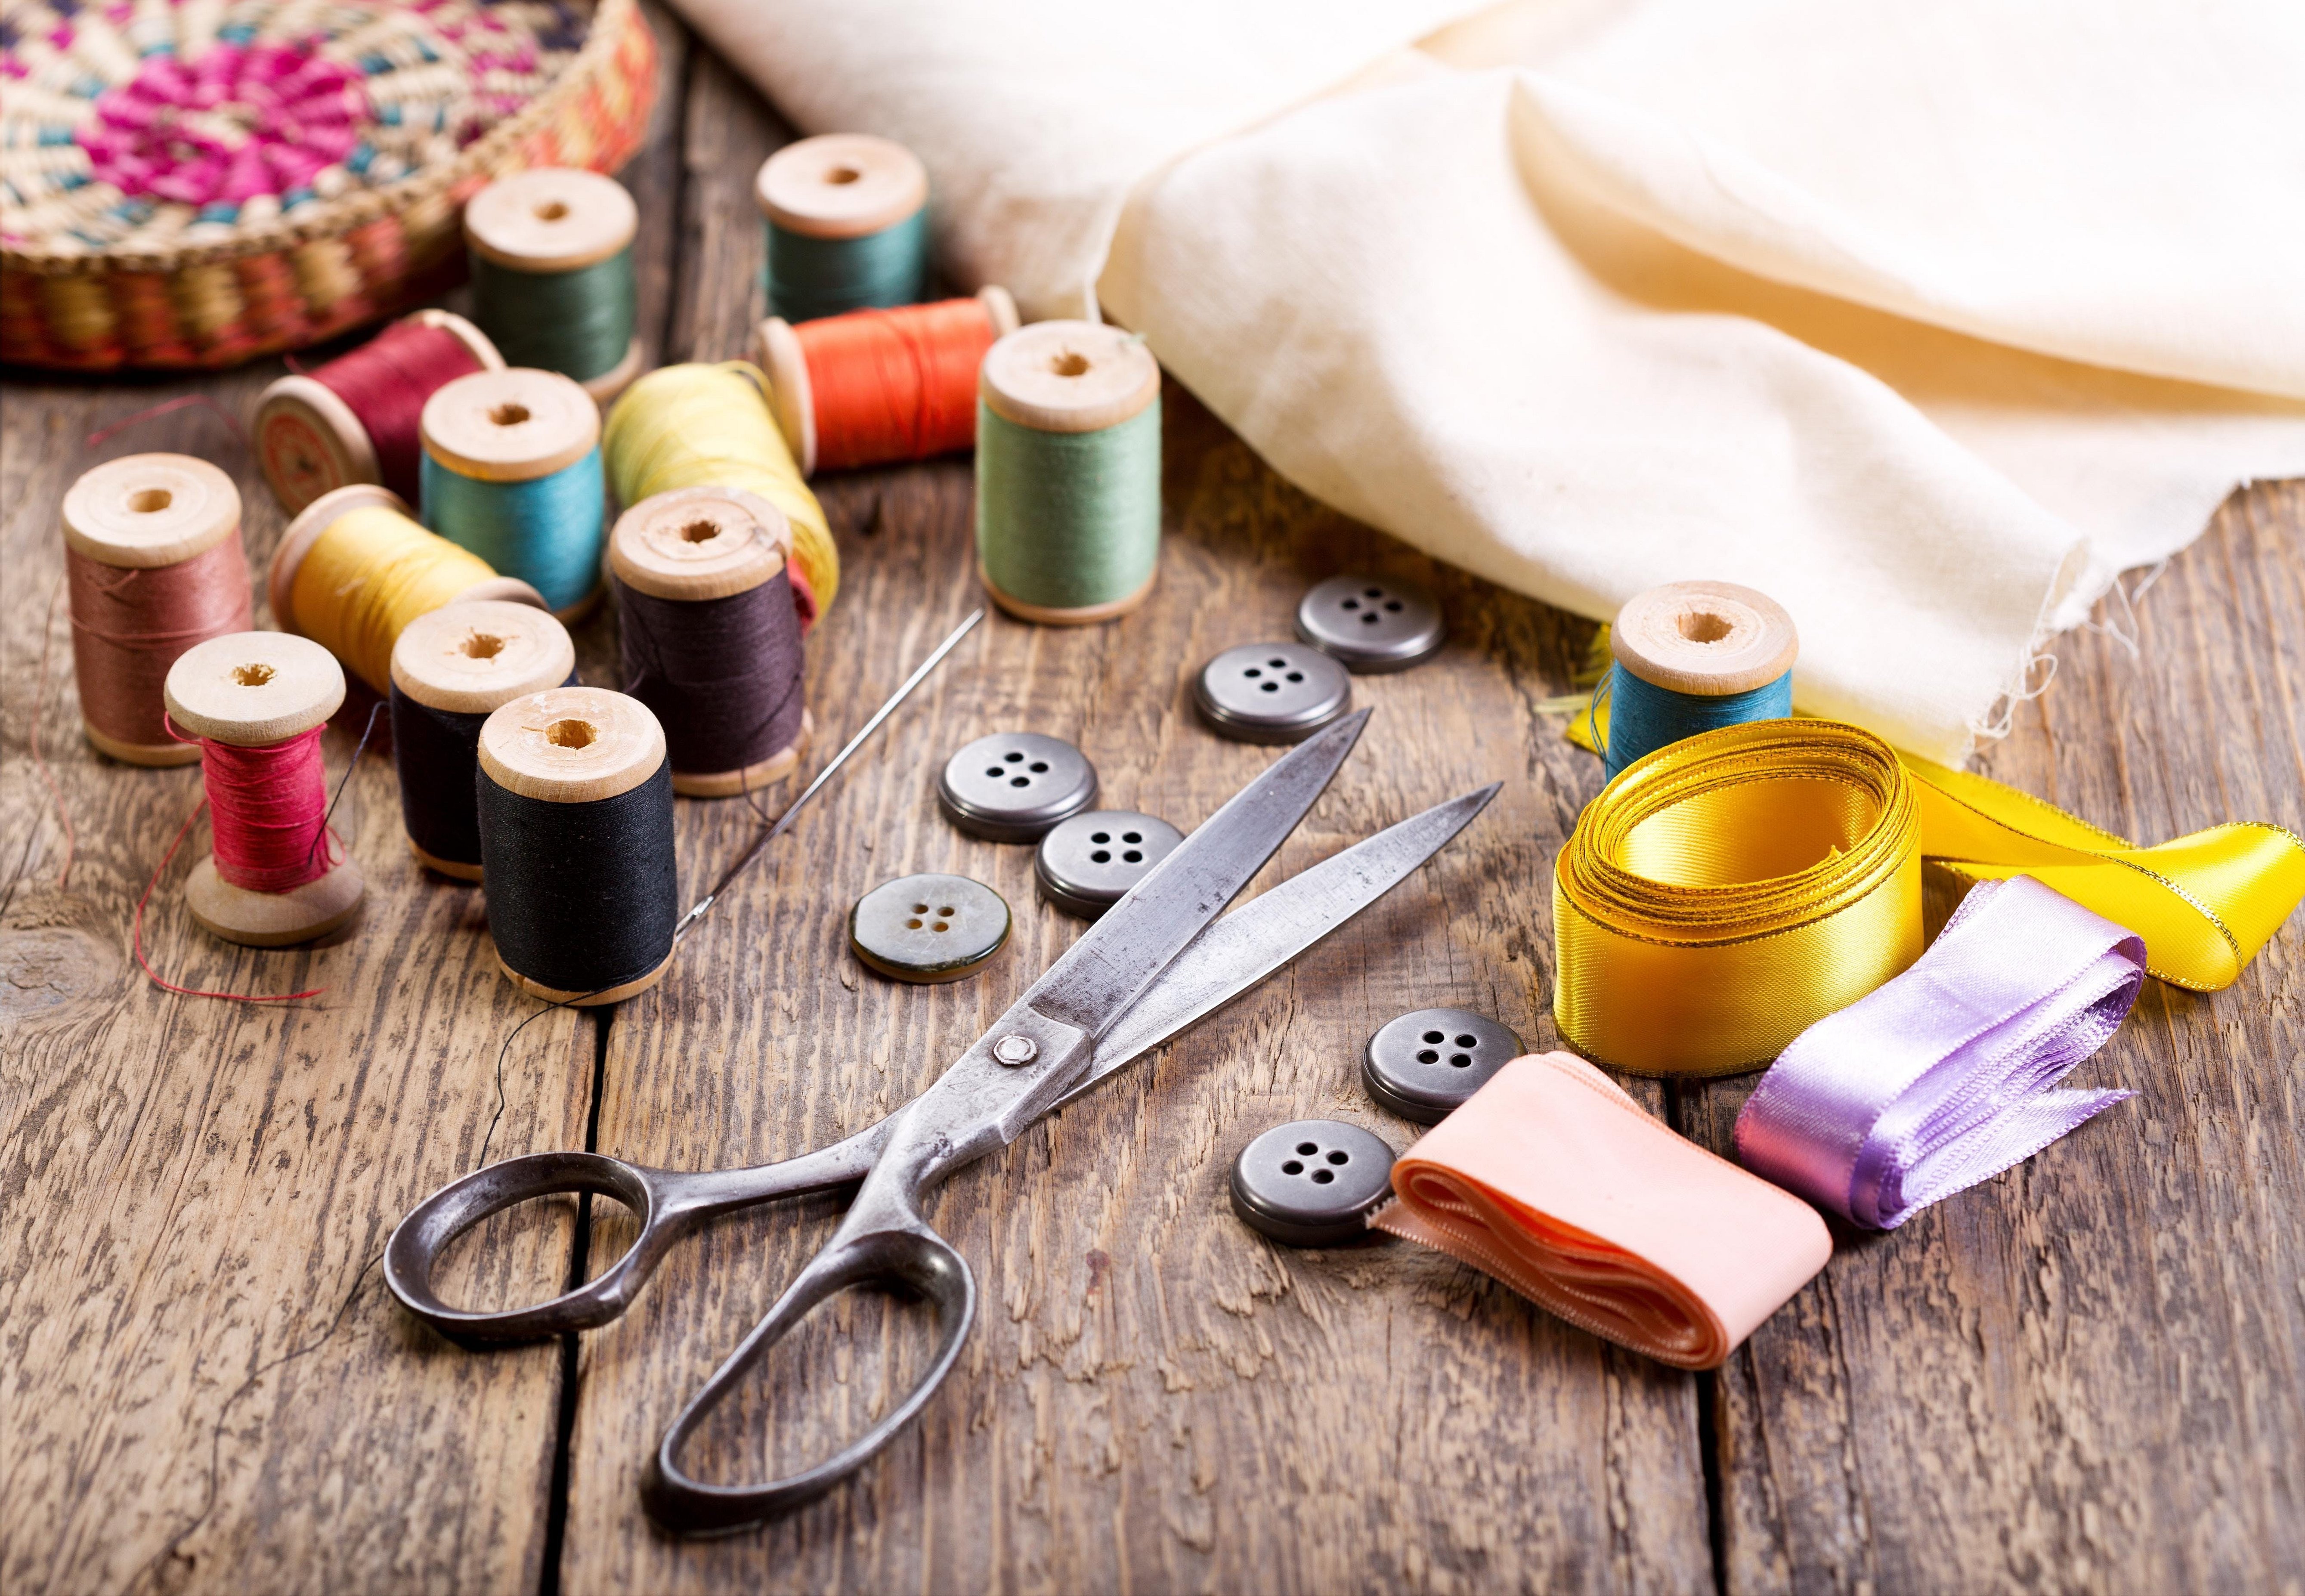
Preparation of materials and tools
The following may be useful when sewing:
- Sewing machine.
- Iron with steam function.
- Ironing board.
- Scissors that cut fabric and paper.
- Nippers - to cut threads.
- Centimeter.
- Transparent ruler 40 cm.
- A roll of tracing paper 50 cm wide.
- Pins (tailor's, safety pins).
- Magnet for pins.
You can print out the patterns and cut them out of cardboard.
- Tailor's chalk, a thin piece of soap, a stationery knife.
- Ripper.
- Needles for sewing machine.
- Pincushion.
- A product that prevents fabric edges from fraying.
- Pattern (can be from a magazine).
- Box (to store threads).
Choice of fabric
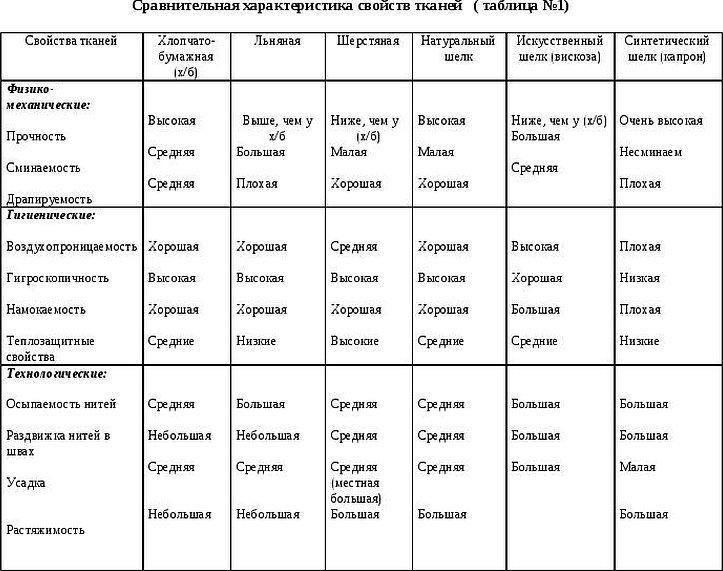
The fabric of a children's T-shirt should not only be beautiful and interesting. When choosing, you need to pay attention to the degree of its air permeability, hygroscopicity, so that the clothes made from it do not cause discomfort. Hygiene and hypoallergenicity are also important characteristics.
When choosing, the comfort of the fabric for the body and practicality are also taken into account. T-shirts are usually sewn from light knitted materials such as interlock, pique, etc. The composition of the knitwear varies. Cotton and linen are very popular. Products made from them are light and breathable, they look stylish, and they are easy to care for.
Sometimes fabrics are used that contain, in addition to natural threads, polyester and elastane fibers.
Viscose also deserves attention.
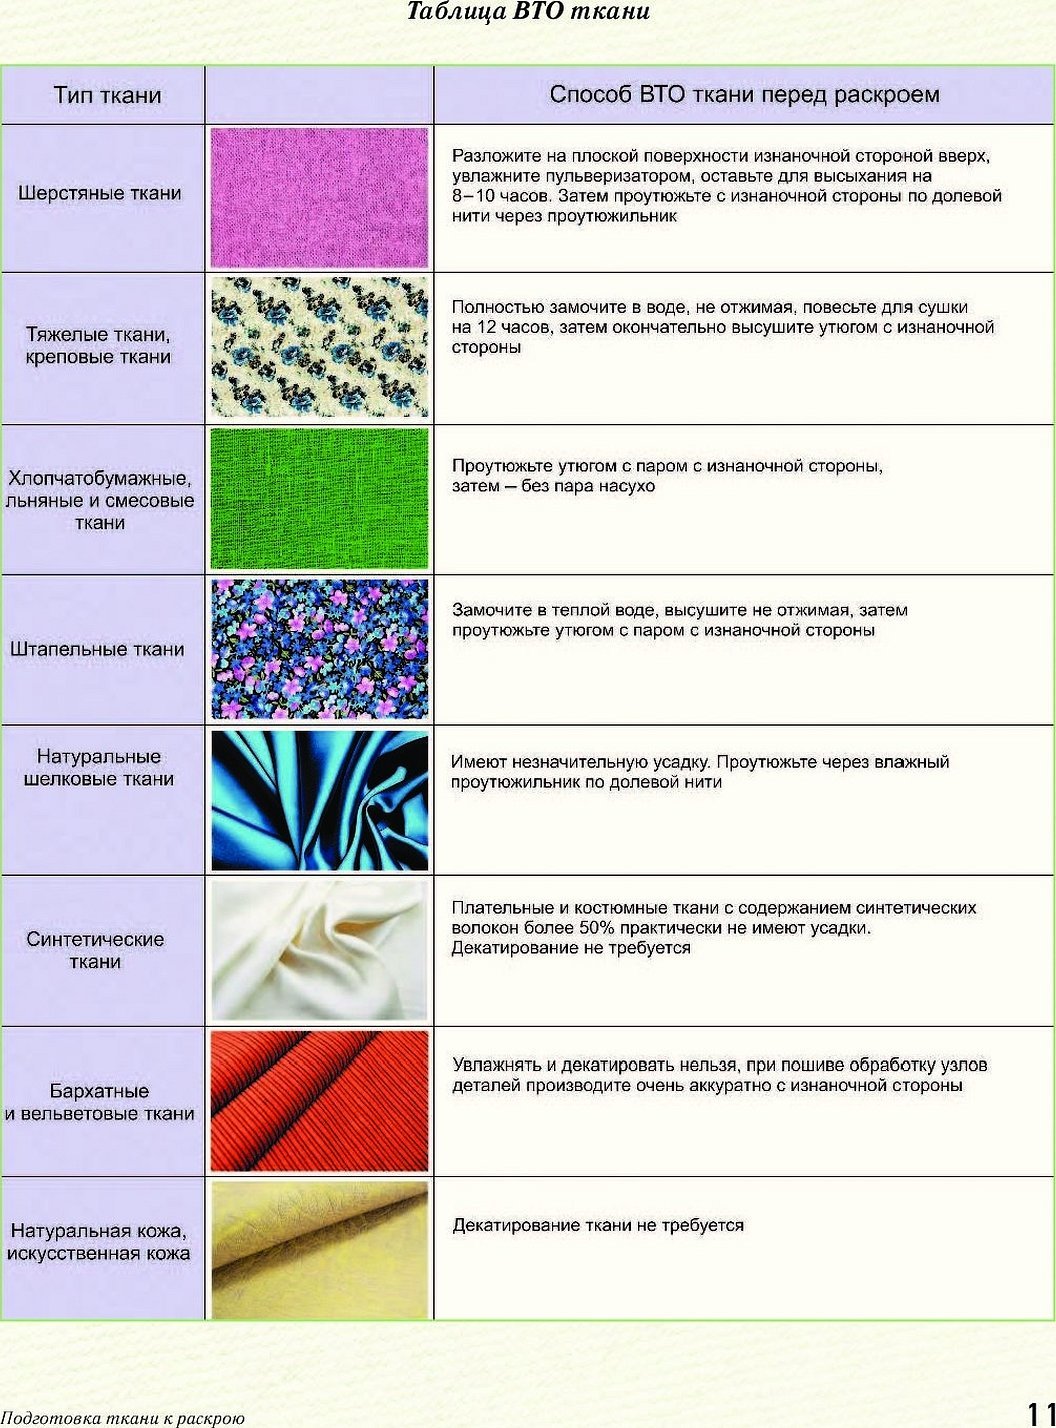
The table shows the characteristics of some fabrics:
Necessary measurements
To make a pattern for a girl's T-shirt, you will need the following measurements:
- Half-girth of the neck (HG): the measurement is taken from the level of the 7th cervical vertebra at the level of its base to the jugular notch.
- Half-chest girth (Сг) - the tape goes around the body at chest level parallel to the floor. The resulting value is divided in half.
- Half waist circumference (W) - Use a centimeter to encircle the body horizontally through the thinnest part of the abdomen. The resulting parameter is divided in half.
- Half hip circumference (H) - measured parallel to the floor through the places of maximum protrusion of the buttocks and abdomen. The measurement result is divided in half.
- Chest width (ChW) - measured between the front borders of the armpits.
- Back length (BL) - from the 7th cervical vertebra along the spine to waist level.
- Length of the front part to the waist line (LFA) - is determined vertically from the jugular fossa to the waist level. In young children, the values of LFA and LFA are the same.
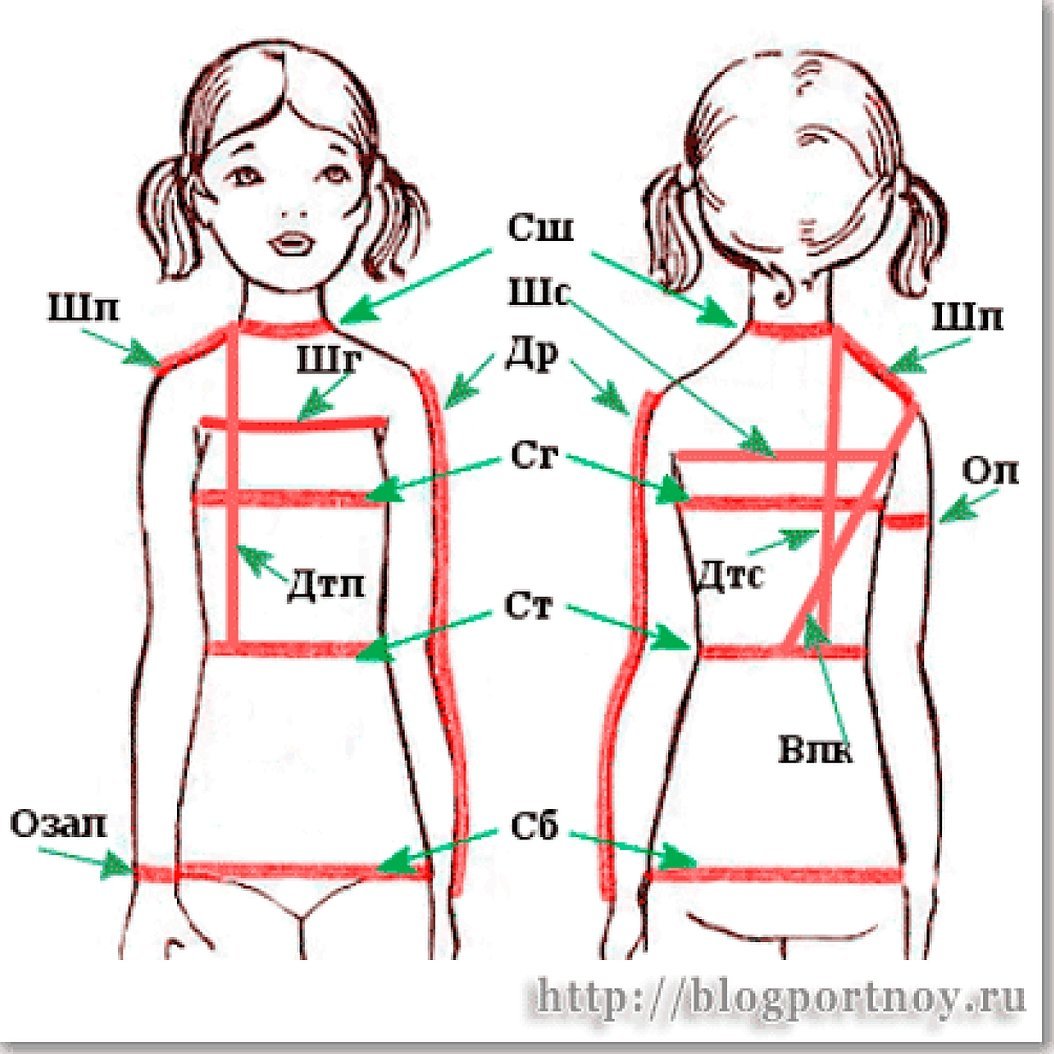
- Chest height (Bg) - measurements as in a traffic accident, but up to the convex point of the chest.
- Back armhole height (depth) (Bprz) - from the highest point of the shoulder seam to the back armpit.
- Oblique shoulder height (OSH) - from the extreme point of the shoulder to the intersection of the spine with the waist.
- Back width (BW) - the distance between the armpits on the back is measured.
- Shoulder width (Shp) is the distance of the future shoulder seam, the horizontal line between the base of the neck and the edge of the shoulder.
- Sleeve length (L) - from the shoulder edge along the outside of the arm to the chosen place.
- Shoulder girth (SG) - parallel to the floor around the widest circumference of the arm.
- Wrist circumference (WC) is the circumference of the wrist line.
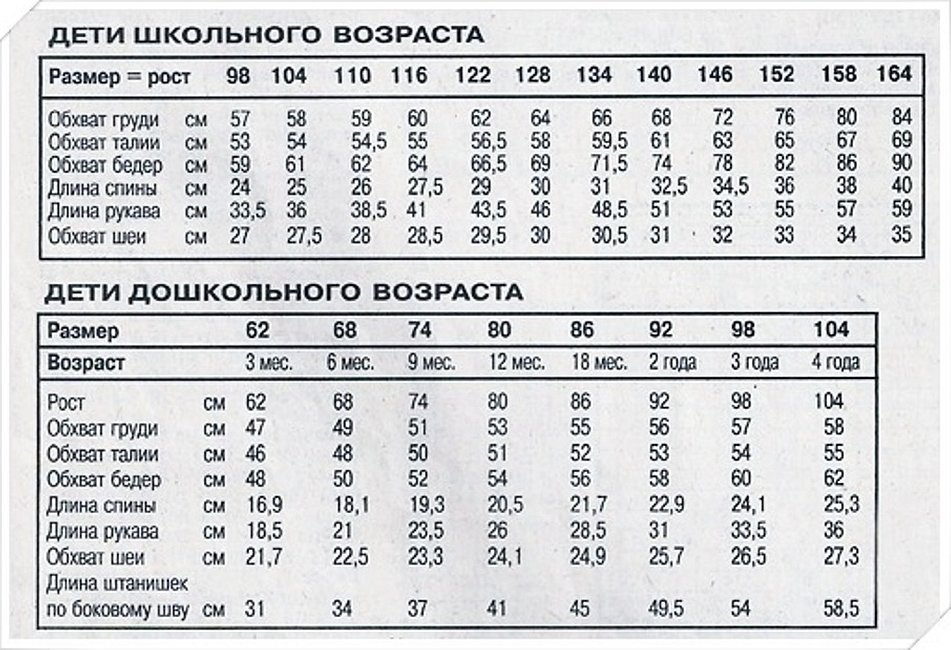
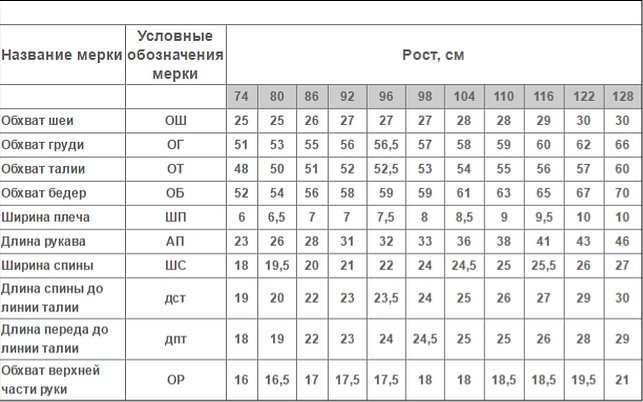
Basic measurements can be determined from the tables, knowing the baby’s height.
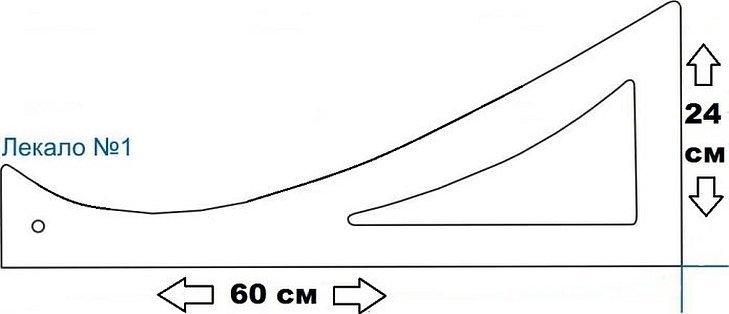
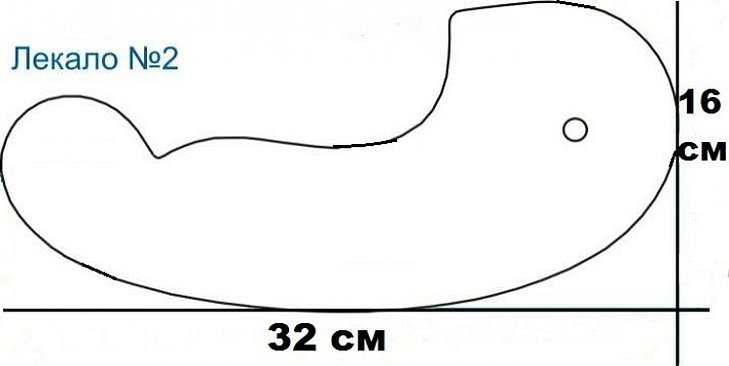
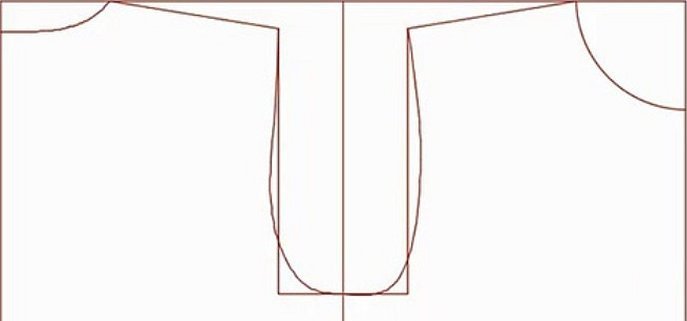
Pattern for a children's T-shirt
Below we will look at the procedure for making a simplified version of this pattern.
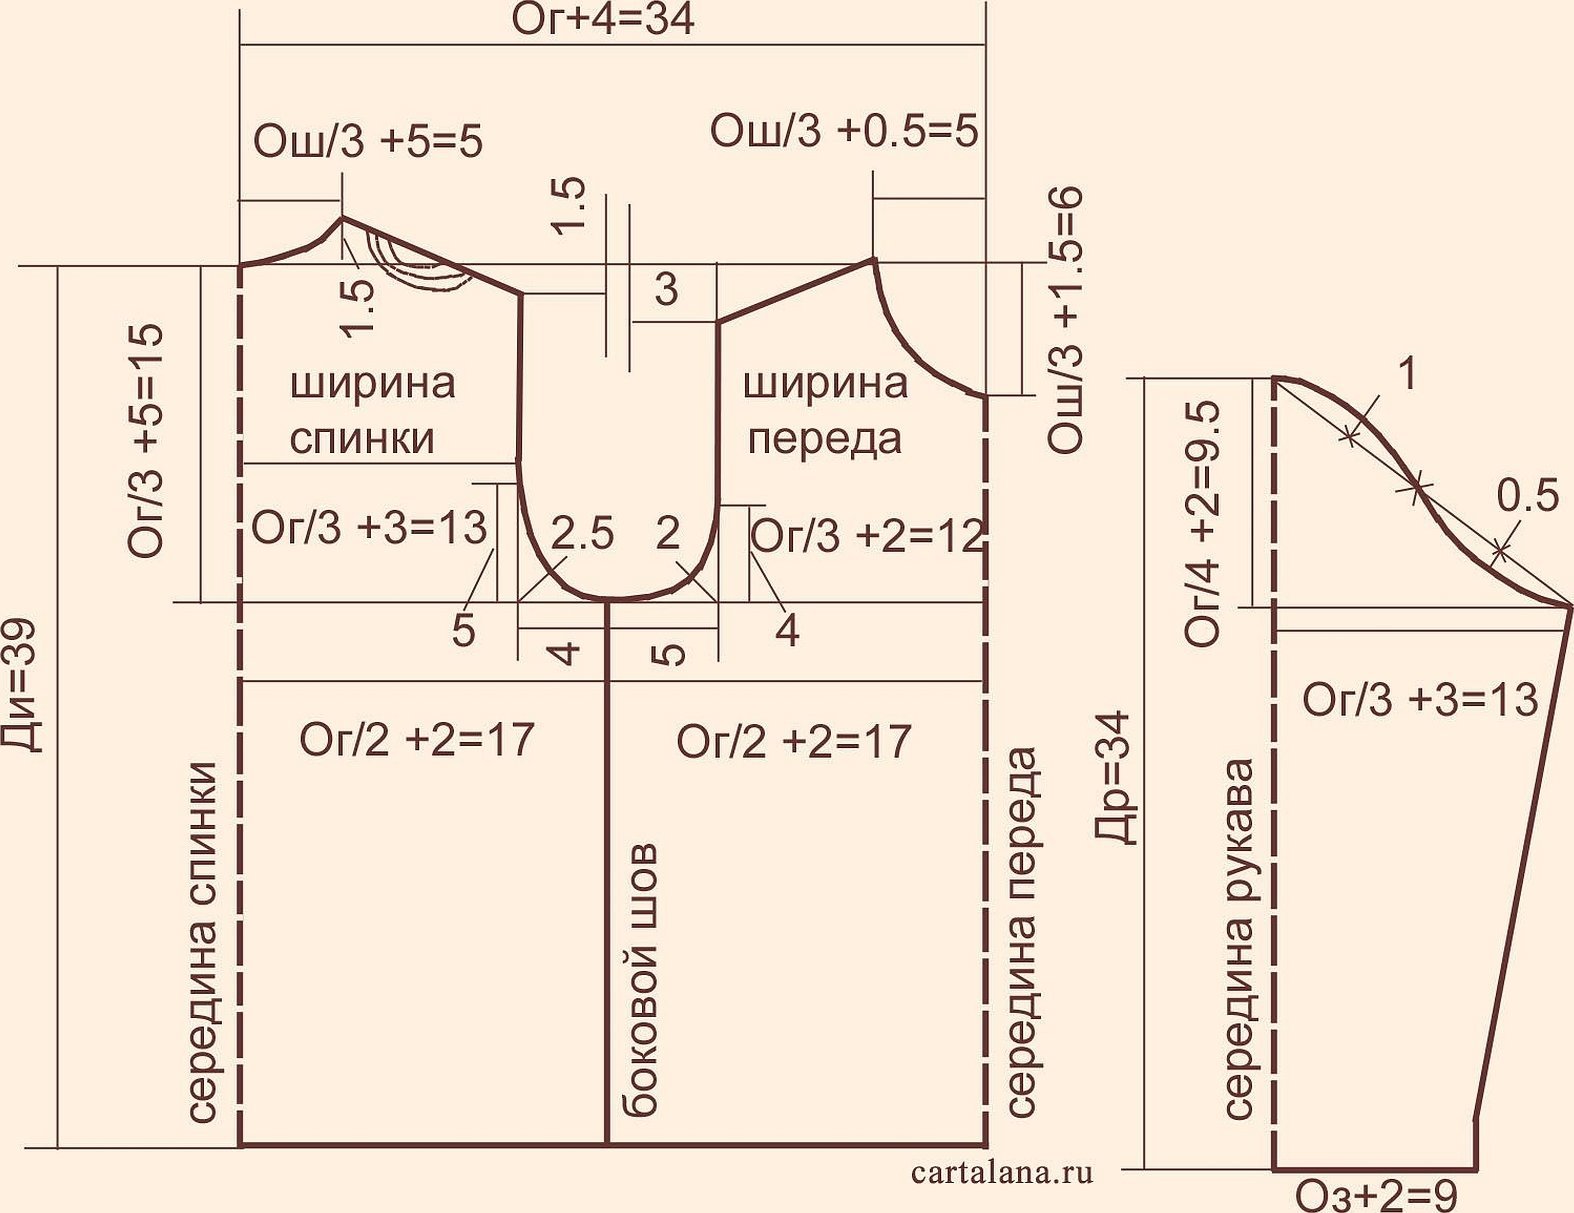
- A rectangle is constructed. Its width is equal to 12 half-girth of the hips + 2-4 cm, length = length of the finished product.
- From the top corner, measure the width of the neck (Osh5), the length of the neck (at the back it is enough to lower it by a couple of centimeters, at the front it can be equal to the width).
- The point corresponding to the edge of the shoulder is lowered by 1.5–2.5 centimeters and connected to the edge of the neckline by the shoulder line.
- The length of the shoulder is measured from the neckline along this line.
- From the end of the shoulder, a line of armhole depth equal to the width of the sleeve at the top - 1 centimeter - is drawn down.
- The armhole line is drawn smoothly
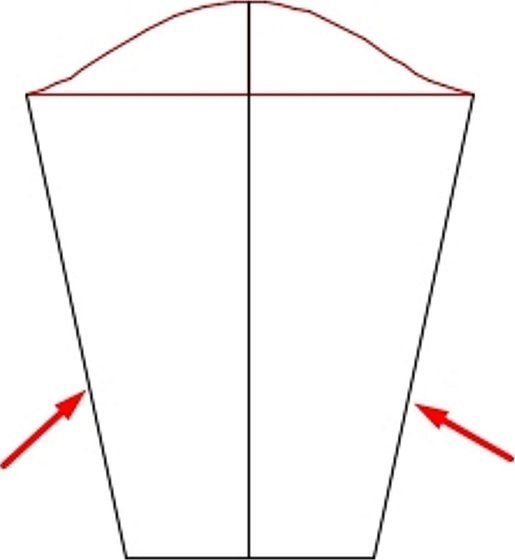
How to build a sleeve
The order of constructing the sleeve:
- A horizontal line equal to the sleeve width is drawn. In the middle, perpendicular to it, a line of the armhole height (5-8 cm) is constructed.
- The armhole is constructed. To construct it, you can attach a ready-made pattern and trace the armhole contour.
- The armhole length and the sum of the armhole lengths (front and back) are compared. If there is a discrepancy, the patterns are adjusted (armhole height, sleeve width, armhole contour).
- The length of the sleeve is measured from the top point of the armhole.
- A line of the width of the lower edge of the sleeve is drawn perpendicular to it.
- The side lines of the sleeve are drawn, connecting the extreme points.
1.5–2 centimeters down from the neckline are set aside for the collar.
How to sew a children's T-shirt
The pattern for a boy's T-shirt is similar to the pattern for a T-shirt, but it has no sleeves and a deeper front neckline.
How to cut out a children's t-shirt
The pattern of a children's T-shirt is often made of knitwear. Cotton fabrics have excellent characteristics, but are prone to shrinkage by 3-5%. To prevent shrinkage, decatization is performed before cutting. The fabric is moistened with water (it is possible to add vinegar to fix the pattern) and dried. Then it is ironed in the direction of the warp thread (parallel to the edge).
Important! If there are any dirty spots on the fabric, it must be washed before ironing.
Next, the fabric is examined for stains, lack of color, holes, and lack of weave. The defective areas are outlined on the reverse side with chalk and taken into account when cutting.
Select the front side, the direction of the pattern, the pile. Lay the fabric face down. Lay out the pattern pieces on it (first the large ones, then the small ones), pin them, and trace with chalk exactly along the outline.
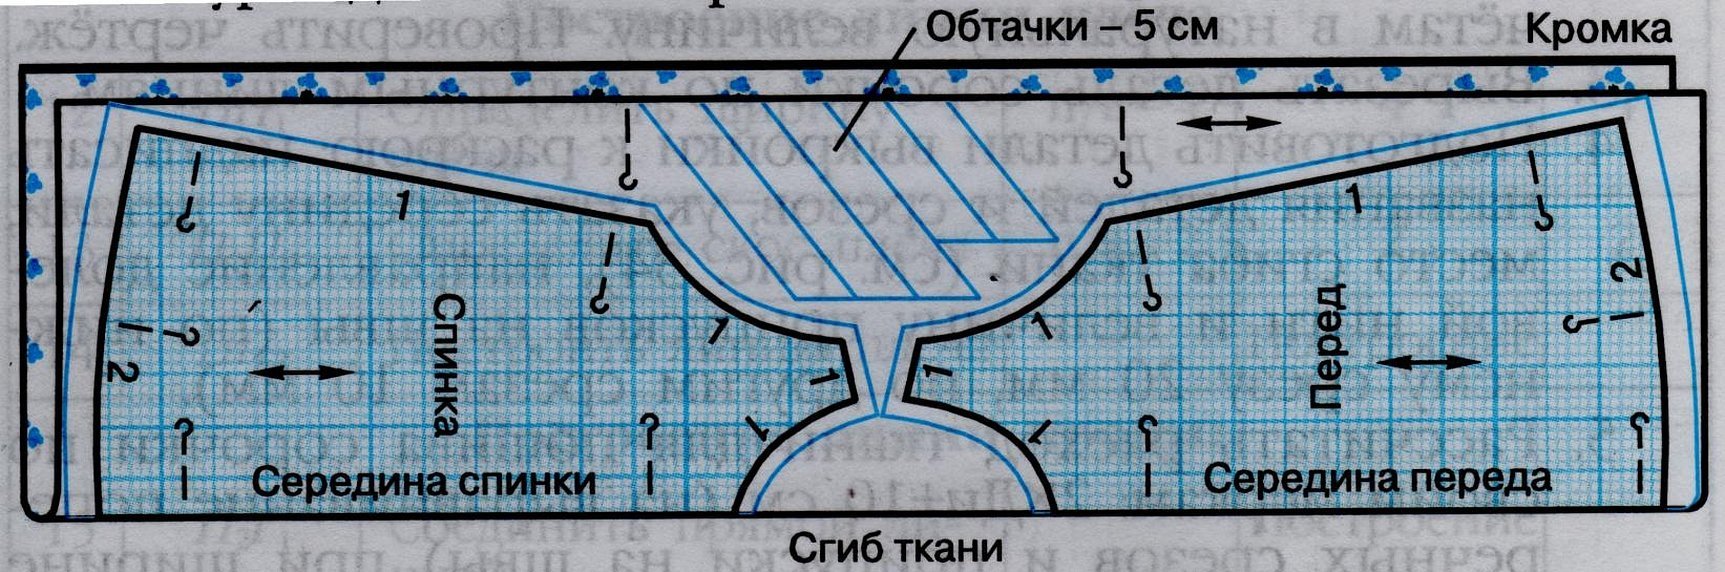
Allowances are made: 3 centimeters along the free edges of the product, 7-15 mm along the seams. The size of the allowance for the seams is determined by the method of joining the parts, if the product is sewn with overlock stitches and - 7 mm is enough.
Finally, the product parts are cut out.
For a boy
The pattern of a T-shirt for a boy is not much different from the patterns of products for girls. They are usually cut out of cold-toned fabrics. They also often wear sleeveless T-shirts.
For a girl
T-shirts for girls are often decorated with rhinestones, appliques, and frills. The color of the fabric of the products is often chosen to be warm. A pattern for a tank top for a girl can be created based on a pattern for a T-shirt.
How to sew a t-shirt
The order of sewing a T-shirt:
- The shoulder seams are sewn.
- The sleeve is sewn to the armholes.
- The side seams are sewn together with the sleeve seams.
- The free edges of the product are overcast. They are turned under and hemmed.
- The length of the neck is measured (without stretching).
- An elastic band 2 centimeters shorter is sewn to it. First, on one side, then it is folded, ironed and sewn on the other side.
Even a novice needlewoman can master sewing a children's T-shirt with a one-piece sleeve without a pattern.
Sequence of actions:
- Take a ready-made T-shirt of the appropriate size.
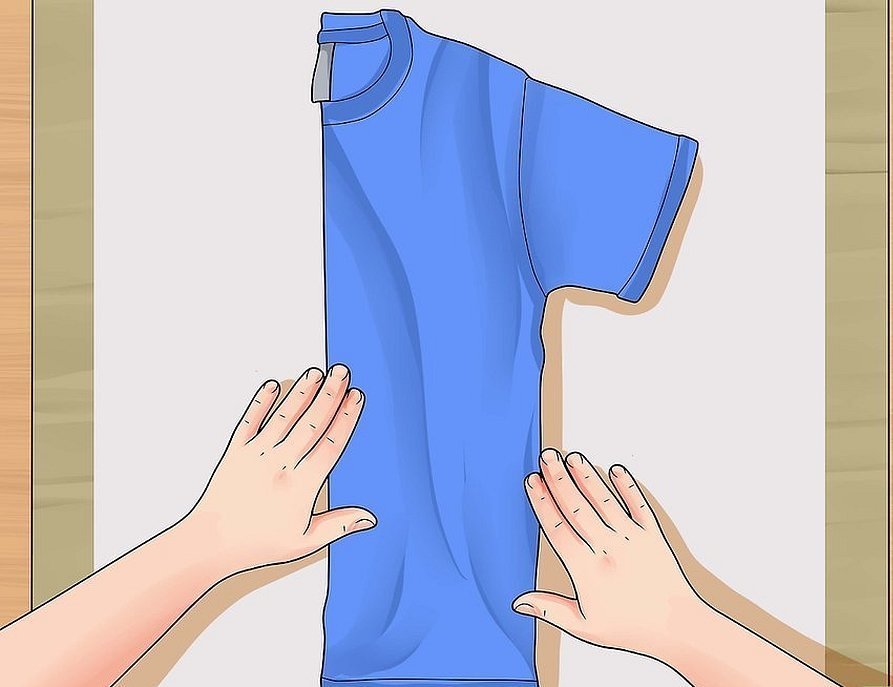
- Fold the knitted fabric in half.
- Fold the sample T-shirt in half and place it on the knitwear so that the folds match.
- Pin, trace the outline with some extra space, cut out.
- Using the resulting piece, cut out another piece of fabric.
- Deepen the neckline on the front piece, comparing it with the sample T-shirt.
- Place the pieces right sides together, join one shoulder seam.
- Sew on the neckline detail.
- Sew the second shoulder seam.
- Finish the bottom of the T-shirt and the edges of the sleeves.
- Sew side seams.
The T-shirt can also be modernized by cutting out an original pattern on the back, adding ribbons, bows, appliques, making a raglan sleeve, modifying it into a tunic, decorating it with rhinestones, beads or embroidery, a girl can sew a T-shirt with a partially open back. A product made with your own hands will always please a person, because it is selected and created in strict accordance with all his requests. Its cost will also be significantly lower than a store-bought one.


