Today, you can find a variety of vests on store shelves: classic ones that go with a business suit, fur ones, ethnic ones. But a sleeveless jacket has never been a mandatory item of a woman's or man's wardrobe, it was rather regarded as a decorative element for creating an interesting and stylish look, adding some zest to it. Next, let's look at how a pattern for a vest is constructed and how you can model the desired item yourself.
- Models
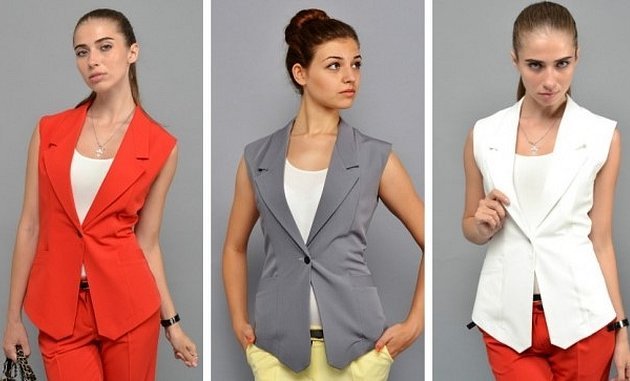
- Vest with collar
- Long fitted women's
- Classic men's
- School vest for girls
- Vest for a boy
- Wrap Vest Pattern
- Building a Basic Pattern
- Simple sewing technology
- Processing of armholes, necklines and sides
- Basics
- Pattern on the base
- Construction of the armhole
- Armhole adjustment
- Back
- Trimming facings and facings
- How to sew a vest quickly
Models
Sleeveless jackets differ in models, types of cut and materials. The item can be long, short, women's, men's, children's, leather, cotton, drape, etc. It is no longer an item of clothing, but an accessory that emphasizes the figure and style.
Vest with collar
As a rule, this model is sewn in a strict official style of dark shades, but in different cases, bright elegant fabrics can be used for this. Vests can be decorated with beads, embroidery or other decorative elements. As a result, the product will look very original and elegant.
To construct a pattern, you need to take and record measurements:
- Og - chest circumference;
- From - waist circumference;
- OB - hip circumference.
Important! Depending on the given values, a pattern is constructed, taking into account seam allowances of 1-2 cm, otherwise the product will be small.
Long fitted women's
Such a vest can be sewn together with a belt, which will emphasize the waistline. The pattern of a women's vest is constructed after taking the necessary measurements. It is also necessary to prepare the fabric from which the product will be sewn, take all the necessary measurements, and make the lining from viscose. A long and fitted vest differs from a regular pattern only in its extended length and the presence of darts for a fitted silhouette of the product. The darts must be made at the chest and waist level. The facing of the neck and armhole is done in the same way as on a regular classic vest. Below is a list of parts for cutting a sleeveless jacket from the main fabric:
- middle and side parts of the shelf;
- middle and side parts of the back;
- underlay;
- pocket flap;
- back neck facing;
- back armhole facing;
- facing of the armhole of the shelf;
- belt;
- pocket piping.

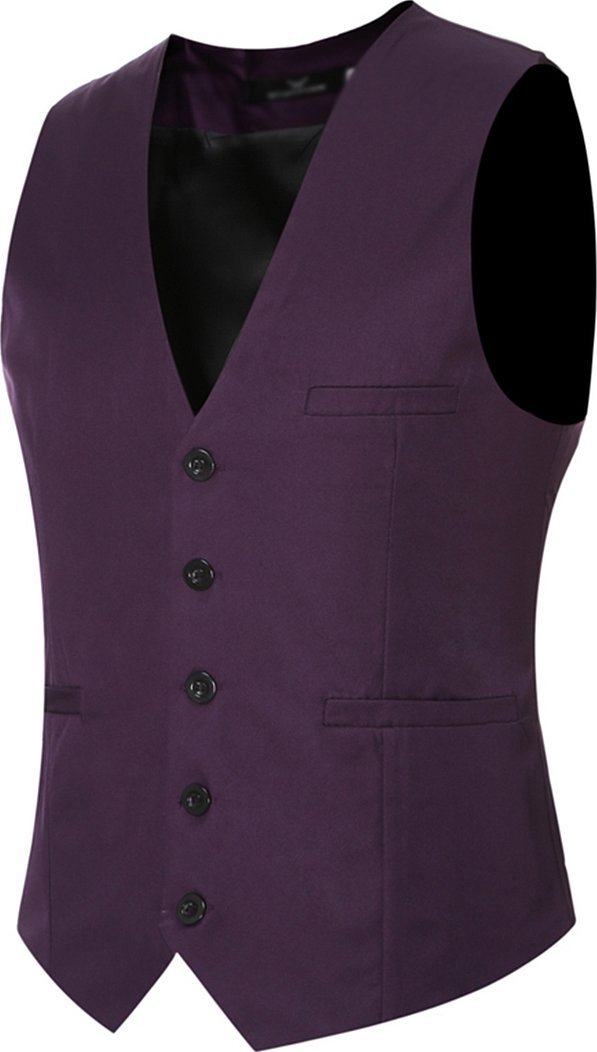
Classic men's
This vest differs from the women's only by the pattern of a different style. It is usually a necessary part of a men's three-piece suit. To sew it, you will need: the main fabric, lining fabric, buttons and a buckle. A men's vest is easy to sew, it will take 3-5 days depending on the skill level. The vest pattern is constructed quite simply and requires general knowledge of working with fabrics and constructing a pattern. Unlike jackets, there are no sleeves and the silhouette itself is very simple to sew with a couple of darts.
School vest for girls
The pattern is constructed in the same way as in classic vests, only in children's sizes. You can wear a turtleneck, blouse or shirt under it. Sewing a vest for a girl is very simple. Now on the Internet there are a lot of training videos and master classes. The product can be the main attribute of a children's school uniform. Sewing it according to ready-made patterns will not be difficult. Or you can make a pattern yourself according to your measurements so that the vest fits the child. You also need to choose the fabric for sewing, and draw a pattern on it in half of the product so that it is mirror-image identical. After all the calculations and cutting out all the details, they are sewn together one by one.

Vest for a boy
The only difference between a boy's waistcoat is the absence of darts at the waist and chest, as well as more restrained dark colors. That is, pink and fitted waistcoats are not sewn for boys. They are most often black, dark blue or gray with 2-3 buttons without other decorative elements. The pattern of a man's waistcoat is slightly different from a woman's in the type of structure and the absence of darts.
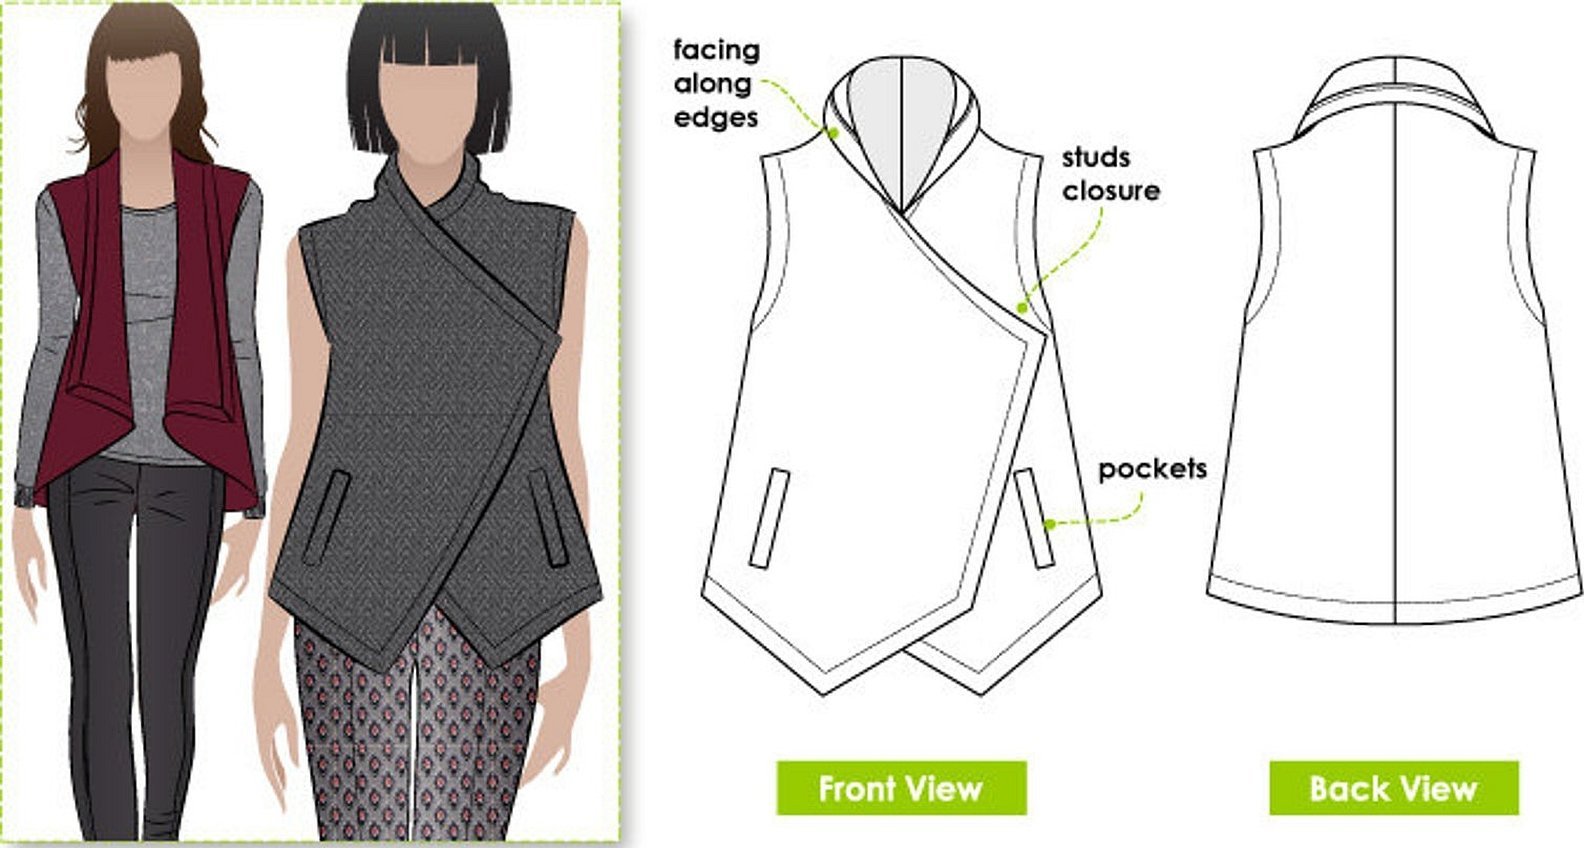
Wrap Vest Pattern
Vests of this style are usually made of thick fabrics. The wrap-around model looks like a regular one, but one side overlaps the other, and buttons may be missing altogether. The length of such a product varies depending on the customer's preference and the availability of fabric.
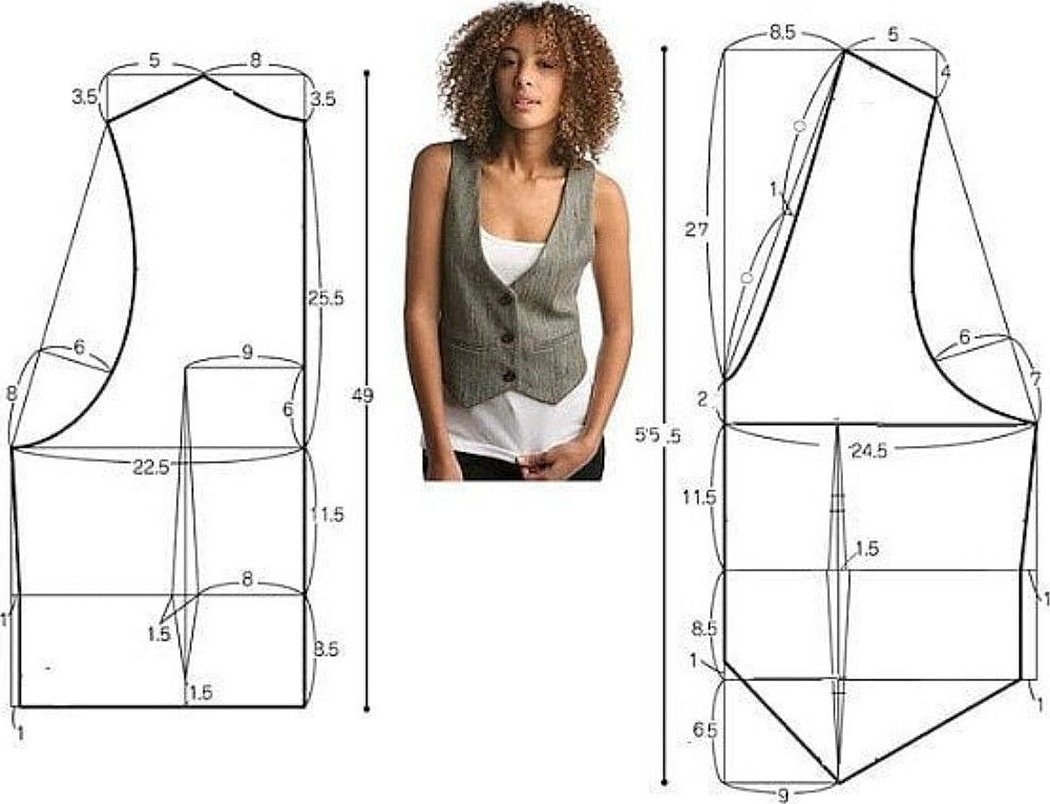
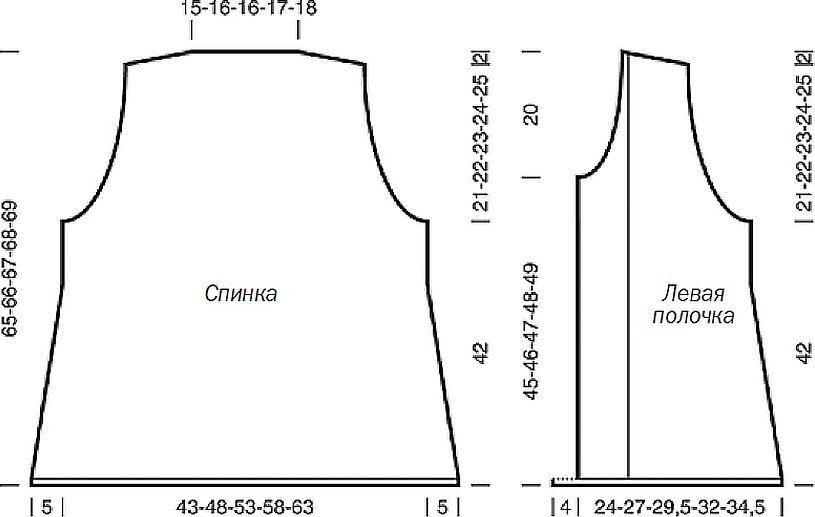
Building a Basic Pattern
There are a great many variations of vest execution, but each of them is based on a basic pattern, which is then modified and modernized for each style. It is made up of the left and right front parts, and the back part of the vest. They are cut out with a 1 cm seam allowance. Then they are joined together with a basting stitch. Machine stitching is done along these seams, and the basting stitches are removed.
Simple sewing technology
The answer to the question of how to sew a vest will be below. For beginner seamstresses, a simplified version of sewing this item has been developed. It is simple and fast, even if you have no experience in sewing items yourself. Here are the main points to consider in the process of creating a vest:
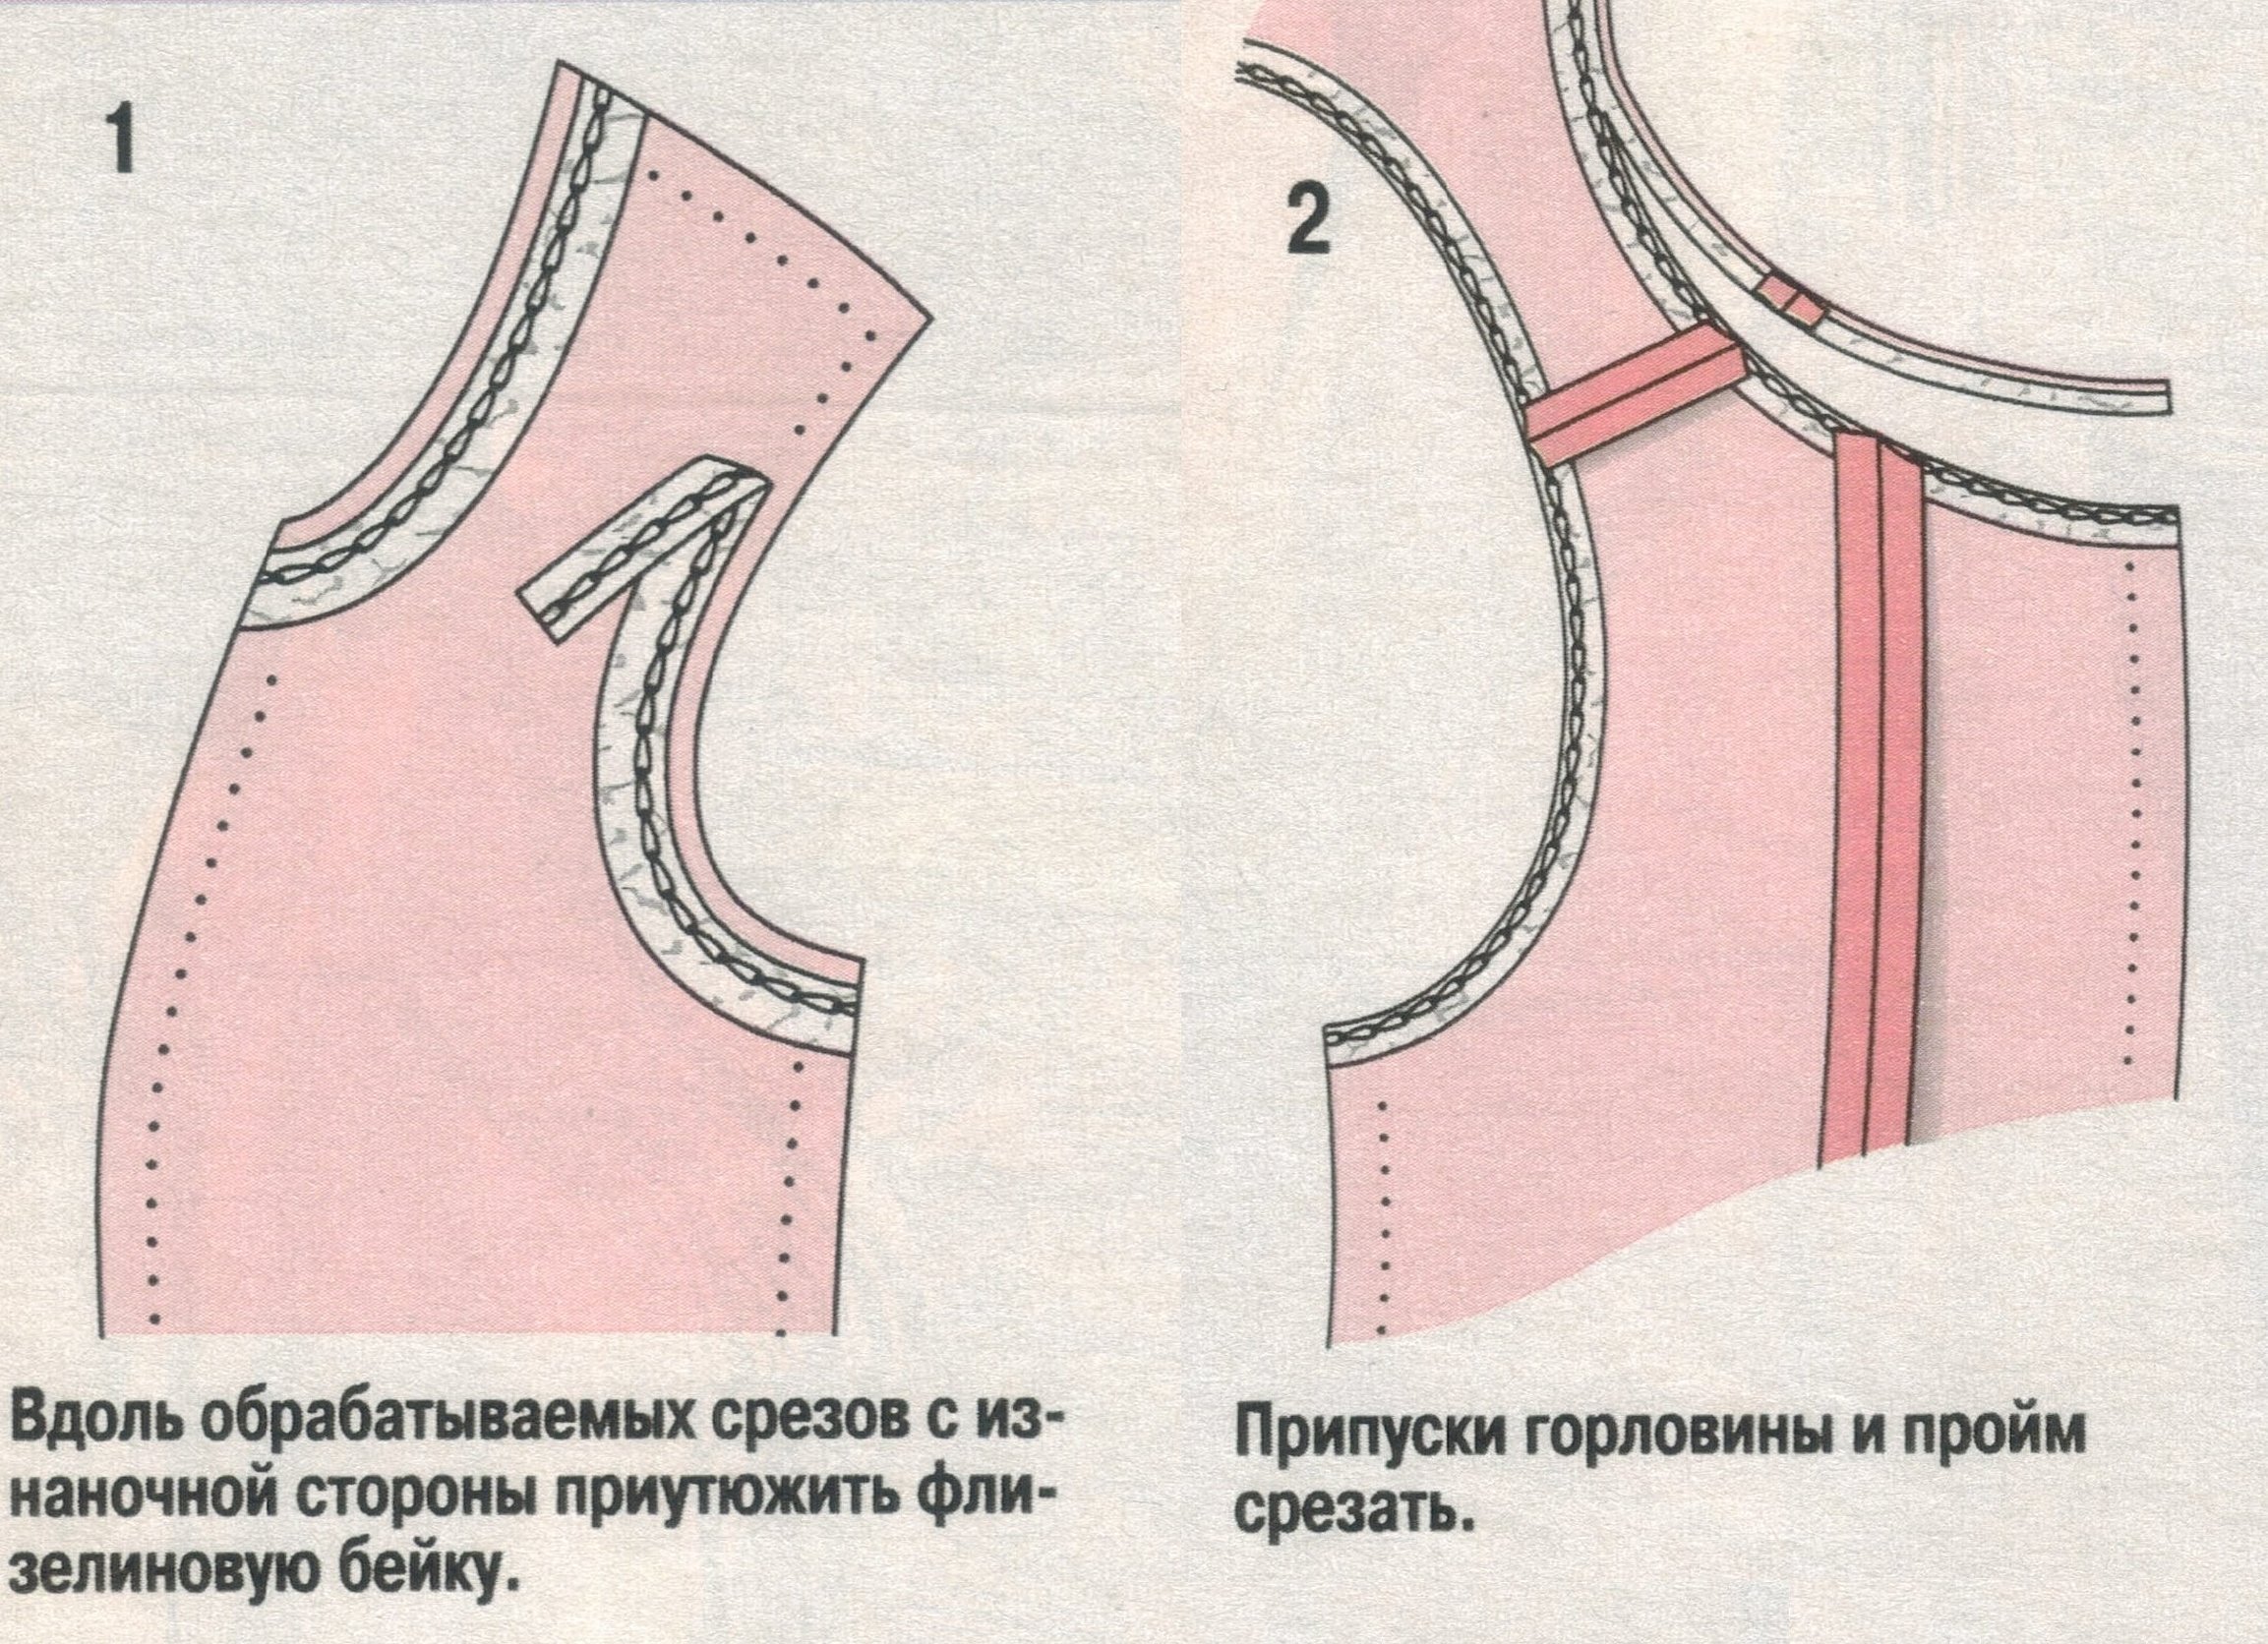
Processing of armholes, necklines and sides
Shoulder garments, unlike others, require armhole, neck and side panel processing. This starts with neck processing and is joined together with other parts. The armhole can be processed in different ways, for example, with a facing, like the neck. For this process, you need to pin the garments in the right places and process the necessary parts evenly without errors, so that the garment looks beautiful and symmetrical.
Basics
The basing is done so that the product is checked for symmetry of parts, and errors in stitching are corrected, for example, to correct contours deformed during stitching. That is, the basing of the vest should be done before it is stitched, so that all inaccuracies at the initial stage can be corrected in time. It is done after trying on, taking into account all the features of the figure, while adjusting the seam lines.
Pattern on the base
The pattern for the base is made as follows. The previously taken measurements, silhouette and material of the product are taken into account. So, from the main fabric, 2 front pieces, 2 facings, 2 pocket fragments are cut out. From the lining: 2 front pieces, 2 back pieces with a fold, 2 tie strips, 2 fragments for the pocket lining. It is better to make allowances of 1.5 cm, and another 3 additional cm will be needed for processing the bottom of the product.
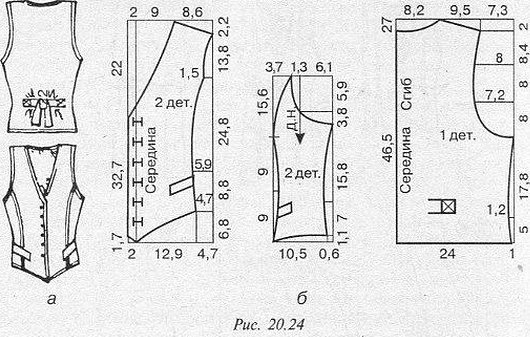
Construction of the armhole
To construct the armhole, draw a vertical line in the middle of the drawing. The depth of the armhole is measured from the top of the pattern. Half of the armhole width is measured to the left and right. To determine the width, add 2 cm to a quarter of the half chest circumference.
Armhole adjustment
Since the depth and width of the armhole may differ on different models of the vest, the standard armhole also needs to be adjusted a little. The adjustment depends on the measurements and size of the vest itself. Also, the design features of the style should be taken into account.
Back
To construct the back pieces, draw a line 8 cm long from the waist level. Then draw a new bottom line on both parts of the pattern. Measure 1 cm along the waist line to the right and drop a line from it at a right angle to the bottom line. Measure half a centimeter from the edge of the neck, 2 cm from the oblique shoulder. Connect these marks with an oblique line, an arc. Shorten the armhole area at the top by one and a half cm.
And the armhole curve needs to be deepened by 2 cm. Then, using the curve, connect the waist and neck marks. Mark the darts at chest level, and draw an arc from the tops of the darts to the armhole line. Finally, divide the back piece into 2 equal parts and draw a dotted line along the fold line.
Trimming facings and facings
The facings and the bottom piping of the garment are sewn together, aligning the edges. They are connected with the lining of the fronts. The bottom piping is stitched from below with a 1 cm seam. And small folds are made in the lining along the notches on the back side of the garment. They are needed to prevent the garment from shrinking. At the end, the garment seam is bent towards the lining and finished with a double stitch so that the thread and stitching do not unravel when washing or ironing the garment.
How to sew a vest quickly
How to sew a vest if the amount of time is too limited - is of interest to many modern busy people who want to quickly make themselves a high-quality and original thing
To sew a vest with your own hands, you can use ready-made patterns from the Internet or cut out from fashion magazines, but then the accuracy of the size will be relative. Therefore, in any case, you should make some adjustments according to the measurements taken.
At the very beginning, you should choose the right fabric for sewing the product. It can be velvet, knitwear, wool, suede, in general, any material suitable for this. But when choosing to sew a leather vest, you will need to take into account the complexity of stitching the leather due to its density and the roughness of the material used.
The easiest way is to sew the product without a pattern. You don't even need a sewing machine, just fabric, thread, scissors, chalk and a ruler. A rectangle of the desired length and width is drawn on the selected fabric, then it is cut out. 15 cm are measured from the upper left point. Another 37 cm are measured down from the lower marked point.
Another smaller rectangle is drawn. A line of approximately 20 cm is drawn straight down from the lower right corner. The product is cut out along the marked lines. The large rectangle is folded in half and a symmetrical opening is made for both arms. Next, the parts need to be sewn together, the seams processed and ironed. A novice seamstress will need approximately 6-8 hours for this, and a master can do it in 2 hours.
These were the main important details for sewing a vest of different styles, using a ready-made pattern or without it at all. It depends on the skill level of the seamstress and the free time for this process.


