Children love to make toys with their own hands. And almost every child wants to know what can be made from paper easily and quickly without glue. Even a novice craftsman can master the art of origami. Scissors and tape will always come in handy in the work, so they should be kept at the ready.

How to make a jumping frog
A square green sheet of paper can be used to make a frog that can jump. You need to be able to work with the basic form "Water Bomb". The name of this form has nothing to do with weapons.
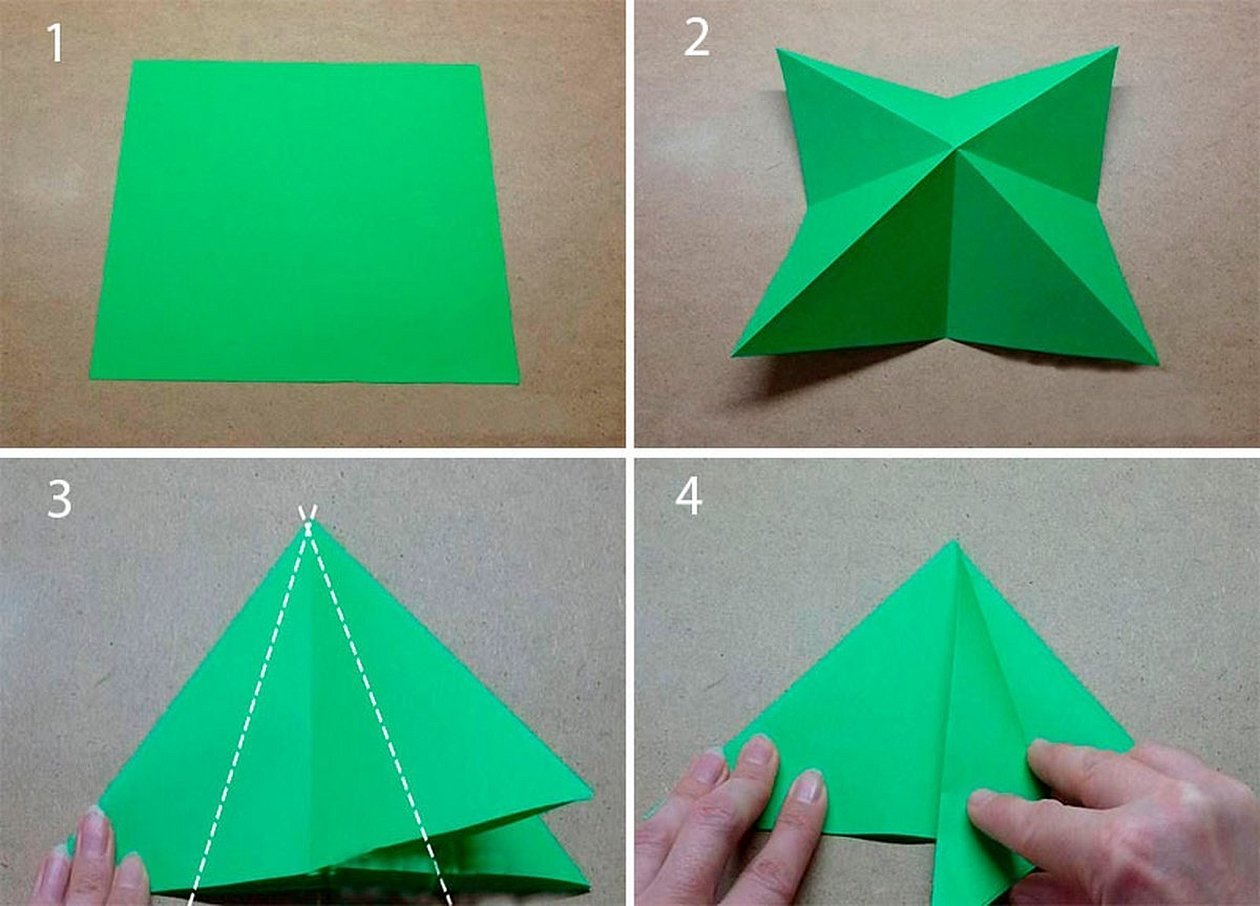
Master class:
- Fold the sheet along two diagonals. Turn it over to the wrong side and fold it in half vertically and horizontally.
- Fold the corners in at the sides to form a triangle.
- On one side of the triangle, bend the sides towards the middle. These are the paws.
- Turn each paw away from the center and divide it in half.
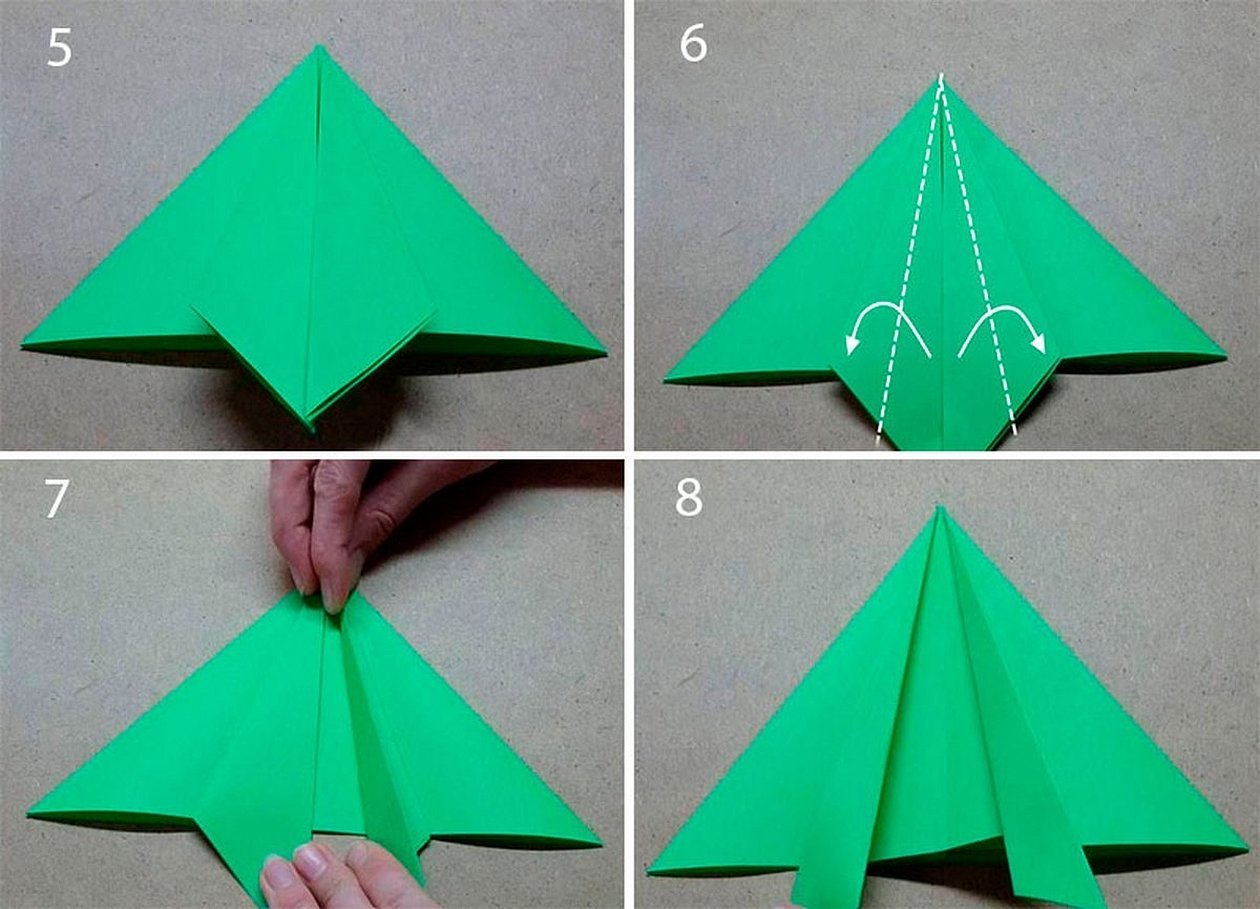
Next:
- Turn the triangle over with its “paws” facing down.
- Fold the corners to the top corner.
- Fold the sides upwards as well.
- Bend the lower corners of the resulting small triangle upwards to make eyes. You can use a felt-tip pen to draw pupils, eyebrows and eyelashes.
- At the bottom, near the frog's hind legs, make a "Lightning" fold. The bigger the fold, the further the frog will jump.
For reference! To make the frog jump, you need to press on its folded tail.

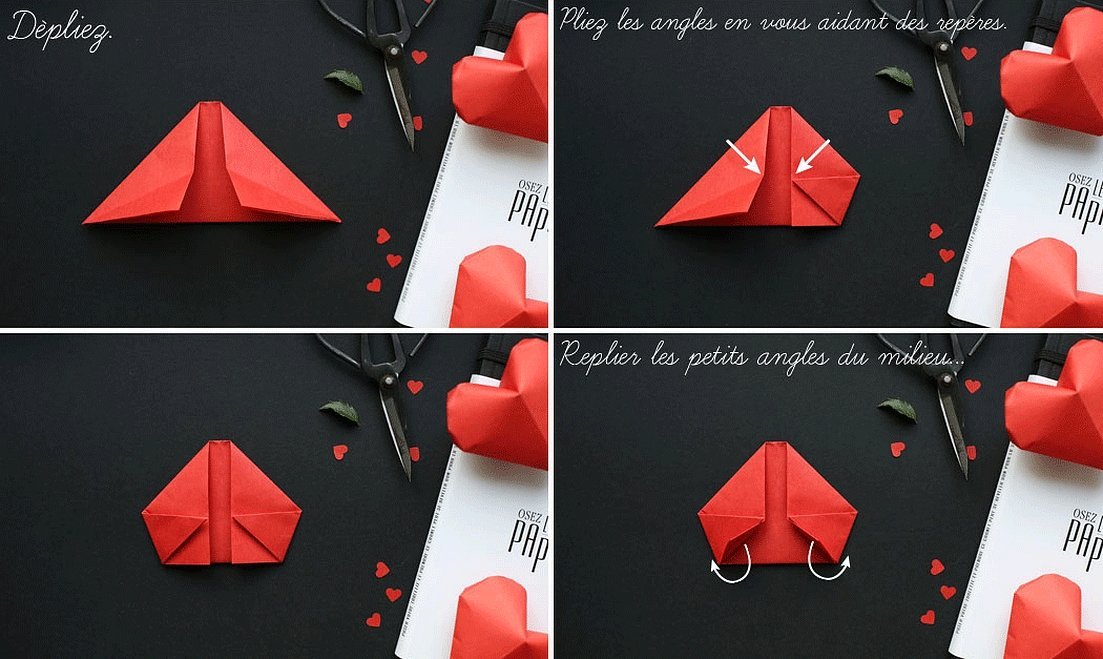
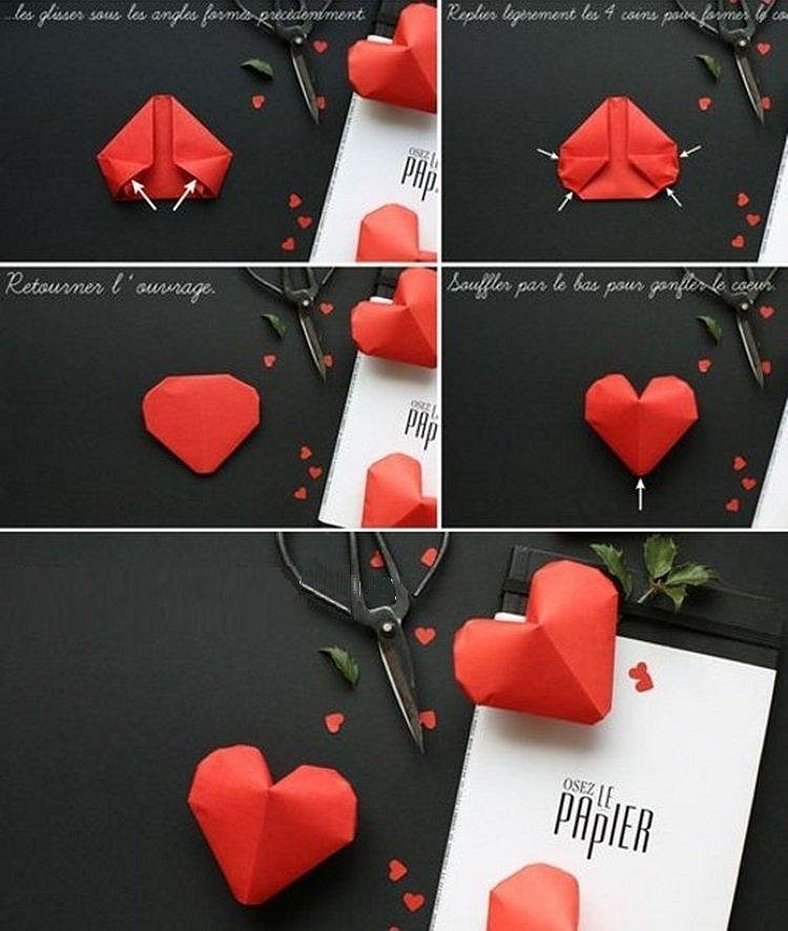
Craft "Heart"
DIY paper crafts without glue bring a lot of joy to the one who makes them and to the one for whom they are intended. A paper heart will be a cute gift or a Valentine.
An inflatable heart looks very interesting and original. You need to prepare one square sheet of double-sided red paper.
Step by step instructions:
- Fold the square vertically and horizontally. Fold it in half.
- Fold the corners upwards. They should not touch the fold line.
- You will get a triangle that needs to be turned with the corner upwards. Bend the free edges to the sides of the triangle and immediately unbend: you should get clear fold lines.
- Along these fold lines, you need to bend the corners inward on both sides.
- All sharp corners in the craft should be carefully smoothed out with your fingers.
- Turn the heart over to the front side and blow into the hole that remains near the sharp end.
A beautiful heart can be attached to the lid of a box or hung on a string to make a hanging decoration.
How to fold a paper boat
A paper boat is a favorite toy of many children. You can invent interesting games with it and even let it sail in the bathtub or in a stream.
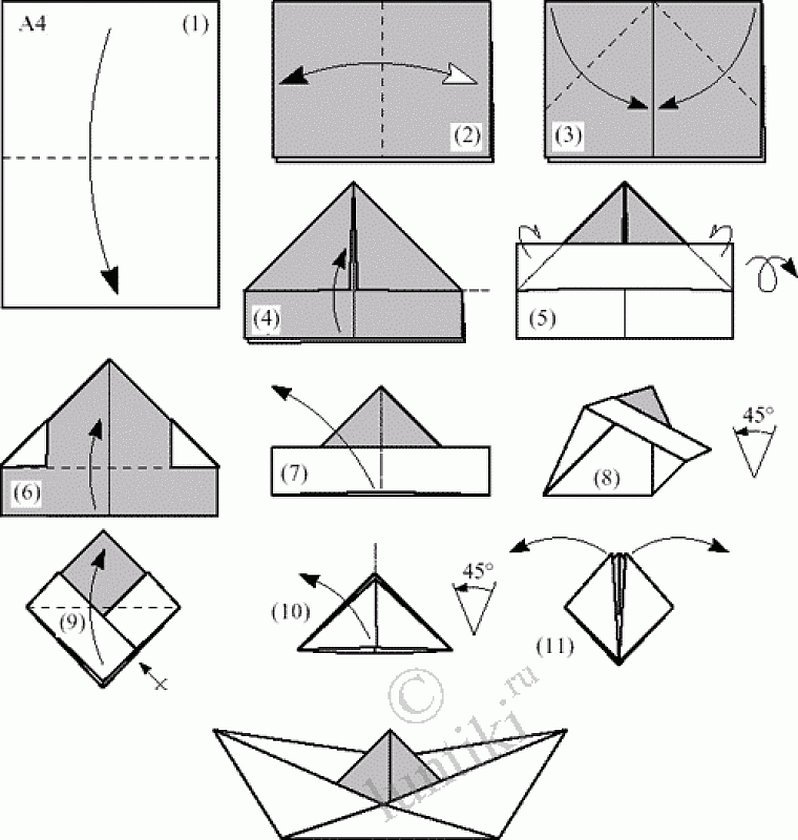
Master class:
- You will need a rectangular sheet of paper. Even a sheet from a notebook will do for the boat.
- Fold the sheet in half and bend the corners towards the center.
- Fold the free edges upwards and hide the corners. You should get an even triangle.
- Connect the corners and a square is formed.
- Fold this square diagonally to form a triangle again.
- Again, combine its corners and make a square out of it.
- Take the square by the upper corners and spread them apart. The figure will open up and you will get a small boat.
- The boat needs to be treated with paraffin so that it doesn't get soaked in the water.
This toy will give children a lot of scope for imagination.
For reference! The boat can be decorated: draw a lifebuoy and a name on board.
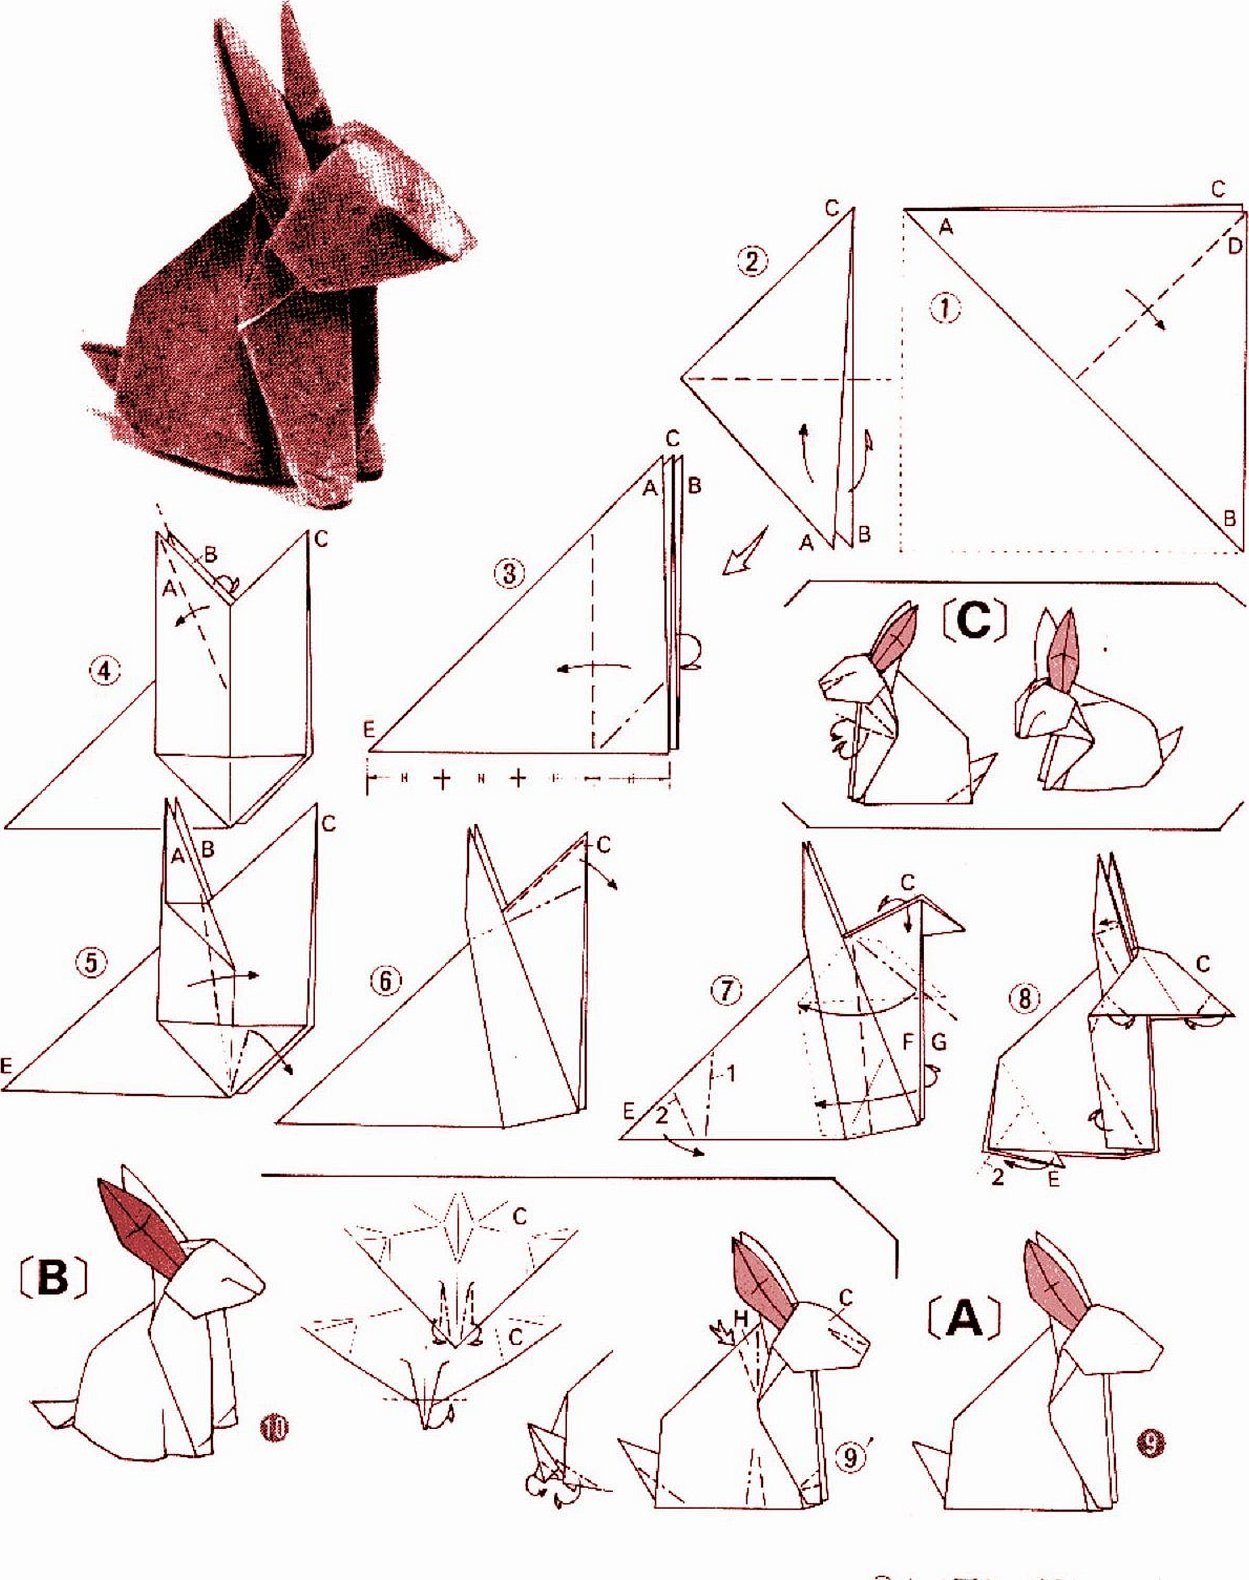
Craft "Bunny"
The art of origami allows you to make a variety of paper crafts without glue. You can fold a cute bunny with your own hands. Such crafts are often made by children in kindergarten and school. You will need a large square sheet of paper.
Progress of work:
- Fold the sheet twice along both diagonals. Bend the sides to form a right triangle.
- Turn the triangle right angle down and bend a small part from the nearest vertical side.
- Open and flatten the pockets inside this section.
- Bend two corners on the left side. These are the ears.
- Bend and flatten the right part. This is the muzzle and front paws.
- Fold the corner that is left of the triangle. Bend it inward and pull out a small corner. This is the tail.
We need to soften the sharp corners and draw a nose and muzzle for the bunny.
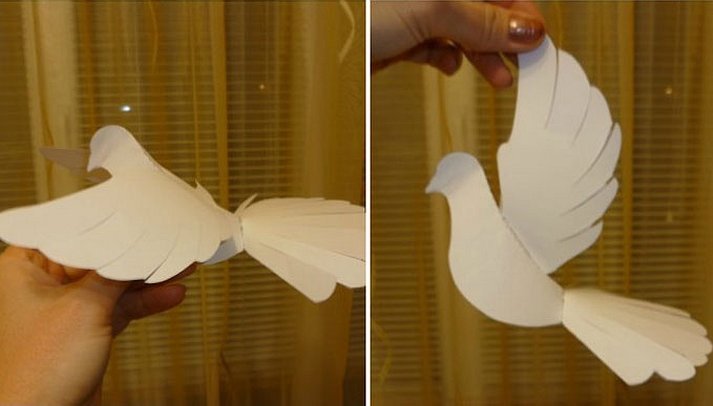
White paper dove
A delicate white dove will be a great homemade gift and room decoration. There are many ideas and master classes on creating paper doves. You need to put in some effort and patience, and then you will get a simple but very beautiful craft. You will need a sheet of thick white paper, a printer, scissors and tape.
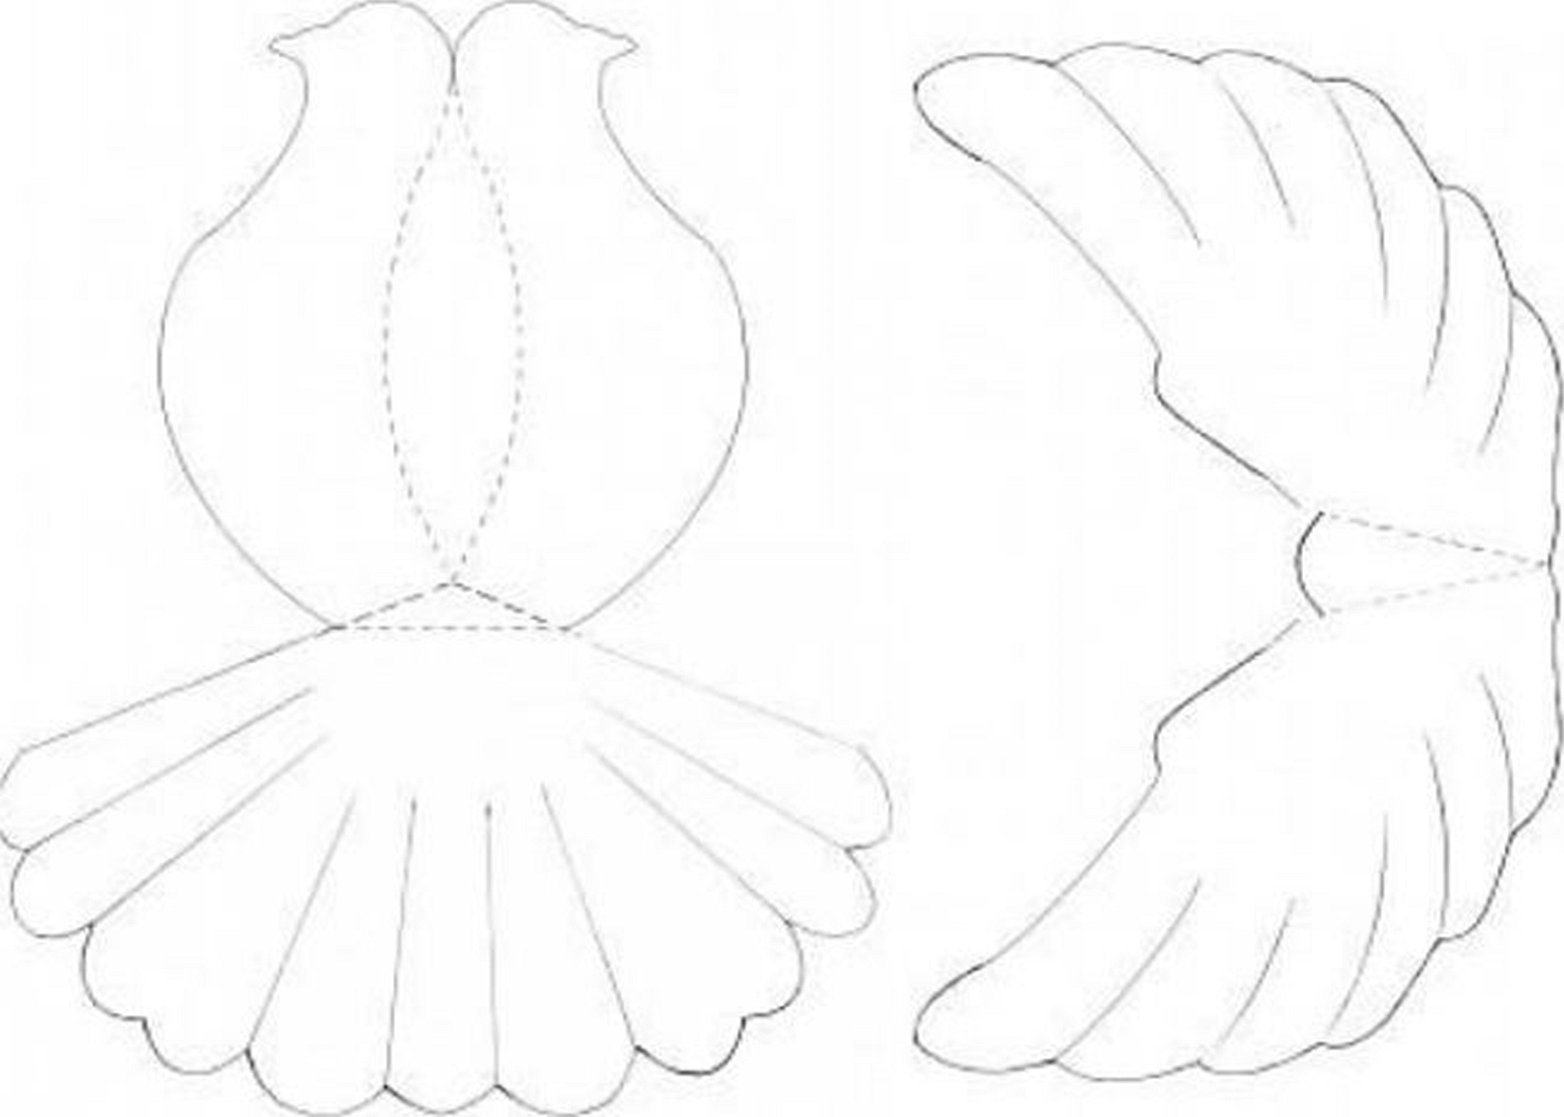
Step-by-step master class:
- Print the template and cut it out of paper.
- Bend the workpiece along the dotted lines.
- Make cuts along the solid lines on the tail and wings. Fold the tail itself along the dotted line.
- Carefully glue the tail and wings together with tape.
This toy is not made using origami technique, but from a template. You can experiment with the design of the wings and tail and come up with new figures.
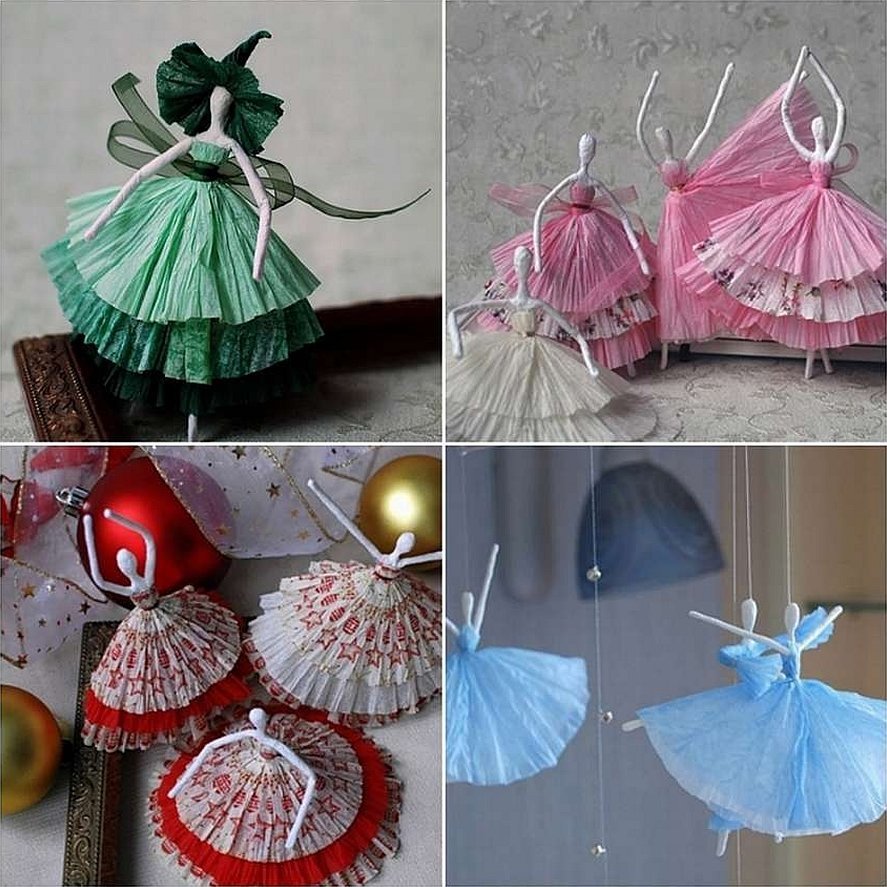
Paper dolls
This toy is a little more complicated than the previous ones. You will need several paper napkins of different colors: white, blue, pink, yellow. You will also need a strong fishing line or thin wire, tape and scissors.
Instructions for beginners:
- Roll a slightly elongated ball from one piece of white paper. This is the head.
- The ball is put on a wire. Then below this wire is braided in several layers with paper of a different color (pink or blue). This is the upper part of the dress.
- Cut two pieces of wire of equal length.
- Weave these pieces with white paper. Bend them a little. These are the arms. You can make the arms from one long piece of wire folded in half.
- Place these pieces perpendicular to each other and carefully connect them.
- In the same way, the ballerina's legs are made from other, longer pieces of wire and connected to the body.
- Cut out a large piece of colored napkin, fold it into a skirt and secure it to the central part of the vertical wire to which the head is attached.
- You will get a delightful ballerina doll in a fluffy skirt.
For reference! In exactly the same way, you need to make a friend for the doll so that she doesn't get bored alone. You can make a whole company of graceful beauties.
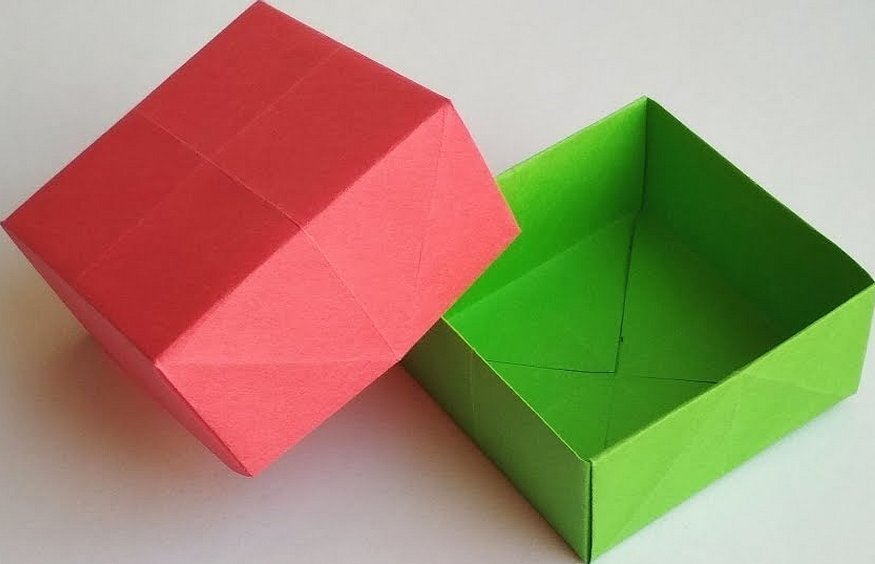
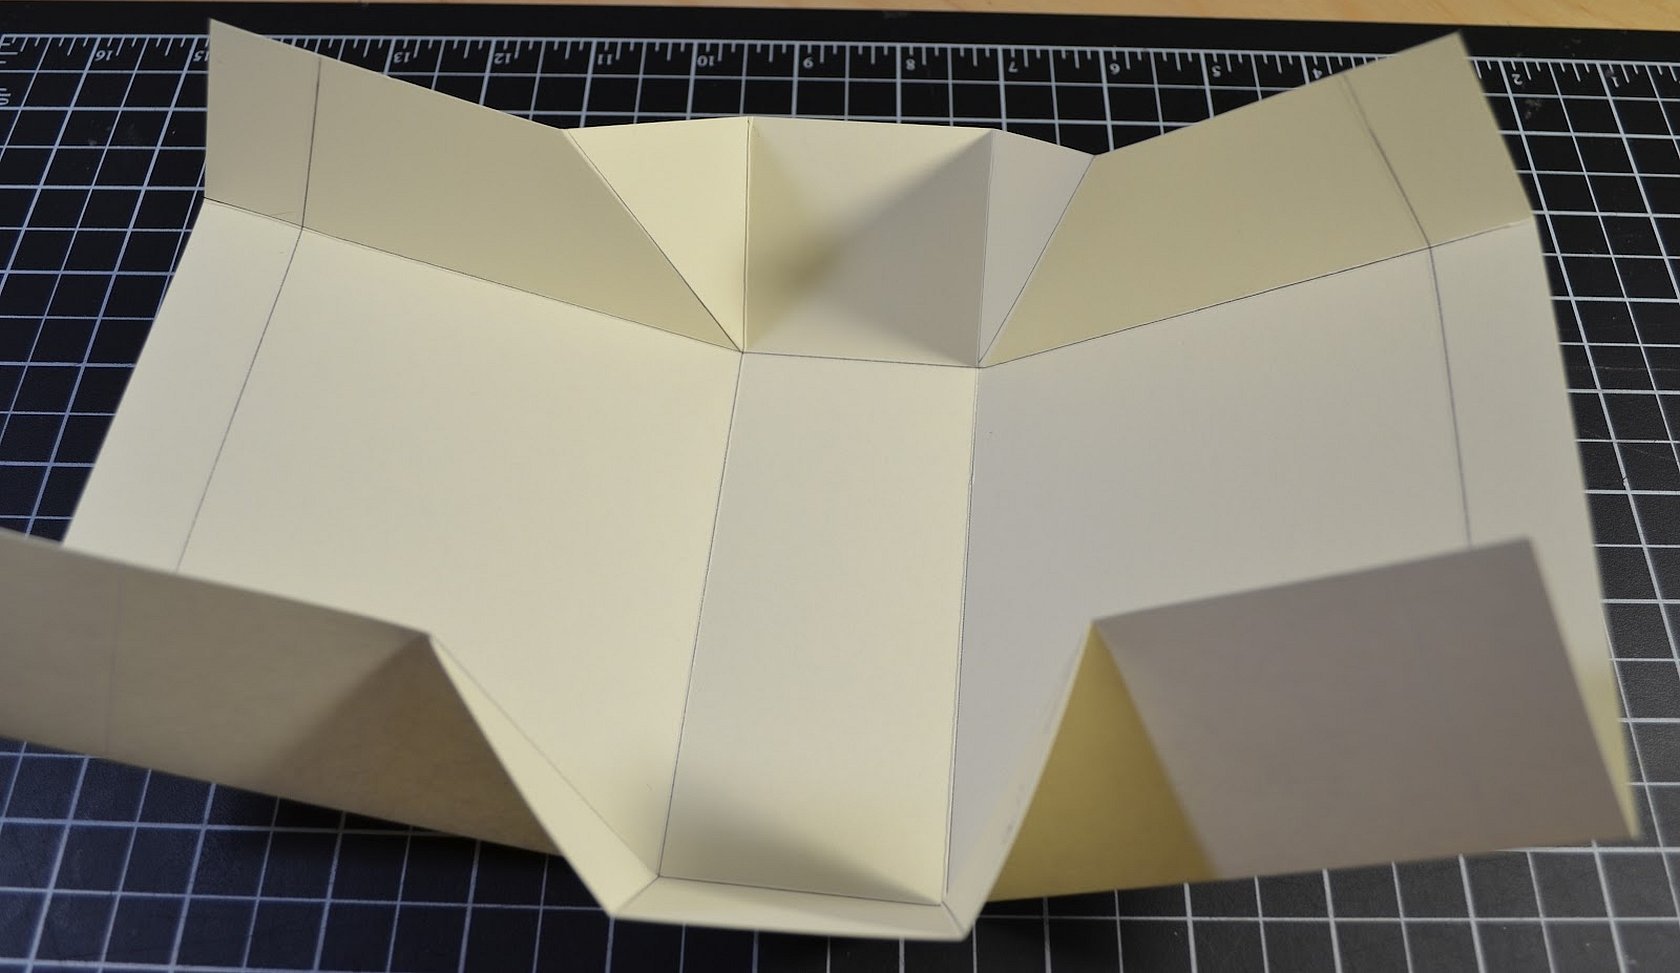
Boxes without glue
Using origami technique, you can fold cute paper boxes with or without lids. You need to prepare 2 square sheets of thick paper, one of which should be slightly larger than the other. You will also need scissors, a ruler, and a pencil.
Progress of work:
- Take a smaller piece of paper and carefully draw two thin lines diagonally with a pencil.
- Fold the right corner to the center.
- Fold the bottom of the sheet in half so that the corner coincides with the drawn line.
- Unfold the folded figure and do the same on all the other corners.
- In the center of the square, use scissors to make two small cuts along diagonal lines.
- Bend all side corners evenly towards the middle.
- Fold all edges of the box inward.
Using exactly the same method, fold the lid of the box from a larger sheet of paper.
In such boxes you can store all sorts of small things, for example, buttons, paper clips and other small details. It is best to decorate the craft with a satin ribbon and hide the gift in it.
Paper gift bags
You can make anything you want using origami, even a gift bag. To do this, you need to prepare colorful gift paper and make a bag out of it. You will have to use a hole punch, tape, and scissors.
Step-by-step instructions:
- Fold an A4 sheet of paper in half.
- Bend one of the narrow sides by 1 cm. Glue it with tape to the other side.
- Bend the sheet so that you get 2 parallel fold lines. Connect the sides and repeat the same on the other side.
- Fold the bottom part by 8 cm. Bend and unfold all the corners, then connect them and secure with tape. This is the bottom of the bag.
- At the top you need to make holes using a hole punch and thread a ribbon through them.
A congratulatory envelope is folded in a similar way, but you don’t need a hole punch for this.
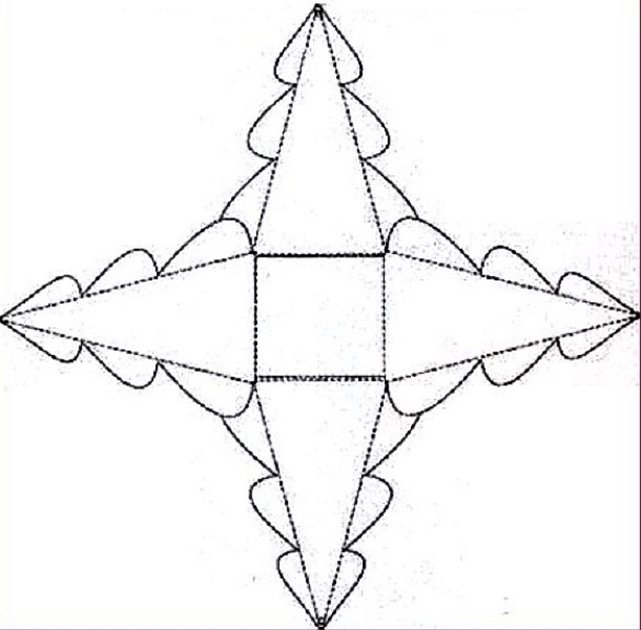
New Year trees
A graceful, fragile Christmas tree is a must-have decoration for the New Year. There are several ways to make a New Year tree.
How to do:
- Cut out two pieces from green paper using the template. The template consists of two identical trees connected to each other by a square at the bottom.
- You need to cut out two of these pieces, fold them together into a square, then bend them along the fold lines on this square.
- After this, you need to connect the tops of the trees: pierce a hole and tie them with a ribbon.
For reference! If desired, the entire tree can be decorated only with hand-made crafts.
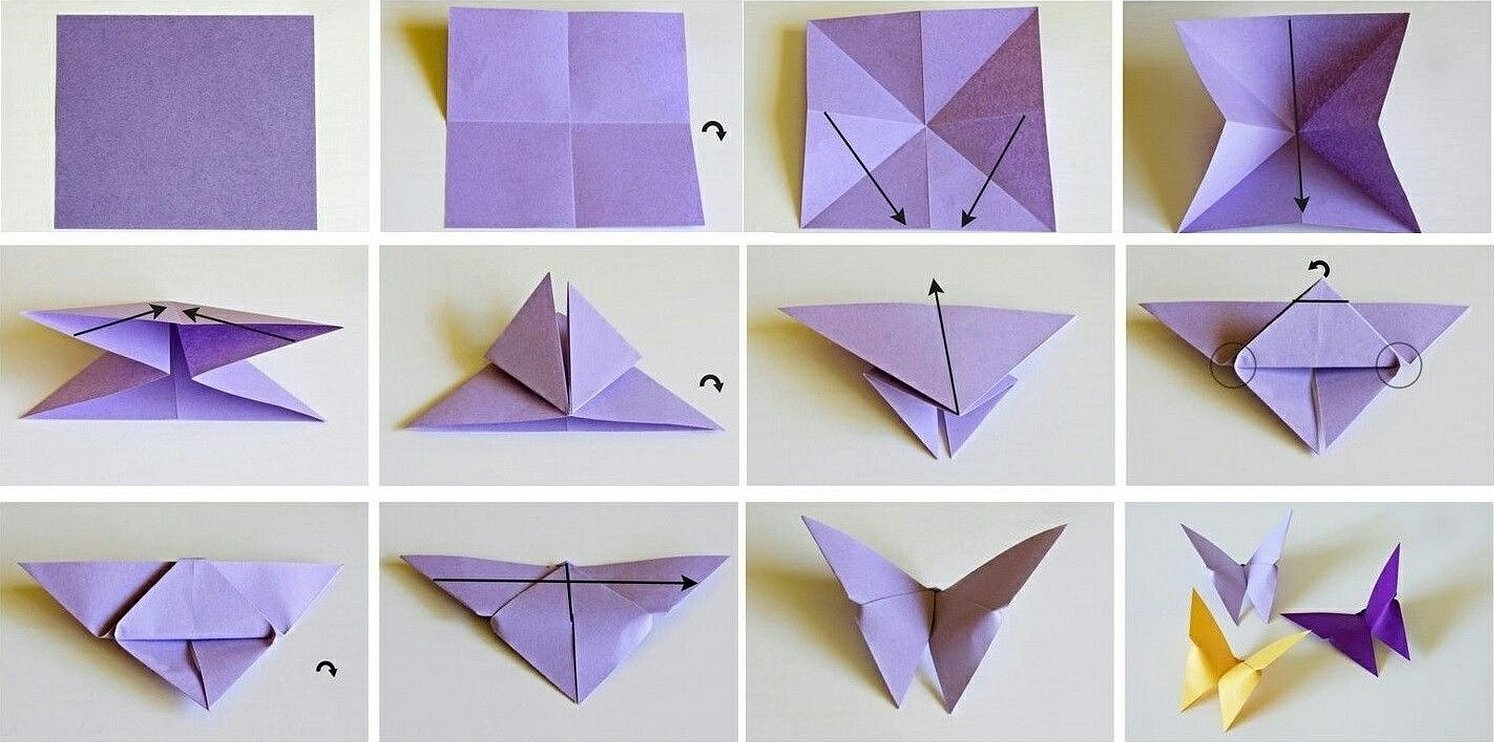
Butterflies without glue
Prepare a square sheet of paper in a delicate pink or blue color in advance. You will get an elegant butterfly.
Master class:
- Fold the square into the basic shape of a “Water Bomb”.
- Turn the resulting triangle over with its free side and bend its upper part down so that it extends slightly beyond the lower side.
- Turn the workpiece over again so that the protruding tip is at the top, and then bend it down.
- Sharp corners can be bent or cut off.
Young dreamers know what can be made from paper without glue. The child will be enthusiastically making beautiful crafts and toys. This activity develops imagination and gives a lot of pleasant emotions.


