It is easy to make a mouse-thief – a fridge magnet with your own hands – you just need to have the simplest tools and materials at hand. In the process of working on the composition, you can use a general template, but it is also acceptable to make your own adjustments to the components of the composition. Such a magnet can be made from natural materials, which will make its appearance even more attractive.
Mice-thieves: the idea of a magnet
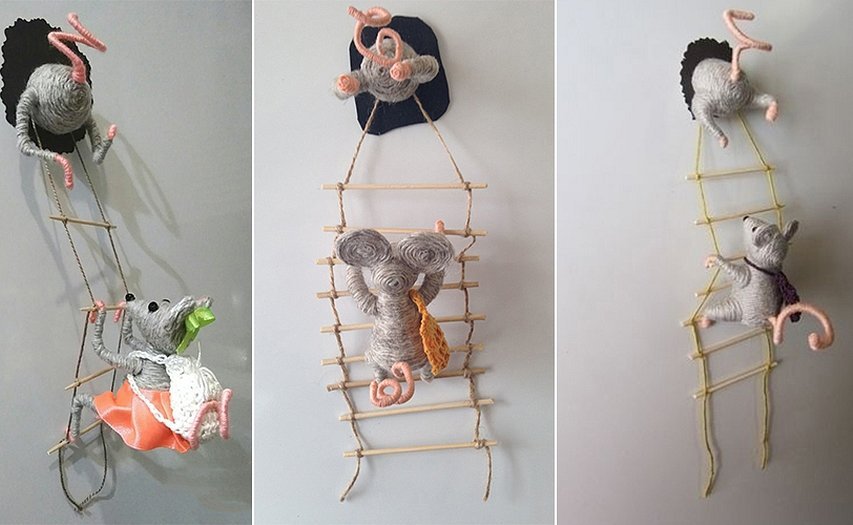
Mice-thieves - a fridge magnet, which is distinguished by its unique idea, simple execution and decorativeness. The magnet "mice climb into the fridge" has the following features:
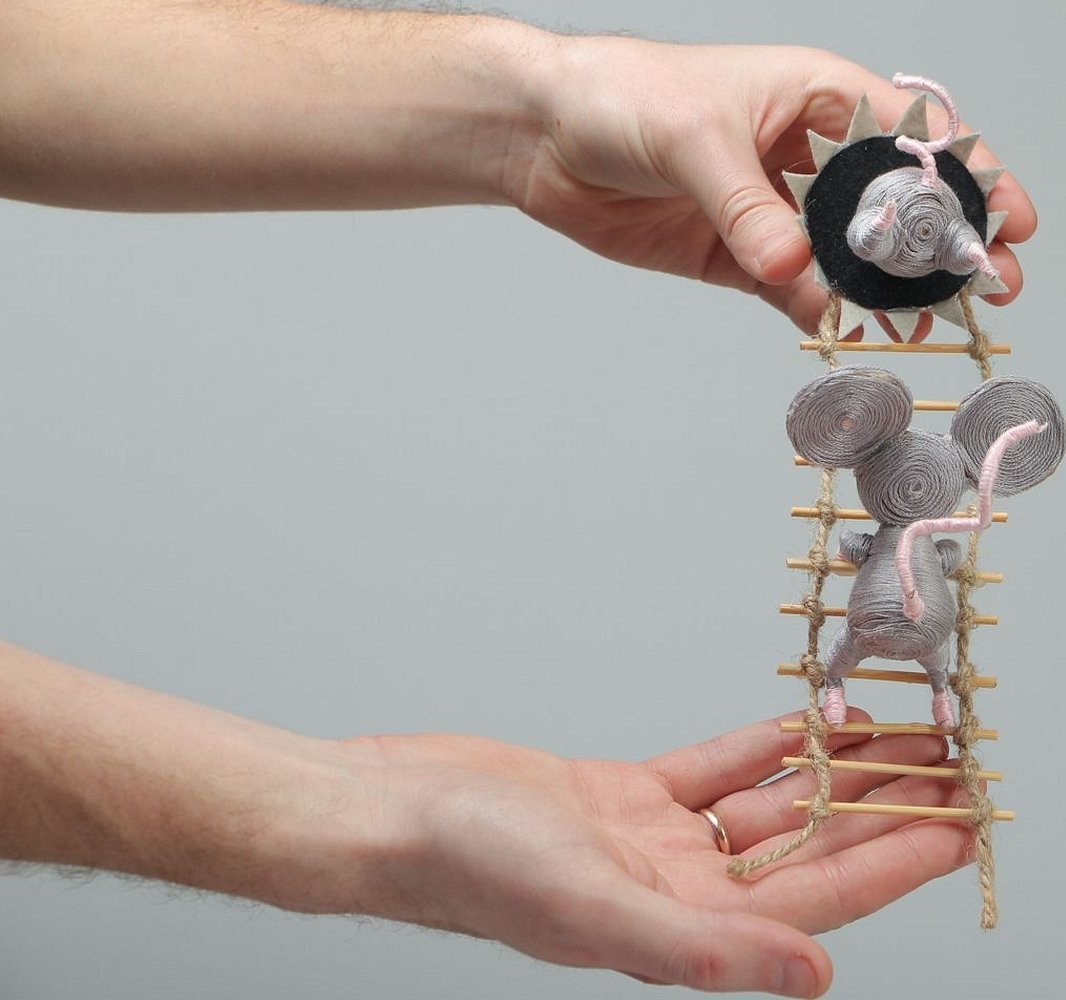
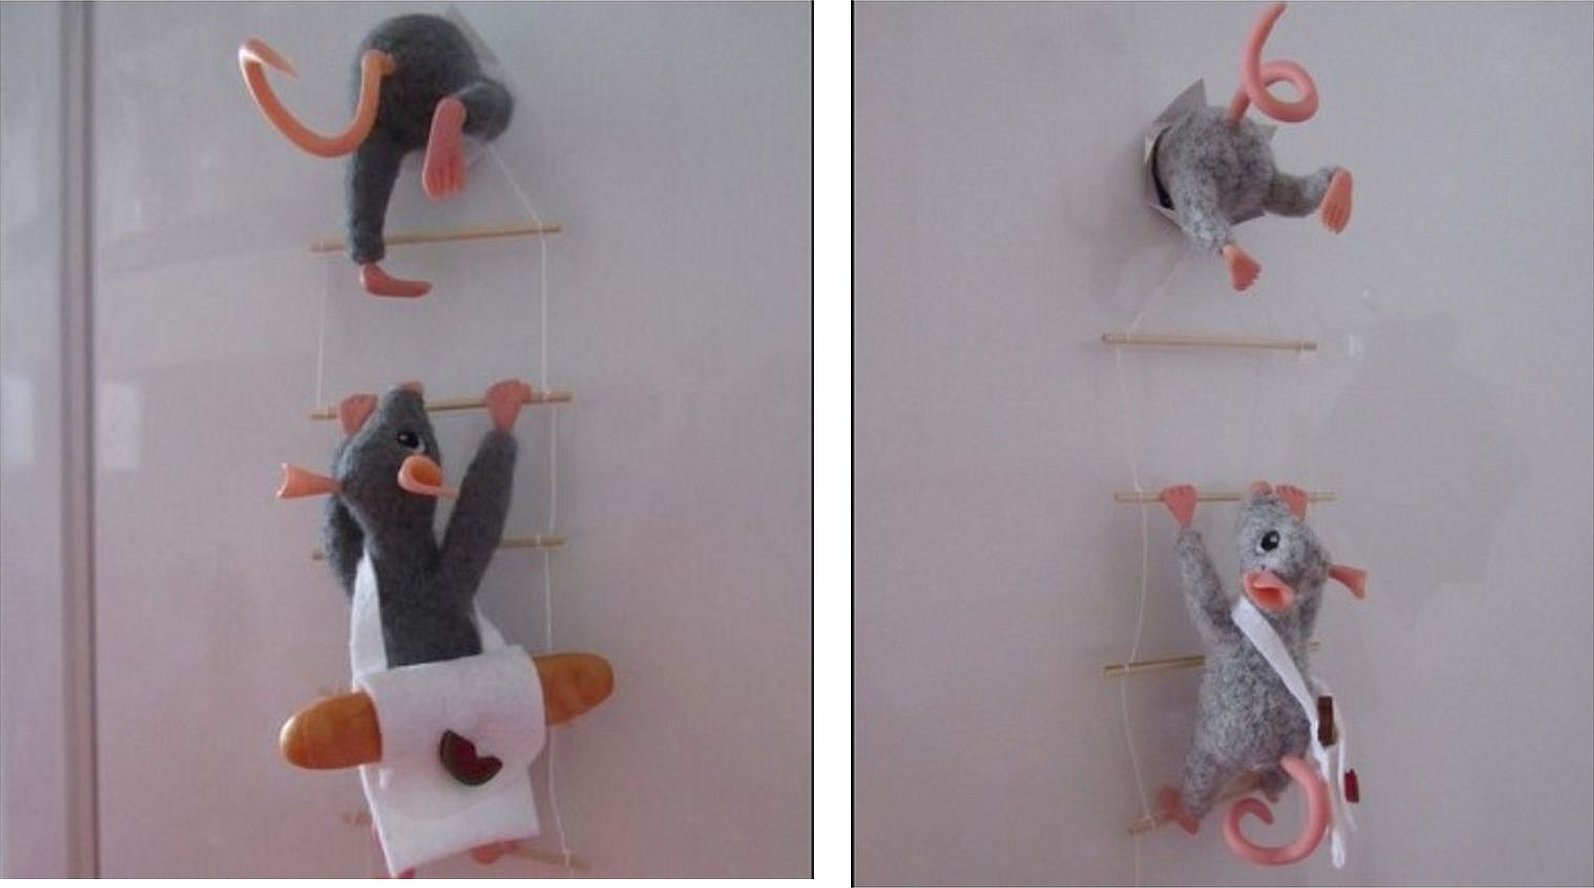
- The first mouse climbs up the decorative ladder. Additionally, you can attach a backpack to the thief's back, from which, for example, a loaf of bread will stick out. This detail can add some comicality to the composition.
- The second mouse is made only up to half of the body. It is on it that the magnet is attached. As a result, it turns out that the animal is sticking out of the refrigerator, trying to steal food.
- The overall picture looks completely unique - 1 mouse has climbed into the refrigerator, and the second one is helping with the theft (or is trying to climb in next).
Mice for the refrigerator in this format will be a great gift, since these animals are the symbol of the current year. At the same time, even the most inveterate opponents of rodents will be touched by this gift.
Important! To make the composition brighter and more attractive, it is worth thinking through all the details and decorating the animals and pets with small decorative elements.
Children especially like this product. If you think of a safer way to make this craft for kids, then you can work on creating the composition together.
Materials, tools for work
A DIY magnetic mouse is usually made from the following tools and materials:
- Beads. They are used for the final finishing of the resulting figurine.
- Jute. Used to form the ladder and some parts of the mouse.
- Hook. This is an auxiliary tool used for knitting the decorative details of the mouse.
- Knitting needle or awl. Used in the process of fastening some parts.
- Wine corks. They will be an excellent basis for forming the body and muzzle of the animal.
- Wire. Will be used to form limbs and a tail.
- Cotton or acrylic yarn of grey (beige) colour. Will be needed when knitting the details.
- Glue gun, thread and needle. Useful for fixing decorative elements.
- Small toothpicks, scissors, knife, sandpaper for modeling.
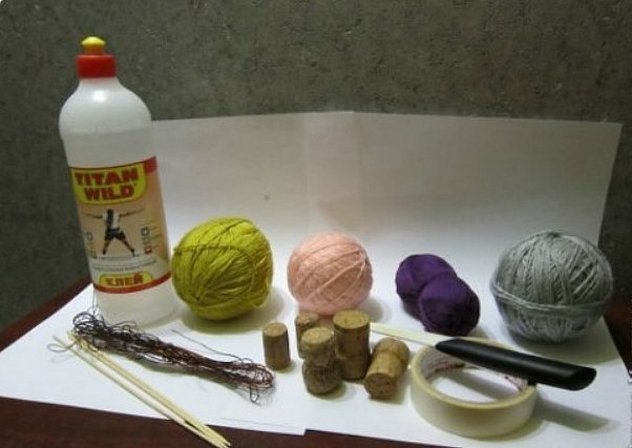
Additional information! Naturally, to complete the composition, you will need a magnet. This can be a thick magnetic tape on a rigid base.
Step-by-step master class on making a fridge magnet
There are several ways to make such an unusual magnet with your own hands to decorate your refrigerator. But even if you choose the simplest manufacturing option, you will get a very nice and detailed craft.
Thieving mice fridge magnets are made by hand as follows:
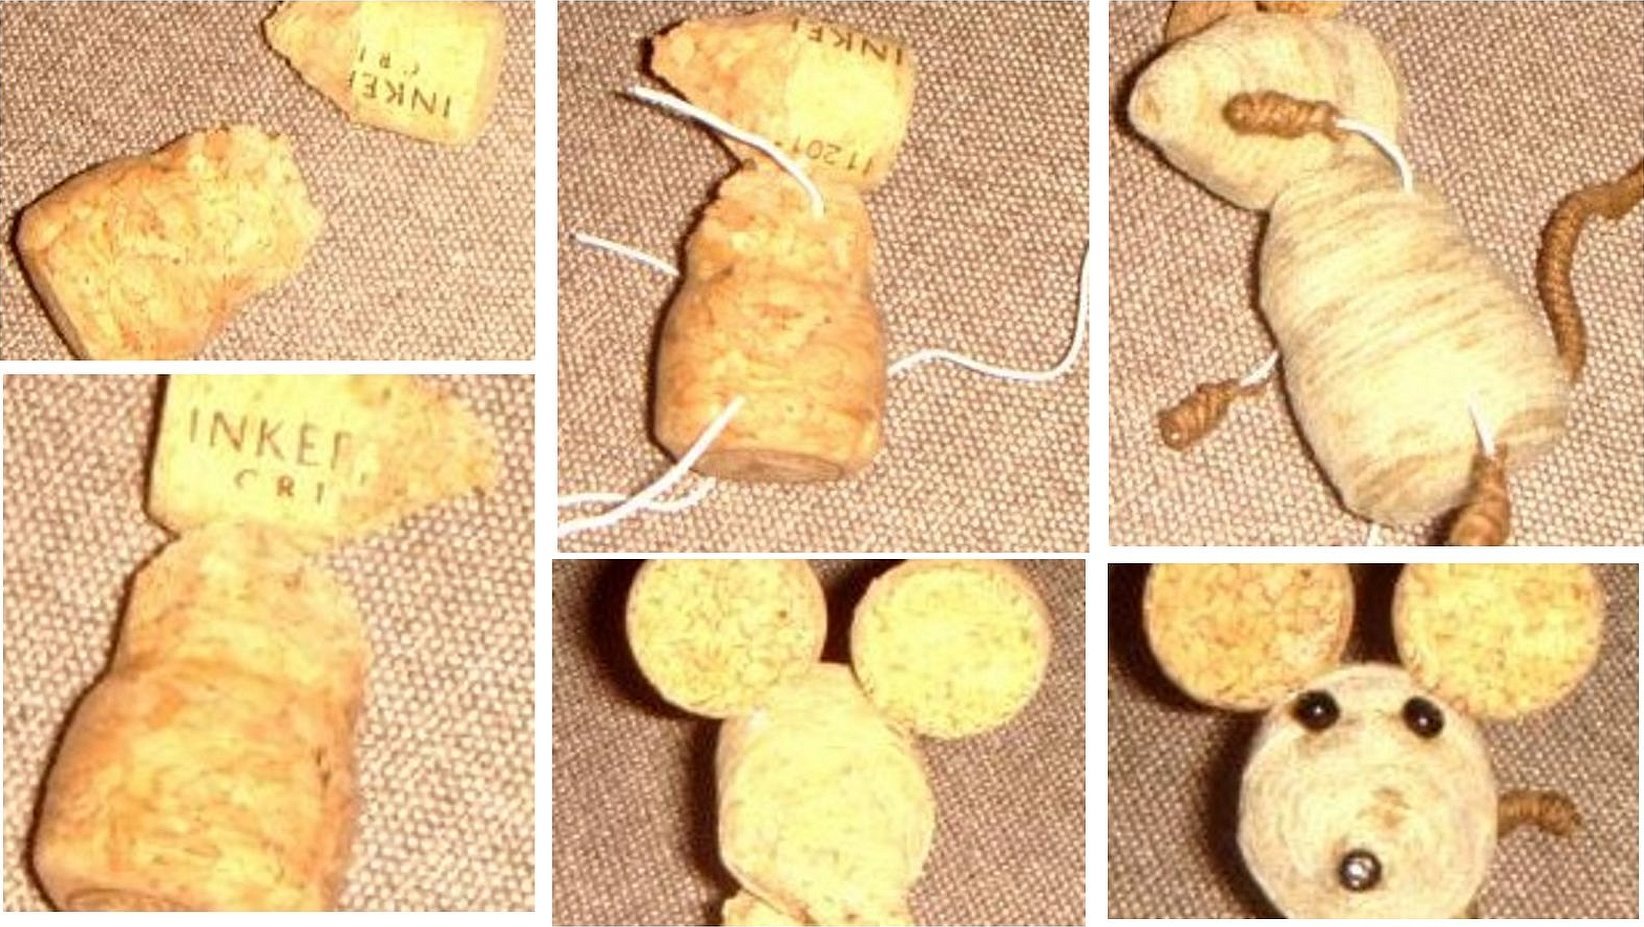
- You need to cut each of the 2 corks in half. The 2 halves should be left unchanged, and the third should be planed so that a cone is formed on one side. From the fourth part of the cork, 2 pieces are cut off along the entire perimeter. The result should be 2 circles.
- Using sandpaper, sand down all edges and cuts so that the corks are smooth and even.
- Using a glue gun, glue the part that is cone-shaped to half of the smooth cork. Glue 2 circles to the head. Leave the second one unchanged.
- Then you need to prepare 8 pieces of wire. At the same time, 2 pieces of them should be a little longer than the rest (about 5 cm). The rest can be 3.5-4 cm - these will be the legs and tails.
- You need to attach shorter pieces of wire to the base of the mice's bodies in front and behind, where they will become tails.
- You need to wrap a little jute around the tips of the paws to form a transition between the parts of the paws.
- Then you need to wrap the body and head of the first mouse with yarn, moving in a circle. You should start with the smooth round part of the cork. This applies to every detail. You can glue the yarn to the base with a glue gun. The second mouse is decorated in the same way.
- Glue on beads instead of eyes and a nose.
- Next, make a ladder. Cut 2 strips of jute 20 cm long. Place the blanks next to each other parallel. Glue them together with toothpicks laid lengthwise.
- The headless part of the mouse will become the basis for the magnet. You need to glue a magnet or magnetic tape to its cut using a glue gun.
- Then, to the base on the same side where the magnet was attached, you should glue the beginning of the ladder.
- Now you need to attach the second mouse, which seems to climb up the ladder after the first one.
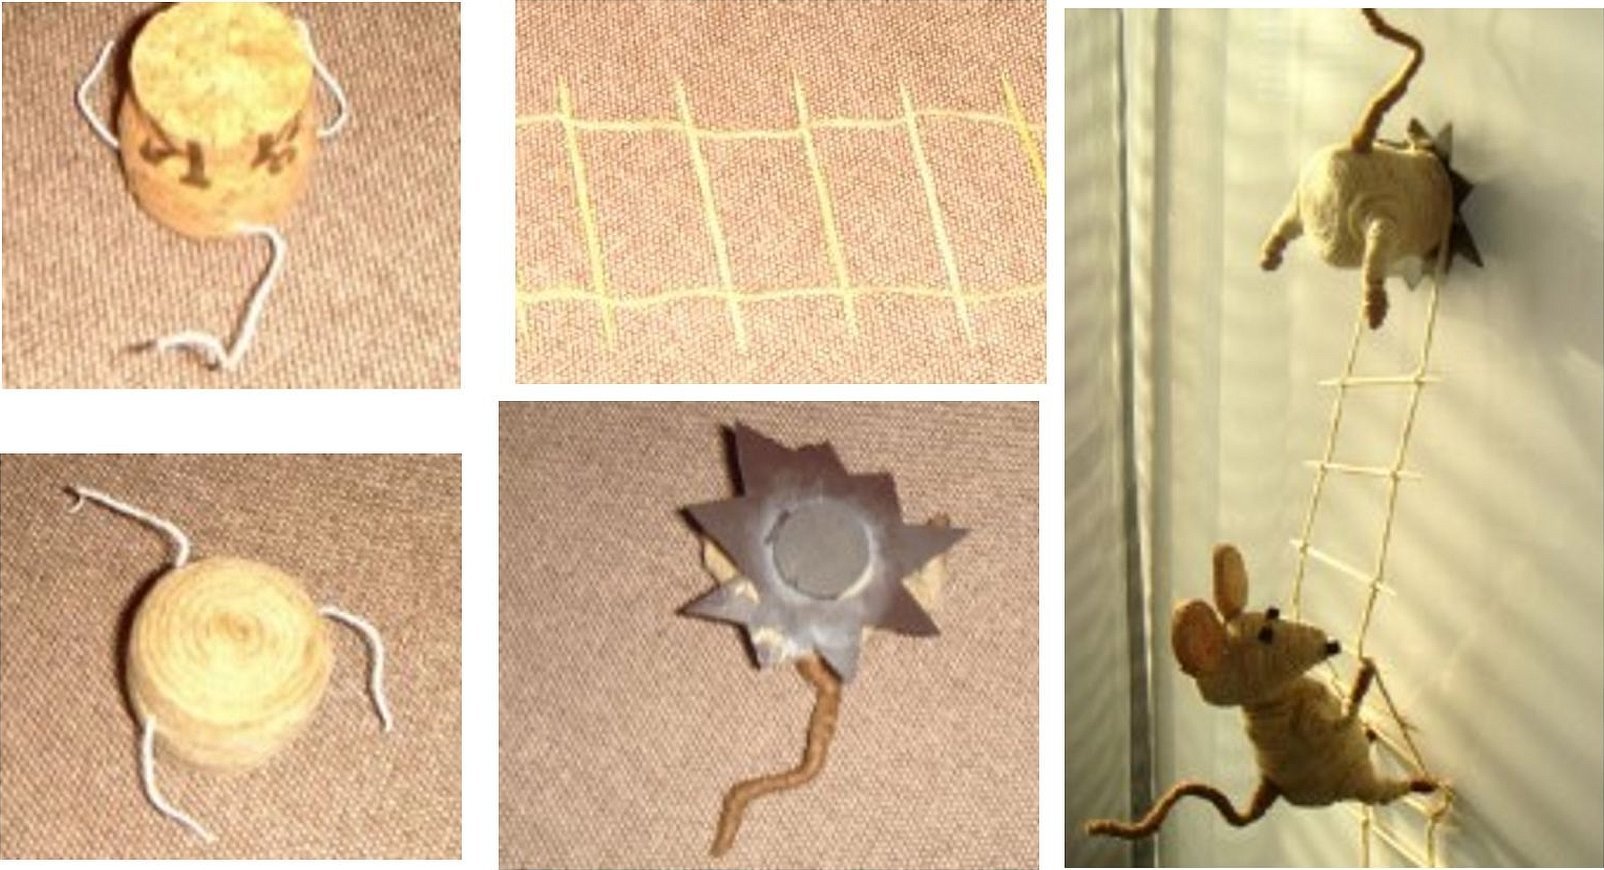
Please note! To make a ladder, you can take thin flexible wire, which should then be wrapped in jute.
There is another master class, according to which the mice themselves can be made by crocheting all parts of the body. The best technique for such a craft is amigurumi:
- First, you need to knit the mouse's body. It all starts with the lower legs. You need to form an amigurumi ring and tie it with 4 single crochet stitches (SC). In this way, you should knit 5 rows. Then you need to cut the thread. Next, you will need to knit another such leg.
- From the working thread of the second foot, make a chain of 3 air loops and connect with the thread to the second foot.
- As a result, you need to knit 11 loops in a circle. This will form the body of the mouse.
- You should knit approximately 5 rows like this, and then start decreasing in each row - 1 sc. This should be done until there are 4 loops left.
- The knitted body can be stuffed with polystyrene balls or pieces of foam rubber. Finish working on the body.
The MK for knitting the muzzle is not difficult:
- You need to create an amigurumi ring, tie it with 4 sc. Then make an increase in the next 2 rows - 2 sc in each loop.
- Then increase the number of loops, that is, knit 3 sc into each. Then make another increase - knit 2 sc into each loop. Then knit 3 rows without changes.
- The next step will be to decrease in the same order as the increase. Fill the head with the same material as the body.
- Then you need to knit the ears-circles. This is the simplest element that can be made without a pattern - just knit them in a circle.
- At the end, assembly is done - the head is sewn to the body. Next, you need to knit 4 strips of pink yarn and sew them to the body as paws.
- Then decorate the face as desired.
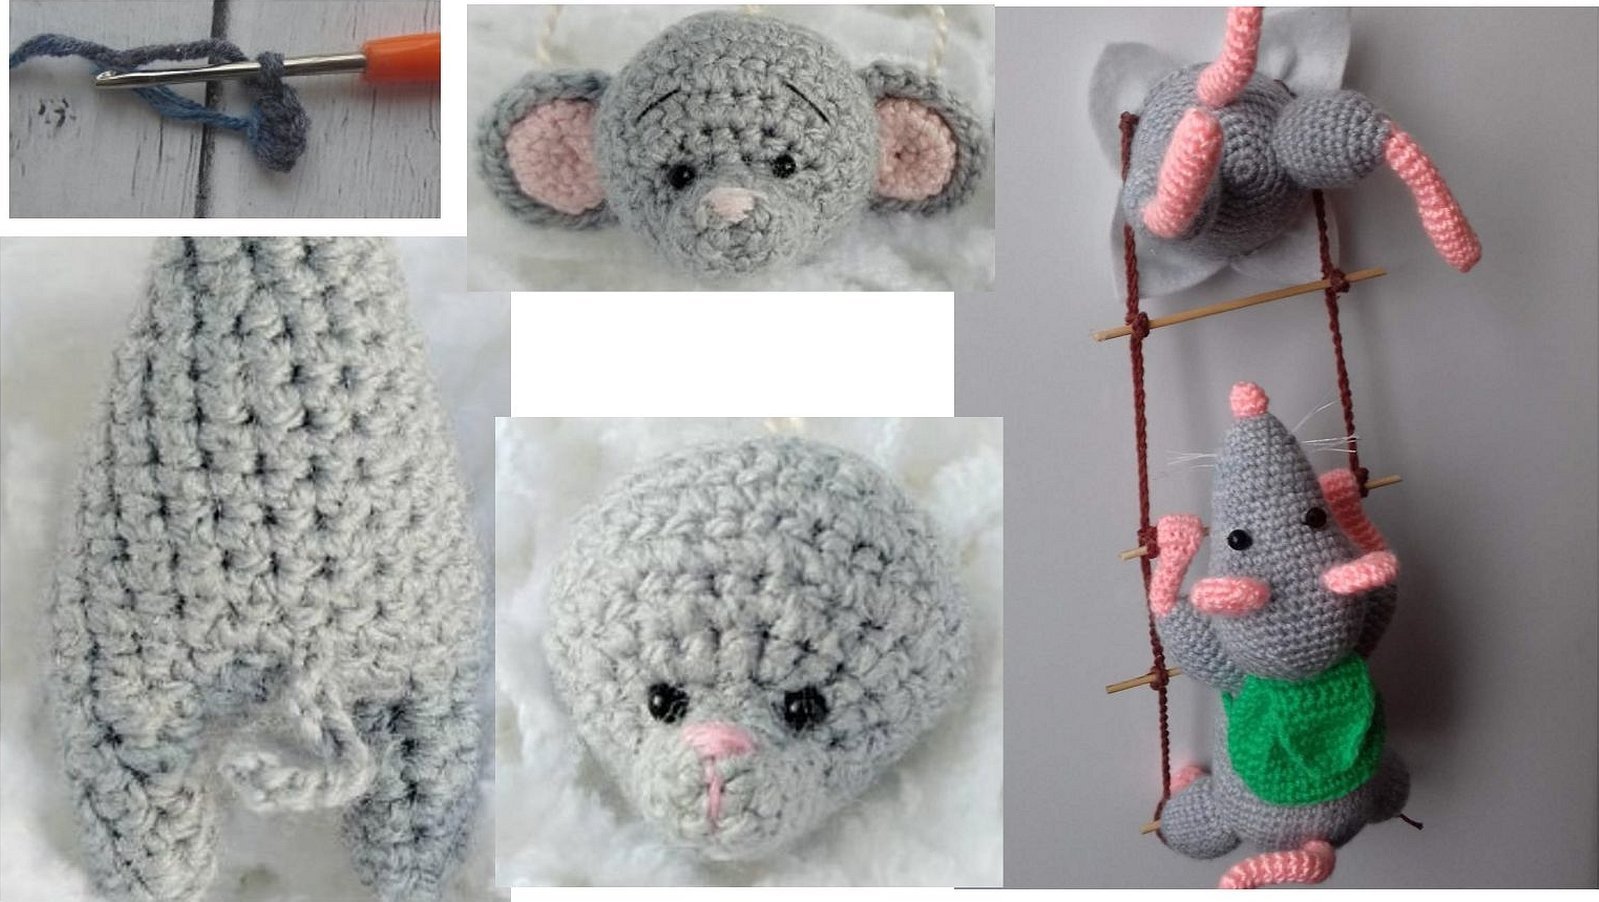
Additional information! To make the legs flexible, you can tie thick wire with thin threads.
The body of the second mouse is knitted in the same way as the first, but only up to half. Then you need to fill the part and glue it to the cardboard circle.
The following description concerns the production of decorative elements: a ladder and a magnet mount. The ladder can be formed from yarn and pieces of wire. The magnet is glued to the back of the cardboard.
You can make a fridge magnet in the form of a mouse-thief from different materials. The simplest option involves using wine corks or amigurumi knitting. The overall composition looks interesting on the refrigerator door, and the mice themselves look like real ones. Any needlewoman will want to make such a decoration for her kitchen.


