It is difficult to imagine the life of a little girl without a doll. To create a bright toy, it is important to take into account the level of your training. Before learning how to properly make a face for a fabric doll, you will have to carefully study sculpture, anatomy, and drawing.
- Why the face is the most important detail in a doll
- How to make a relief face for a textile doll
- Basic rules for tightening
- How to paint a textile doll's face
- Should I prime my face before work?
- What paints to use
- What else do you need for work?
- How to Paint a Face on a Textile Doll: A Step-by-Step Master Class for Beginners
Why the face is the most important detail in a doll
Creating an author's doll - a cartoon toy or a person with a royal character - is an exciting, and sometimes even jewelry work. Beginning needlewomen, immersed in the process of creating a doll, are constantly in a creative search for beautiful, interesting solutions for the implementation of this or that idea.
Work on a doll, of course, begins with getting acquainted with sculpture. Using real sculptures and photographs as an example, you need to learn to feel three-dimensional space, sculpt copies from polymer clay and objects from the most common plasticine, training your eyes and hand.
First of all, it is necessary to study the proportions of a person. Although a doll is often created with exaggerated facial features or body parts, an important step to distorting real human proportions is to study and understand the correct classical principles.
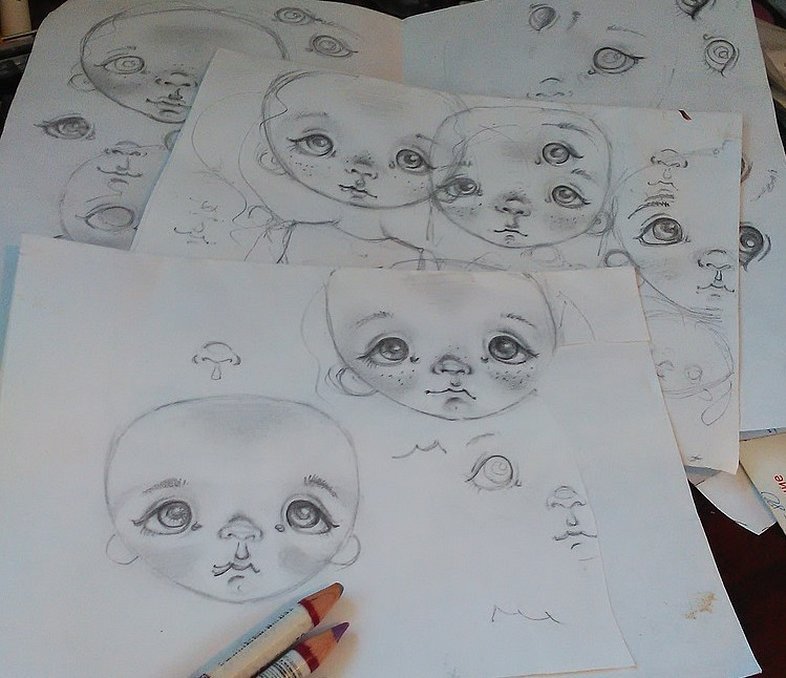
Each needlewoman can make the first sketch of a doll on paper - this is the so-called fore-sketch. On it, details are drawn - the doll's face in full face and profile, as well as its body, outfit. In subsequent sketches, the image is specified. The doll is drawn from different angles, color is added.
Please note! Before making a sketch, it is worth carefully studying human anatomy: the structure of the head and arms, bones, muscle relief. The most difficult process in creating a doll is sculpting the face.
How to make a relief face for a textile doll

The first thing you need to do is to make a sketch of a doll's volumetric face, for example, with a simple pencil. It's good if a person imagines the final image and facial expression of the product. In any case, you can always find and print a sample of facial features on the Internet. If desired, you can use a stencil, sketching a characteristic sketch on paper, and only then move on to the face on the fabric. For beginners, it is difficult to follow the symmetry on a fabric face. Therefore, you can feel free to use a ruler, a measuring tape, a paper template for drawing the face and other auxiliary devices. After this, you need to put your head aside for 5-10 minutes, so that you can then look with a fresh eye and check the symmetry again.
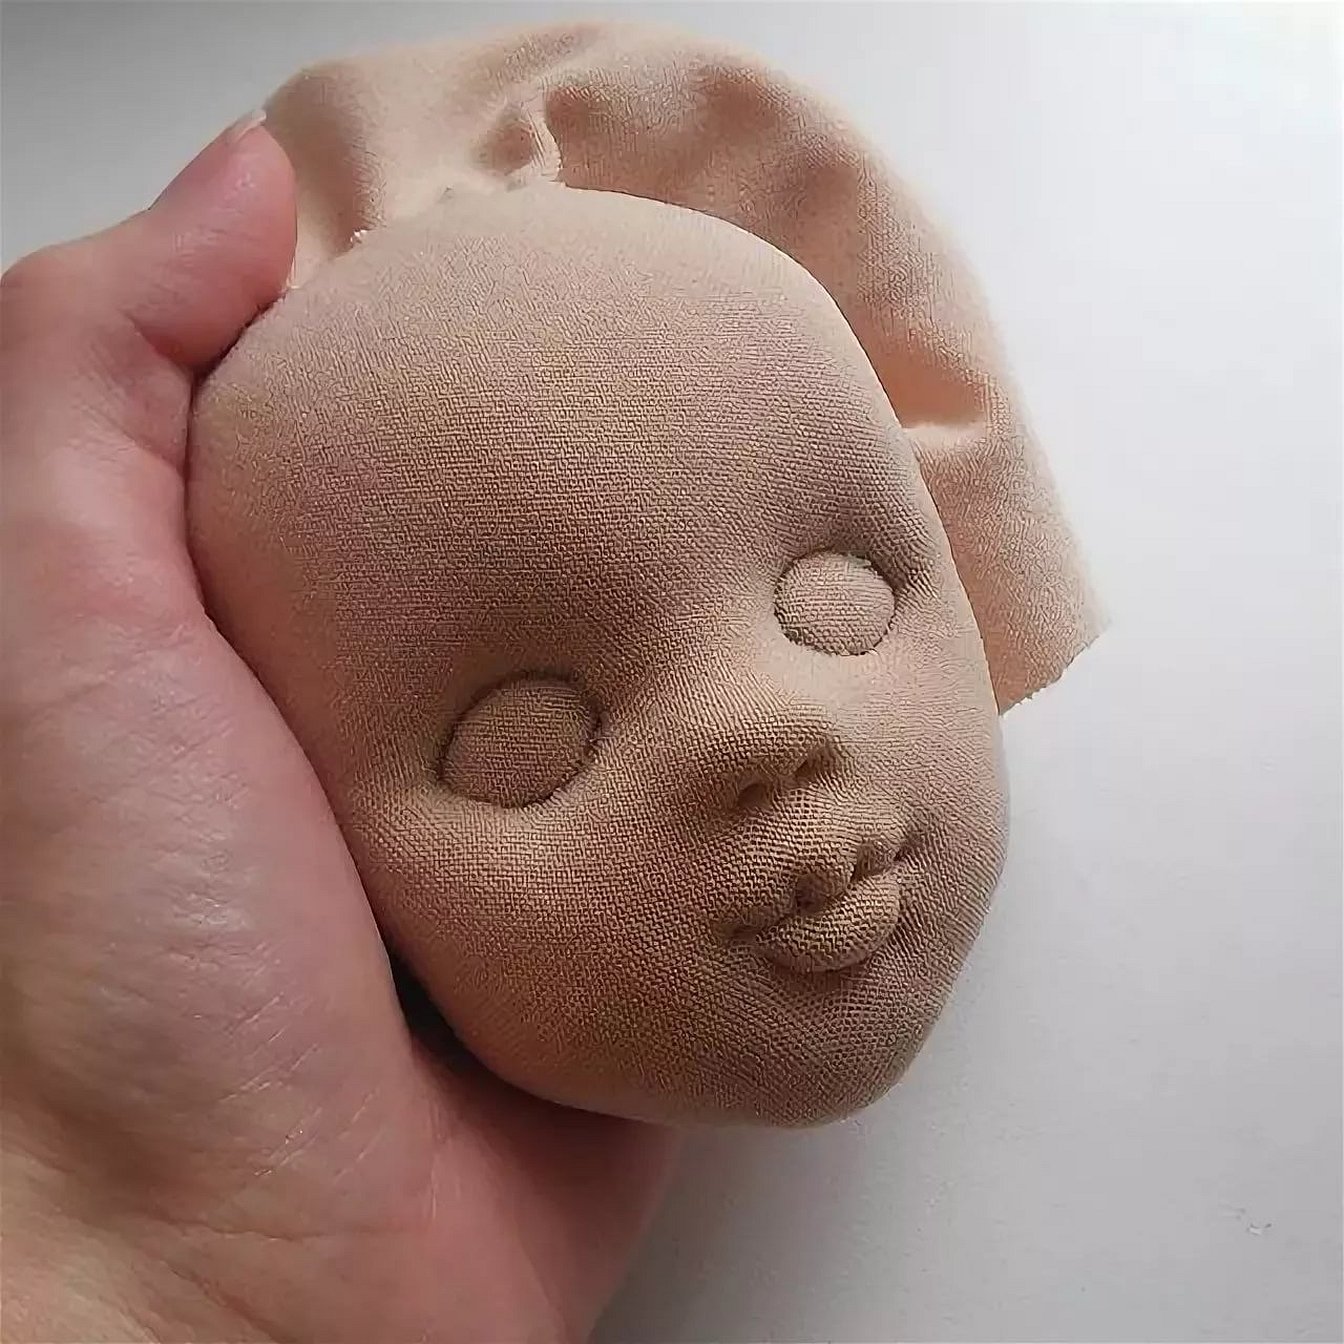
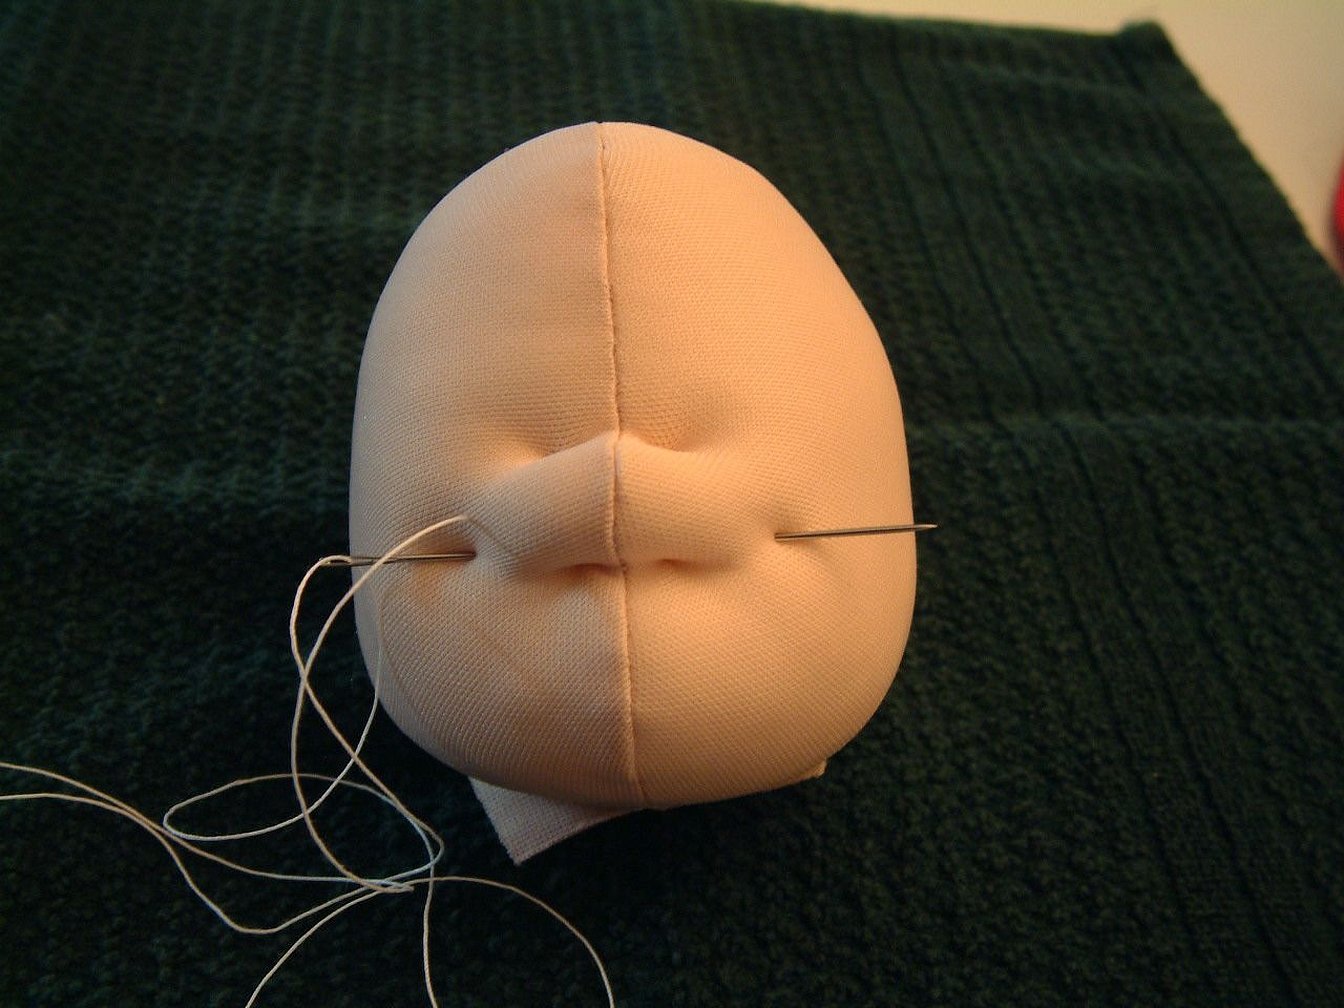
When doing this work, you need to remember about thick winter quilts. They usually have a pattern stitched on them that forms certain bulges. The head needs to be stitched through. It is better to fix the tightening from the back side, so the seam will be easier to cover with hair. When performing the actions, you can use a strong or regular thread.
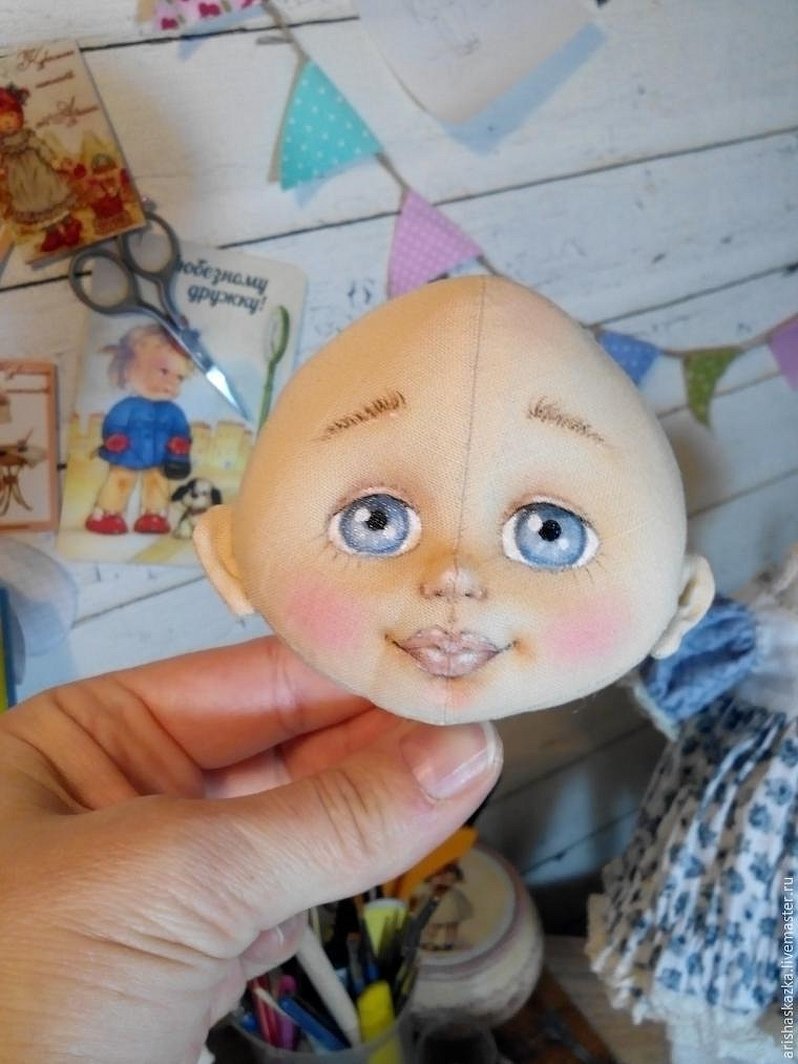
The most difficult part of the work is painting the face of a textile doll. This mainly concerns working with facial features, especially the eyes. The character of the toy and its mood depend on them. Dolls that look more realistic are becoming increasingly popular. Some craftswomen use their artistic talent and paint faces that captivate even those who are completely indifferent to toys.
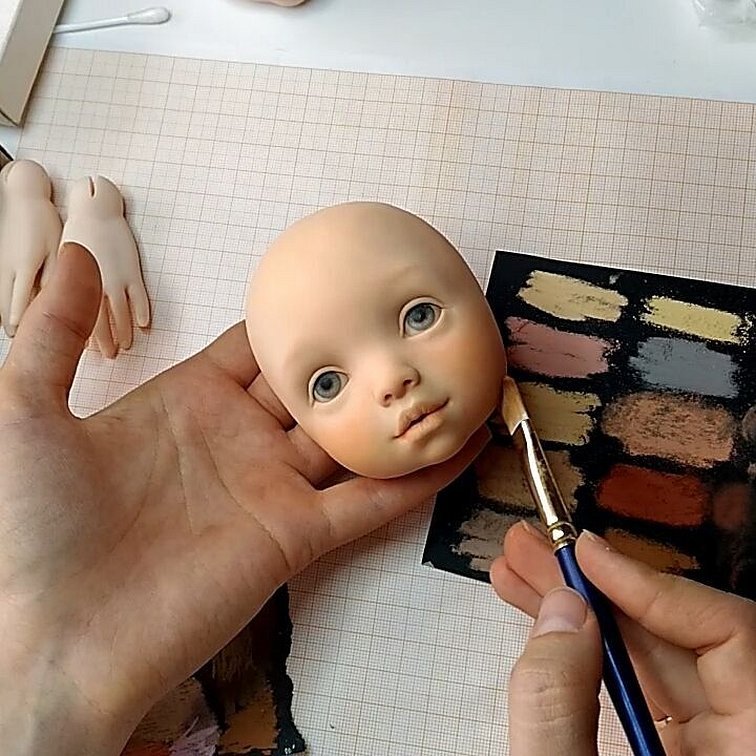
To tone the doll's face, you can use both acrylic paints and pastels. The second option simplifies the work much more, since the shading is quite good. Pastels should be used dry. In no case should you take oil pastels.
Using several halftones allows you to make the doll's face more natural. To tint the cheeks, you can use pink or light pink shades. Light brown, beige, and dark beige tones are suitable for tinting the rest of the features.
Important! You can draw the eyes and thin dark lines using acrylic fabric paint. The upper part of the eyes is drawn with transparent acrylic varnish.
Basic rules for tightening
To complete the master class you will need:
- Threads. They must be reliable so as not to break. If the thread breaks, the doll will have a distorted face, and as a result, the volumetric work will have to be redone.
- A special long needle that can easily pass through the doll's head blank without getting lost in the stuffing.
- The actual doll head can be made from nylon tights.
Taking into account the basic rules of tightening the doll's face, you can create a real masterpiece with your own hands. For one of the methods of making a textile doll's head, an ordinary stocking is used, which is filled with stuffing. Tightening the face of a textile doll in detail master class:
- After the nylon blank is completely stuffed, sewn and covered with the main material, markings are made.
- It is necessary to carefully mark the places where the nostrils will be, as well as the inner and outer corners of the eyes.
- The thread is threaded into the needle. It is important to use a new piece of thread for each new operation.
- It's time to move on to the most important part of the master class. The needle is inserted into the left nostril and brought out from the inner corner of the right eye.
- It must be returned in the opposite direction. The distance between the entry and exit points of the thread must be at least 2 mm so that the fabric does not tear.
- Each time the thread is pulled a little, but you need to make sure that it does not break.
- The action must be repeated symmetrically.
Important! Children's faces are quite plump. Therefore, a few manipulations with a needle and thread for expressive facial expressions will be enough.
How to paint a textile doll's face
How to paint a doll correctly? The textile toy should be cheerful, a little naive, a little surprised. The smiling mouth and the round snub nose are already stitched along the contour. To complete the work, you need to apply decorative makeup.
Please note! You can paint the doll's face with acrylic paints, although in some places it is allowed to apply war paint with oil paints.
In advance, you need to prepare a palette for diluting the paint, brushes of different thickness and hardness, white paper for testing. The master class begins with preparing the paint. The product should be laid out in a small amount on the palette, then dip the tip of a dry hard brush. The tone should be slightly darker than the "skin" of the toy. It is advisable to smear excess paint on a sheet of paper.
With light, quick strokes, apply the paint to the cheeks, into the recesses of the lines, near the eyes and mouth. You can slightly tint the nose. If the paint is not applied evenly enough, you can shade it with a cotton swab. Next, apply white paint to the eye circles.
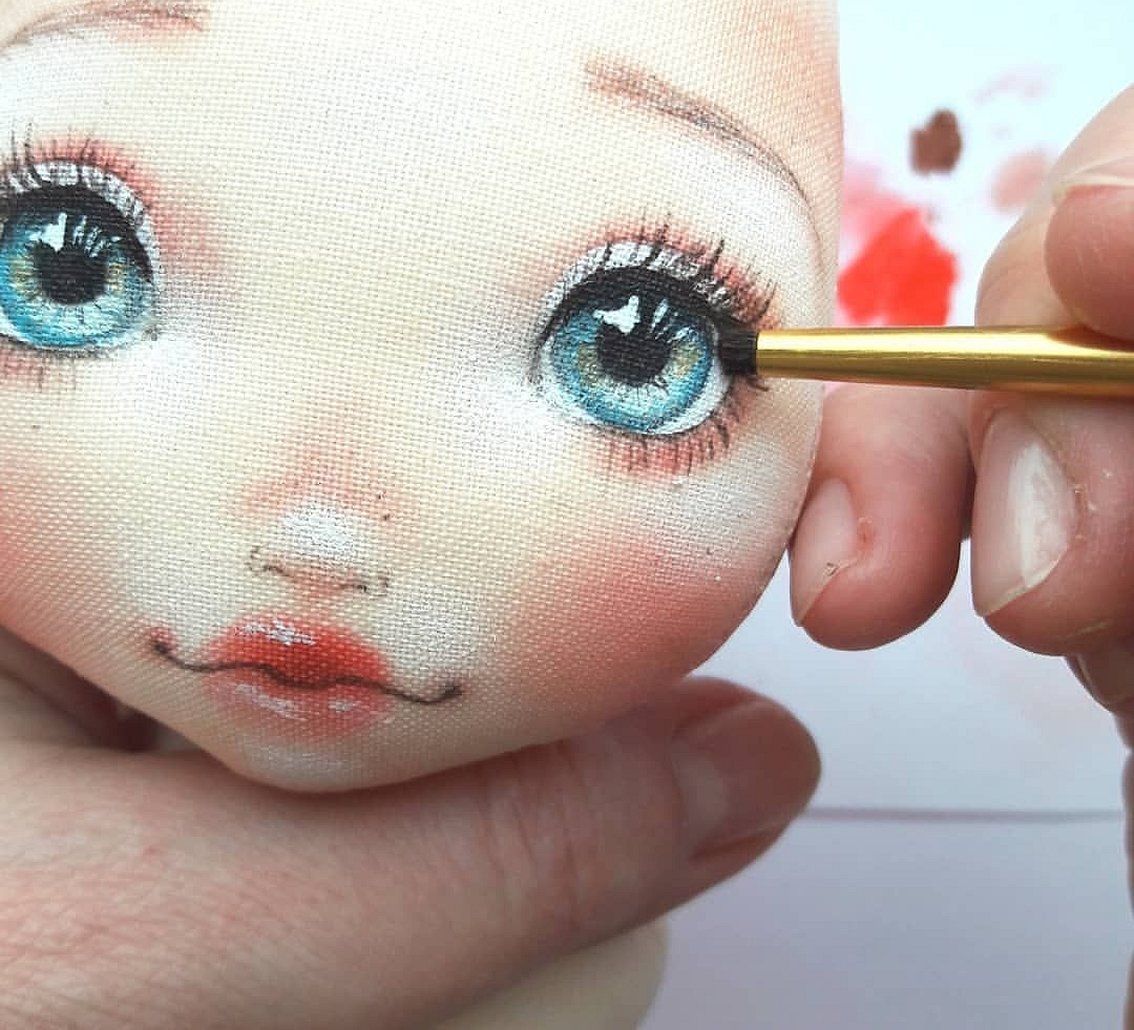
The center of the eyes should be marked with a pencil, then step back a little upwards (1-2 mm), and then draw a large circle from this center. After that, you will have to step back another 1 mm upwards and draw a smaller circle. The eyes should be made identical. Initially, you need to paint a large circle with light brown paint, then, without waiting for the paint to dry, make the outer diameter dark with a smooth transition to the center in light brown. After drying, you will have to mark the black pupil.
Using a thin brush, make two white spots on both pupils. One small, the other larger. Finally, apply dry red paint to the lips.
Should I prime my face before work?
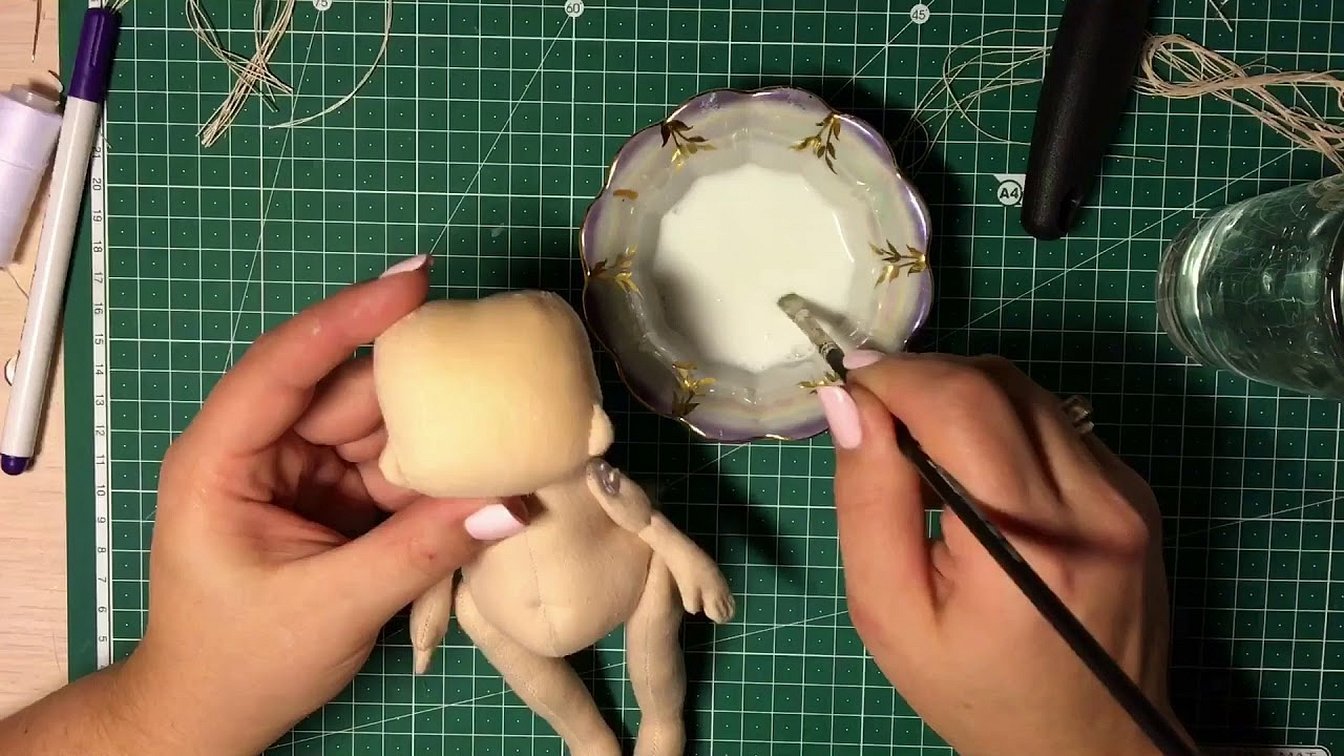
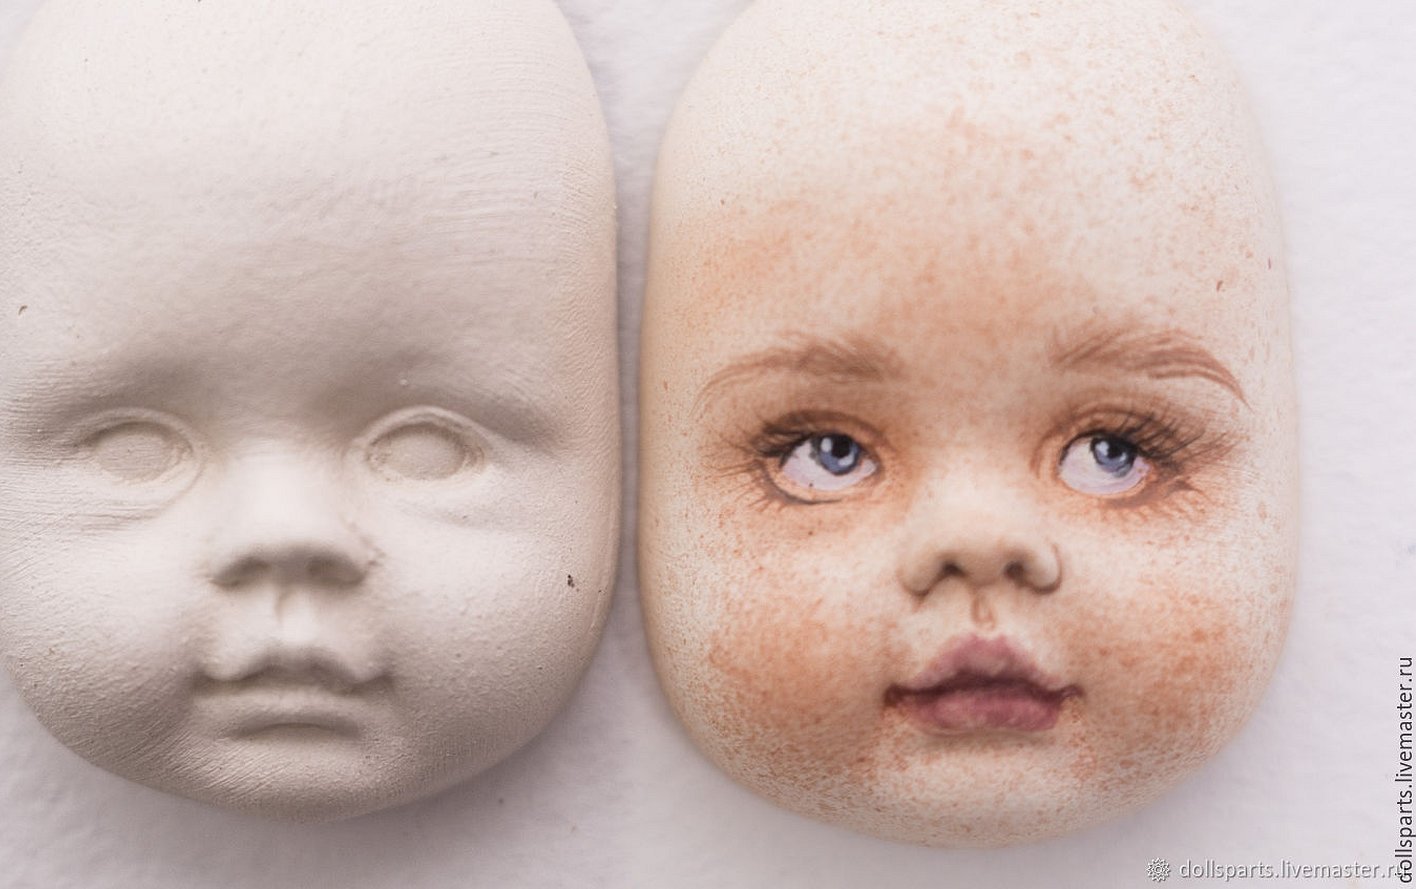
Many people wonder whether it is necessary to prime a textile toy? This coating is necessary for a doll with a three-dimensional face so that it holds its shape. To create a certain character, a textile doll must be painted and properly toned. But the very first step is to apply the primer.
When performing the work, the following composition of the fabric primer is used:
- PVA glue 1 tbsp. l. (15 ml.).
- Instant coffee 1.5 tsp.
- Water 50 ml.
Pour hot (warm) water over the coffee, let it cool, and then add PVA glue. Warm and cold solutions give different shades of color. If there are lumps, strain the liquid through a sieve. Using a dish sponge, dye the fabric. When tinting the fabric, stir the primer composition periodically so that the glue does not settle to the bottom of the container and the product is covered evenly. After priming, dry the product. You can leave the textile to dry in the air, on a radiator, or dry it with a hair dryer.
Please note! The primer composition can be stored for a week, but it is better to make it fresh. Coffee powder gives a richer color than granules. You can add cinnamon, vanillin. They must first be mixed with coffee, and then poured with water.
What paints to use
To create the image of a doll, it is better to use professional acrylic water-based paints. Oil paints for drawing a face are absolutely not suitable, as they react with the material from which the toy is made, completely destroying it. You can get a variety of effects using glossy and matte paints. They can be mixed together.
What else do you need for work?
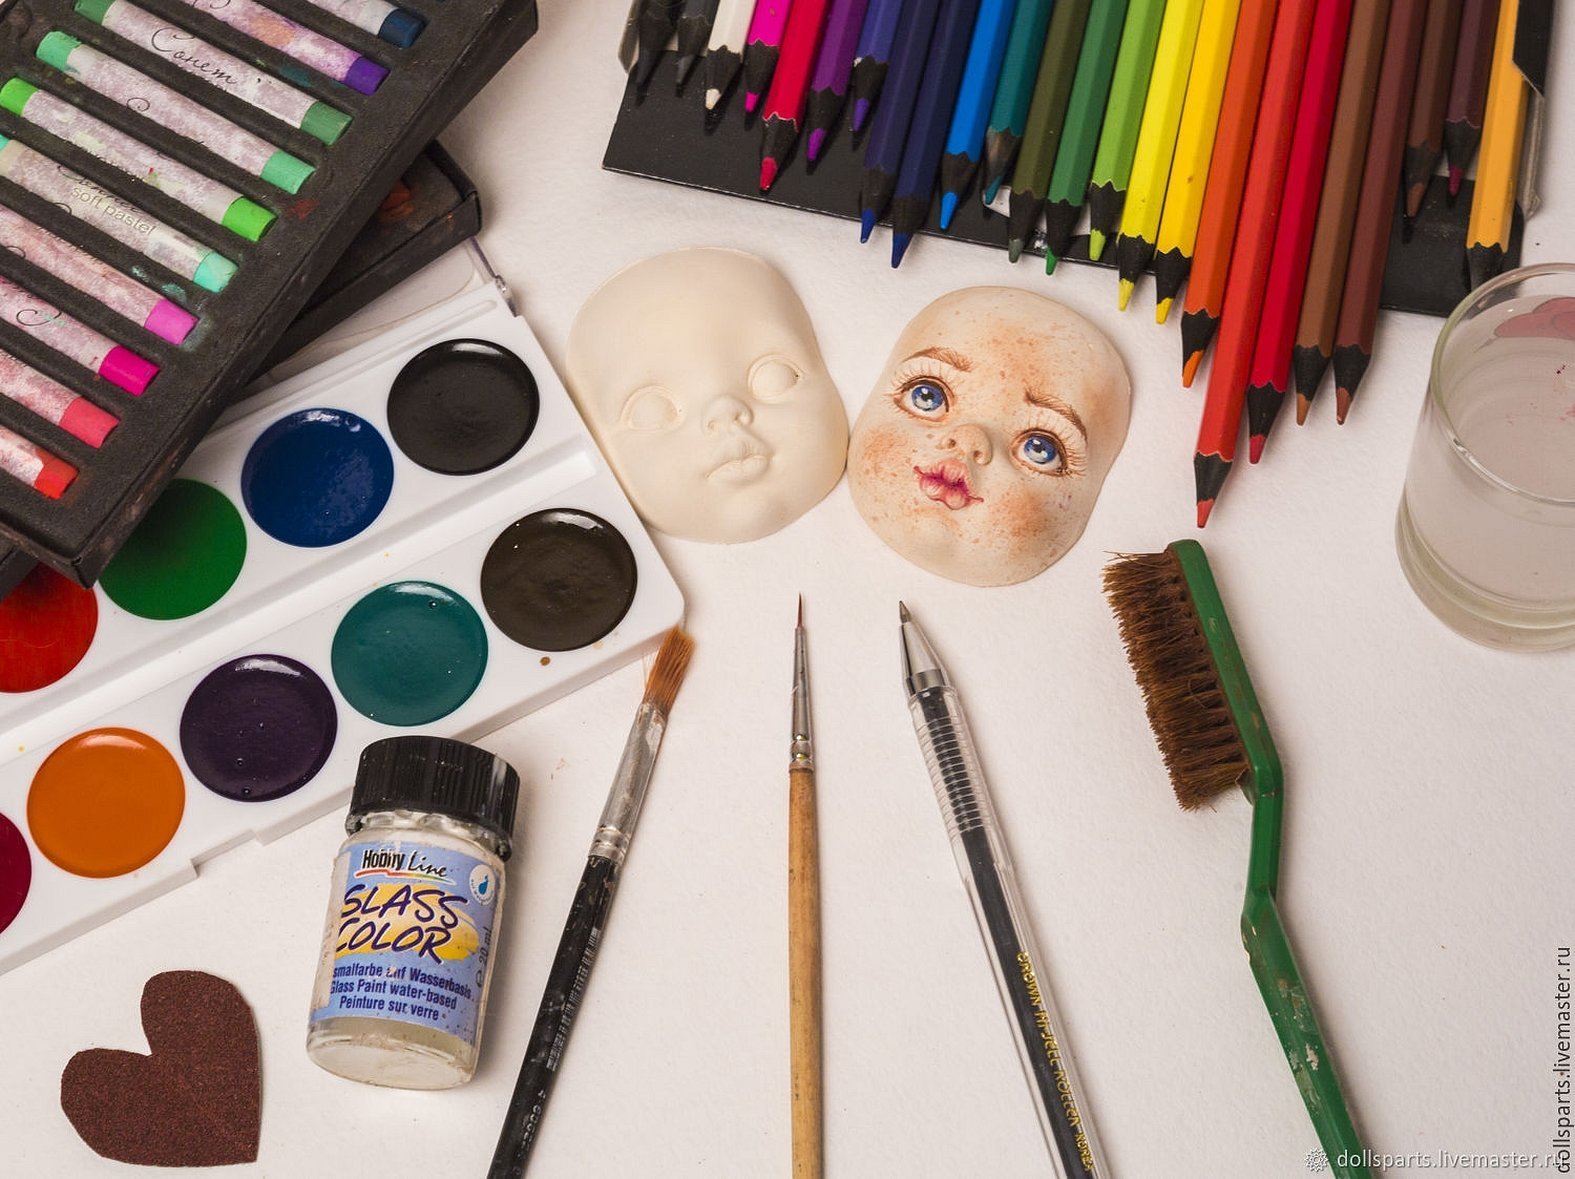
To draw a little doll face, you need to prepare the tools:
- Palette. It is better to choose glass or porcelain. It is convenient to mix suitable colors on it, but you can also use paper.
- A synthetic brush that draws details on the base well. Natural products do not go well with acrylic. It is best to choose a thin brush. This way, you can draw small details more easily.
- Toothpicks or cotton swabs are useful for working with the solvent.
How to Paint a Face on a Textile Doll: A Step-by-Step Master Class for Beginners
When painting a doll's face, you need to follow the instructions:
- It is necessary to draw two identical circles on the central axis (in the middle of the face). It always visually seems that the eyes should be slightly higher to the hairline. This visual deception occurs because the lower part of the face is more loaded with elements (nose, mouth, chin).
- Then, from below and above, deep into the circle, you need to draw the eyelids. The pupil should be slightly covered by the upper eyelid. Only in a very frightened person can it be in the middle, without touching the eyelid. But this will look ugly.
- The next step is toning the brow ridges. The distance from the eye to the brow needs to be made a little darker. This will create depth along with volume.
- The eye needs to be painted with not quite white paint so that the absolutely white highlight stands out against this background.
- Next, the iris and black pupil are colored. You should not use a pure color. It is advisable to add a little brown to the blue. The iris also changes saturation from the edge to the center.
- A shadow is drawn under the eyelid.
- You should place two white dots relative to the center of the eye opposite each other. One dot will depict a glare (lower), the second (upper) its reflection.
- Next, you need to outline the eye. The line closer to the highlight should be brighter. The upper eyelid will have to be drawn clearly, since it is all in dark eyelashes and has a shadow. The line of the lower eyelid should be made much lighter and almost dotted, darkening towards the outer corner.
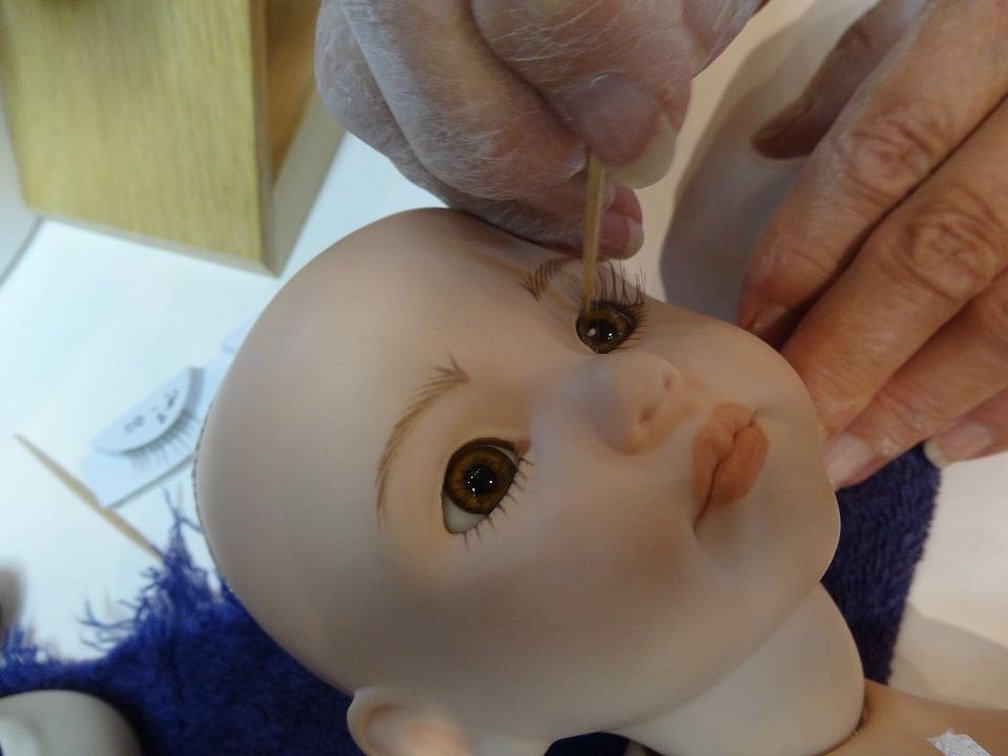
- All that remains is to tone the eyelids, nose, and lips in volume. The final process is almost real glued eyelashes.
In conclusion, it should be noted that creating a doll's face is quite a painstaking job, in which you need to master various disciplines and skills. When performing actions, you should remember the artist's rule - it is better to draw in layers. By gaining the desired color intensity layer by layer, you can avoid rough lines. Accordingly, the doll's facial features will look more natural.


