There are many sleeve models and cuff options. All of them can be calculated based on a basic pattern. You can choose the most suitable sleeve model and prepare a pattern for it. To do this, you need to understand the principles of calculation and the sequence of actions when performing it. In this way, you can create a pattern for the type of sleeve you like.
- Determining the parameters of the length and depth of the armhole
- Measurements for construction
- Girths
- Lengths
- Construction of a basic pattern for a one-seam sleeve of a garment
- Allowances to add to sleeve width
- Set-in sleeve of medium width for a full figure
- Peculiarities of pattern construction
- Wide set-in sleeve with set-in cuff - sewing
- Set-in sleeve with low collar and set-in cuff – sewing
- Short set-in sleeve - sewing
Determining the parameters of the length and depth of the armhole
The construction of the armhole affects not only the fit of the sleeve, but also how loosely the chest fits and how the entire garment fits the figure. The armhole is the shoulder opening to which the sleeve is sewn. If a sleeveless garment is being made, the arm is threaded through this opening.
The armhole length is the measurement of the opening taken from top to bottom. It can be determined using a ruler. Usually, this requires measuring this parameter for the clothes that are being worn. In this case, the arms should be freely lowered down.
This value can be measured more accurately from the back. The starting point is at the top, where the edge of the shoulder slope is located. When palpating, you can feel the bone in this place. The distance should be measured to the lower edge of the armpit.
The width of the armpit is the change in the widest part of the armpit horizontally. It can be determined more accurately by measuring the length of the segment between the front and back highest points of the armpit.
Measurements for construction
When taking measurements, the person being measured should stand straight and without tension. In this case, it is necessary to pay attention to the following:
- The arms should be lowered along the body. It is important to pay attention to this when the model is a child.
- The feet should be positioned so that the heels are together and the toes are slightly apart. The distance between the toes should be approximately 15-20 cm.
- The model can check the correctness of the measurements taken by standing in front of the mirror. This will help make the process more accurate.
- For greater accuracy, the client must wear only underwear when taking measurements. Sleeveless, tight-fitting clothing is possible.
- To increase the accuracy of the measurements taken, marks can be placed on the body. They can be marked with chalk or pins can be placed in these places.
- It is recommended to place the base of the neck, shoulder line and shoulder point on the model's body. These parameters are very important for the sleeve pattern to be drawn up correctly.
- The upper edges of the armpits are marked. They are located at the same level as the protruding parts of the shoulder blades.
Accurately taken measurements will help to create a high-quality pattern. This way you can make any sleeve model, for example, a raglan.
Girths
When constructing a pattern, not only the front and back armhole depths are used, but also the sleeve circumferences at the elbow and wrist. When using these values, it is necessary to take into account the adjustment for the fit.
Lengths
The pattern requires the sleeve length, which is measured from the edge of the shoulder to the girth. You will need to determine where the elbow is located. For this purpose, you need to measure the distance from it to the edge of the shoulder.
Construction of a basic pattern for a one-seam sleeve of a garment
Various methods can be used to carry out the construction.
One of the calculation methods is based on the use of a formula. In this case, the armhole measurement (length or width) is calculated as the sum of the armhole measurement and the amount of allowance, which depends on the required degree of fit of the sleeve.
Another method is based on the construction of a grid of measurements. In this case, the following procedure is used:
- First, look at the front and back patterns together, joining them along the side seam.
- The required length is measured from the center of the back.
- Measure the distance from the front to the sleeve opening.
- Based on these measurements, the length and width of the armhole are determined.
This is how the dimensions are determined when constructing a pattern for a one-seam sleeve.
Another method for determining the armhole depth can be used.
To perform the procedure, you need to do the following:
- The back and front pieces are placed next to each other. They need to be positioned so that the lower points of the armholes touch.
- The upper edges of the armholes of the front and back parts of the product will not touch - there will be some distance between them. Let's mark these points, respectively, as A and B. Now we need to draw a segment between them.
- From the point of contact between the bottom of the back armhole and the front, you need to draw a line vertically upwards. It should intersect the segment between points A and B.
- The distance from the intersection point to the bottom of the armhole is considered the armhole depth.
When using this value, you need to make an adjustment for the degree of tightness.
The pattern will require the front and back armhole measurements. The first is measured with a centimeter along the edge of the armhole, laid on the shelf. The back armhole measurement is measured in a similar way, but for this, the back pattern is used.
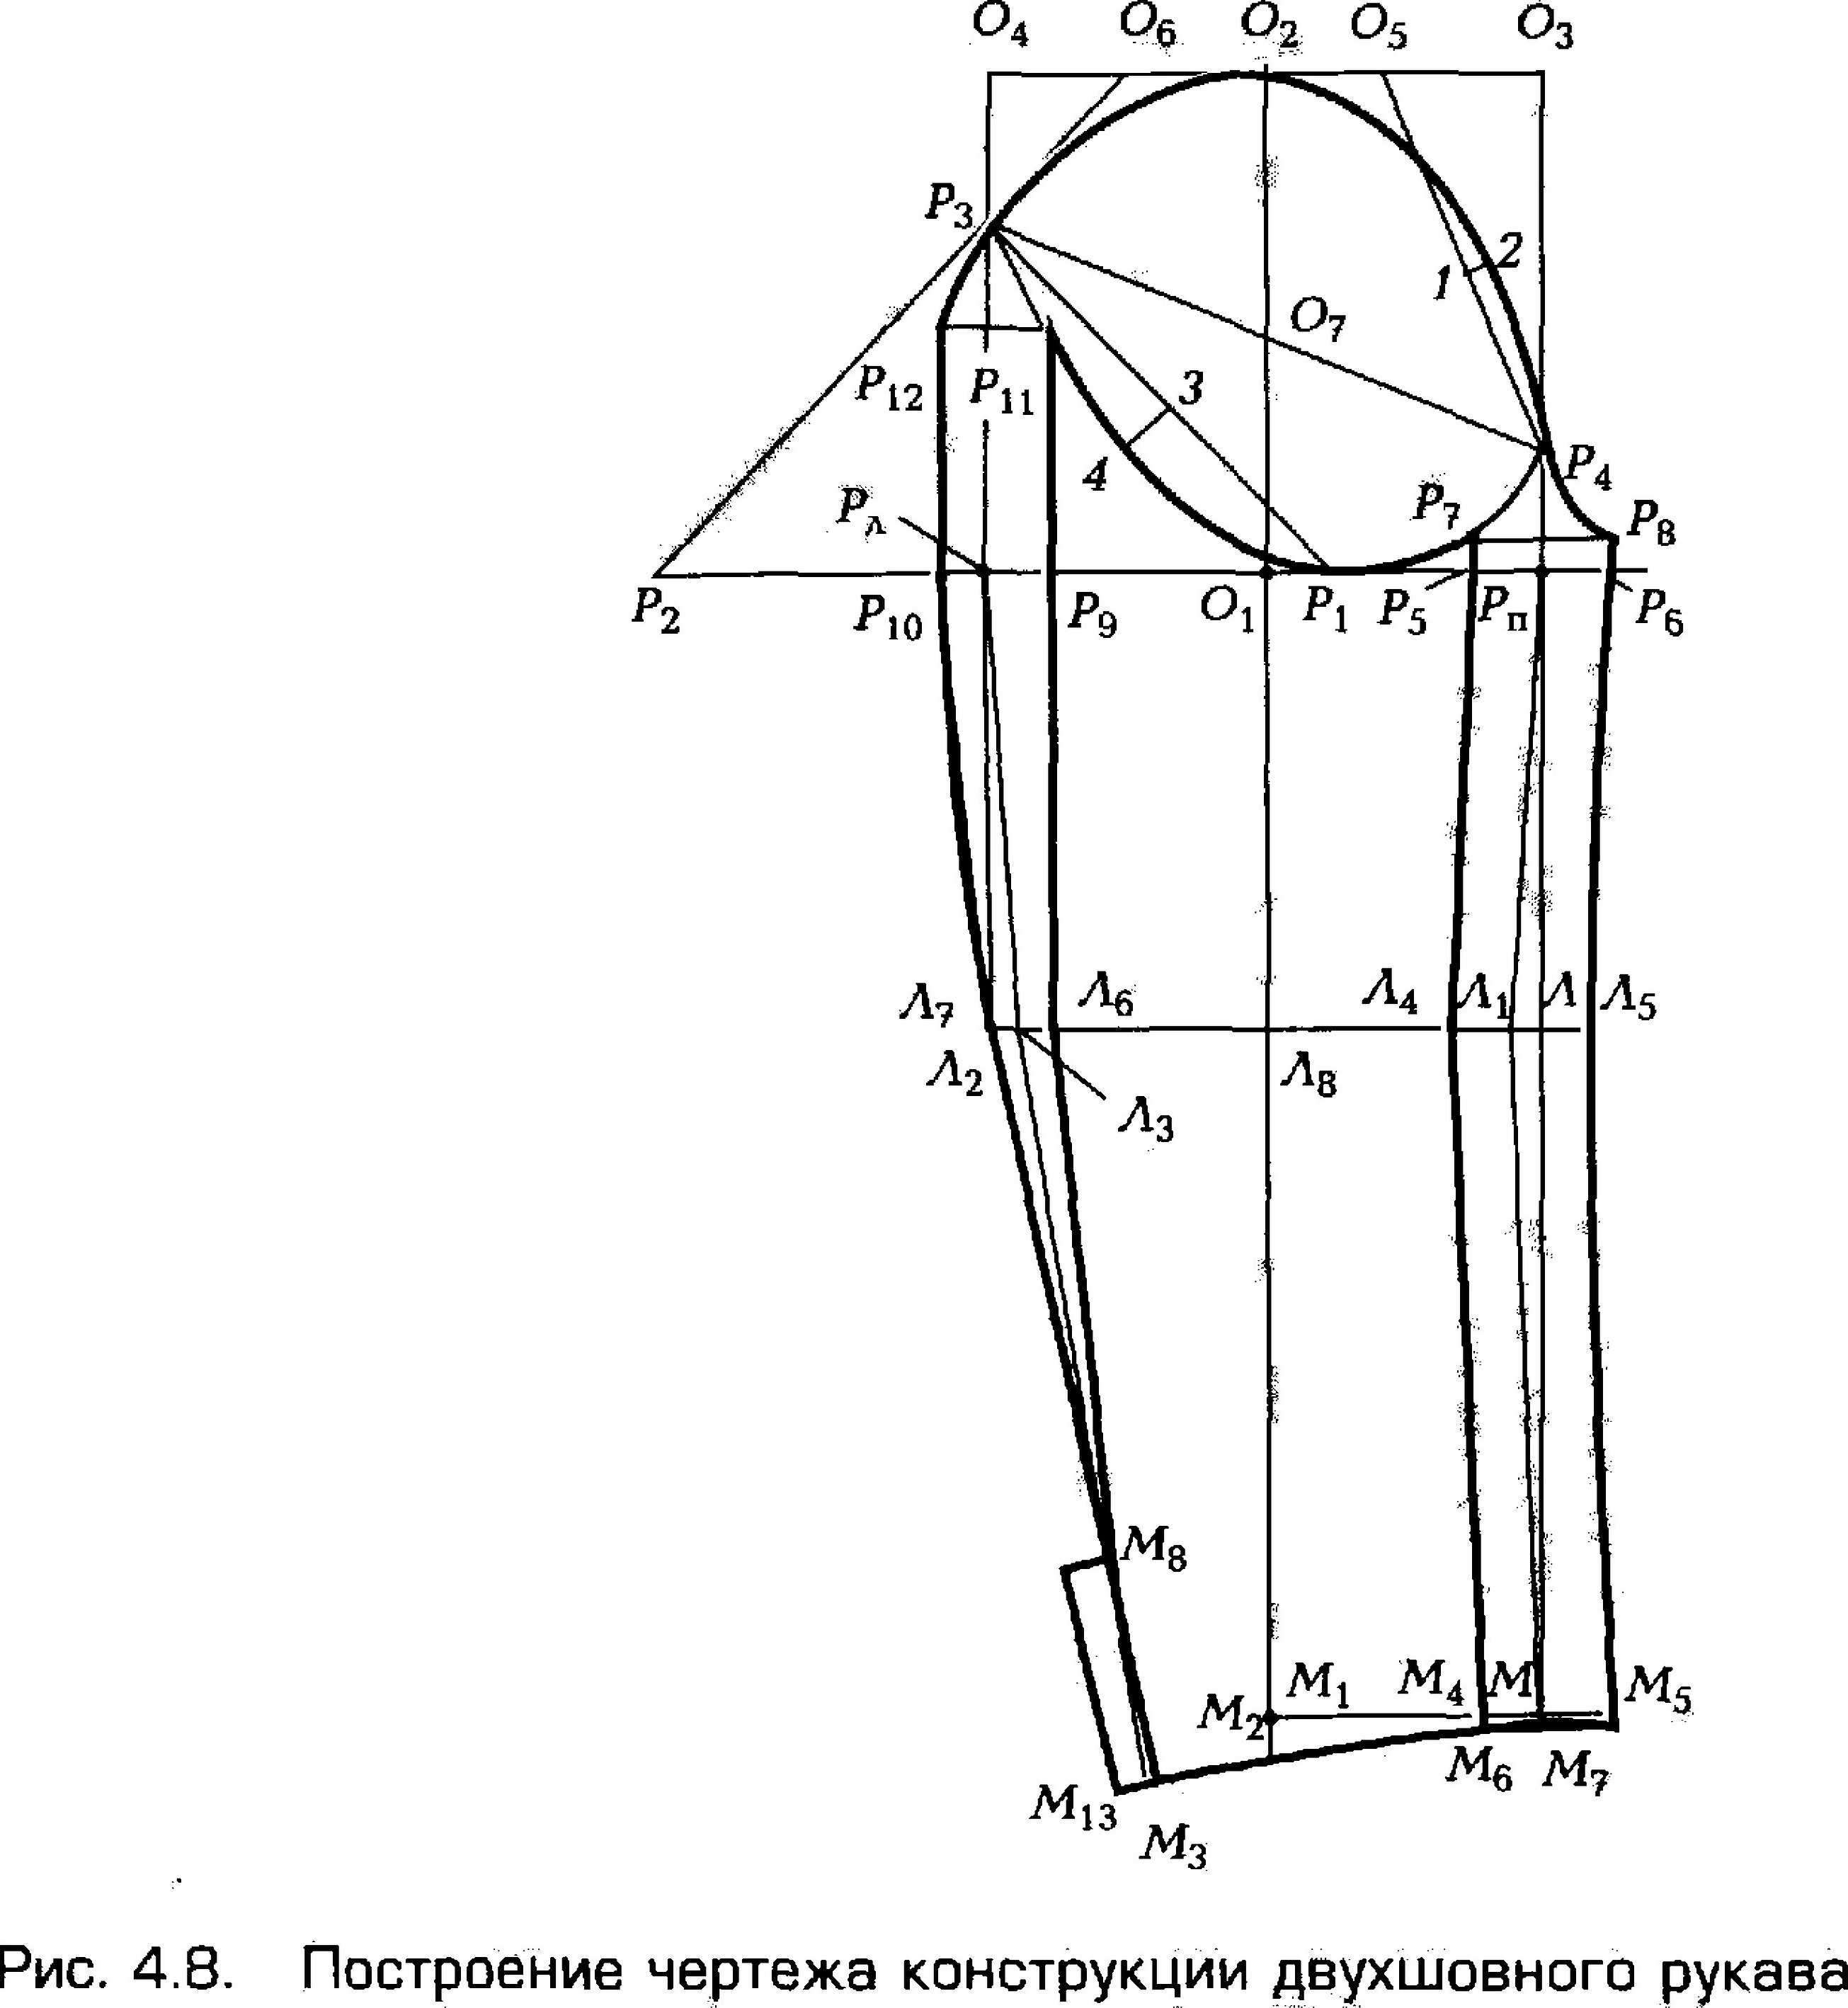
Below we will tell you how to cut out a sleeve:
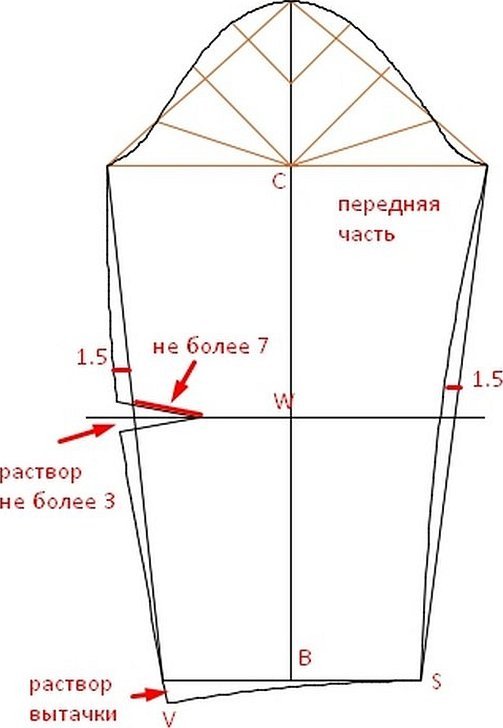
- First, the construction begins with a vertical line on which the necessary points must be set aside. A and B are the extreme points – the edge of the shoulder and the end. The distance between them is the length of the sleeve. Point C is the depth of the armhole. Segment AC is the depth of the armhole. Point F denotes the middle of this segment.

- At the level of point C, draw a horizontal segment. Point D is placed in the backward direction. The distance to it is three quarters of the length of the back armhole. Point E is marked in the forward direction. The distance to it is equal to three quarters of the length of the front armhole.
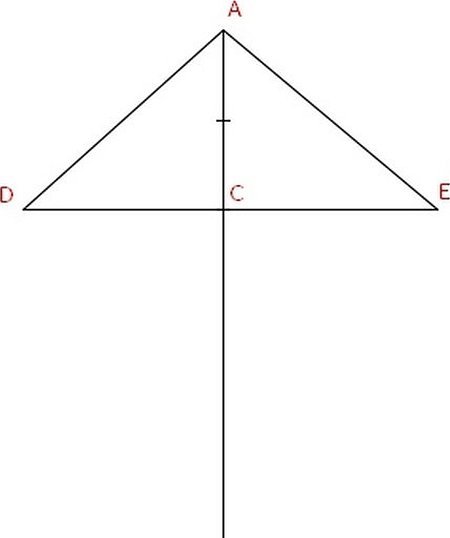
- Based on the constructed points, you need to draw a triangle (the vertices will be points A, D and E).
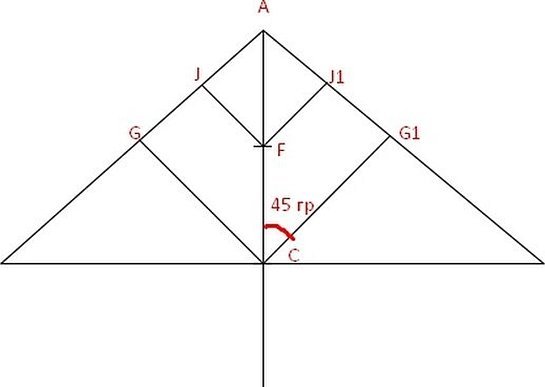
- From point C, two segments must be drawn at an angle of 45 degrees to the vertical: on the front and back inclined sides of the constructed triangle. The same constructions are made based on point F.
- At the bottom, on the inclined sides of the triangle, half the distance to the nearest intersection points is measured.
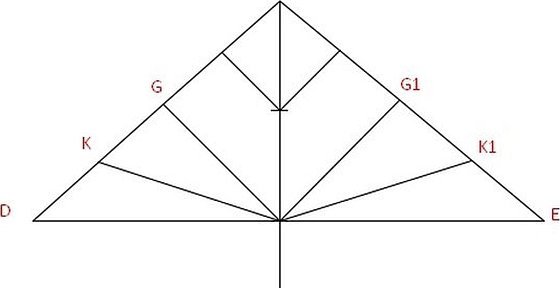
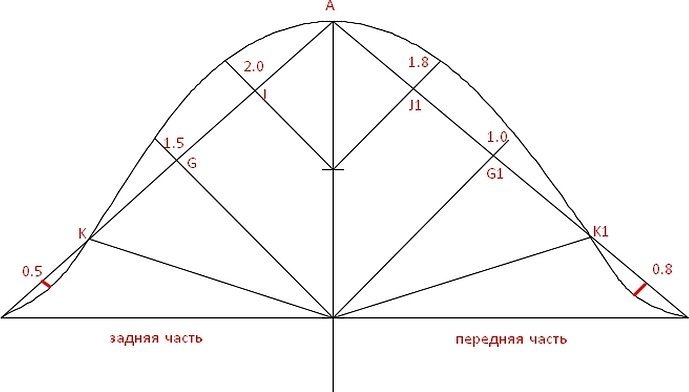
- Now all that remains is to draw the armhole using the available templates.
- Now you need to put the elbow point off the extreme shoulder point. In this place, make a front dart. Its solution cannot exceed three centimeters, and the length - seven. It is also necessary to provide another front dart at the bottom of the sleeve.
Now the basic pattern is ready. It will tell you how to sew the sleeve. It is necessary to provide for an allowance for the armhole for a tight fit.
It is important to remember that the size of the allowance depends not only on the desired freedom of fit, but also on the type of product being created. For example, for a jacket the allowance will be greater than for a dress, and for a coat it will increase even more.
Allowances to add to sleeve width
When sewing clothes, they may have differences related to the features of the silhouette. This lesson must be taken into account. In this case, fitted, semi-fitted and other types of dresses can be considered. The same features are taken into account when sewing sleeves.
Important! When making a sleeve, an adjustment of the appropriate amount is made to ensure the desired degree of fit.
Below are the allowances for dresses according to the desired sleeve option:
- when it comes to a tight-fitting sleeve, an allowance of 2–3 cm is used;
- if the adjacent option is considered, then this value becomes equal to 4–5 cm;
- semi-fitted sleeve means 5-7 cm;
- for extended, 8–9 cm is required;
- for a loose sleeve, an addition of 10–11 cm is suitable;
- for a very loose fit, you will need to provide 10–11 cm.
Important! For a jacket, the allowance will increase by 2–3 cm. If you are sewing a coat, it will increase by about the same amount. This calculation is used not only for sewing, but also for knitting.
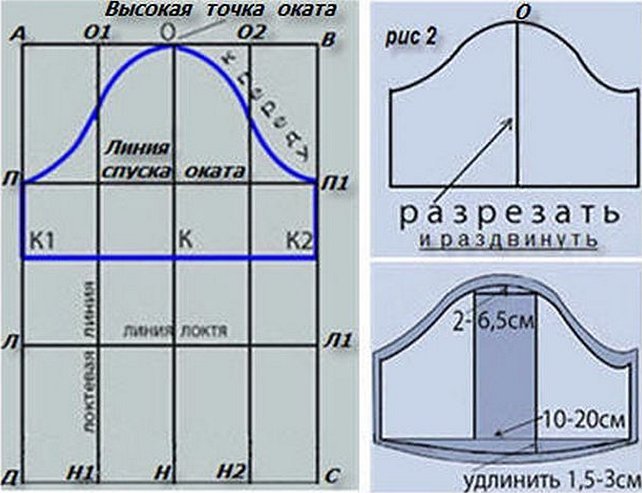
Set-in sleeve of medium width for a full figure
Before creating a pattern, you need to take several measurements:
- It is necessary to use the existing drawing and make a vertical measurement of the armhole diameter. To do this, it is necessary to combine the tops of the shelf and the back part. The measurement is made between the corresponding marks.
- Now you need to mark the middle of the segment that was obtained. From this point you need to draw another segment that goes to the mark of the depth of the sleeve cutout.
- From the central point of the top line of the pattern, a perpendicular is lowered to the horizontal line that touches the bottom of the sleeve.
Now you need to calculate the sleeve width. To do this, you will need the shoulder circumference measurement obtained earlier, to which you must add an adjustment for the desired degree of fit.
Below we will tell you how to cut out a sleeve according to the armhole of the finished product:
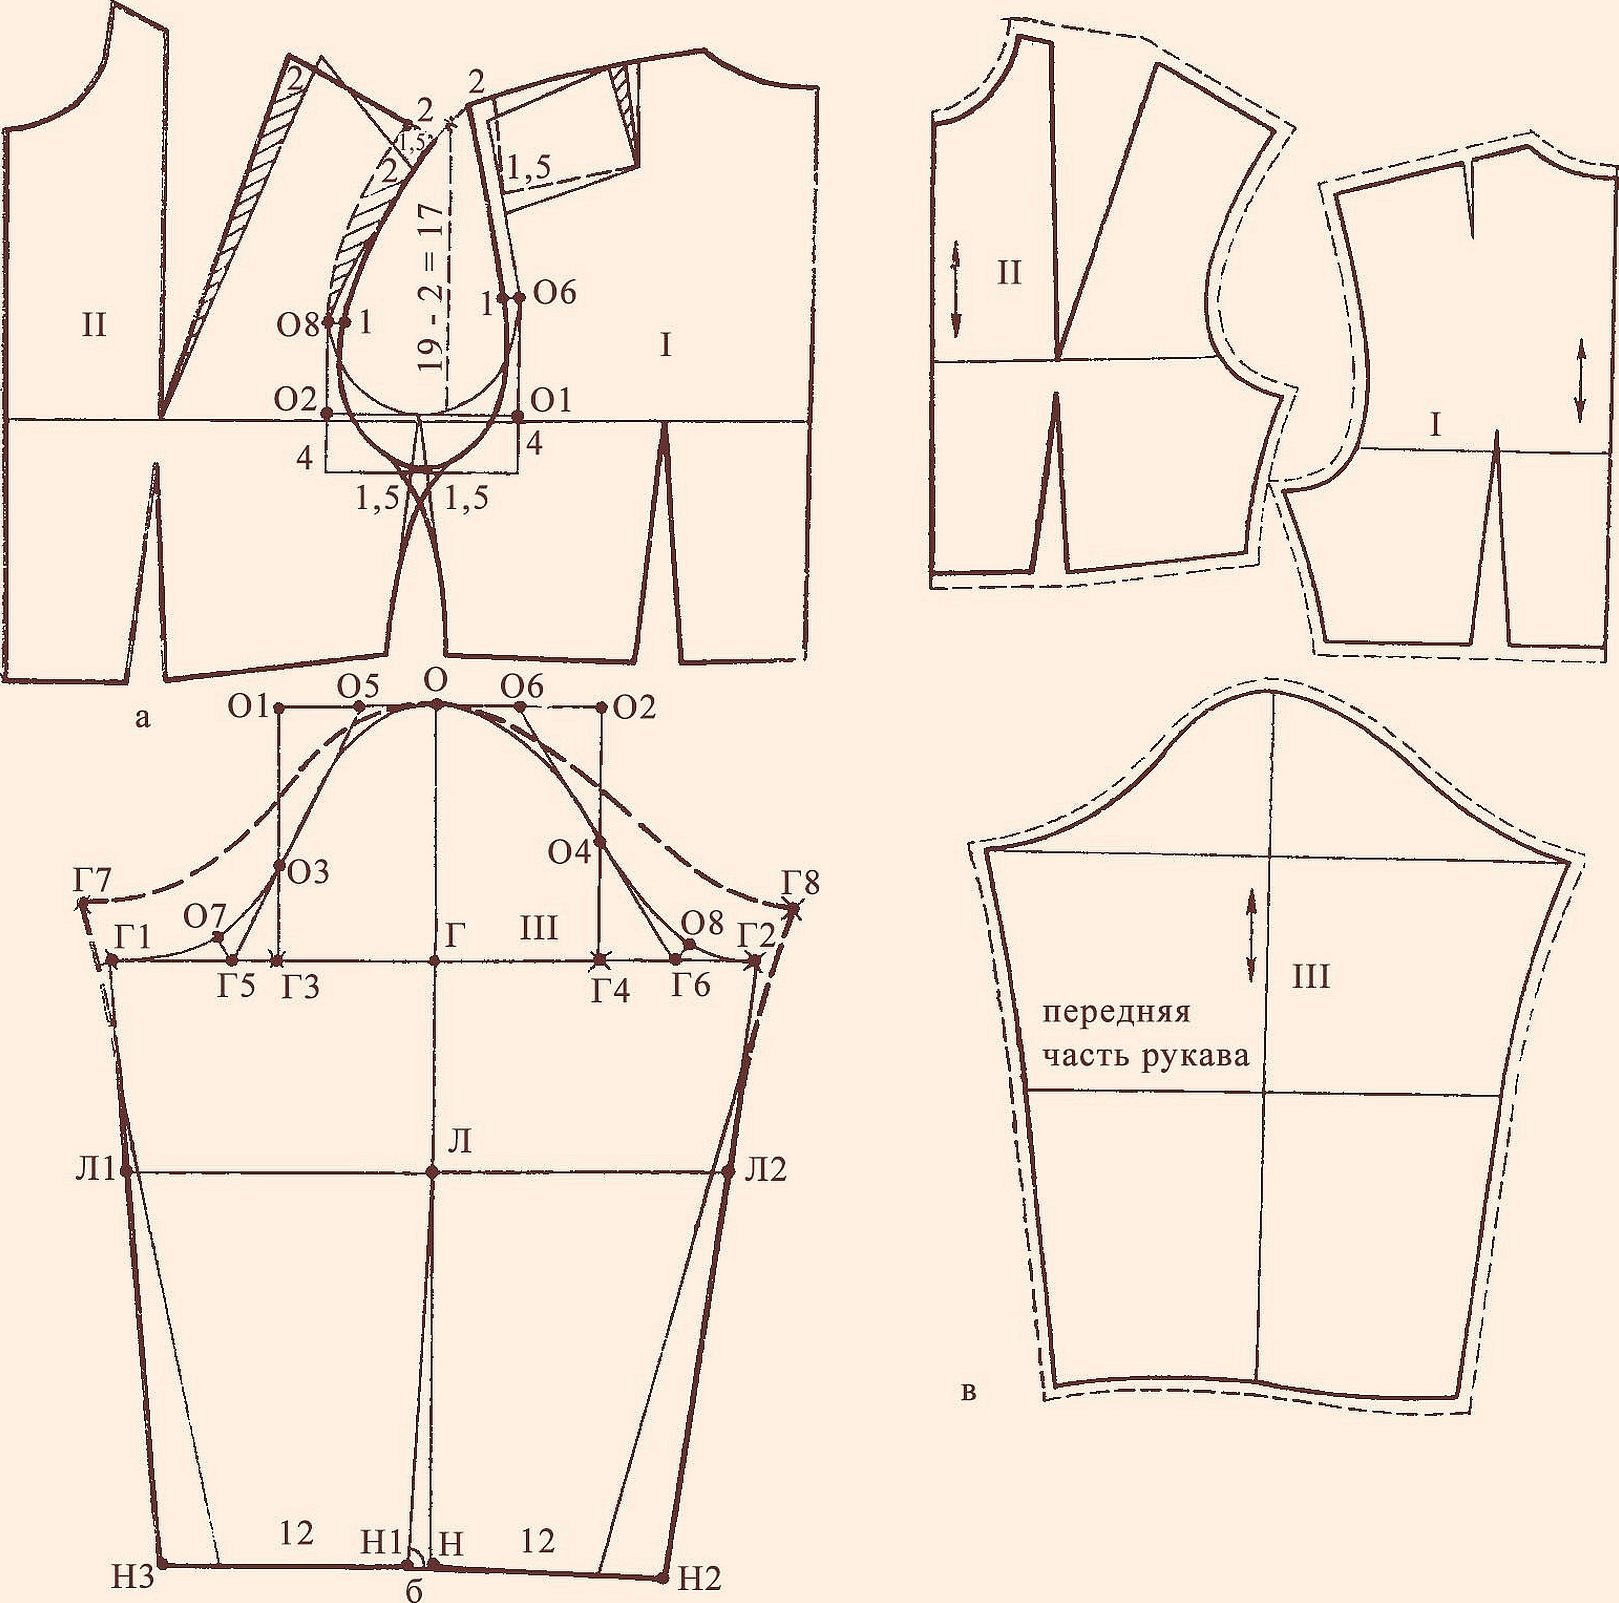
- To begin constructing the pattern, you must first draw a horizontal segment that will mark the upper edge of the sleeve. From it, draw a line vertically downwards, on which the length of the sleeve is measured.
- The starting point of the cut is the middle of the upper horizontal segment. From it, you need to put aside half the width of the sleeve in both directions and draw vertical lines at these points.
- Now you need to determine where to cut the elbow. To do this, you need to measure the length of the shoulder part and put the necessary mark. This distance is set aside from the extreme point of the sleeve cap.
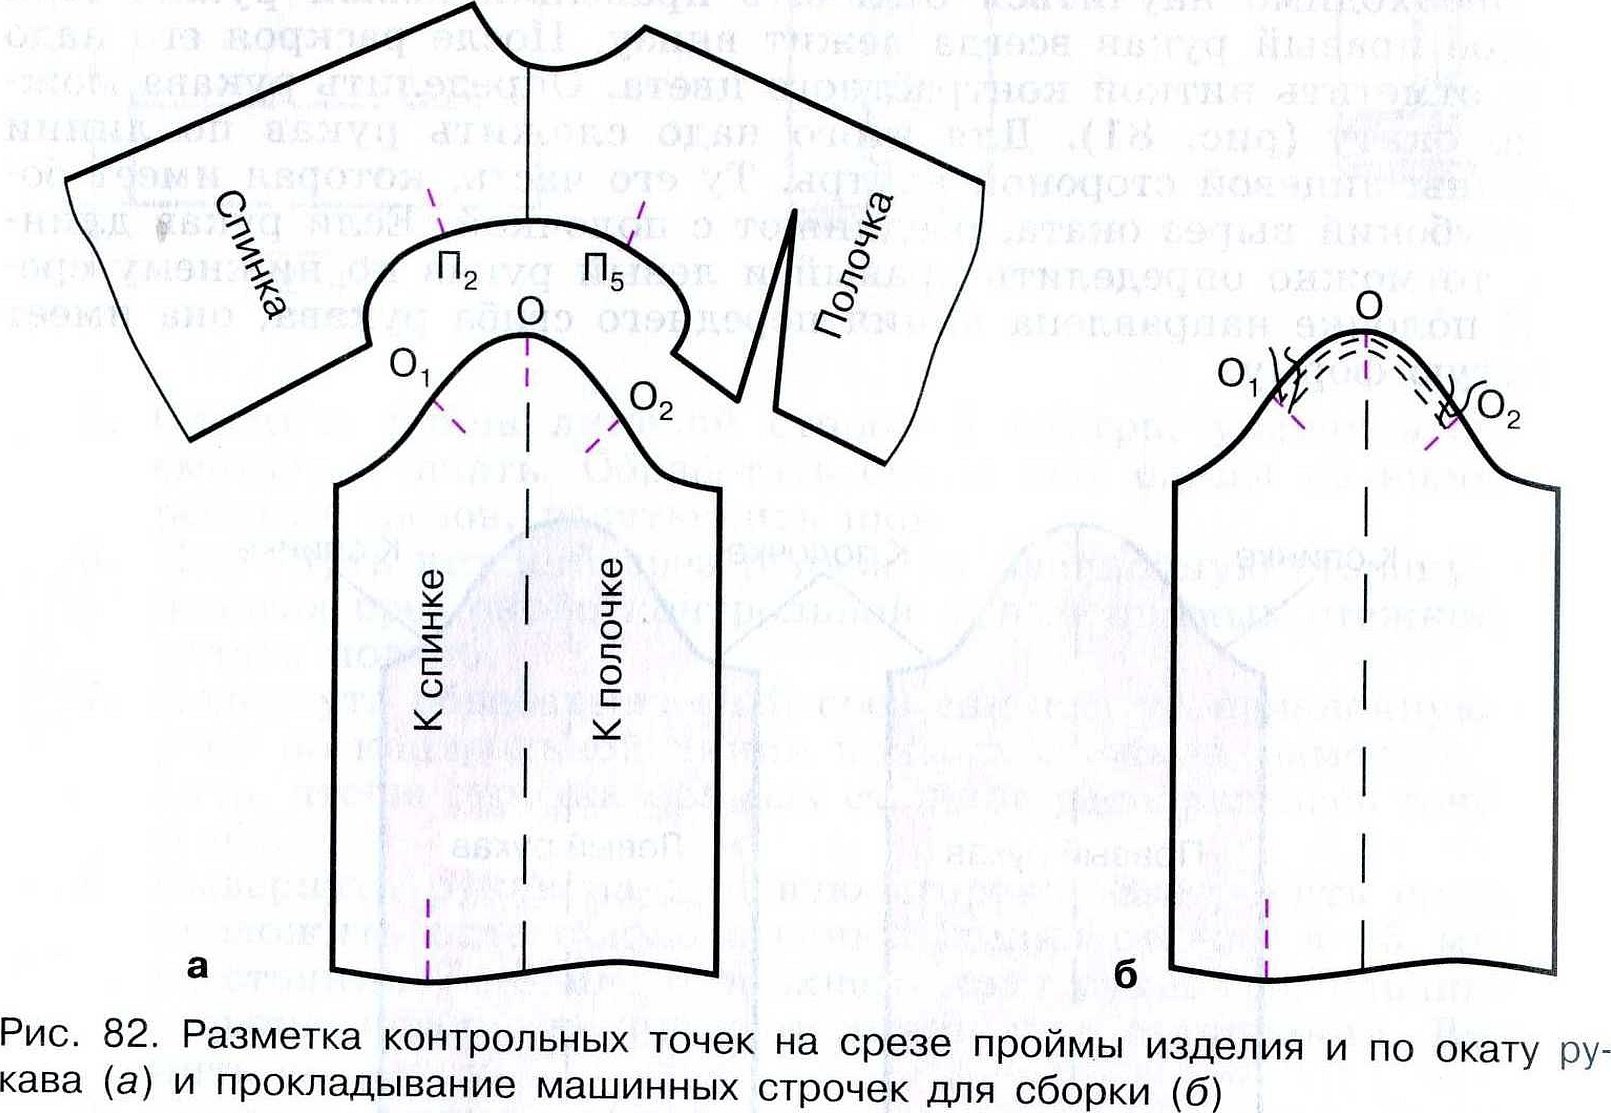
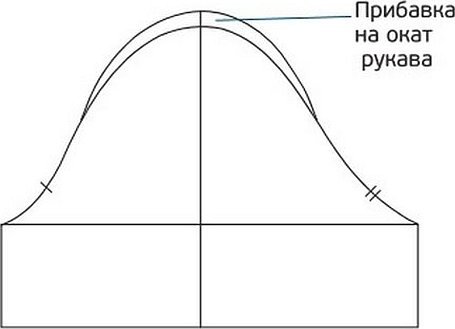
- In the upper part of the drawing, mark the armhole with a smooth line. It is important to make marks at the control points. It is necessary to ensure that these marks coincide on the sleeve pattern and in the corresponding places of the back and shelf.
- Now you need to outline the bottom of the drawing with a smooth line. Here, just like in the upper part, you need to put marks at the control points and then make sure that they coincide with similar marks on the back and shelf.
- Mark a line that corresponds to the front sleeve roll.
- Now you need to mark off the lower sleeve width on the pattern.
- The lower bevel is drawn in a vertical downward direction.
- Now all that remains is to outline the lower elbow roll.
After this, the basis of the sleeve pattern will be formed.
Peculiarities of pattern construction
During the work process, you need to pay attention to the features of creating a pattern:
- Dividing the armhole into upper and lower parts helps to place marks on it and on the main part of the pattern more accurately.
- Once the sleeve of the garment has been sewn into the armhole, it is necessary to try it on to ensure that it has been cut and attached correctly.
- During the work process, it is necessary to take into account that the size of the armhole exceeds the armhole dimensions by the amount of the supplement intended to take into account the degree of fit.
- The fit of the sleeve needs to be adjusted along the upper part of the armhole. In the lower part, it is made minimal in size. This happens because there is no need to adjust the armhole in this place. This should be taken into account when cutting any sleeve, for example, a lantern.
- Once the sleeve is attached to the armhole, you need to make sure that there is no excessive tension.
After finishing the work, you need to try it on to make sure that the sleeve pattern for the dress was made correctly.
Wide set-in sleeve with set-in cuff - sewing
There are several different types of cuffs. For example, you can consider straight or shaped. The former have a rectangular shape when cut. Shaped ones do not have a standard appearance: they can have a complex shape, depressions or protrusions, use internal or external angles. A flounce can be used for this purpose.
Additional information! The use of cuffs is acceptable on sleeves of almost any size. They can be full, three-quarters, half-size, or seven-eighths of the full size. It is important that their shape and color match the design of the collar and pockets of the garment. Even a novice dressmaker can sew them.
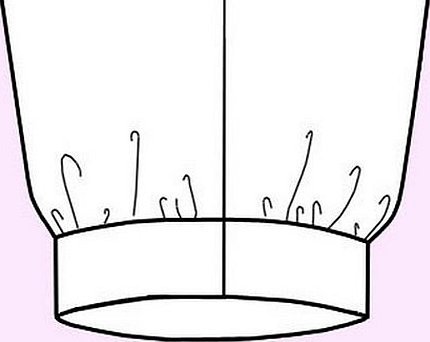
The edge of the sleeve when attached to the cuff can be slightly or strongly gathered. If it is not gathered at all, the cuff looks like a continuation of the sleeve.
This piece may be closed into a ring or have a clasp. In some cases, the cuff is constructed in such a way that it remains unconnected and does not use a clasp.
Set-in sleeve with low collar and set-in cuff – sewing
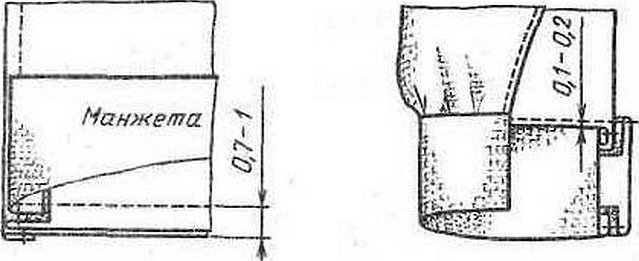
To attach the set-in cuff to the sleeve, place it face down on the inside of the sleeve and stitch along the edge.
Then it is folded back so that the front side faces outward. The seam will be visible from the outside. It should be folded down and stitched at a distance of 1–1.5 mm from the previous seam.
After this, you need to iron the fabric so that the seam is folded down and covers the joint.

Short set-in sleeve - sewing
There are several types of short set-in sleeves. The smallest is called a "wing". When a pattern for a short sleeve is made, the cap is made in the same way as in the basic one. The sleeve itself is 18–20 cm long. The length is measured from the top point of the cap. Such a sleeve is sometimes called a wing.
The sleeve model of the dress can be chosen according to your tastes. Cuffs can be used for decoration. When cutting, the main attention should be paid to the formation of the correct armhole line.


