Every season, fashion changes its guidelines, so the fair sex increasingly faces the issue of buying new clothes. Fashionable things make a girl's appearance attractive and also increase self-esteem. However, there are situations when a woman cannot buy items due to financial problems or in the absence of the desired model, size, color in stores. Then it is easier to sew a suitable thing yourself. As a result of sewing, the clothes look high-quality, unique. The article describes in detail the method of sewing blouses with your own hands.
- Differences between a blouse and a sweater
- Summer A-line blouse without sleeves and collar
- Blouse with original neckline trim
- Simple summer blouse with one-piece sleeves
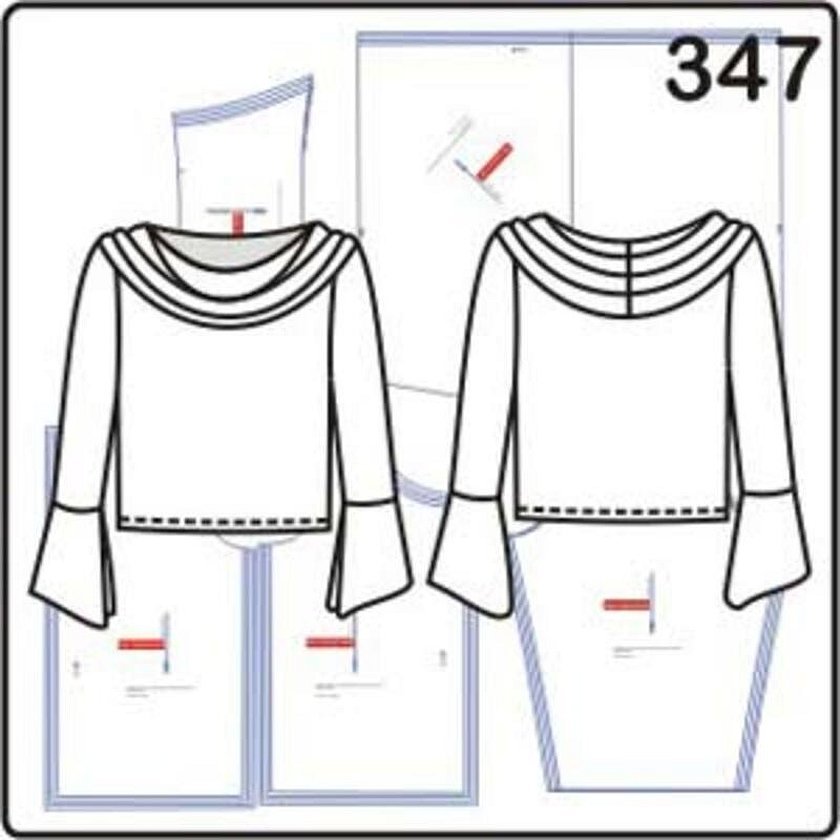
- Long sleeve blouse with gathers and a neckline
- Summer blouse with wing sleeves
- Knitted blouse (jumper) with gathers on the neck
- Short Sleeve Swing Neck Blouse
- Straight blouse with wide collar-cuff
- Batwing Sleeve Blouse
- Knitted blouse with raglan sleeves
- Fitted blouse with darts
- Summer tunic plus size
- Blouse with front tucks
- Summer blouse with ¾ sleeves
- Lightweight knitted jumper
- Sports style blouse
- Lightweight sweater (jumper)
- How to sew a blouse without a pattern
- The Peasant Blouse is a delicate, feminine option that suits any figure.
Differences between a blouse and a sweater
A blouse (from the French "blouson" - jacket) is a stylish piece of women's outerwear made of thin material, looking like a short fitted shirt. The classic type has short or long sleeves with collars and cuffs. The blouse is usually fastened with buttons, with the exception of tunics. Decorations include frills, ruffles, and beaded appliqués. It is especially popular in the summer.

Types:
- batnik - a model similar to a man's shirt;
- tops - blouses with thin straps;
- tunic - a product that looks like a blouse that turns into a dress.
Additional information! Basques, flounces on girls' blouses, and flyaway models are the trend of 2019.
A jacket is a piece of outerwear, usually with a high, buttoned collar. It is the basis for creating a sweater, pullover, jumper, jacket.
Criteria by which things are distinguished:
- fastening - with buttons or a zipper;
- by length - to the waist line, hips, knees, calves;
- material;
- appearance - loose, tight-fitting;
- collar - high, turn-down type;
- Sleeves - ¾, full length, short.
The main difference between a blouse and a sweater is the area of application. A blouse has a more formal look, so it is worn to work, meetings, and events. The pattern for a sweater is most often sporty, casual.
Before sewing, it is recommended to carefully take measurements. For sewing, the shoulder length is measured, and the length of the blouse, sleeves, waist, chest, neck, hips, and wrist are also determined.
Please note! To ensure that the product matches the desired result, you need to draw a diagram according to all dimensions.
All the patterns listed below are freely available on the Internet and are patterns for a simple cut blouse. The product is cut from a well-draped fabric that contains silk, cotton, and polyester. For example, guipure, chiffon. In rare cases, staple is used.
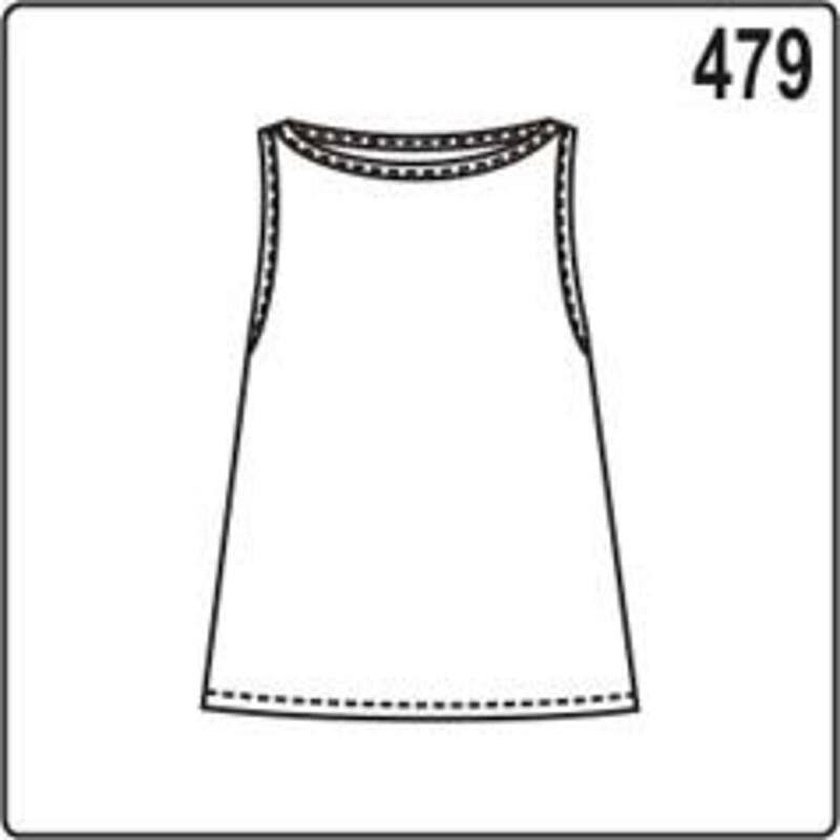
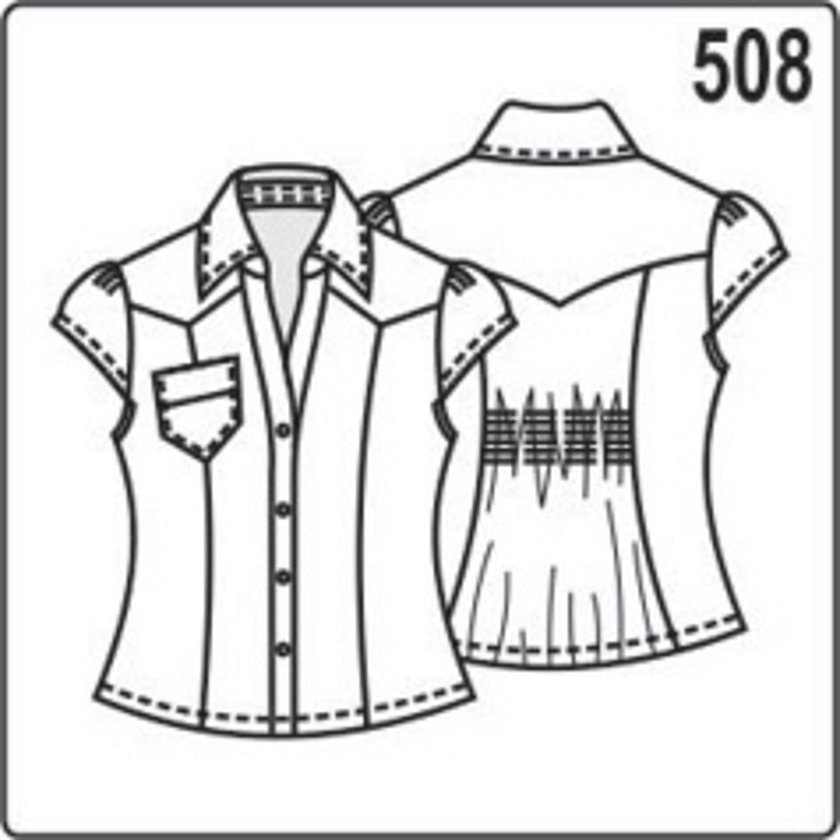
Summer A-line blouse without sleeves and collar
The armhole and neckline edges are processed using piping, which is cut with or without allowances. The allowance for the side and shoulder seam is 1 cm, and for the bottom - 1.5 cm. It is also necessary to cut out the piping for the edging of the necklines and armholes. If you have fabric with a pattern, the advice is to buy a ready-made piping of one color, without making allowances for the processed edges.
During cutting, the width of the cut without allowances is 3 cm. The length of the edging is measured according to the cut of the product with the addition of 1 cm.
When sewing, fold the front and back with the right sides together, stitch the shoulder and side seams of both parts. Iron the seams. Neaten the seams and the bottom edge. Iron the seams toward the back. Iron the bottom edge onto the garment. Secure the bottom with a finishing line using a sewing machine. Make a edging.
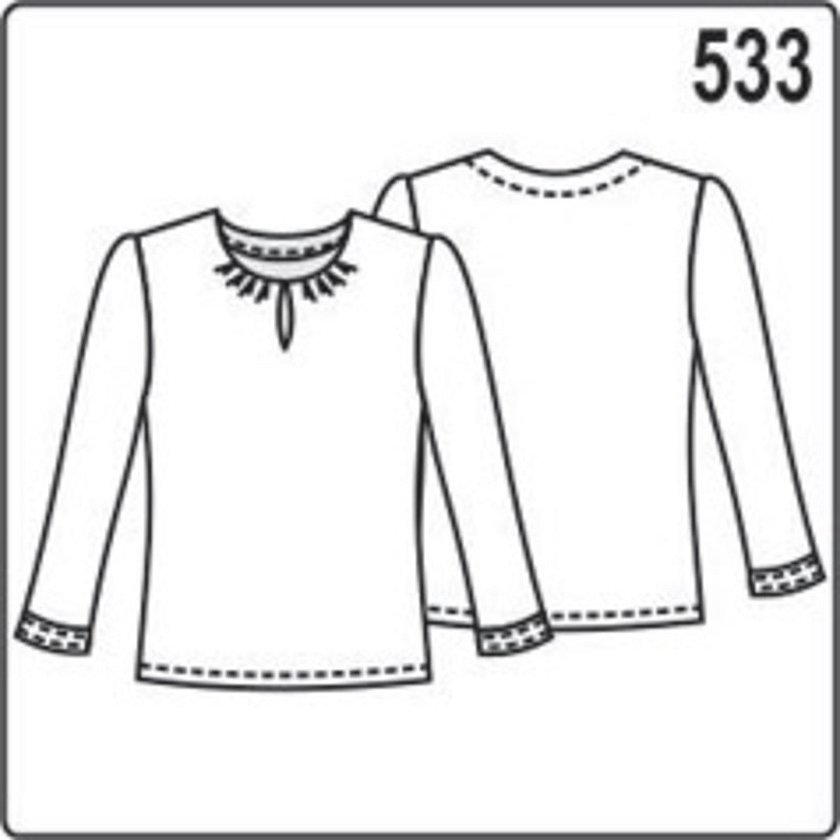
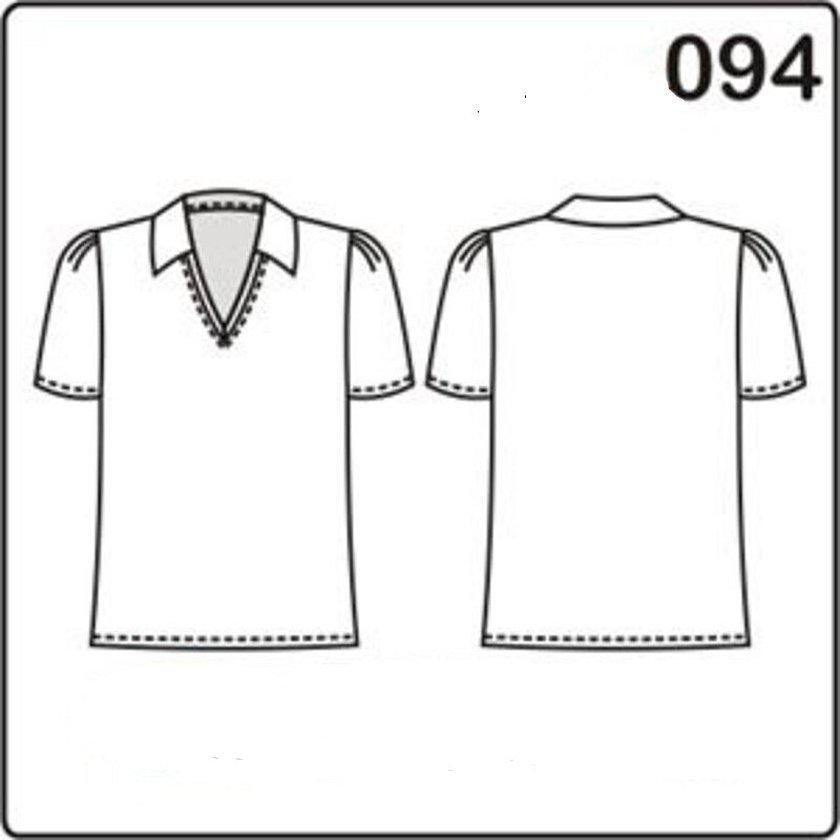
Blouse with original neckline trim
Blouse with V-shaped neckline and original edging is designed for sizes 44-54. It is recommended to use silk, cotton fabric. The front and back are cut from lining material.
The length of the neck edging tape is 60, 62, 64 cm, and also 4 cm wide with allowances. The parts are cut out using small seams, adding 2 cm to the bottom of the product, sleeves, the neck is cut out without an allowance. The darts are stitched, ironing the allowance upwards. The linings of the front sides are folded together. The edge of the cut is stitched according to the pattern marks on the side cut of the front.
Important! Trim the seam allowance, then turn the lining inside out and iron it. The edge of the cut is then stitched to the edge.
Instructions:
- Place the linings of the front and back together with the parts of the top fabric with the wrong side facing out, baste the cut and then process.
- Sew and overcast the shoulder seam.
- Iron onto the back.
- Sew the sleeve into the armhole.
- Sew the side seam and the sleeves.
- Leave the left side seam open for the zipper, length 30cm, then sew in.
- The bottom is stitched and ironed.
The width of the blouse neckline edging is 1 cm.
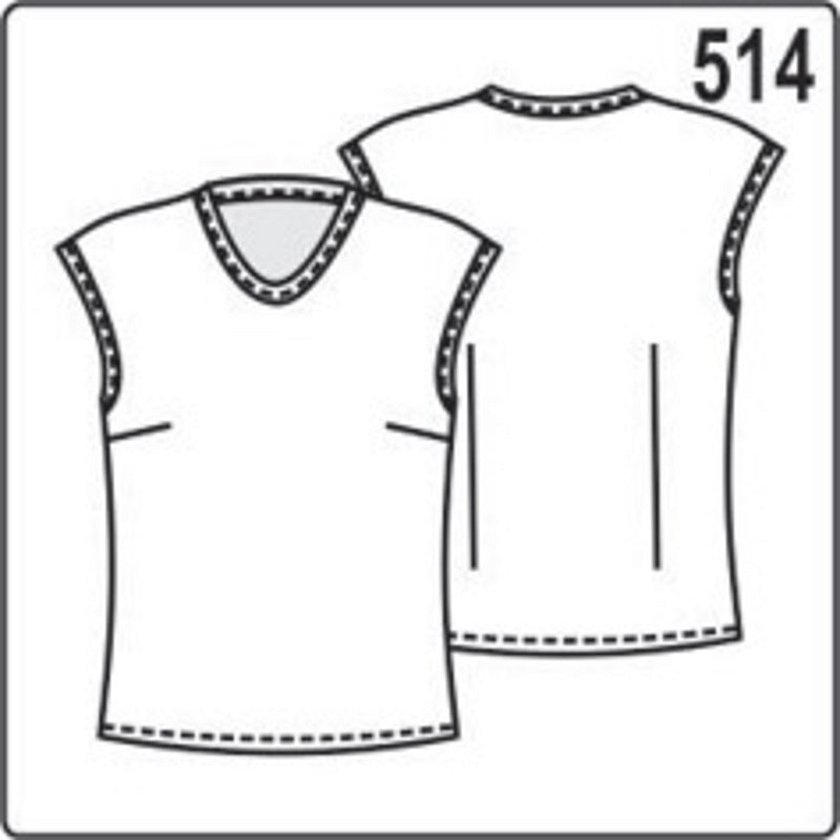
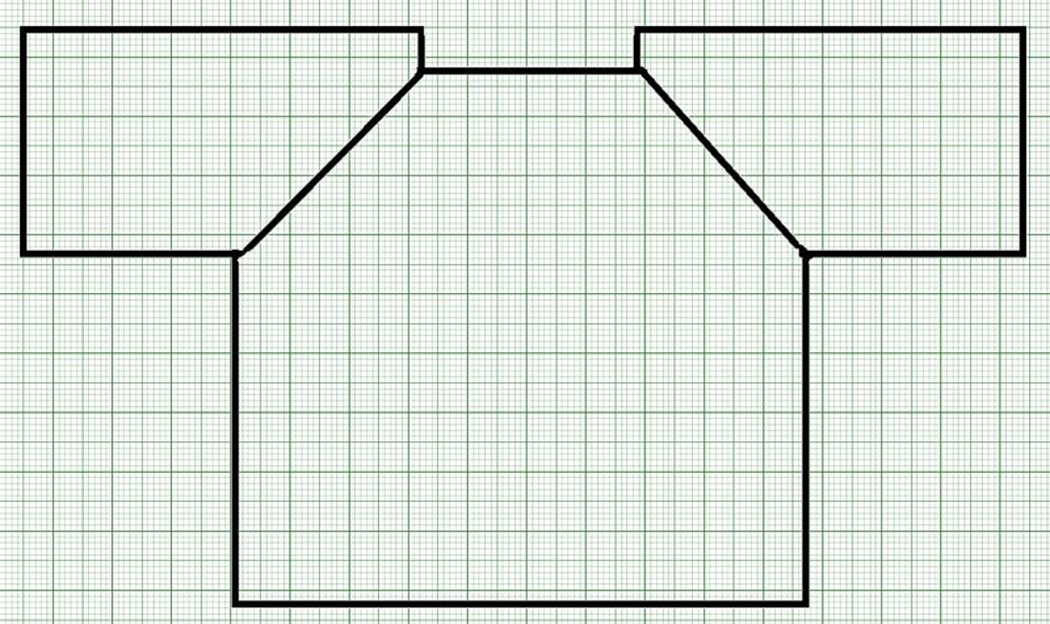
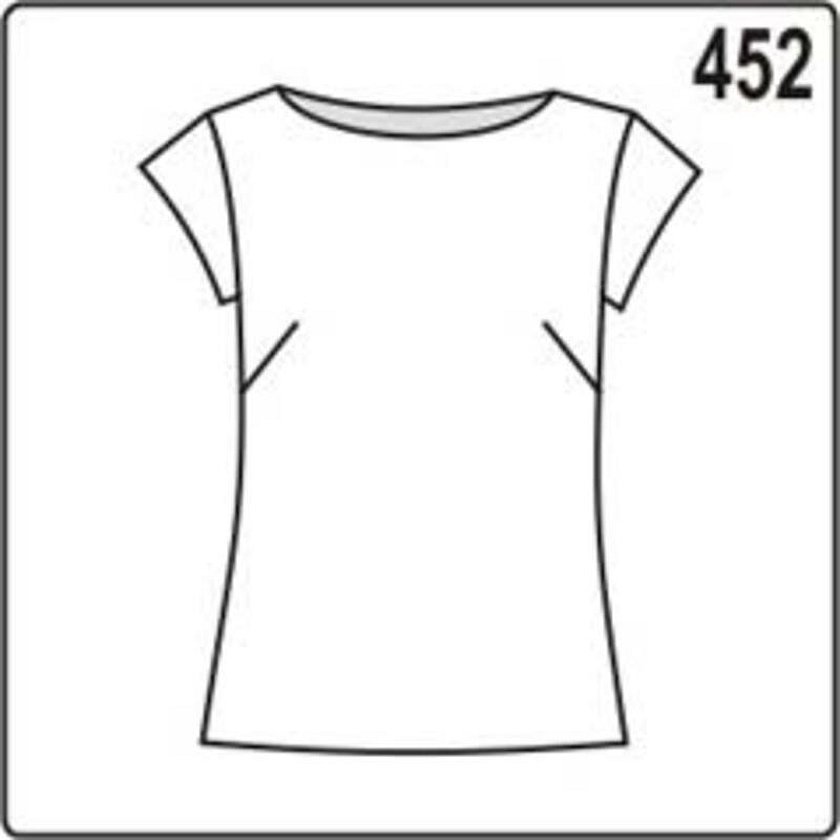
Simple summer blouse with one-piece sleeves
Products with a one-piece sleeve speed up the process of cutting and sewing. The scheme is a pattern for sizes 44, 46, 48, 50, 52. The model has names: jumper, blouse, T-shirt. The complexity of sewing is in the edging.
Instructions:
- Add 1 cm to the pattern edge to process the seam when sewing.
- Add 3 cm at the bottom.
- The neckline and armholes are cut without allowance.
- The binding for the edging is 4 cm wide.
- Length of the piping + 4 cm to the edged edge, cut along the crosswise, not the grain, threads.
Additional information! Use thin interlining to duplicate the shoulder cut.
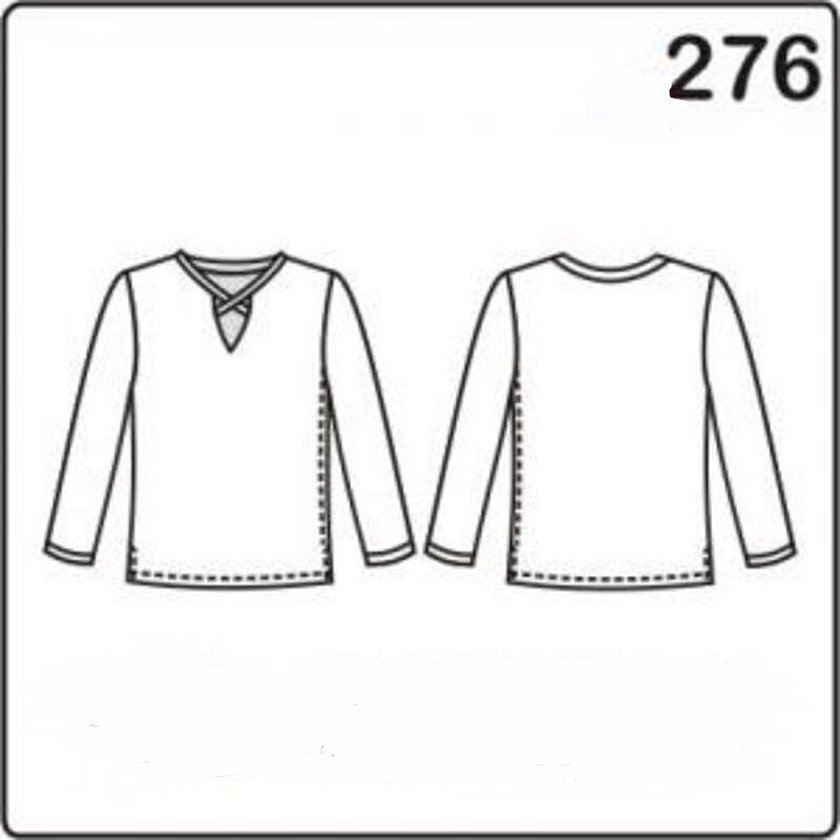
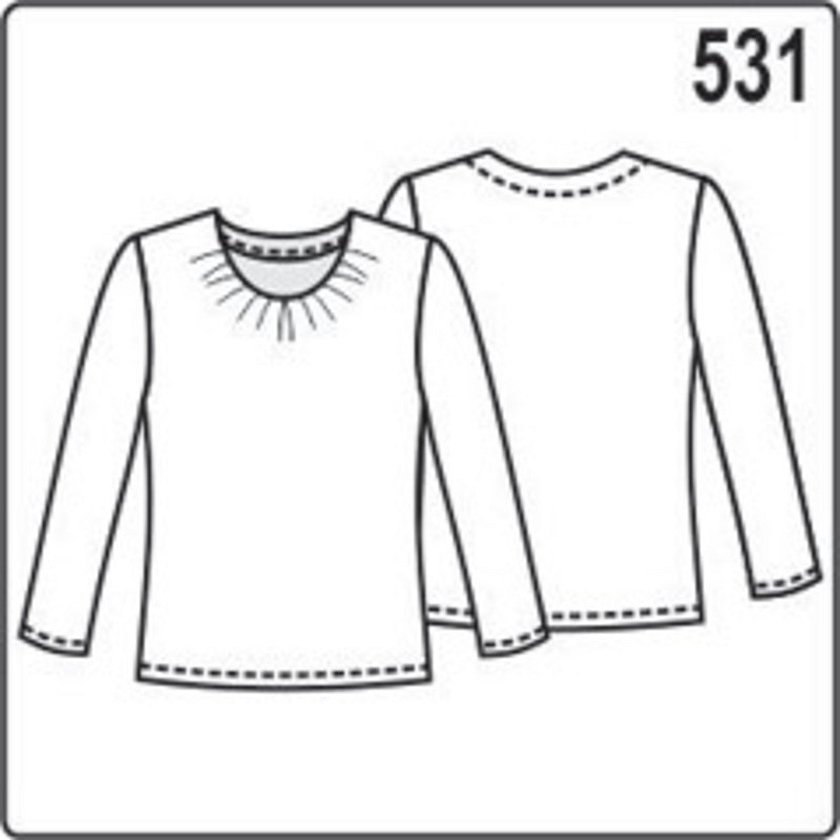
Long sleeve blouse with gathers and a neckline
The long-sleeved garment is cut from a well-draped fabric.
Please note! The fastener can be either a hook, a thread loop, or a button on the neck.
Instructions:
- Add 1 cm to the seam and 2 cm to the bottom.
- The back necklines are stitched independently.
- Cut out the facing for the sleeve opening, length 20 cm, width 2.5 cm.
- Before starting sewing, the sleeve cuffs and facing parts are duplicated.
- Cut out the interlining exactly according to the pattern, do not duplicate the seam allowances.
Important! Doubling the shoulder sections of the back will help protect against stretch marks.
Summer blouse with wing sleeves
Sizes 44-46. When cutting, it is recommended to monitor the direction of the grain line of the side, front of the blouse, yoke, collar.
Instructions:
- The pattern is made without seam allowance, so you need to add 1 cm, 1.5 cm to the bottom.
- The lower edge of the sleeve in the form of a wing is cut without allowance.
- Cut out the armhole facing, width 1.5 cm, and length - unfinished part of the armhole +2 cm.
- Duplicate the outer part of the placket, collar, and inner part of the stand using adhesive interlining.
Knitted blouse (jumper) with gathers on the neck
When working with knitwear, extra attention is needed, fitting takes up a significant amount of time. The creation procedure is similar to the formation of flounces.
Important! The pattern is constructed without adding seam allowance.
Instructions:
- Cut 1 cm to the seams, bottom and sleeves by 3 cm.
- During the overlocking procedure, make the seam allowance width according to the characteristics of the sewing equipment.
- Cut out the back neck facings, the width is equal to the size for the front facing.
- The facing and shoulder sections should be backed with interlining.
Short Sleeve Swing Neck Blouse
When cutting, add 1 cm for the seam, down the sleeves, blouses by 3 cm. Then cut out the piping for the edging yourself, width - 3 cm, length - 35 cm. The allowance may differ, as it is affected by the width of the processing equipment. Reinforce the shoulder cut of the back with thin interlining.
Straight blouse with wide collar-cuff
The pattern is constructed without seam allowance, you need to add 1 cm for seams, 2.5 cm to the bottom. The model looks good in white cambric fabric. The blouse pattern can be easily changed into a straight dress.
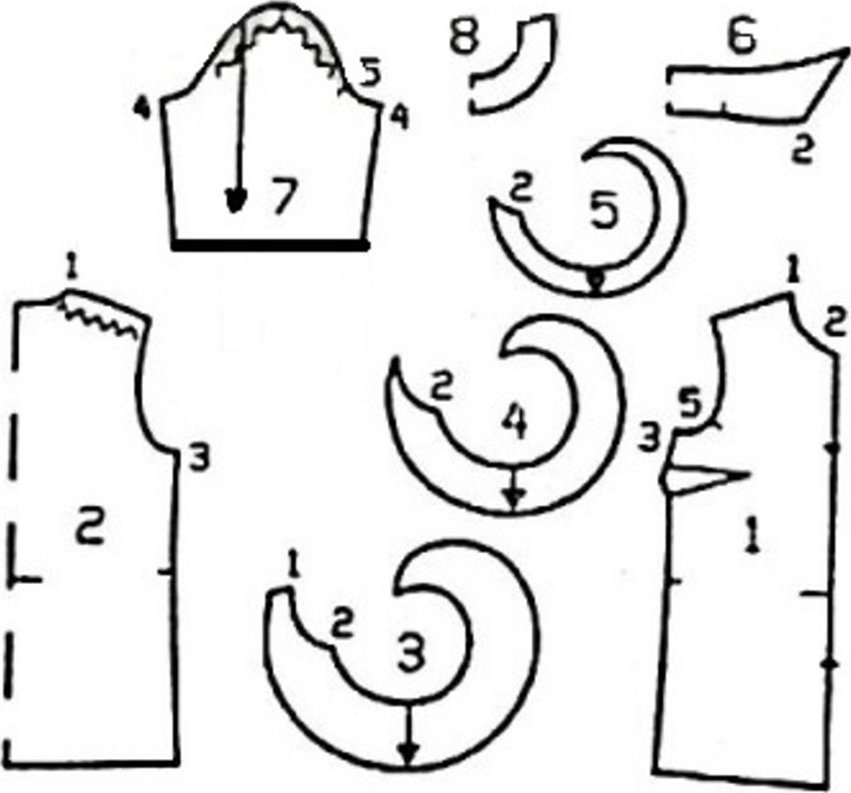
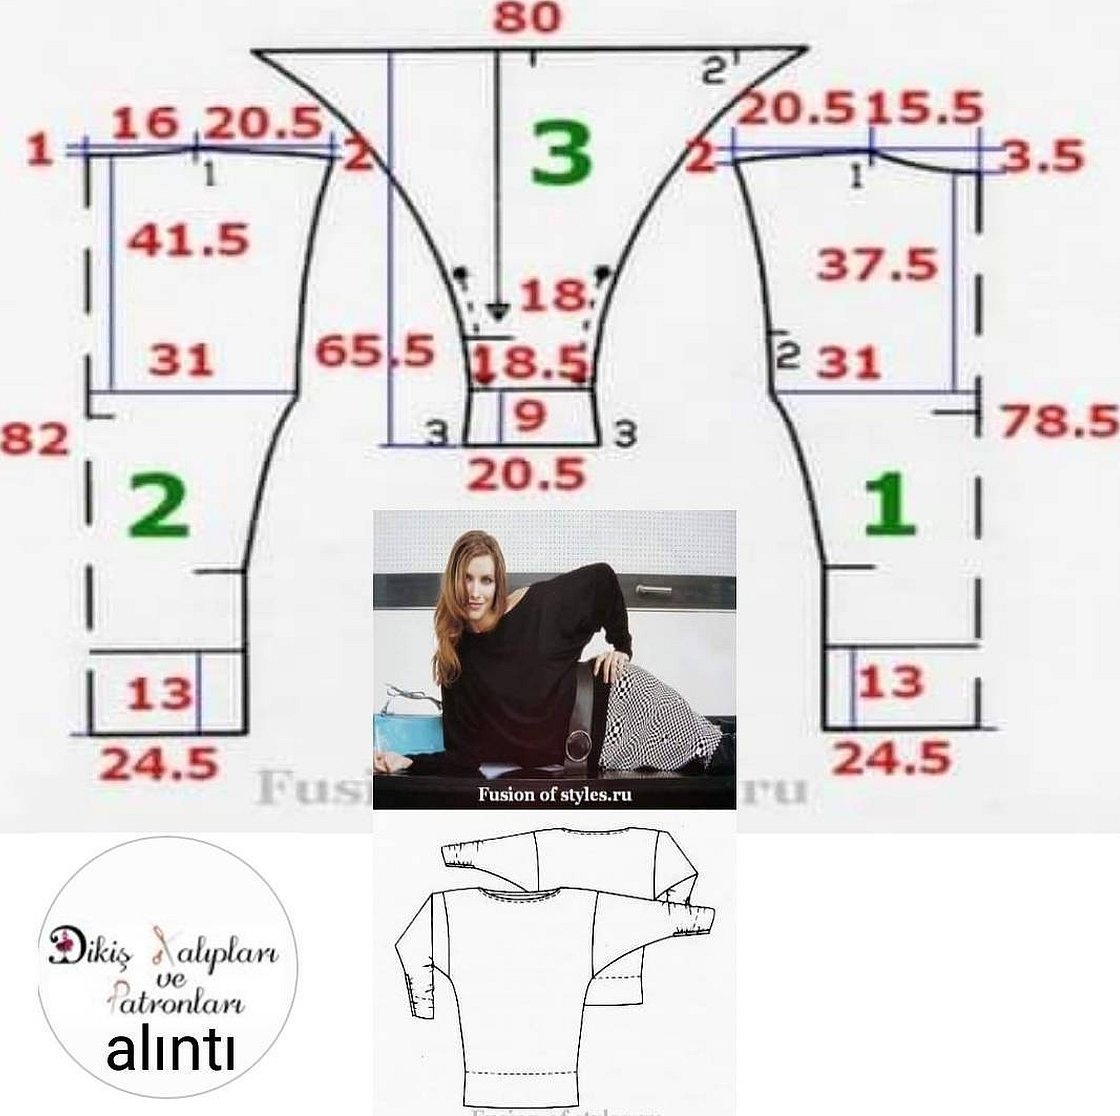
Batwing Sleeve Blouse
Knitwear is suitable for creating this model. Allowances for the seam on the bottom, sleeve do not need to be made, for the rest 1 cm.
Peculiarities:
- 1 - shelf with a fold;
- 2 - back with a bend;
- 3 — sleeve;
- a - decorative strip for sleeve, length 15 cm, width 4 cm.
Knitted blouse with raglan sleeves
Pattern features - no shoulder seam. The sleeve is cut out in one piece with the back, fronts, then sewn into the neck.
Please note! To sew the model, you don’t need an exact pattern; a small drawing with the back, front, and sleeve details is enough.
Add 8 cm to the hip width measurement.
Fitted blouse with darts
A variant with the transition of the bust dart into the waist dart, maintaining the silhouette's fit with a minimum number of seams. It creates an ideal silhouette that emphasizes the figure.
Modeling styles use basic patterns of a bodice with a chest dart and a one-seam sleeve, add 1.5 cm to the seams.
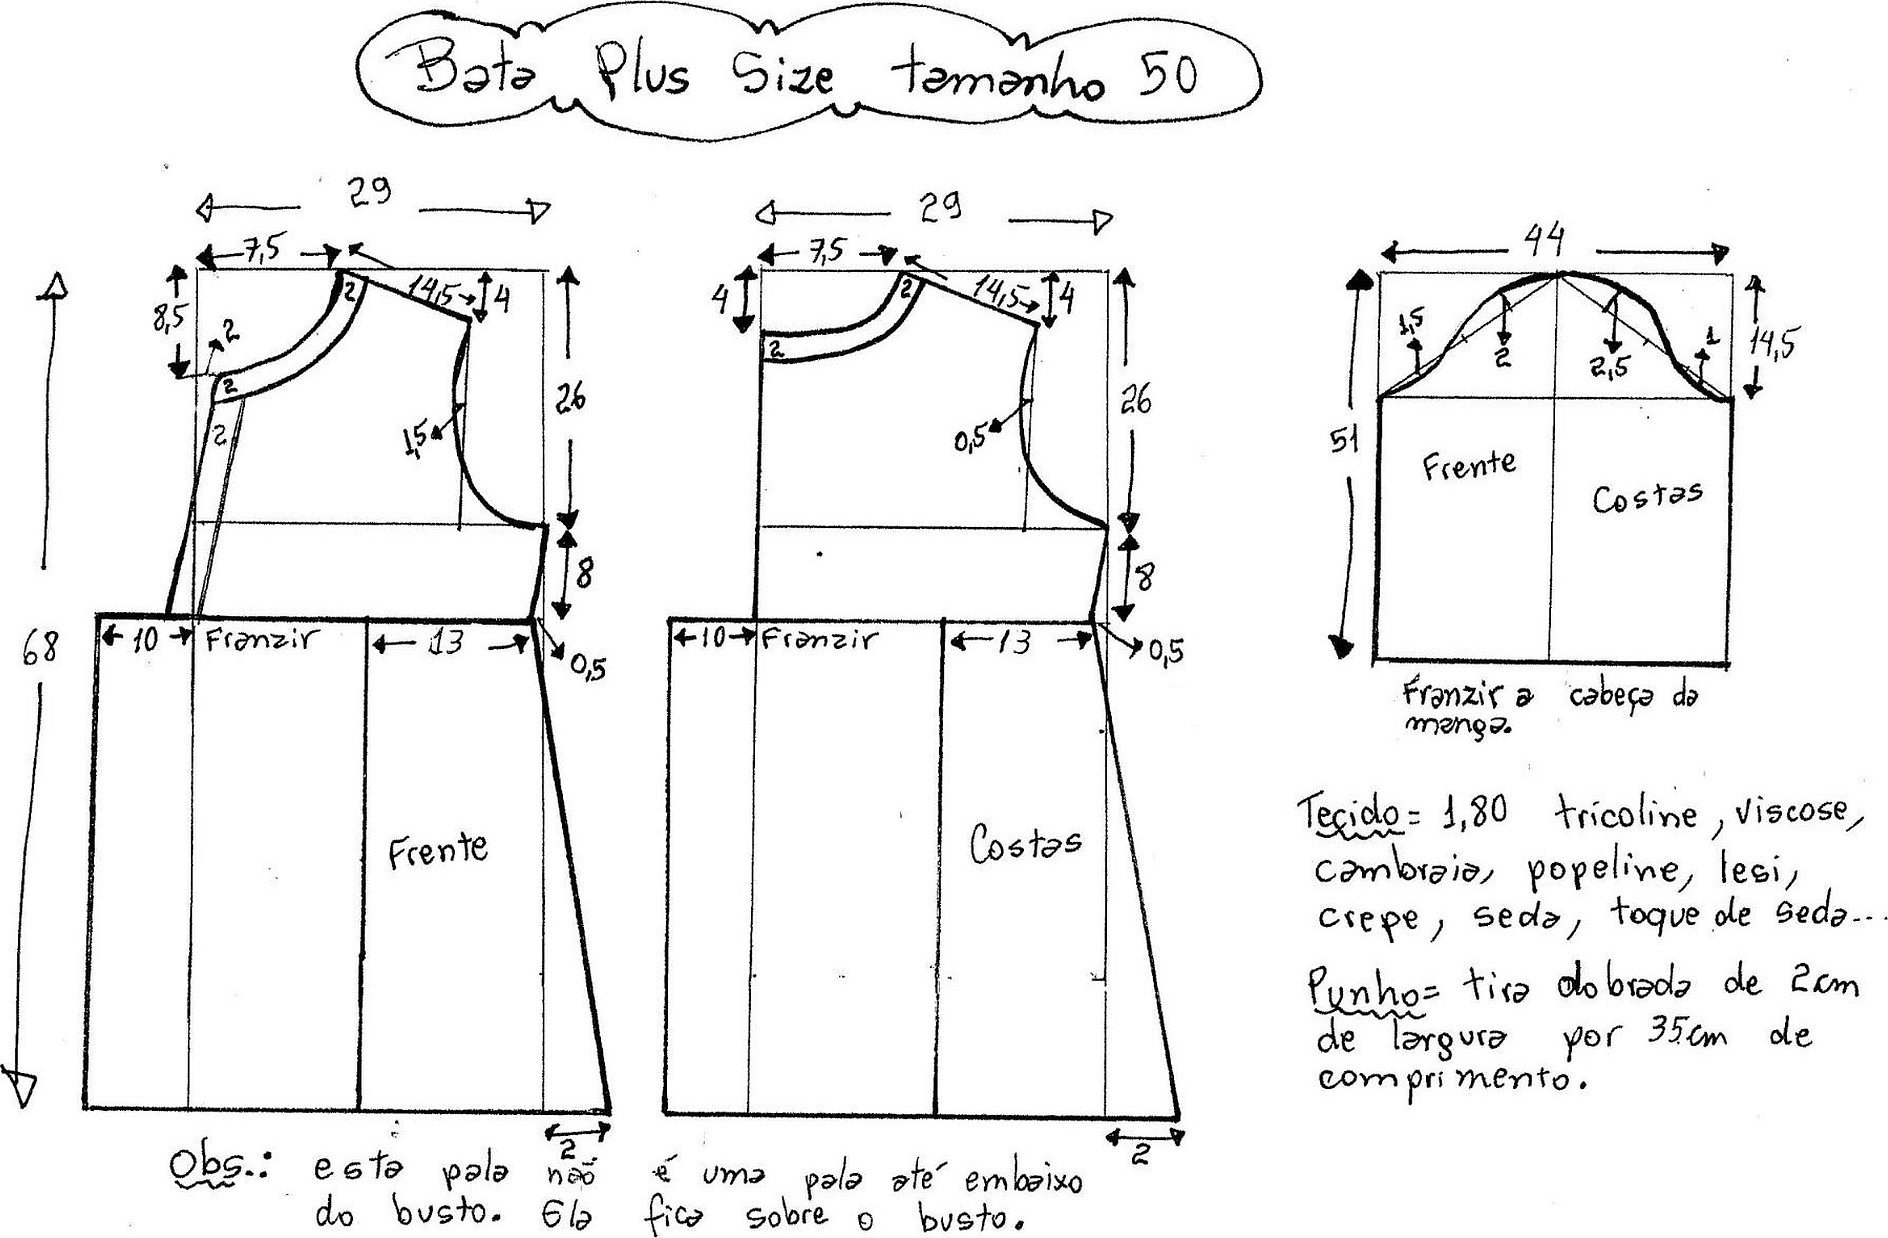
Summer tunic plus size
Sizes 50, 52, 54, 56, 58, 60, 62, 64. Add 1 cm to each cut, 2 cm to the bottom. After cutting, duplicate the yoke with interlining.
Blouse with front tucks
The product is sewn from a single-color material. When cutting, add 1 cm to the cut. Duplicate the upper part of the cuff, the folded collar, the right placket, and the inside of the collar.
Important! If you have thin fabric, treat the strip with thin interlining.
Summer blouse with ¾ sleeves
An allowance for processing is added to the cut pattern, since the pattern was originally made without them. Add 1 cm for seams, 3 cm for hemming the bottom. You can make an edging on the neck, but this complicates the sewing process. The top of the dart, the shoulder cut of the back are duplicated with thin interlining.
Important! If desired, replace the interlining with piping.
Lightweight knitted jumper
The neckline facing is done from the front and back pattern of the blouse. 1 cm is added to the seam, 4 cm for the hem.
Instructions:
- The shoulder and side seams of both sides of the item are stitched together.
- Overcast, then iron towards the back.
- Overcast the bottom and neckline.
- Iron on the wrong side.
- Stitch.
- Sew cuff seams, fold inside out, iron.
- The cuff is sewn to the sleeve edge, overcast, and then ironed.
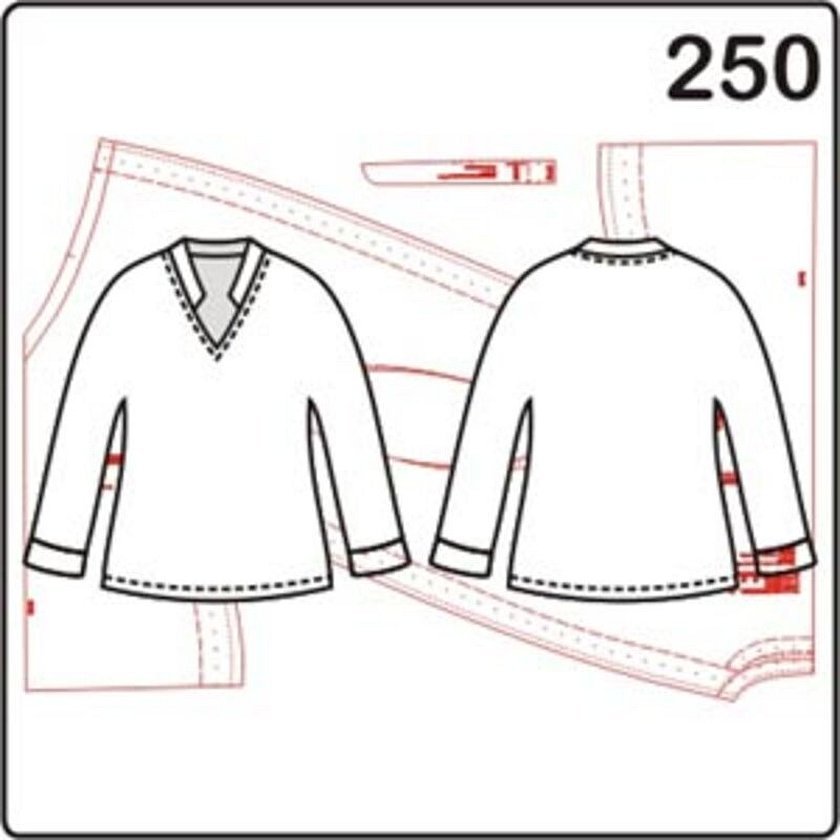
Sports style blouse
The pattern of this model of a sports style product has a short sleeve, which is made of elastane. Viscose, cotton - is perfect for creating summer blouses. The product has a turn-down collar, a V-shaped neckline with edging.
When cutting out the details, make a seam allowance of 0.7 cm, the bottom of the product, sleeves 2 cm, the neck - no allowance. Also, a piping for the neck is cut out, 25 cm long, 4 cm wide.
Lightweight sweater (jumper)
The model is cut from light fabrics, a single-color fabric looks attractive for this model. The neck is edged with a piping. The bottom of the product, the sleeves are hemmed.
You need to add 1 cm on both sides to the shoulder, side, armhole cut. Do not make allowances for the bottom, sleeves, neck.
How to sew a blouse without a pattern
How to sew a summer blouse with your own hands quickly and without a pattern? It is difficult for a beginner needlewoman to sew a thing the first time. It is especially difficult to make the right pattern. However, there are blouses for which you do not need to make a pattern in advance - seamless oversized products.
For these models, choose light, airy fabric.
Instructions for making a "poncho":
- Fold the fabric in half with the right sides facing each other.
- On the fold line, cut out the neck of a suitable shape and size.
- Sew, finish the edges.
A poncho is an unusual, attractive item that a beginner can sew in 1 evening. Advice: belt the blouse, then it will take on a unique look.
The Peasant Blouse is a delicate, feminine option that suits any figure.
Step by step plan:
- Cut out 2 rectangular pieces from the material with a perimeter of 110×8 cm.
- Sew the pieces together, finishing the edges.
- Set aside 25 cm from the bottom and sides.
- Measure up 45 cm.
- Cut into longitudinal strips.
- Treat the seams.
- Combine the sides.
- Turn the edge of the neck by 10 cm, stitch 2 times.
- Decorate the bottom seam with ribbon or lace.
Thus, the article analyzes the main types and methods of creating a beautiful blouse. Sometimes sewing a product is the only right decision when there are no goods in the store. Beginner craftsmen are advised to try to create a simple level model for a doll, and then move on to complex options. You can also start mastering the craft by creating different clothes for dogs and cats.


