Cross stitch is one of the oldest types of needlework. The peculiarity of this technique is that only the background is embroidered with a cross, the drawing itself is stitched with a contour stitch. To create a real masterpiece and surprise your loved ones, bead embroidery "Clock" is suitable. And the place for the product can be the kitchen of the house.
Tools
Each type of needlework requires the preparation of various items to perform the work. In embroidery, different threads are used depending on the type of embroidery, the material used for the embroidery, and the purpose of the resulting product.
The threads used for embroidering napkins cannot be compared with the threads for tapestry or pillow designs – they are different. In addition, embroidery involves the use of special equipment: needles of different thicknesses, depending on the density of the base (fabric), as well as hoops of different diameters.
Important! Embroidery "Clock with a cross" requires painstaking work, the correct selection of accessories, and an accurate combination of colors. Therefore, you will have to be patient and learn all the intricacies of the chosen type of needlework.
When doing the work, you need to use a thread like mouline. This product should be wound into skeins, each of which has six threads. As needed, you should cut off the skein and separate the required amount of thread. If desired, you can diversify the coloring by combining parts of different shades.
When doing the work, you need to follow one important rule: the length of the thread should not exceed 65 cm, as the embroidery will look untidy. Some needlewomen use mélange floss threads. In them, the color smoothly transitions from one to another.
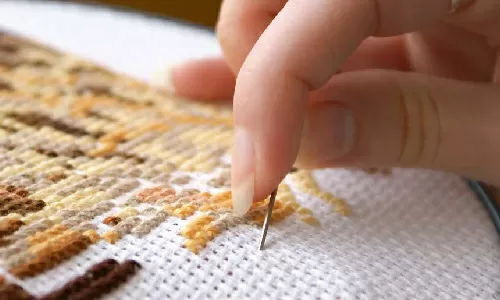
Cross-stitched clocks are usually made on canvas, linen and plain weave fabrics, where the interlacing of the threads forms squares and is of equal thickness. Each cross takes the same number of threads of the fabric in height and width, for example 2, 3 or 4.
Depending on the canvas number, you should select a pattern. Usually, the most suitable canvas number is offered in the patterns and the size of the finished embroidery is indicated. The market offers canvas of various shades and there you can also find a set for embroidery "Clock" (the company may be different). It should be noted that the color of the canvas can well become the background for creating an original masterpiece.
Important! The embroidery should be placed exclusively in the center so that all the fields are the same. They are not sewn up, the fields are necessary when stretching the fabric on the hoop, and on the cardboard when framing the finished embroidery, and for the edging, something bright, red, for example, a satin ribbon or a beaded "diamond" rim can be suitable. As a fastener to the wall, you can use an original colored strap. The most optimal field size is 5 cm on each side.
You can use different types of needles for work. They can be distinguished by number and shape. For cross stitching, you need to use only a blunt short needle up to 3 cm. Using this type of product, you can get identical and even crosses.
The embroidery needle has a long eye. This helps to facilitate the threading of multi-layered floss threads. When embroidering French knots, you often have to use needles with a round eye.
This item helps to protect the embroidery from shrinking. As a result, you can create a quality masterpiece. With the help of a special frame of rectangular or round shape, the material is kept taut. If the work is done on canvas, then you can do without this product.
Nowadays, there are wooden, metal and plastic hoops. However, wooden ones are considered the best, as metal hoops are heavy, their smooth surface slides when fixed, and dark circles remain on the fabric, and plastic hoops are not durable. Hoops come in various shapes and sizes. There are manual and floor hoops with a bracket for changing the angle of the embroidery.
Cross stitch clock
At first glance, these are ordinary patterns for partial embroidery with beads or a cross. They are applied directly to gabardine or satin, which are additionally backed with interlining. The fabric is easy to stitch, does not snag, does not warp. Embroidery instructions are included. This greatly simplifies the process. Not only experienced needlewomen can cope with embroidery, but also those who try themselves in such a role for the first time.
The cross-stitched clock looks very beautiful and is easy to frame. And the main thing is that this is an embroidery of a clock with a mechanism. As a result, you get not an imitation, but a full-fledged working clock. As an interesting detail, you can place some animal on the side of the handicraft: it can be a funny pig, and very stylishly and unusually designed. This can be a great gift, made with your own hands.
How to assemble an embroidered clock yourself
The master class will help needlewomen create a unique masterpiece.
To get started you will need:
- Cross stitch with a clock.
- Clockwork and hands. These can be taken from a suitable clock. Individual elements are sold in specialized stores. Some are bought to order.
- Frame and mat for framing the drawing. If you don't have this item, you can use a ready-made watch case.
- Scotch tape, ruler, pencils, PVA glue, protractor, screwdriver, small hammer, adjustable wrench.
Now we need to move on to creating a new masterpiece:
- On the back of the passe-partout, the dial is marked out. A ruler, pencil, and square (protractor) are used for this.
- You can strengthen the back of the embroidery using interlining.
- Where there will be a hole (in the center) for attaching the clock mechanism, you need to iron a circle of interlining.
- Pins are used to determine the points on the dial.
- Next you need to stretch the embroidery.
- You need to stick some tape to the back of the passe-partout.
- The base and the mat must be connected to each other.
- To secure small pieces, you can use double-sided tape.
- When decorating watches, small rings made of plastic (or circles) are used.
Please note! Dots or numbers can be made from various parts. Everything depends on the imagination of the needlewomen.
- For the remaining divisions of the dial, you can use circles with teeth from small punch buttons for the clasp.
- The ring with teeth should be placed on the marked point, pressed down a little, and then a wooden block should be attached. After completing the steps, you need to tap it gently with a hammer. Small teeth pass through the thread and embroidery material.
- You need to make a hole exactly in the center using an awl.
Disassembling the watch is easy. You only have to remove the screws and separate the case. The hands need to be removed with special care. You can use tweezers or a nail stick. The hands are made of thin tin. Therefore, they can become deformed.
The next step is to unscrew the flat nut located under the arrows. To do this, use a small adjustable wrench.
Important! The clock mechanism is inserted into the central hole. The nut must be turned over and then tightened. The middle of the clock must be exactly in the center.
After all the steps have been completed, you can insert exactly what you have got into the frame. The hands should be fixed in place - the hour hand first down, then the minute and second hands. The battery should be inserted into the clock mechanism from the back.
Features of such watch sets
The buyer can always read the main characteristics and visually evaluate the features of the canvas. Beginners should not start with too small and dense crosses. The optimal canvas size is number 14. This marking is used by all brands on the market.
The special feature of the set for such watches is that it includes:
- needle;
- floss wool/acrylic (threads are not sorted into an organizer);
- color symbol scheme;
- Instructions in Russian.
For your information! Threads play an important role. For cross stitching, floss is used, and usually the name and logo of the brand are placed on the cover of the kit. The best are considered to be French DMC, German Madeira, British Anchor, Russian floss Gamma, but there are also worthy manufacturers in the Czech Republic and Poland. In simple kits, the number of thread colors does not exceed twenty.
The quality of the needle also plays an important role. It should have a large eye to make it easier to thread the thread. It is best when the set includes at least one more spare needle. But in general, the needlewoman should get a separate set of needles and accessories (these are scissors, a device for threading, sharp scissors or a ripping tool).
Different types of needlework most often use different embroidery techniques. It all depends on the level of complexity. Of the ready-made kits that you can buy in an online store, some of the most difficult will probably be kits for cross stitching with evenly woven fabric.
In conclusion, it should be noted that when embroidering, needlewomen constantly shift their gaze from the pattern to the work and back. It is no wonder that the right place on the pattern has to be constantly searched for, and if the pattern is printed with small symbols, then it is simply a disaster. To solve such difficulties, a magnetic board will come to the rescue, as well as a board with magnifying rulers (line magnifier).


